Transcription
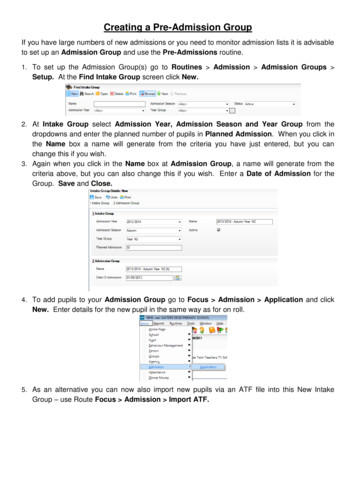
Creating a Pre-Admission GroupIf you have large numbers of new admissions or you need to monitor admission lists it is advisableto set up an Admission Group and use the Pre-Admissions routine.1. To set up the Admission Group(s) go to Routines Admission Admission Groups Setup. At the Find Intake Group screen click New.2. At Intake Group select Admission Year, Admission Season and Year Group from thedropdowns and enter the planned number of pupils in Planned Admission. When you click inthe Name box a name will generate from the criteria you have just entered, but you canchange this if you wish.3. Again when you click in the Name box at Admission Group, a name will generate from thecriteria above, but you can also change this if you wish. Enter a Date of Admission for theGroup. Save and Close.4. To add pupils to your Admission Group go to Focus Admission Application and clickNew. Enter details for the new pupil in the same way as for on roll.5. As an alternative you can now also import new pupils via an ATF file into this New IntakeGroup – use Route Focus Admission Import ATF.
Importing ATF Files into SIMSIn March, schools receive an Admissions Transfer File (ATF) from their LA. This file contains thenames of applicants who have been offered a place at your school for the following September,together with additional basic applicant information. Once the ATF has been imported into SIMSand applicants have been accepted, the curriculum planning process can be started.Before proceeding, please ensure that you have received an ATF from the LA and that itis stored in an accessible location. An intake group and admission group combinationmust also have been defined, into which applicants can be imported.Note for Primary Schools with Nursery ClassesSchools that receive an ATF may encounter applicants in the file who are already members of theschool, e.g. they are enrolled in a Nursery class. These applicants can be imported as preadmission pupils but prior to accepting and subsequently admitting them, the admissions officermust record these children as leavers from the Nursery class.To import the ATF into SIMS please follow the instructions below:1. Select Routines Admission Import ATF File to display the Import ATF File wizard.2. Click the Next button3. Click the Browse button to display the Open dialog4. Navigate to the location of the stored ATF, highlight it then click the Open button5. Click the Next button to validate applicant addresses in the ATFThe House Number and House Name of an address are held in a single field of the XML filestructure. This field is called a PAON (Primary Addressable Object Name).This page is displayed only if the ATF contains addresses with correctly formatted PAON fieldsand enables you to correct the address details to prevent SIMS from rejecting the address.The Hide Best Guess check box is selected by default.Addresses that can be reconciled without user intervention are not displayed.
The only addresses displayed in the lower section of the page are those that cannot be resolvedautomatically. These addresses can be corrected by clicking either the House Number or HouseName field then entering the correct information manually.Alternatively, address details can be discarded and therefore not imported by selecting the Discardcheck box adjacent to the relevant entry.If a large number of addresses require correction during import, you should request a correctlystructured ATF from the LA.6. After correcting or discarding any incorrect addresses, click the Next button7. Select the required Intake Group from the drop-down listPlease ensure that your Admissions Policy complies with the DfE Codes of Practicebefore continuing. Please also ensure that the intake group and pre-admission groupselected have been defined for the correct date of admission before proceeding with theimport.SIMS checks that the details contained in the ATF header correspond with the details of the intakegroup into which the file is being imported. All admission groups associated with this intake groupare displayed in the panel at the bottom of the wizard.8. Highlight the required Admission Group then click the Next button to import the ATF. Aprogress bar is displayed.Schools that have started to enter manually the details of next year’s applicants may encountersome duplicate applicants when importing the ATF. To reduce the risk of duplicate applicants,SIMS checks the information in the ATF against existing applicant details. Any details that matchbased on surname and forename are displayed.Application Reference Numbers (ARNs) play a key role in the matching of applications. Applicantswho have been entered manually in SIMS are not issued with an ARN.ARNs are created as part of the LA process and applicants contained in the ATF have been giventheir own unique number, which is imported into SIMS with the rest of their details. Theseapplicants are not displayed on this page.These details require investigation to determine whether they are new applicants orduplicates of existing, manually entered applications. Non Own Admissions Authorityschools that have imported more than one ATF may encounter applicants in the currentATF who have already been imported.
If an applicant in the ATF is a match for an existing applicant, select the Update Applicationcheck box. This updates the existing application and adds the applicant’s ARN to theircurrent record.If an applicant in the ATF is a match for an existing applicant in SIMS, where theirapplication was originally from another admissions year or they are currently an existingpupil in the Nursery year, select the New Application check box.For example, an applicant applied to join the school for the Nursery year in September2012 but their application was unsuccessful, so they have now applied to join the Receptionyear in September 2013. These applicants are created as new applications.If an applicant in the ATF is a completely new applicant and is not the same as theindividual found by SIMS, select the New person check box to record a new person and anew application.View all the fields in the panel using the scroll bar to move backwards and forwards across thepage.9. Click the Next button to continueSIMS also checks for Contact matches, e.g. any applicant in the incoming ATF who shares acontact who is already present in the system. If any of the contacts listed on the following page of the wizard prove to be a match for anexisting contact, select the Matches check box adjacent to the correct Name.If any of the contacts listed on the following page of the wizard prove to be a new contact,select the Matches check box adjacent to the New person record in the Name column.10. Once you have dealt with each contact, click the Next button to continueWhen the import is complete, the following information is displayed: Number of applications in fileNumber of applications processedNumber of new applications displayed.Applicants are imported with a status of Offered and their details can be viewed and updated byclicking the Application icon on the toolbar or selecting Focus Admission Application.If there are any warnings or errors in the ATF import, they are listed in the wizard.
Please ensure that you click the Save button so if any issues have been highlighted, theinformation is available for you to discuss with your LA Support Team.The log file may contain confidential information about the applicants so give carefulconsideration to where you store these files.You can save the details of the ATF import, click the Save button, located on the right-hand side ofthe page.Navigate to or create a local folder in an appropriate location, enter a File name then click theSave button.To print the details of the ATF import, click the Print button to display the Run a Screen BasedReport dialog.Select the Output to a web browser check box then click the OK button to display the report inyour web browser. The report can be printed by clicking the Print button.11. Click the Finish buttonOnce the import process has completed successfully, you can set you applicants as accepted andadmitted by selecting Focus Admission Application or by clicking the Application iconlocated on the shortcuts toolbar.Additional information about the applicants can be obtained by producing individual DataCollection Sheets and sending them to the applicant’s parent/guardians for completion and return.Data Collection Sheets can be produced via Reports Run Focus Application or individuallyby clicking the Reports hyperlink in the Links panel.
If you have large numbers of new admissions or you need to monitor admission lists it is advisable to set up an Admission Group and use the Pre-Admissions routine. 1. To set up the Admission Group(s) go to Routines Admission Admission Groups Setup. At the Find Intake Group screen click New. 2.