Transcription
OUTLOOK INSTALLATION GUIDEDate Updated: 06/28/17
Outlook Installation GuideSherpa 3030 Locust StreetSt. Louis, MO 63103 (314) 432-1234
Table of ContentsIntroduction . 2For IT Admins . 2For Single Users. 3Questions . 6
IntroductionWelcome, Sherpa users! This guide will show you how to install theSherpa add-in with your Microsoft Outlook account so you can createsales notes in Sherpa from your inbox, sync your Sherpa calendar withOutlook and seamlessly update events on both calendars with the push of abutton.If you have questions throughout this guide, please contact our CustomerExperience team at (314) 432-1234 or by email at support@sherpacrm.com.For IT AdminsIntroductionYou can install or remove add-ins for Outlook for your organization by usingthe EAC (exchange admin center). By default, after you install an add-in foryour organization, the add-in is available for all users in your organization.After installation, you can use the EAC to make the add-in optional orrequired for your users, and to specify whether you want the add-in to beenabled or disabled.Platform CompatibilityThe Sherpa integration for Outlook is accessible in Office 365 online(www.office.com) and Outlook.live.com.BrowsersThe Sherpa integration for Outlook is compatible with Google Chrome andInternet Explorer (versions 11 and up). We recommend updating your browserto the latest version in order for the integration to work properly. To see whatbrowser you're currently using, visit whatbrowser.org.Desktop ApplicationOur integration will also work on the Microsoft Outlook desktop application.To use the integration on a Mac, make sure the Outlook desktop applicationis version 15.35 or higher (Outlook 2016). To use the integration on aWindows PC, the version must be 16.0.7902 or higher (Outlook 2016). You'llknow you're using the right version if Sherpa's orange mountain icon appearsin your email inbox.2
Installation1. Use the EAC to add an add-in.2. In the EAC, navigate to Organization Add-ins.3. Click New , and then choose the location that you want to install theadd-in from. For the Sherpa add-in choose “Add from URL.” In the URL,enter pa-outlookmanifest.xml4. Click Save.Manage user access1. Use the EAC to add an add-in.2. In the EAC, navigate to Organization Add-ins.3. In the list view, select the Sherpa add-in to change the settings, and thenclick Edit.4. If you don’t want your users to use the add-in, clear the Make this add-inavailable to users in your organization check box, and then click Save.5. If you want your users to be able to use the add-in, select Make this add-inavailable to users in your organization, and then select the option youwant.o Optional, enabled by default Use this setting if you want to allow yourusers to turn off the add-in.o Optional, disabled by default Use this setting if you want to allow yourusers to turn on the add-in.o Mandatory, always enabled. Users can’t disable this add-in Use thissetting if you don’t want your users to turn off the add-in.6. Click Save.For Single UsersIntroductionPlatform CompatibilityThe Sherpa integration for Outlook is accessible in Office 365 online(www.office.com) and Outlook.live.com.BrowsersThe Sherpa integration for Outlook is compatible with Google Chrome andInternet Explorer (versions 11 and up). We recommend updating your browserto the latest version in order for the integration to work properly. To see whatbrowser you're currently using, visit whatbrowser.org.3
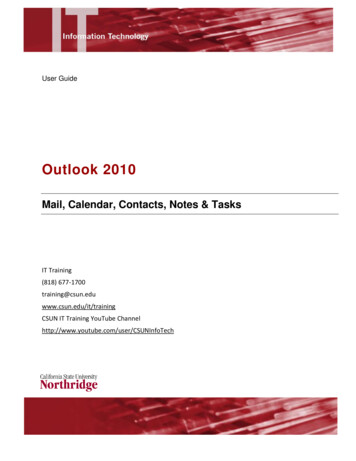
Desktop ApplicationOur integration will also work on the Microsoft Outlook desktop application.To use the integration on a Mac, make sure the Outlook desktop applicationis version 15.35 or higher (Outlook 2016). To use the integration on aWindows PC, the version must be 16.0.7902 or higher (Outlook 2016). You'llknow you're using the right version if Sherpa's orange mountain icon appearsin your email inbox.You can install or remove add-ins for Outlook from the browser or desktopapplication. In the desktop application, it is easiest to install the add-in fromthe Office Store. From the browser, you can add the add-in through thesettings and managing integrations.Adding through Desktop Application1. In Outlook, click Home store on the ribbon.2. On the Add-Ins for Outlook page, click on the Click here to add a customadd-in and select Add from URL 3. In the URL, /sherpa-outlookmanifest.xml4
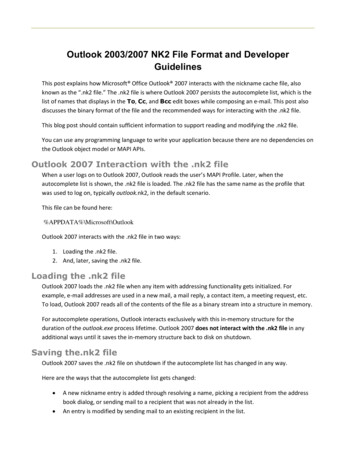
4. Click OK and then Install on the next prompt.5. When the add-in is installed, go to File Manage Add-ins or ManageApps to make sure it's turned on. When you’re prompted to sign in, typethe email address and password you use to sign in to Office programsAdding through web browser1. In Outlook Mail, click on the settings button that looks like a cog wheel inthe upper right corner.2. Click on Manage Integrations.3. On the Add-Ins page, click on the Click here to add a custom add-in andselect Add from URL 5
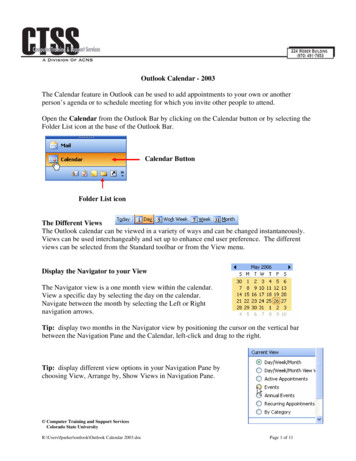
4. In the URL, /sherpa-outlookmanifest.xml5. Click OK and then Install on the next prompt.6. When the add-in is installed, go to File Manage Add-ins or ManageApps to make sure it's turned on. When you’re prompted to sign in, typethe email address and password you use to sign in to Office programsQuestionsQuestions? Please reach out to our Customer Experience team atsupport@sherpacrm.com or give us a call at (314) 432-1234.6
to the latest version in order for the integration to work properly. To see what browser you're currently using, visit whatbrowser.org. Desktop Application Our integration will also work on the Microsoft Outlook desktop application. To use the integration on a Mac, make sure the Outlook desktop application is version 15.35 or higher (Outlook 2016).