Transcription
Densah Bur & C-Guide Instructions for Use
2
SECTIONS1. Osteotomy Preparation. p042. Unique Characteristics and Clinical Advantages. p083. Densah Burs Versatile Utilization. p114. The Densah Bur Kit. p175. Indications and Contraindications for Use. p256. C-Guide System. p417. Densah Burs Maintenance, Cleaning and Storage. p46VERSAH TERMS AND CONDITIONS OF SALE. p50*Please visit versah.com/ifu-manuals for the most current IFUDensah Bur Instructions for Use3
1. Osteotomy PreparationSince the early days of dental implantology, osteotomies have been preparedusing standard drills designed for use in industrial applications. These drill designshave proven to be functional for dental applications; implant success rates havebeen satisfactory over time but osteotomy preparation techniques have still beenlacking for various reasons. Standard drill designs used in dental implantology aremade to excavate bone to create room for the implant to be placed. Standarddrill designs, in twist or fluted shapes, cut bone effectively but typically donot produce a precise circumferential osteotomy. Osteotomies may becomeelongated and elliptical due to chatter of the drills. In these circumstances,the implant insertion torque is reduced, leading to poor primary stability andpotential lack of integration. Osteotomies drilled into narrow bone locations mayproduce dehiscence, buccally or lingually, which also reduces primary stability andwill require an additional bone grafting procedure, which adds cost and healingtime to treatment.4
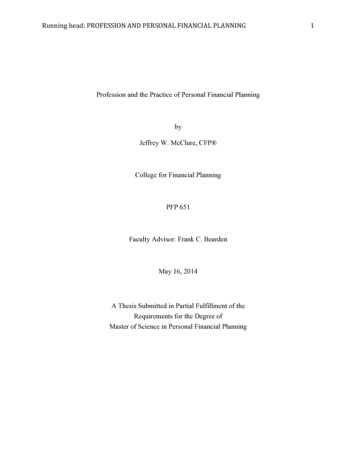
I. Osseodensification and the Densah Bur OverviewThe Densah Bur technology is based on a novel biomechanical bone preparationtechnique called “osseodensification.” Unlike traditional dental drilling techniques,osseodensification does not excavate bone tissue. Rather, bone tissue issimultaneously compacted and auto-grafted in outwardly expanding directionsfrom the osteotomy. When a Densah Bur is rotated at high speed in a reversed,non-cutting direction with steady external irrigation, a strong and dense layerof bone tissue is formed along the walls and base of the osteotomy. Densecompacted bone tissue produces stronger purchase for your favorite dentalimplant and may facilitate faster healing.Biomechanical1 as well as histological2,3,4 validation studies ofah VersLLCDensifying Crust inOsseodensificationMode due toCompactionAutograftingthe osseodensification and the procedure utilizing the Densah Burtechnology concluded that, in porcine tibia and Sheep Illiac Crest,osseodensification may facilitate bone expansion, increase implantstability and create a densification layer around the preparation site byCompaction Autograftingin the Apex of theOsteotomy FacilitatesSinus Graftingcompacting and autografting bone particles along the entire depth ofthe osteotomy.1. Huwais, Salah, and Eric G. Meyer. "A Novel Osseous Densification Approach in Implant Osteotomy Preparation to Increase Biomechanical Primary Stability, Bone Mineral Density, and Bone-to-Implant Contact." International Journal of Oral &Maxillofacial Implants 32.1 (2017).2. Trisi, Paolo, et al. "New osseodensification implant site preparation method to increase bone density in low-density bone: in vivo evaluation in sheep." Implant dentistry 25.1 (2016): 24.3. Lahens, Bradley, et al. "Biomechanical and histologic basis of osseodensification drilling for endosteal implant placement in low density bone. An experimental study in sheep." Journal of the Mechanical Behavior of Biomedical Materials 63(2016): 56-65.4. Lopez, Christopher D., et al. "Osseodensification for enhancement of spinal surgical hardware fixation." Journal of the mechanical behavior of biomedical materials 69 (2017): 275-281.* To view or to download PDF, visit us on the web at www.versah.com/our-scienceDensah Bur Instructions for Use5
61. Osteotomy Preparation
01. Todisco, M. and P. Trisi, Bone mineral density and bone histomorphometry are statistically related. Int J Oral Maxillofac Implants,2005. 20(6): p. 898-904.02. Frost HM. A brief review for orthopedic surgeons: fatigue damage (microdamage) in bone (its determinants and clinical implications).J Orthop Sci. 1998;3(5):272-281.03. Kold S, et al. Bone compaction enhances fixation of hydroxyapatite-coated implants in a canine gap model. J Biomed Mater Res B ApplBiomater. 2005;75(1):49-55.04. Schlegel KA, et al. Bone conditioning to enhance implant osseointegration: an experimental study in pigs. Int J Oral Maxillofac Implants.2003;18(4):505-511.05. Nkenke E, et al. Histomorphometric and fluorescence microscopic analysis of bone remodelling after installation of implantsusing an osteotome technique. Clin Oral Implants Res. 2002;13(6):595-602.06. Frost HM. Intermediary Organization of the Skeleton. 1st ed. Boca Raton, FL: CRC Press; 1986:109-164.07. Burri C, Wolter D. [The compressed autogenous spongiosis transplant (author’s transl)]. Unfallheilkunde. 1977;80(5):169-175.08. Halldin A, et al. The effect of static bone strain on implant stability and bone remodeling. Bone. 2011;49(4):783-789.09. Duncan RL, Turner CH. Mechanotransduction and the functional response of bone to mechanical strain. Calcif Tissue Int. 1995;57(5):344-358.10. Kold S, et al. Compacted cancellous bone has a spring-back effect. Acta Orthop Scand. 2003;74(5):591-595.11. Trisi P, et al. Implant micromotion is related to peak insertion torque and bone density. Clin Oral Implants Res. 2009:20(5):467-471.12. Pagliani L, Sennerby L, Petersson A, et al. The relationship between resonance frequency analysis (RFA) and lateral displacementof dental implants: an in vitro study. J Oral Rehabil. 2013;40(3):221-227.13. Trisi P, Colagiovanni M, Perfetti G. Implant Stability Quotient (ISQ) vs Direct in Vitro Measurement of Primary Stability (Micromotion):Effect of Bone Density and Insertion Torque. Journal of Osteology and Biomaterials. 2010;1(3).NOTE: The references cited illustrate general principles of bone Biomechanics and implant treatment and are not specific to the Densah BurDensah Bur Instructions for Use7
2. Unique Characteristicsand Clinical AdvantagesRegular twist drills or straight fluted drills have 2-4 lands to guide themthrough the osteotomy. Densah Burs are designed with 4 or more lands,which precisely guide them through bone. More lands means less potentialchatter. During osseodensification, Densah Burs produce a controlled boneplastic deformation, which allows the expansion of a cylindrical osteotomywithout excavating any bone tissue.8
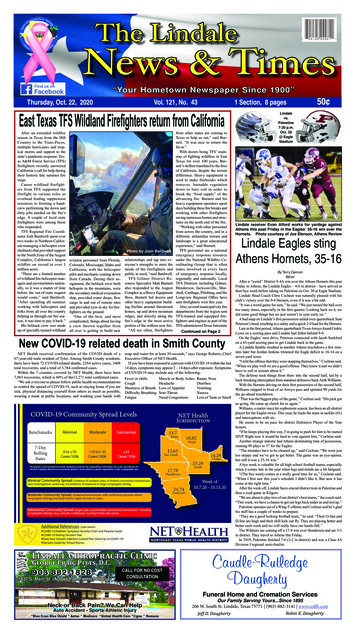
I. ModesCounterclockwise (CCW)Non-Cutting DirectionClockwise (CW)Cutting DirectionDensah Burs progressively increasein diameter throughout the surgicalprocedure and are designed to be usedwith standard surgical engines,Densifying Mode(Non-Cutting Direction)Cutting Mode(Cutting Direction)to preserve and compact bone(800-1500 rpm) in a counterclockwisedirection (Densifying Mode),and to precisely cut bone if needed(800-1500 rpm) in a clockwisedirection (Cutting Mode).Densah Bur Instructions for Use9
II. MotionThe Densah Burs are always tobe used with copious irrigation ina Bouncing-Pumping motion(vertical pressure to advance the drillinto the osteotomy, then a minor pullout for pressure relief, then advancewith vertical pressure again and so onin an in/out fashion). The duration andnumber of bouncing-pumping episodes(in/out) are usually dictated by bonedensity and desired length.ah LLC Vers102. Unique Characteristics and Clinical Advantages
3. DensahBurs VersatileUtilization Site evaluation is critical to choose the drilling protocol. Bone morphology, volumeand composition all influence the site preparation. The Densah Burs are designed tofunction in both clockwise (cutting mode) and counterclockwise (densifying mode) toaccomplish specific objectives based on the site and bone diagnosis. One should useclinician experience and judgement in conjunction with the Densifying Reference Guiderecommendation and suggested use protocols.11
I. Cutting Mode; Use in the Mandible in "Type I" Bone and Abundant "Type II" Bone with Dense Trabecula.Clockwise Direction3.5, 3.7, 3.8 mm Implant4.0, 4.2, 4.3 mm Implant4.5, 4.7, 4.8 mm Implant5.0, 5.2, 5.3 mm Implant5.5, 5.7, 5.8 mm Implant6.0, 6.2, mm Implant*Due to the geometry of the Pilot Drill do not drill too deep or use lateral pressure. This applies to all sequential pages relating to the Pilot Drill.123. Densah Burs Versatile Utilization
II. Densifying ModeCounterclockwise DirectionNOTE: Recommended drill speed is 800-1500 rpm with torque range from 5-50 Ncm for both modes.Densah Bur Instructions for Use13
III.Versatile UtilizationDensah Burs can be used in bothCutting and Densifying modes within the sameprocedure.You can move between multipleosteotomy sites in a patient — cutting in one site anddensifying in another — using the same Densah Bur.In hard trabecular bone, Densah Burs can beused in both Cutting and Densifying modes withinthe same osteotomy.(Densify-Preserve) after Cut Protocol.To view the video, visit us on the webat www.versah.com/dac-videoScan thisQR Codeto view ourDensify AfterCut videoContinuouslyCounterclockwiseNon-Cutting Direction(densifies bone)Continuously ClockwiseCutting Direction(cuts bone)Densify or cut bone with a push of the reverse buttonon your implant drill console143. Densah Burs Versatile Utilization
Upper ArchDensifyOsteotomy Site 1CutDensify DensifyOsteotomy Site 2CutCutDensify DensifyOsteotomy Site 3Lower Arch*Clinician experience and judgement should be used in conjunction with the Densifying Reference Guide recommendation and suggested use protocols.Densah Bur Instructions for Use15
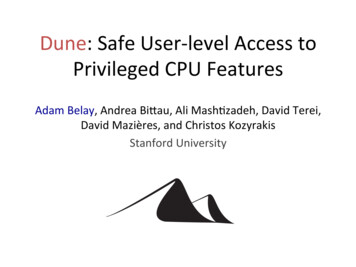
IV. Densah Bur MarkingDensah Bur Laser LinesDensah Burs are externally irrigated and designed to be used atdrill speeds of 800-1500 rpm. They are marked with laser markings1from 3-20 mm depth. Densah Burs have a tapered geometry; catalognumber is a reflection of their minor and major diameter dimension.E.g., Densah Bur VT3848 has a minor-diameter of 3.8 mm anda coronal major-diameter of 4.8 mm at 11.5 mm laser markwith an (average-diameter) of (4.3 mm) at the 8 mm laser markwhich becomes the crestal diameter for short implantslength 8 mm.20 mm18 mmNOTE: Cutting and Densifying must be done under constant waterirrigation. A pumping motion is required to prevent over heating.Surgical drills and burs should be replaced every 12-20 osteotomies2MAJOR Ø15.0 mm13.0 mmMAJOR Øor sooner when they are dulled or worn.11.5 mm10.0 mm(AVERAGE Ø)8.0 mmDrilling Depth5.0 mmMeasure the drilling depth of the Densah Bur from the widest3.0 mmpart of its tip to the indication line. Regardless of the Densah Burdiameter, the maximum additional tip depth is 1.0 mm.1. The accuracy of laser markings are tested within /- .5mm.2. Please find details under reference 1 on page 49.163. Densah Burs Versatile UtilizationMINOR Ø1.0 mm
4. The Densah Bur KitThe Densah Bur kit includes 12 burs that are designed to create osteotomies for allmajor dental implants in the market. Each Densah Bur is marked with depth markingsfrom 3-20 mm. They are designed to be used in a consecutive increasing order to achievethe desired osteotomy diameter.17
I. Included in the KitDensah Burs are designed to be used for osseodensification in small increments (alternate between VT5 and VT8) in dense trabecularbone to allow gentle expansion of the osteotomy. In soft bone, the osteotomy final preparation diameter should be prepared withDensah Bur with an average diameter that measures 0.5-0.7 mm smaller than the implant average diameter. In hard bone, theosteotomy final preparation diameter should be prepared with Densah Bur with an average diameter that measures 0.2-0.5 mmsmaller than the implant average diameter. With Osseodensification, bone preservation creates a spring back effect. Asa rule, osteotomies must not be undersized beyond the above stated parameters.VT5 BursVT8 BursVT1525 VT2535 VT3545 VT4555VT1828 VT2838 VT3848 VT4858VS2228VS3238VS4248VS5258(2.0 mm)(2.3 mm)(2.5 mm)(3.5 mm)(4.5 mm)(5.5 mm)(3.0mm)(4.0 mm)Average Diameter(5.0 mm)(3.3 mm)(4.3 mm)VS8 Burs(5.3 mm)Average DiameterPlease refer to Densah Bur Densifying Reference Guide for specific implant placement protocol.To view or to download PDFs, visit us on the web at www.versah.com/densifying-reference-guide184. The Densah Bur KitAverage Diameter
VT51525(2.0 mm)2535(3.0 mm)35454555(4.0 mm)(5.0 mm)VT818282838(2.3 mm)Pilot(3.3 mm)38484858(4.3 mm)(5.3 mm)VS82228(2.5 mm)3238(3.5 mm)4248(4.5 mm)5258(5.5 mm)Suggestive Preparation Steps for Hard Bone OsteotomySuggestive Preparation Steps for Soft Bone OsteotomyIn abundant dense bone: Densah Bur to be used in CuttingMode (800-1500 RPM) in Clockwise direction or to be used withDensify-Preserve after Cut protocol (see page 28).Densah Bur Instructions for Use19
NOTE: Case diagnosis and treatment planning should be done as normally practiced with implant patients. Careshould be taken to select the appropriate Densah Bur sequence for osteotomy preparation indicated by theimplant type (tapered/straight), implant diameter and bone density (Hard/Soft). Please refer to Densah BurDensifying Reference Guide for specific implant placement protocol. To view or to download PDFs, visit us onthe web at www.versah.com/densifying-reference-guide204. The Densah Bur KitScan this QR Code toview our DensifyingReference Guide
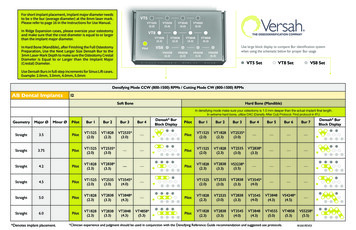
II. Decision Tree for Osseodensification ProtocolVT5 BurVT8 BurVS8 BurSoft Trabecular Bone — Tapered ImplantsImplant DiameterBur 1Bur 2Bur 3Bur 43.5, 3.7, 3.8PilotVT 1525(2.0)VT 2535*(3.0)——4.0, 4.2, 4.3PilotVT 1828(2.3)VT 2838*(3.3)——4.5, 4.7, 4.8PilotVT 1525(2.0)VT 2535(3.0)VT 3545*(4.0)—5.0, 5.2, 5.3PilotVT 1828(2.3)VT 2838(3.3)VT 3848*(4.3)—5.5, 5.7, 5.8PilotVT 1525(2.0)VT 2535(3.0)VT 3545(4.0)VT 4555*(5.0)6.0, 6.2PilotVT 1828(2.3)VT 2838(3.3)VT 3848(4.3)VT 4858*(5.3)*Denotes implant placement. Continued on next pageThis is a generalized protocol: Please refer to Densah Bur DensifyingReference Guide for specific implant placement protocol.To view or to downloadPDFs, visit us on the web at www.versah.com/densifying-reference-guideIn abundant dense bone: Densah Bur to be used in Cutting Mode (800-1500 RPM)in Clockwise direction or to be used with (Densify-Preserve) after Cut protocol (seepage 28).*Clinician experience and judgement should be used in conjunction with the Densifying Reference Guide recommendation and suggested use protocols.Densah Bur Instructions for Use21
II. Decision Tree for Osseodensification ProtocolVT5 BurVT8 BurVS8 BurHard Trabecular Bone — Tapered ImplantsImplant DiameterBur 1Bur 2Bur 3Bur 4Bur 5Bur 6Bur 73.5, 3.8PilotVT 1525(2.0)VT 1828(2.3)VT 2535*(3.0)————4.0, 4.2, 4.3PilotVT 1525(2.0)VT 1828(2.3)VT 2535(3.0)VT 2838(3.3)VS 3238*(3.5)——4.5, 4.7, 4.8PilotVT 1525(2.0)VT 2535(3.0)VT 2838(3.3)VT 3545*(4.0)———5.0, 5.2, 5.3PilotVT 1828(2.3)VT 2535(3.0)VT 2838(3.3)VT 3545(4.0)VT 3848(4.3)VS 4248*(4.5)—5.5, 5.7, 5.8PilotVT 1525(2.0)VT 2535(3.0)VT 2838(3.3)VT 3545(4.0)VT 3848(4.3)VT 4555*(5.0)—6.0, 6.2PilotVT 1828(2.3)VT 2838(3.3)VT 3545(4.0)VT 3848(4.3)VT 4555(5.0)VT 4858(5.3)VS 5258*(5.5)*Denotes implant placement. Continued on next pageThis is a generalized protocol: Please refer to Densah Bur DensifyingReference Guide for specific implant placement protocol.To view or to downloadPDFs, visit us on the web at www.versah.com/densifying-reference-guide224. The Densah Bur KitIn abundant dense bone: Densah Bur to be used in Cutting Mode (800-1500 RPM)in Clockwise direction or to be used with (Densify-Preserve) after Cut protocol (seepage 28).
II. Decision Tree for Osseodensification ProtocolVT5 BurVT8 BurVS8 BurSoft Trabecular Bone — Straight ImplantsImplant DiameterBur 1Bur 2Bur 3Bur 4Bur 53.0PilotVT 1828(2.3)VS 2228*(2.5)———4.0PilotVT 1828(2.3)VT 2838(3.3)VS 3238*(3.5)——5.0PilotVT 1828(2.3)VT 2838(3.3)VT 3848(4.3)VS 4248*(4.5)—6.0PilotVT 1828(2.3)VT 2838(3.3)VT 3848(4.3)VT 4858(5.3)VS 5258*(5.5)*Denotes implant placement. Continued on next pageThis is a generalized protocol: Please refer to Densah Bur DensifyingReference Guide for specific implant placement protocol.To view or to downloadPDFs, visit us on the web at www.versah.com/densifying-reference-guideIn abundant dense bone: Densah Bur to be used in Cutting Mode (800-1500 RPM)in Clockwise direction or to be used with (Densify-Preserve) after Cut protocol (seepage 28).*Clinician experience and judgement should be used in conjunction with the Densifying Reference Guide recommendation and suggested use protocols.Densah Bur Instructions for Use23
II. Decision Tree for Osseodensification ProtocolVT5 BurVT8 BurVS8 BurHard Trabecular Bone — Straight ImplantsImplant DiameterBur 1Bur 2Bur 3Bur 4Bur 5Bur 6Bur 73.0PilotVT 1525(2.0)VT 1828(2.3)VS 2228*(2.5)————4.0PilotVT 1828(2.3)VT 2838(3.3)VS 3238*(3.5)————5.0PilotVT 1828(2.3)VT 2535(3.0)VT 2838(3.3)VT 3545(4.0)VT 3848(4.3)VS 4248*(4.5)—6.0PilotVT 1828(2.3)VT 2838(3.3)VT 3545(4.0)VT 3848(4.3)VT 4555(5.0)VT 4858(5.3)VS 5258*(5.5)*Denotes implant placement.This is a generalized protocol: Please refer to Densah Bur DensifyingReference Guide for specific implant placement protocol.To view or to downloadPDFs, visit us on the web at www.versah.com/densifying-reference-guide244. The Densah Bur KitIn abundant dense bone: Densah Bur to be used in Cutting Mode (800-1500 RPM)in Clockwise direction or to be used with (Densify-Preserve) after Cut protocol (seepage 28).
5. Indications andContraindications for UseIndicationsContraindications1. Densah Burs are indicated for use to prepare1. Osseodensification does not work in corticalosteotomies for dental implant placement in thebone. In (Type I/Dense Bone); use the Densahmandible or maxilla.Burs in Cutting Mode (CW) and reverse-out(CCW) to re-autograft. (Densify-Preserve after2. The Pilot Drill is used to create the initial holein bone to prepare an osteotomy for dentalimplant placement and monitor the drillingdepth.3. The parallel pin is for use as a paralleling guidewith the Densah Burs.Cut Protocol).2. Traditional guided surgery may present a higherrisk of implant failure due to its limitation inallowing the needed bouncing techniqueand adequate irrigation.3. Avoid Densifying Xenograft.The general health of dental implant patient candidates should be carefully evaluated prior to treatment. Patients with serious medical problems or inpoor health should not receive dental implant treatment. Patients with medical problems such as: compromised immune system, drug or alcohol abuse,uncontrollable bleeding, endocrine disorders or titanium allergy should be carefully evaluated prior to treatment or excluded. Clinician experience andjudgement should be used in conjunction with the Densifying Reference Guide recommendation and suggested use protocols. Do not apply lateral pressurewhen drilling with the pilot drill.25
I. Osseodensification in Medium and Soft Trabecular Bone Qualities1.Flap the soft tissue using the technique indicated for the implant position.2. Drill to the desired depth using the Pilot Drill (Drill speed 800-1500 rpmwith copious irrigation). When drilling do not apply lateral pressure, and monitor drilling depth.3. Depending upon the implant type and diameter selected for the site, begin with the narrowestDensah Bur. Set the drill motor to reverse (Counterclockwise drill speed 800-1500 rpmwith copious irrigation).4. Begin running the bur into the osteotomy in a Densifying CCW direction. When feeling the hapticfeedback of the bur pushing up out of the osteotomy, modulate pressure with a pumping motionuntil reaching the desired depth. Copious irrigation is always necessary.5. If resistance is felt, gently increase the pressure and the number of bouncing-pumping motionsto achieve desired depth.6. Place the implant into the osteotomy. If using the drill motor to tap the implant into place,the unit may stop when reaching the placement torque maximum. Finish placing the implant to depthwith a torque indicating wrench.265. Indications and Contraindications for Use
II. Osseodensification in Dense Trabecular Bone Quality Especially in the MandibleWe recommend the use of the Densah Burs in small increments. Use the VT8 drills asintermediate alternating steps between the VT5 consecutive drills if needed. Increase thenumber of bouncing-pumping motions to achieve desired depth.1.Flap the soft tissue using the technique indicated for the implant position.2. It is advised to prepare the osteotomy 1.0 mm deeper than the final implant length, usingthe Pilot Drill (Drill speed 800-1500 rpm with copious irrigation).3. Depending upon the implant type and diameter selected for the site, begin with the narrowestDensah Bur. Set the drill motor to reverse (Counterclockwise drill speed 800-1500 rpm withcopious irrigation). Begin running the bur into the osteotomy. When feeling the haptic feedback of thebur pushing up out of the osteotomy, modulate pressure with a pumping motion untilreaching the desired depth.You may notice resistance and a gentle hammering effect while pressingdown to advance the bur into the osteotomy.Continued on next page*Clinician experience and judgement should be used in conjunction with the Densifying Reference Guide recommendation and suggested use protocols.Densah Bur Instructions for Use27
II. Osseodensification in Dense Trabecular Bone Quality Especially in the Mandible4. (Densify - Preserve) after Cut (DAC) if needed: When strong resistance may be felt.Change the drill motor to forward-Cutting Mode (Clockwise direction at 800-1500 rpmwith copious irrigation). Begin advancing the Densah Bur into the osteotomy until reaching thedesired depth. Stay in the osteotomy, change the drill motor back to reverse-DensifyingMode to densify and auto-graft the cut bone back into the osteotomy walls. By not removing thebur from the osteotomy between cutting and densifying modes, you will re-deposit the cut boneparticles inside the boundaries of the osteotomy. (See page 29 for illustration.)5. Place the implant into the osteotomy. If using the drill motor to tap the implant into place, the unitmay stop when reaching the placement torque maximum. Finish placing the implant to depth witha torque indicating wrench.6.Osseodensification in Dense trabecular bone is only recommended to be utilized to expand a lessthan adequate ridge width in the Mandible.7.28In abundant dense bone: Densah Bur may be used in Cutting Mode (800-1500 RPM) in Clockwisedirection or to be used with Densify-Preserve after Cut protocol.5. Indications and Contraindications for UseScan thisQR Codeto view ourDensify AfterCut video
(Densify - Preserve) after Cut (DAC) ProtocolDensifying ModeCutting ModeCounterclockwise (CCW)Clockwise (CW)Non-Cutting DirectionCutting DirectionDensifying ModeCounterclockwise (CCW)Non-Cutting Direction*Clinician experience and judgement should be used in conjunction with the Densifying Reference Guide recommendation and suggested use protocols.Densah Bur Instructions for Use29
III. Osseodensification May Facilitate Lateral Ridge ExpansionA. Ridge Expansion ProcedureOsseodensification will not create the tissue, it may only optimize and preserve what already exists.Scan thisQR Codeto view ourRidge ExpansionProcedure videoThere is a need for 2 mm of trabecular-bone core and 1/1 trabecular/cortical bone ratio toachieve a predictable plastic expansion. The more cortical bone there is, the more trabecular core is needed to facilitate predictable expansion.The ideal minimum ridge to expand is 4 mm (2 mm trabecular core 1mm cortex on each side).This protocol is indicated to expand a ridge with a narrow crest and wider base. It is not indicated in resorbed ridge with a narrow base.In ridge expansion cases, please oversize your osteotomy and make sure that the osteotomy crestal diameter is equal or larger than theimplant major diameter.2.0mm1.Diagnose and assess the amount of trabecular bone available using a CBCTto evaluate bone composition needed to perform a predictable plastic expansion.2.Flap the soft tissue using the technique indicated for the implant position.3.Depending upon the implant type and diameter selected for the site, after a narrow pilotosteotomy, begin with the narrowest Densah Bur. Set the drill motor to reverse–Densifying Mode(Counterclockwise drill speed 800-1500 rpm with copious irrigation). Begin running the bur into the osteotomy. When feeling the hapticfeedback of the bur lift off pressure and reapply, repeatedly lift off and reapply pressure with a pumping motion until reaching the desired depth.305. Indications and Contraindications for Use
4.Use the Densah Burs in small increments. As the bur diameter increases, the bone may gradually expand to the final diameter. Theosteotomy may be expanded with minimal bone dehiscence, which may allow for total implant length placement in autogenous bone withoutthread exposure. Mandibular osteotomies need to be planned and performed to 1 mm deeper than the implant length.5.Place an implant with a diameter that is equal or slightly larger than the initial ridge width (up to 0.7 mm larger). Ifusing the drill motor to tap the implant into place, the unit may stop when reaching the placement torque maximum. Finish placing the implantto depth with a torque indicating wrench. The proper diameter implants should be included in the treatment plan and on hand at the surgicalappointment.6.If 1.5-2.0 mm of buccal bone thickness has resulted after osseodensification, perform hard and soft tissue veneer contour-graft to augmentaround the implant to develop tissue thickness that may enhance long term stability. Complete implant coverage may be considered for 2-stagehealing protocol.*Clinician experience and judgement should be used in conjunction with this suggested use protocol.Densah Bur Instructions for Use31
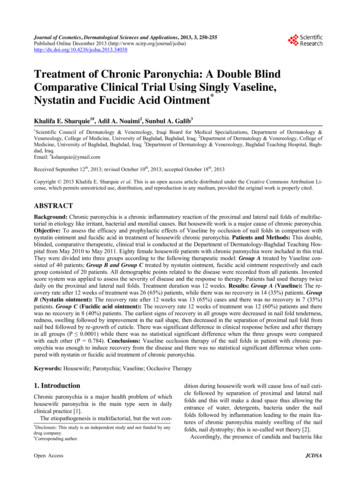
III. Osseodensification May Facilitate Lateral Ridge ExpansionB. Ridge Expansion with Modified Ridge Split:For cases with ridge width 4mm that contains 2mm of trabecular-bone core.This protocol is indicated to expand a ridge with a narrow crest and wider base. It is not indicated in resorbed ridge with a narrow base.In ridge expansion cases, please oversize your osteotomy and make sure that the osteotomy crestal diameter is equal or larger than theimplant major diameter.1.In cases of an initial ridge width 4mm that contains 2mm of trabecular-bone core, an intra-bony ridge split is needed; ridge split tobe made by a Piezosurgery 0.3-0.5 mm tip. Ridge split is recommended to be as deep as the planned implant length. No vertical cutsare needed. Ridge split is to allow more buccal wall elasticity during the expansion procedure. This intra-bony split is contra-indicated in resorbed ridge with a narrow base.2.Depending upon the implant type and diameter selected for the site, after a narrow pilot osteotomy, begin with the narrowest Densah Bur. Set the drill motor to reverse–Densifying Mode (Counterclockwise drill speed 800-1500 rpm with copious irrigation). Beginrunning the bur into the osteotomy. When feeling the haptic feedback of the bur lift off pressure and reapply, repeatedly lift off and reapplypressure with a pumping motion until reaching the desired depth.4.Use the Densah Burs in small increments. As the bur diameter increases, the bone may gradually expand to the final diameter.The osteotomy may be expanded with minimal bone dehiscence, which may allow for total implant length placement in autogenous bonewithout thread exposure.5.Oversize the osteotomy to be slightly wider than the implant major diameter (especially in the mandible) to prevent the implantthread from over-straining the expanded bony walls. Mandibular osteotomies need to be planned and performed to 1mm deeper thanthe implant length.325. Indications and Contraindications for Use
Step 1Step 2-3Step 4-5Step 66.Place implant with a diameter that is equal or slightly larger than the initial ridge width (upto 0.7 mm larger). If using the drill motor to tap the implant into place, the unit may stopwhen reaching the placement torque maximum. Finish placing the implant to depth with atorque indicating wrench. The proper diameter implants should be included in thetreatment plan and on hand at the surgical appointment.7.If 2.0 mm of buccal bone thickness has resulted after osseodensification, performhard and soft tissue veneer contour-graft to augment around the implant toStep 7develop tissue thickness that may enhance long term stability. Complete implant coveragemay be considered for 2-stage healing protocol.8.If the resulted buccal bone thickness post expansion is 1 mm, do not place the implantand allow for 2-stage approach (Guided Expansion Graft).*Clinician experience and judgement should be used in conjunction with this suggested use protocol.Densah Bur Instructions for Use33
2. Trisi, Paolo, et al. "New osseodensification implant site preparation method to increase bone density in low-density bone: in vivo evaluation in sheep." Implant dentistry 25.1 (2016): 24. 3. Lahens, Bradley, et al. "Biomechanical and histologic basis of osseodensification drilling for endosteal implant placement in low density bone.