Transcription
GUIDE TO ORGANIZING YOUR MUSIC USINGMEDIAMONKEYBy Jack ZhouIntroductionMediaMonkey is an extremely versatile media organizer and player. It has almost all of thefunctionality of Winamp or iTunes and offers more advanced tools for music management. Thisguide will teach you how to take music that is poorly labeled, haphazardly placed in differentfolders, and mastered at jarringly different volumes and organize it into one well labeled, neatlyfiled, volume leveled music library. I focus on this process because MediaMonkey makes it veryeasy to do and efficient for someone who has never used this program before. MediaMonkey’sother features, such as playlist creation, are more common among media players and will not bediscussed in this user guide. If you are looking for a more general or comprehensive guide, or ifsomething in this guide doesn’t make sense, please consult www.mediamonkey.com/support/.Note 1: this guide is for the free version of MediaMonkey, releasenumber 3.0.3. The gold (paid) version has some additionalfeatures not covered in this guide. Some instructions in this guidemight not apply to newer versions.Note 2: Both the words label and tag refer to the information, suchas the artist the song is by or the year that the song was released,that is stored in the file itself. These two words will be usedinterchangeably in this guidePreparationBefore you begin, make sure you have these:PC with Microsoft Windows 98 or higherInternet connectionMusic in a compressed audio format, such as mp3, wma, or m4a, on your computerWorking knowledge of PC’s, and media players such as iTunesMajor Steps1. Downloading and installing MediaMonkey: get MediaMonkey running on yourcomputer.Page 1
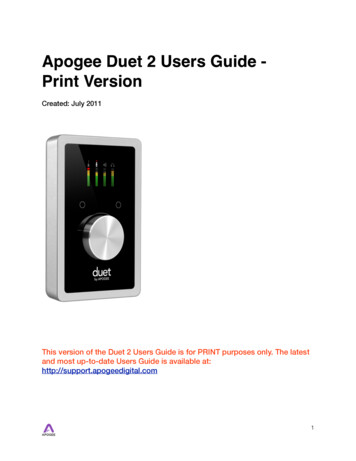
2. Adding your music to MediaMonkey: scan your music so that MediaMonkey can useit.3. Auto-tagging from web: use the Internet to properly label your songs.4. Auto-organizing files: quickly rename songs and file them categorically into the rightfolders.5. Volume leveling tracks: even out the differences in volumes between songs.Guide1. Downloading and installing MediaMonkey:These steps will get MediaMonkey installed and running on your computer.1.1 Open up your internet browser, and navigate towww.mediamonkey.com/trialpay1.2 Click on the download now button under “MediaMonkey Free Version,” andsave the file to an easily accessible location on your hard drive.1.3 Open and run the file once it has completed downloading. The program willask you to select a language, so select English and click “OK.”1.4 Follow the instructions to install MediaMonkey:Fig. 1.1 Click next when you see thewelcome screen.Fig. 1.2 Read the license agreement forMediaMonkey, then check “I accept theagreement” and click next.Page 2
Fig. 1.3 Choose the path you wish to installthe program to. Click browse to find the rightfolder. Click next when ready.Fig. 1.4 Choose what folder in the startmenu you want the icon to be in, thenclick next.Fig. 1.5 Decide where you wantMediaMonkey icons to be created, thenclick next.Fig. 1.6 Decide which file typesMediaMonkey will be associated with. Ifyou’re not sure just keep the defaultoptions and click next.Fig. 1.7 Review your installationpreferences, then click install.Fig. 1.8 MediaMonkey is installing on Page 3your computer.
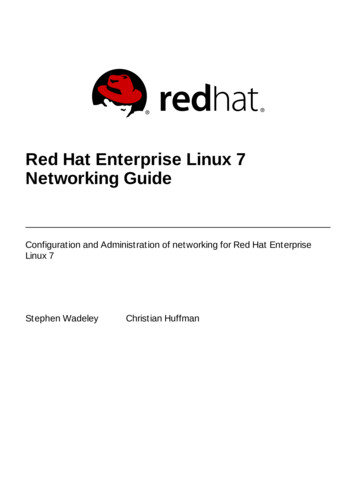
1.5 When the installation is finished, select “Launch MediaMonkey” and click“Finish.”Note: in the future, you can open MediaMonkey by opening thestart menu, clicking on “All Programs,” then the “MediaMonkey”folder, then clicking on “MediaMonkey.” Alternatively, youcould double click the MediaMonkey icon on your desktop.2. Adding your music:This step tells MediaMonkey which music files you want it to keep in its database.MediaMonkey can only organize songs that are in its database, so make sure you scanall your music. If this is your first time using MediaMonkey, you must complete thisstep before you move on to the other sections of this user guide.2.1 If you are running MediaMonkey for the first time, a window called “Add/RescanFolders” will automatically pop up. If this is not the first time, open this windowby going to the file menu and clicking “Add/Rescan Tracks to the Library,” asshown in figure 2.1, or by simply pressing the Insert key on your keyboard. Thiswindow is where you will be adding the majority of your music to theMediaMonkey library.2.2 Using the file tree, navigate to the folder where your music is kept. Check theboxes next to all the folders which contain the music you wish to add, as shown infigure 2.2. Then click “OK.” The program will begin to scan all the informationfrom the music in the folders you have selected.Note: Depending on how many music files you are adding, thiscould take up to several minutes.Fig. 2.1 The Add/Rescan Tracksbutton in the file menu.Fig. 2.2 The Add/Rescan Tracksdialog box.Page 4
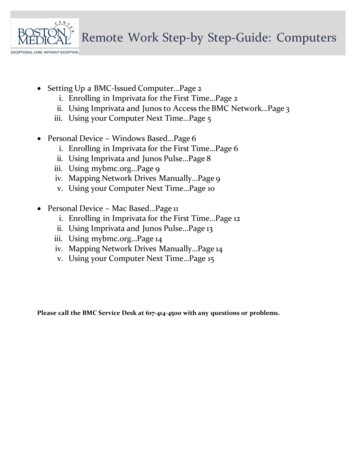
2.3 After MediaMonkey finishes adding your music, it will ask if you want to importsettings from other music players you have installed. If you have musicinformation or playlists stored on another media player, select it and click “OK.”If not, just click cancel.2.4 Finally you will see the main screen for MediaMonkey. Click the icon namedArtist & Album Artist on the left side of the screen. All the music you addedshould show up in the center screen, organized alphabetically by artist and then bytitle, as shown in figure 2.3.Fig. 2.3 MediaMonkey’s main window. All of the scannedsongs are now available in the library.3. Auto-tag from web:This function uses the internet to look up missing tag information, including albumcovers, for a particular song. For example, if you have a song but don’t know whatalbum it is from, this function will look that up based on the title, artist, and any otherinformation stored in the song’s tag.3.1 Select a song that has incomplete information.3.2 Right click on the song, and select auto-tag from web. Alternatively, you couldselect the song and then click “tools” in the top toolbar, then click “auto-tag fromweb.” These are the blue highlighted options in figures 3.1 and 3.2.Page 5
Fig. 3.1 The menu thatappears when you right clickon a song.Fig. 3.2 The Tools menu. Itis very similar to the rightclick menu in figure 3.3.3 A window will pop up with the song’s information downloaded from the internet,as shown in figure 3.3. If you think the information is correct, navigate to thewindow at the bottom and select the check box next to the song you want toupdate. If the information is incorrect, click the dropdown box at the top for a listof albums by that artist. Pick the correct album and the correct release date.Also, you could click the options button to the right of that and select a differentsearch engine. Click “Auto-Tag,” and all the information embedded in the tagshould update to match the online search result.Fig. 3.3 Auto-tag from Web window with the songinformation displayed. The song that is highlighted inyellow will be updated with the new information.Page 6
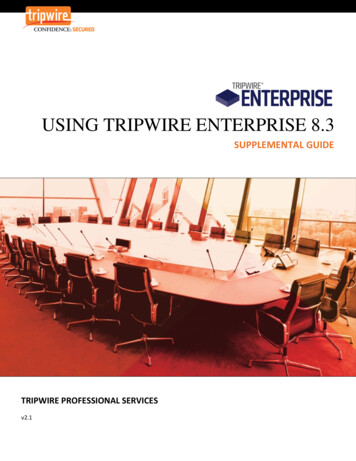
3.4 A window will pop up asking where to save the album cover image. Select “saveto tag” and click OK. Close the window when the tag is done updating. Yoursong will now have all the tag information that was available online. If you wantto update more songs, just repeat the process.Note: The search engine is not perfect, so if you are looking upan obscure song or band, it might give you incorrect information.4. Auto-organize files:This function renames your songs, and places them into different folders that areorganized by category. This is useful if you have songs with long, unwieldy filenames,or songs located in various misnamed folders. The greatest benefit of this feature isthat it can automatically organize as many or as few files as you want, giving you thepower to neatly organize your entire library in one click.4.1 Select the songs you want to auto-organize. Hold the Ctrl key when you areclicking to select multiple songs.4.2 Right click the selection or go to the tools menu and select auto-organize files.These are shown as the yellow highlighted options in figures 3.1 and 3.2.Fig. 4.1 Auto-Organize window. The songs that will be moved arehighlighted in yellow. The songs with duplicate filenames arehighlighted in red.Page 7
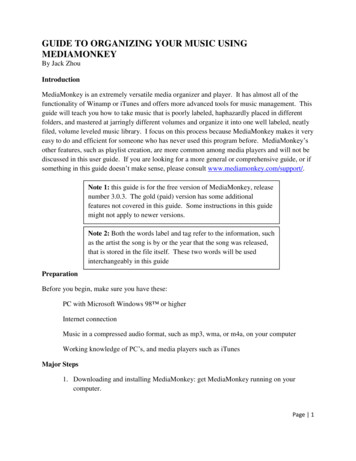
4.3 A window will appear with a list of all the files that you have selected. Click theconfigure button at the top right. Here are the options you can manipulate.Fig. 4.2 Configuration window.a.Main directory: choose one overarching folder that all your music will bekept in. A “.\” means that the song’s original folder will be the maindirectory.b.Subdirectory: specify the folders that will separate different types ofmusic from each other. If you click the drop down box, there are somepopular options that can be used to organize your music. For example, ifyou picked “Album Artist then Album,” Album Artist \ Album showsup in the box. This means that all songs from the same artist will beplaced in a folder with the artist’s name. Then they will be furthersubdivided in to folders corresponding with each song’s album. If you areunsatisfied with the options in the drop down menu, click on the buttonnext to it with the two horizontal arrows. A list of other categories isdisplayed, such as Year , Genre , and etc, which you can add anddelete to the subdirectories box.c.Filename: This allows you to automatically change the filename of thesong. The pull down menu works in the same way as the menu for thesubdirectories box. Once again, you can further customize the defaultoptions by clicking on the double arrow box and selecting your own tagsto add.Page 8
4.4 When you are done, make sure to look at the information in the sample box for anexample of the location and file name of a particular song in your library. Whenyou are satisfied, click “OK.”4.5 The list of songs you have selected to auto-organize is visible again. The programwill move or rename the songs highlighted in yellow. The songs that arehighlighted in red have conflicting filenames, which is a reliable way to tell if youhave duplicate songs.Note: Auto-organizing permanently changes the song’s locationand filename. If there is important information about the song thatis stored in the original filename, record that first before usingauto-organize.Put a check next to the songs that you want to move, and then click “OK.” Thefiles should reorganize and rename themselves to your specifications.5. Volume leveling tracks:MediaMonkey has a very useful feature that automatically makes the average volume ofall selected songs the same. If you have songs from different sources that are mastered atdifferent volume levels, this feature is helpful at eliminating harsh changes in volumesbetween songs.5.1 Select the tracks that you want to volume level.5.2 Right click the files or click the tools menu, and select “Analyze Volume,” asshown by the red highlighting in figures 3.1 and 3.2.Fig. 5.1 The green progress bar when analyzing the volume. Right clicking on thebar allows you to cancel the process.5.3 The program will begin analyzing every song and storing the volume information.Note: This process can take very long depending on the numberof songs selected and the speed of your computer. You canterminate it by right clicking on the progress bar and selectingterminate as shown in figure 5.1.Page 9
5.4 Once this is finished, all the selected songs will have volume information. Thismeans that the MediaMonkey will adjust its volume accordingly to make sure thevolumes of songs are almost equal. However, other media players and devicessuch as iPods will not be able to read this information, and thus their songs’volumes will not be leveled even if they were in MediaMonkey.5.5 To make the volume leveling carry to all other programs, you must permanentlymodify the song. To do this, the select the songs you want to level, and right clickon them or click tools and select “Level Track Volume” as highlighted in green infigures 3.1 and 3.2.Caution: doing this will change the song permanently. Althoughyou can always adjust volume of the song by changing the volumesettings and releveling the song, the original volume data will belost forever.A warning will appear saying that this will permanently change the song. Click“OK.” For songs that already have volume information, this process will be veryquick. Any songs without this information will be volume analyzed first, thenvolume leveled. Your songs should now have the same average volume.Summary:This is the extent of my guide to organizing and volume leveling your music usingMediaMonkey. Now that your music is properly tagged, organized, renamed, and volumeleveled, enjoy listening to it and playing with some of MediaMonkey’s playback features.MediaMonkey has many other powerful features, such as taking music from a CD and putting onyour computer, converting files from one type to another, and burning CDs of your playlists.These and other features can be found on www.mediamonkey.com/support/.Page 10
unsatisfied with the options in the drop down menu, click on the button next to it with the two horizontal arrows. A list of other categories is displayed, such as Year , Genre , and etc, which you can add and delete to the subdirectories box. c. Filename: This allows you to automatically change the filename of the song.