Transcription
Covenant Affiliated OfficePowerchart OrdersInstructions
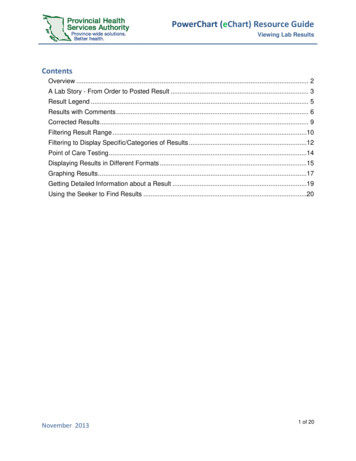
Accessing the Covenant Health PowerChart1.Visit www.covenanthealth.com in your web browser,and scroll to the bottom of the page and click on thelink to “Physician Resources”.2.From the Physician Resources page, choose theicon for “Covenant Secure Gateway ”3.If your location is directly connected to the CovenantNetwork, at the Unified Gateway screen, you’ll beprompted to enter your Covenant networkusername/password. If you are in a location notdirectly connected to a Covenant Network, you’ll beprompted for your Covenant network username/password, and Passcode (RSA token).4.Choose the CovMD icon.5.Choose eCare Applications PowerChart icon.6.Log into Cerner Citrix with your Covenant Networkusername/password.7.23456Click on PowerChart (“P” icon).7
Finding a PatientOpening a patient’s chart can be accomplished multiple ways: Searching for patient, locating them on a patient list (ifapplicable), or locating them on ambulatory organizer (if applicable). The last nine opened charts will be available forquick access under the “Recent” dropdown next to the search field. For purposes of this training, we will explain thesearching for a patient method as follows:(1) Click the magnifying glass to open the Encounter Search box.(2) Enter the search criteria for the patient on the Encounter Search screen.(3) Choose the correct encounter and click OK.231When exiting PowerChart, please use the Exit Dooron the toolbar.
Home ScreenAmbulatory Organizer is the Home Page. It displays the surgery schedule for the selected Provider.Use the “Date” and “Patient’s For” selection to manipulate your screen results.Patient’s charts can be opened by double-clicking the patient’s name.
Chart ViewsAffiliated Summary and Demographics are the views for the chart and for patient information.
Orders ViewIf your provider does not have Favorite PowerPlans, you can search generic powerplans by specialty (Surg, Card, Ortho, OB, etc)then modify those orders accordingly.
Ordering Favorite PowerPlansIn the New Order Entry component, select “Inpatient” and “Shared” then search for your provider in the searchbox under Shared.Their name and favorite plans will appear, choose the plan, clickOrder, then click the “shopping cart” box at top of screen.
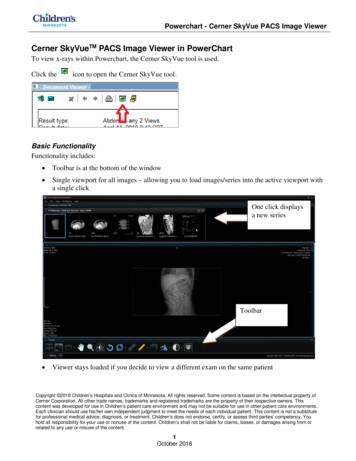
Placing OrdersSelect the provider for which the proposed orders will route to their Message Center.Select Modify in the Orders for Signature screen.Surgical Orders are multiphasedPowerPlans. Address all phases of thePowerPlan, placing checkmarks bythose orders to place.Orders can be added by clicking “Addto Phase” and searching for individualorders.Any order with a will need to bemodified to answer additionalinformation. Right click the order tomodify.Click “Orders for Signature”, then“Sign”
Multi-Phase PowerPlan
Proposed OrdersOnce signed, the order displays on the order profile with ablue circle and white question mark, denoting proposal status.The order is not visible to any other users until accepted.
Proposed Orders: Provider WorkflowThe providerreceivesproposedorders in theproposedorders folderwithinmessagecenter
Proposed Orders: Provider WorkflowProvider canchoose to accept(green check),reject (red do notsign), or acceptwith modifications(gray triangle) tochange the detailsof the order
Proposed Orders: Provider WorkflowOnce accepted ormodified, the orderbecomes active and isseen by all users on theorder profile.
Chart ViewPatient’s Blue Banner Bar displays the Chosen Patient Information.The menu bar on the left side contains components of the chart to view/print. Notes, Documentation and Results Review contain components of thechart that can be viewed/printed. Where applicable, the gray bar can rightclicked to allow for refining search criteria as well as choosing radiobuttons of table, group or list. Links and Feedback contains the link to Sovera as well as the STAR Facesheet link. Insurance cards can be located via “Patient” on the toolbar and clicking “View Images”.
Printing1. Some printing, such as with lab results or orders” can be accomplished by selecting your criteria on the screen, and thenclicking the “Print” icon on the Patient Blue Banner Bar.2. If the “Print” icon is not available, you can print your selection by right clicking the document of choice and choosing MedicalRecord Request.3. For the Medical Record Request, click OK, then select your appropriate template (if not preselected) and click Preview. Whenthe preview generates the report you can select to print it.4.Another option for printing is via the “Medical Record Request” on the toolbar and choosing your template, date range, andsections to print. Choose Preview and when the preview generates the report you can select to print it.
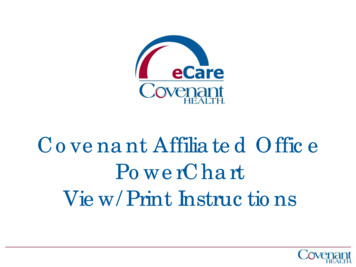
Viewing PACS ImagesRadiology reports can be opened by double-clicking the report in the Results Review window. To View PACS images, clickthe “projector screen” icon on the Radiology Report.Radiology reports can also be opened by clicking Links and Feedback and McKesson PACS “View Studies”.
Radiology reports can be opened by double -clicking the report in the Results Review window. To View PACS images, click the "projector screen" icon on the Radiology Report. Radiology reports can also be opened by clicking Links and Feedback and McKesson PACS "View Studies".