Transcription
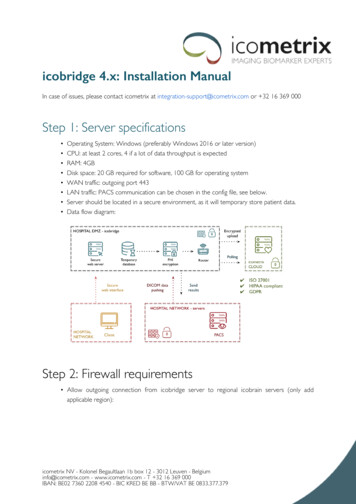
icobridge 4.x: Installation ManualIn case of issues, please contact icometrix at integration-support@icometrix.com or 32 16 369 000Step 1: Server specifications Operating System: Windows (preferably Windows 2016 or later version)CPU: at least 2 cores, 4 if a lot of data throughput is expectedRAM: 4GBDisk space: 20 GB required for software, 100 GB for operating systemWAN traffic: outgoing port 443LAN traffic: PACS communication can be chosen in the config file, see below.Server should be located in a secure environment, as it will temporary store patient data.Data flow diagram:Step 2: Firewall requirements Allow outgoing connection from icobridge server to regional icobrain servers (only addapplicable region):icometrix NV - Kolonel Begaultlaan 1b box 12 - 3012 Leuven - Belgiuminfo@icometrix.com - www.icometrix.com - T 32 16 369 000IBAN: BE02 7360 2208 4540 - BIC KRED BE BB - BTW/VAT BE 0833.377.379
RegionHostnameEuropeicobrain-eu.icometrix.comIp addressesProtocol13.248.146.126 Step 3: Install software Run icobridge-installer-4.x.exe Example installation process can be seen below DICOM server and executables will be installed in C:\Program Files (x86)\icobridge-4.x Configuration files, database and log files are stored in C:\icobridge-4.x
During installation a random unique encryption key is generated to pseudonymise data beforeupload, it is recommended that you change this afterwards during the configuration step.
When the installation is finished, the icobridge service is started and you are redirected tohttp://localhost:8042/icobridge/core where you can register the icobridge.Step 4: Registration Url: http://localhost:8042 A valid cloud authentication configuration is required If none is available, you are prompted to register the icobridge: Fill in the form values: Country: select country from list Region: is automatically chosen based on regulatory rules for each country Hospital: hospital name, please specify as detailed as possible
Technical contact: this is the email address of the person we can contact should wenotice issues with the icobridge. Make sure this is a technical person, preferably ITpersonnel, that can assist with questions regarding network, PACS, firewall, virtualmachine, etc Agree with the terms and conditions, which can be read by clicking the link. Click register, the icobridge is restarted in the background with new configuration values. Theweb page is automatically reloaded. Should there be a problem with the registration, first refer to the log files in C:\icobridge-4.x\Logs\ to determine possible cause. If issues persists, please contact icometrix at integration-support@icometrix.com or 32 16 369 000 If registration was successful, you are redirected to the configuration page.Step 5: Configuration Url: http://localhost:8042 Use navigation on the top to update current configuration values. Click save configurationbutton to apply changes and reset icobridge. Only fill in forms for services that are required, some are optional (SMTP, LDAP, HL7, etc) In order to test icobridge installation, DICOM and PACS configuration are required. Note that the configuration interface is only available from the local machine (localhost).Step 6: DICOM configuration DICOM server allows to receive images from other PACS servers, modalities or DICOMnodes Port: DICOM server listening port, can be chosen. Add incoming firewall connectionexception if needed. AE title: identifier, this is used to communicate back to PACS server, by default weuse ICOBRAIN MS. On receiving DICOM images no AE title check is performed.
PACS Server or DICOM node able to receive DICOM results IP address: ip address (or hostname) Port: typically 104 is used AE title: PACS server identifier, note that is value could be case sensitive A PACS C-Echo test can be performed, note that you first need to save anyconfiguration changes made.Step 7: PACS configuration Add incoming DICOM route: ip-address/hostname: ip-address or hostname of the machine hosting the icobridgesoftware AE title: ICOMETRIX Add outgoing DICOM routes: ip-address or hostname of the machine hosting the icobridge software port: 9104, unless changed in step 6 AE titles: ICOBRAIN MS, ICOBRAIN DM, ICOBRAIN TBI, ICOBRAIN EP andICOBRAIN CVAStep 8: Testing Send image from PACS to at least one of the three routes added in step 7 Verify data is uploaded to icometrix by checking the log files in C:\icobridge-4.x\Logs orfrom the interface http://localhost:8042 Verify report and result overlays are received in PACS and correctly shownNotes Virus scanner
Exclude directory C:\icobridge-4.x\OrthancStorage and with extension C:\icobridge-4.x from read and write access scan. Having a virusscan enabled on that directory can impact performance and causedatabase corruption Directory permissions Make sure system and service users have write permissions to C:\icobridge-4.xdirectories During auto-update new files in those directories are downloaded or changed Encryption key A random unique key was generated during installation, but we recommend you tochange it afterwards. Any character is allowed, use at least 8 characters, keep in mind the encryption keyshould have enough randomness.In case of issues, please contact icometrix at integration-support@icometrix.com or 32 16 369 000
In order to test icobridge installation, DICOM and PACS configuration are required. Note that the configuration interface is only available from the local machine (localhost). Step 6: DICOM configuration DICOM server allows to receive images from other PACS servers, modalities or DICOM nodes Port: DICOM server listening port, can be .