Transcription
INSTRUCTIONS FOR USEOrtofon Century
2 Pro-Ject Audio Systems · Pro-Ject Ortofon Century · Revision 2019.01.21
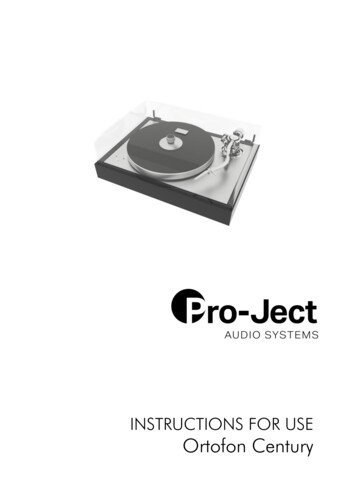
Ortofon Century100 year jubilee edition turntableControls, features and (13)(14)(15)(16)(17)(18)(19)(20)(21)MAIN PLATTER WITH PRO-JECT LEATHER ITCHASSISRECORD CLAMPSPEED CONTROLMOTOR WITH MOTOR PULLEYDRIVE BELTSUB-PLATTERTRANSPORT SCREWSTONEARM COUNTERWEIGHTTONEARM LIFTTONEARM REST AND REMOVABLE TRANSPORT LOCKCARBON / ALUMINIUM TONEARM TUBEORTOFON CONCORDE CENTURY CARTRIDGETONEARM FLANGEANTI-SKATING SLIDING MECHANISM WITH WIREANTI-SKATING WEIGHT SUPPORTLIDLID HINGESHINGE FASTENERSPHONO OUTPUT SOCKETPOWER SUPPLY SOCKET Pro-Ject Audio Systems · Pro-Ject Ortofon Century · Revision 2019.01.213
Turntable (13)(14)(15)(16)(17)(18)4Instruction for useCartridge alignment protractorWhite cotton glovesAnti-skating weight supportAnti-skating sliding mechanismAllen key 1.5mmAllen key 2mmAllen key 3mmCounterweight no. 180 for cartridges with weight between 3 - 9g (without headshell)Single adaptorHook toolStylus Pressure GaugeConnect IT RCA – CC 1,23mClothPower supply3x FeetRound drive belt for 78 r.p.m.Pro-Ject Leather IT Pro-Ject Audio Systems · Pro-Ject Ortofon Century · Revision 2019.01.21
CONTENTSTURNTABLE OVERVIEW2-3ACCESSORIES OVERVIEW4SETUP AND INSTALLATION1. FEET ASSEMBLY72. TRANSPORT SCREWS73. MOUNTING AND CONNECTING THE CARTRIDGE84. CARTRIDGE DOWNFORCE ADJUSTMENT8-95. ANTI-SKATING FORCE ADJUSTMENT96. ANTI-SKATING ADJUSTMENT10-117. CONNECTION TO THE AMPLIFIER118. MAINS POWER CONNECTION11-129. FITTING THE LID1210. SWITCHING ON AND OFF1211. CHANGING REPLAY SPEED1212. ADJUSTING THE VERTICAL TRACKING ANGLE (VTA)1213. ADJUSTING THE AZIMUTH1314. USEFUL TIPS1315. MAINTENANCE AND CLEANING13TECHNICAL SPECIFICATIONS14WARRANTY, SERVICE15PACKAGING16 Pro-Ject Audio Systems · Pro-Ject Ortofon Century · Revision 2019.01.215
Dear music lover,Thank you for purchasing a Pro-Ject Audio Systems record player.In order to achieve maximum performance and reliability, please study these instructions carefully.Warning of a hazard for the user, the unit or possible misuseImportant noticeThe following instructions for adjusting the cartridge are provided in case the cartridge is replaced by a differentmodel at a later date.During assembling and adjustment small parts could be lost if they are not carefully placed in a suitablereceptacle. Before starting assembly make yourself acquainted with the parts listed above which arecorrespondingly numbered in the technical drawings above. Separately packed items are marked with anasterisk *.Safety instructionsThe power supply is used to connect and disconnect the unit from the mains. Make sure that the plugis easily accessible at all times. Hold the plug when unplugging the power cord. Never handle thepower cord while your hands are wet or damp.Avoid letting liquids enter the device. Never place any item containing liquid, like a flower vase, on ornear the device. Never spill any liquid on the device. Never place any naked flame sources, like lightedcandles, on or near the device. The product shall not be used in damp or wet locations, next to abathtub, sink, swimming pool or any other similar conditions.Keep plastic bags away from children to prevent any risk of suffocation.The turntable was shipped partially disassembled in order to avoid damage to sensitive parts.Please check immediately to make sure that neither the packaging nor the device was damaged intransit.6 Pro-Ject Audio Systems · Pro-Ject Ortofon Century · Revision 2019.01.21
SETUP AND INSTALLATION1.FEET ASSEMBLYRemove the three feet (15 –accessories list) from the grey foam insert. Carefully turn the turntable and screwthe feet into the thread insert from the bottom of the turntable. Balance the turntable by using a spirit levelbefore next steps.2.TRANSPORT SCREWSRemove the three transport screws (8) from the upper part of the chassis before installing the sub-platter (7),the drive belt (6), the platter (1) and record clamp (3). Pro-Ject Audio Systems · Pro-Ject Ortofon Century · Revision 2019.01.217
3.MOUNTING AND CONNECTING THE CARTRIDGEInformations below are valid only with using SME type headshell. Turntable has mountedintergated cartridge and headshell without the need for screws or the plugging in of wires.All cartridges with half inch mounting holes can be mounted. Leave the needle's protection cover on, fit thecartridge to the headshell by using the supplied screws by passing one screw through each slot in the headshell(13). Do not tighten the nuts yet.Connect the tonearm wires with the cartridge pins as follows:whiteleft channel positive (L )redright channel positive (R )greenright channel return (R-)blueleft channel return (L-)The full sound quality of the record player can only be achieved if the cartridge is adjusted correctly. Particulartools like the Pro-Ject Audio Systems alignment tool are required to accomplish this job properly. If you are not wellacquainted with the adjustment of cartridges, please call for the willing help of your Pro-Ject Audio Systemsdealer.Please note: adjusting a cartridge and tonearm calls for the greatest care in order to avoid damagingthe cartridge or tonearm bearings. Ask your local dealer for help if you are unsure in any of thenecessary steps and precautions which must be taken.4.CARTRIDGE DOWNFORCE ADJUSTMENTThe counterweight (9) supplied is suitable for cartridges weighing between 3 - 9g and for between 15 – 22gfor compelte systems like The Concorde cartridge (counterweight no. 180). Adjust the downforce prior tosetting the anti-skating force.Place counterweight (9) halfway along the counterweight support rod at rear of arm, being sure to have thesecuring screw uppermost.With the power off, and the platter static, place the stylus pressure gauge onto the platter. To set therecommended 18mN downforce (1mN 0,1g / 0,1 Pond), place the tip of the stylus exactly in-between thetwo points marked 15mN and 20mN.8 Pro-Ject Audio Systems · Pro-Ject Ortofon Century · Revision 2019.01.21
If the stylus gauge becomes level, then the correct pressure has been achieved. However if the there isinsufficient or excessive pressure the gauge will either not move or tilt down.To adjust the amount of pressure, carefully move the counterweight (9) along the support rod, until the styluspressure is sufficient to raise the pressure gauge to the level position. Moving the counterweight (9) away fromthe cartridge will reduce pressure and towards will increase pressure.Please note: It is advised to remove stylus tip from gauge whilst making adjustments to avoid damageto stylus.5.ANTI-SKATING FORCE ADJUSTMENTAdjust the anti-skating force by positioning the weight on the appropriate groove of the anti-skatingsliding mechanism. Anti-skating downforce should be adjusted in correspondence with the tonearmdownforce as follows:Tonearm downforce:Lower than 13 mN or 1.3 grams14–18 mN or 1.4–1.8 grams19–25 mN or 1.9–2.5 gramsAnti-skating groove:1st groove from bearing2nd groove from bearing3rd groove from bearing Pro-Ject Audio Systems · Pro-Ject Ortofon Century · Revision 2019.01.219
6.ANTI-SKATING ADJUSTMENTThe anti-skating mechanism is shipped partially disassembled to avoid damage during transport. For correctinstallation, please follow the steps below.Step 1:Prepare anti-skating sliding mechanism and anti-skating mechanism support from the accessories bag.The anti-skating sliding mechanism is supplied with a pre-mounted anti-skating weight and thread formounting on the tonearm.Step 2:Mount the anti-skating mechanism support as shown on the picture below and tighten the securing screw.Put the anti-skating mechanism on the end of the anti-skating support rod.Be careful when handing the anti-skating thread in order to avoid damaging it.Step 3:Put the eye of the anti-skating thread around the hole for the HOOK SCREW and screw the HOOK SCREWinto the tonearm through the eye of the anti-skating thread as shown in the illustration below.The anti-skating thread should fit into the groove in the tonearm.10 Pro-Ject Audio Systems · Pro-Ject Ortofon Century · Revision 2019.01.21
7.CONNECTION TO THE AMPLIFIERThe record player has gold plated female RCA phono sockets (20) so you can substitute the interconnect cablessupplied with higher quality cables such as the Pro-Ject Connect IT Si interconnect cables for connection to theamplifier if you wish. Use the Phono input (sometimes labelled gram, disc or RIAA) on your amplifier. Makesure that the phono input offers correct matching and amplification for the type of cartridge used. Line inputs(like CD, Tuner, Tape or Video) are not suitable.Take care about connecting the left and right channel correctly. The RIGHT CHANNEL is usually marked RED,the LEFT CHANNEL BLACK or WHITE. Check the manual of your amplifier for relevant information. An earthingwire may be connected to the screw terminal between the sockets if you encounter humming problems.If your amplifier does not have an input suitable for phono cartridges, a separate phono amplifier stage forMM or MC cartridges is required. It has to be connected between record player and a free line level input ofthe amplifier.For detailed product information regarding Pro-Ject Audio Systems interconnect cables and phono amplifiersplease visit our website: www.project-audio.com8.MAINS POWER CONNECTIONThe turntable is supplied with a power supply suitable for your country's mains supply. Check the label beforeconnecting to ensure compliance with the mains rating in your house.Connect the low voltage plug from the power supply to the socket (21) on the rear of the recordplayer before connecting the power supply to the mains. Pro-Ject Audio Systems · Pro-Ject Ortofon Century · Revision 2019.01.2111
9.FITTING THE LIDFit the lid (dust cover 17) carefully over the hinge prongs and adjust the screws (19) until the lid stays openwhere you want it to without being too stiff to open or close.10.SWITCHING ON AND OFFPress the speed control button (4) to start the turntable.11.CHANGING REPLAY SPEEDTo play records at 33 r.p.m. press the speed control button (4) to starts the motor. Pressing the speed controlbutton two times selects 45 r.p.m. The selected speed is shown respectively by the flashing LED. When the platterhas attained full speed, the LEDs stop flashing.To be able to play 78 r.p.m. the flat drive belt has to be removed and the round drive belt has to be fittedaround the sub-platter (7) and the larger diameter part of the motor pulley (5). To do so the platter (1) has tobe removed.After the round drive belt has been fitted, pressing the speed control button two times selects 78 r.p.m. Whenfull speed is attained the LED 45 stops flashing.A long (more than three seconds) press on the speed control button stops the motor.12.ADJUSTING THE VERTICAL TRACKING ANGLE (VTA)Put a record on the platter. When the needle is lowered into the record groove and the tonearm is not resting onthe lift arm, the tube of the tonearm should be parallel to the surface of the record.If it is not, loosen both hexagon screws in the tonearm base just enough to allow vertical movement of the armpillar without force and slide the arm up or down until it is parallel.Retighten the hexagon screws without applying excessive force (which would deform the arm pillar) – finger tightis quite sufficient.12 Pro-Ject Audio Systems · Pro-Ject Ortofon Century · Revision 2019.01.21
13.ADJUSTING THE AZIMUTHThe cartridge needle must be vertical in the record groove in order to trace the groove wall modulationscorrectly.A small screw at the bearing end of the arm allows incorrect azimuth to be corrected.Slacken off the screw just enough to be able to revolve the arm tube without applying force. Note! Do notremove this screw completely!14.USEFUL TIPSThe lid is not only a dust cover but also a resonant structure likely to be excited by and to pass into the plinth theacoustic energy emanating from your loudspeakers during replay. Therefore it is recommended to remove thelid for achieving a better sound quality. The record player should be positioned on a low-resonance surface,like wood or multiple layer ply board to avoid structural vibrations disturbing replay.15.MAINTENANCE AND CLEANINGYour record player requires little or no regular maintenance. Remove dust with a slightly moistened antistaticcloth. Never use a dry cloth because this will create static electricity which attracts even more dust! Antistaticcleaning fluids are available at specialized stores but must be applied sparingly to avoid damage to rubberparts. It is recommended to fit the needle cover before cleaning or maintenance to avoid damage.If the player is not used over a long period of time, the drive belt should be removed to prevent unequalstretching.Always disconnect the record player from the mains power supply as a precaution before maintenance! Pro-Ject Audio Systems · Pro-Ject Ortofon Century · Revision 2019.01.2113
TECHNICAL SPECIFICATIONSOrtofon CenturyPro-Ject 9’’ S-ShapeNominal speedsSpeed varianceWow and flutterSignal to noiseEffective tonearm massEffective tonearm lengthOverhangPower consumptionOutboard power supplyDimensions (W x H x D)Weight33/45 r.p.m. (electronic) 78 r.p.m. (manual)33: 0.13 % 45: 0.10 %33: 0.10 % 45: 0.09 %70dB13.5g9 " (230mm)18mm5W/ 0.5W standby mode15V/ 1.6 A DC, universal power supply462 x 131 x 351mm, dust cover open 462 x 423 x 390mm10.5 kgTechnical specifications The Concorde CenturyFrequency rangeChannel separationOutput voltageRecommended load impedanceCompliance/stylus typeRecommended tracking forceWeight1420-29.000Hz26dB/1kHz5.5mV/1000 Hz47 kOhm/amplifier connection – MM-input16µm /mN – elliptical18mN18.5g Pro-Ject Audio Systems · Pro-Ject Ortofon Century · Revision 2019.01.21
Potential incorrect use and fault condi
Turntable accessories (1) Instruction for use (2) Cartridge alignment protractor (3) White cotton gloves (4) Anti-skating weight support (5) Anti-skating sliding mechanism (6) Allen key 1.5mm (7) Allen key 2mm (8) Allen key 3mm (9) Counterweight no. 180 for cartridges with weight between 3 - 9g (without headshell)