Transcription
Smart Business ArchitectureBorderless Networks for Enterprise OrganizationsRSA Security Information andEvent Management (SIEM)Deployment GuideRevision: H1CY10
RSA SIEM Deployment GuideTable Of ContentsCisco Smart Business Architecture Borderless Networks for Enterprise. 5Business Benefits. . 5Enhanced Security and Risk ManagementSimplifying ComplianceOptimizing IT and Network Operations.RSA enVision Product Overview. . 6Deploying RSA enVision. . 7Cisco Adaptive Security Appliance Configuration InstructionsCisco Secure IDS/IPS Configuration InstructionsCisco IronPort Email Security Appliance Configuration InstructionsCisco IronPort Web Security Appliance Configuration InstructionsCisco MARS Configuration InstructionsConfigure Cisco MARS for File Reader Serice to Collect Raw Message LogsALL DESIGNS, SPECIFICATIONS, STATEMENTS, INFORMATION, AND RECOMMENDATIONS (COLLECTIVELY, "DESIGNS") IN THIS MANUAL ARE PRESENTED "AS IS," WITH ALL FAULTS. CISCO AND ITS SUPPLIERS DISCLAIM ALL WARRANTIES, INCLUDING, WITHOUT LIMITATION, THE WARRANTY OF MERCHANTABILITY, FITNESS FOR A PARTICULAR PURPOSE AND NONINFRINGEMENT OR ARISING FROM ACOURSE OF DEALING, USAGE, OR TRADE PRACTICE. IN NO EVENT SHALL CISCO OR ITS SUPPLIERS BE LIABLE FOR ANY INDIRECT, SPECIAL, CONSEQUENTIAL, OR INCIDENTAL DAMAGES, INCLUDING,WITHOUT LIMITATION, LOST PROFITS OR LOSS OR DAMAGE TO DATA ARISING OUT OF THE USE OR INABILITY TO USE THE DESIGNS, EVEN IF CISCO OR ITS SUPPLIERS HAVE BEEN ADVISED OF THE POSSIBILITY OF SUCH DAMAGES. THE DESIGNS ARE SUBJECT TO CHANGE WITHOUT NOTICE. USERS ARE SOLELY RESPONSIBLE FOR THEIR APPLICATION OF THE DESIGNS. THE DESIGNS DO NOT CONSTITUTE THE TECHNICAL OR OTHER PROFESSIONAL ADVICE OF CISCO, ITS SUPPLIERS OR PARTNERS. USERS SHOULD CONSULT THEIR OWN TECHNICAL ADVISORS BEFORE IMPLEMENTING THE DESIGNS.RESULTS MAY VARY DEPENDING ON FACTORS NOT TESTED BY CISCO. CCDE, CCENT, Cisco Eos, Cisco HealthPresence, the Cisco logo, Cisco Lumin, Cisco Nexus, Cisco StadiumVision, Cisco TelePresence,Cisco WebEx, DCE, and Welcome to the Human Network are trademarks; Changing the Way We Work, Live, Play, and Learn and Cisco Store are service marks; and Access Registrar, Aironet, AsyncOS, Bringingthe Meeting To You, Catalyst, CCDA, CCDP, CCIE, CCIP, CCNA, CCNP, CCSP, CCVP, Cisco, the Cisco Certified Internetwork Expert logo, Cisco IOS, Cisco Press, Cisco Systems, Cisco Systems Capital, the CiscoSystems logo, Cisco Unity, Collaboration Without Limitation, EtherFast, EtherSwitch, Event Center, Fast Step, Follow Me Browsing, FormShare, GigaDrive, HomeLink, Internet Quotient, IOS, iPhone, iQuick Study,IronPort, the IronPort logo, LightStream, Linksys, MediaTone, MeetingPlace, MeetingPlace Chime Sound, MGX, Networkers, Networking Academy, Network Registrar, PCNow, PIX, PowerPanels, ProConnect, ScriptShare, SenderBase, SMARTnet, Spectrum Expert, StackWise, The Fastest Way to Increase Your Internet Quotient, TransPath, WebEx, and the WebEx logo are registered trademarks of Cisco Systems, Inc. and/or its affiliates in the United States and certain other countries. All other trademarks mentioned in this document or website are the property of their respective owners. The use of the word partner does not implya partnership relationship between Cisco and any other company. (0812R) Any Internet Protocol (IP) addresses used in this document are not intended to be actual addresses. Any examples, command displayoutput, and figures included in the document are shown for illustrative purposes only. Any use of actual IP addresses in illustrative content is unintentional and coincidental. Cisco Unified Communications SRND(Based on Cisco Unified Communications Manager 7.x) 2010 Cisco Systems, Inc. All rights reserved.Smart Business Architecture2
RSA SIEM Deployment GuideThis document is for the reader who: Has read the Cisco Security Information and Event Management and Borderless NetworksEnterprise Deployment Guide Wants to connect Borderless Networks to an RSA SIEM solution Wants to gain a general understanding of the RSA SIEM solution Has a level of understanding equivalent to a CCNA certification Wants to solve compliance and regulatory reporting problems Wants to enhanced network security and operations Wants to improve IT operational efficiency Wants the assurance of a validated solutionSmart Business Architecture3
RSA SIEM Deployment GuideCisco Smart Business ArchitectureBorderless Networks for EnterpriseThe Cisco Smart Business Architecture for Enterprise offers partners andcustomers valuable network design and deployment best practices; helpingorganizations deliver superior end-user experiences that include switching,routing, security, and wireless technologies combined with the comprehensivemanagement capabilities for the entire system. Customers can use the guidanceprovided in the architecture and deployment guides to maximize their Cisconetwork’s value in a simple, fast, affordable, scalable, and flexible manner.The modular design of the architecture means that technologies can be addedwhen the organization is ready to deploy them. It also provides configurationsand topologies tested by Cisco that CCNA -level engineers can use for designand installation, and to support organizational needs.Cisco offers a number of options to provide Security Management capabilities.This guide is focused on our partnership with RSA and their products that meetCisco’s goal to deliver affordable, easy-to-use security information and an eventmanagement (SIEM) solution.Figure 1. RSA enVisionSmart Business Architecture4
RSA SIEM Deployment GuideBusiness BenefitsRSA enVision Product OverviewThe RSA enVision platform collects event logs generated by Cisco’s Networkand Security Infrastructure, permanently archives copies of the data, processesthe Cisco logs in real-time, and generates alerts when it observes suspiciouspatterns of behavior. Security and IT administrators can interrogate the full volumeof stored data through an intuitive dashboard, and advanced analytical softwareturns the complex, unstructured mass of raw data into structured information, givingadministrators actionable insights to help them in three main areas:RSA enVision is a feature-rich compliance and security application. It allowsyou to capture and analyze log information automatically from your network,security, application, operating, and storage environments. The enVisionLogSmart Internet Protocol Database (IPDB) provides the architecture to collectand protect all the data automatically, from any network device, without filteringor agents. It gives you an accurate picture of how your network is being used,and by whom. It independently monitors your network to verify security policies,to generate alerts for possible compliance breaches, and to analyze and reporton network performance.Enhancing Security and Risk MitigationWith real-time security event alerts, monitoring, and drill-down forensic functionality, the platform gives administrators a clear view of important information.Because they can see and understand the threats and risks, they can take moreeffective actions to mitigate those risks.enVision is tightly coupled with its underlying appliance operating system andhardware, and together they comprise a highly scalable platform that providesguaranteed levels of performance.Simplifying ComplianceAdministrators can automatically collect log data about the Cisco network andsecurity infrastructure, file, application, and user activity that can significantlyhelp simplify the compliance process. Over 1100 included reports are tailoredto today’s specific compliance requirements. The solution simplifies compliancewith whatever legislation emerges in years to come, because it stores all logdata without filtration or normalization and protects it from tampering, providinga verifiably authentic source of archived data.Optimizing IT and Network OperationsManaged log data is the best source of information about infrastructure performance and user behavior. IT support staff can utilize the RSA enVision platformto track and manage activity logs for servers, networking equipment, and storageplatforms, as well as monitor network assets, the availability and status of people,hardware, and business applications. It provides an intelligent forensic tool fortroubleshooting infrastructure problems and protecting infrastructure resources,and it assists IT managers in help desk operations and provides granular visibilityinto specific behaviors by end users.Smart Business Architecture5
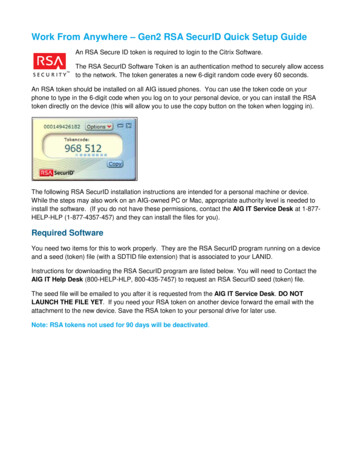
RSA SIEM Deployment GuideDeploying RSA enVisionRSA enVision is made up of three components: Application: supports interactive users and runs the suite of analysis tools.Step 1: Setting Up RSA enVision Collector: captures incoming events.The configuration process takes approximately 30 minutes to complete. Youcannot change any of the site configuration options after the wizard is finished.The configuration tasks for a single-appliance site are as follows: Database: manages access and retrieval of captured events.The enVision ES series appliances are designed to operate in a standalone,nondistributed mode. They have all three enVision components—Application,Collector, and Database—installed on one appliance. The single appliance is asite. Some single-appliance sites have an external storage system.A range of appliances are available; all are based on the same hardware withlicensing to suit specific requirements. To choose the most appropriate, look atthe number of network devices to be monitored and the number of events persecond to processES 560ES1060 ES1260 ES2560 ES3060 ES5060 ES7560No. 02500300050007500TaskActivity1Plan the installation according to the enVision Configuration WizardPlanning Worksheet—Single Appliance Site.2Set up the RSA enVision appliance hardware.3Connect to the appliance using a KVM switch. (You can also connect remotelyusing DRAC instead of using a local KVM. See Appendix B “Dell RemoteAccess Controller Utility.”) The Configuration Wizard starts automatically.4Complete the enVision Configuration Wizard.NOTE: enVision uses the default IP address 192.168.1.55. IP addressconflicts can occur if the LAN cable is connected to an existing networkwhen you run the configuration wizard. For this reason, you should verifythe LAN cable is not connected to an existing network or confirm the IPaddress is not being used before you run the configuration wizard.If you click Cancel at any time while using the wizard, you must restartthe wizard to configure your site. To restart the wizard, double-click thelsconfigurationwizard.exe file in the c:\windows\installations directory.RSA enVision supports IronPort ESA, IronPort WSA, IPS, ASA, CS-Mars, CiscoISR, ASR, Cisco ACS, Aironet AP, Catalyst Switches running Catos, NetworkCompliance Manager, Content Engine, Content Services Switch, Mobility ServicesEngine, Security Agent, Security Manager, Unified Computing System Manager,VPN Concentrator, and Wireless LAN Controller.When the wizard displays the Review Page window, verify that everything is correct on the Review Page. Click Finish. (If the Review page isnot correct, click Cancel and check your hardware setup.)In the last step, the wizard displays the enVision Configuration Wizard Logwindow. The log displays the steps the system is performing to configure thesite. The system restarts several times while completing the setup.The appliances restart automatically when the site configuration processis complete.5Immediately after you configure RSA enVision 4.0, RSA strongly recommends that you download and install two Content Updates: Event SourceUpdate Package and VAM & Signature Content Update Package.Go to RSA SecurCareOnline https://knowledge.rsasecurity.com. Click onProducts. Under RSA enVision click Content Updates. Complete theinstructions available on that page to download and install the updates.6Smart Business ArchitectureApply the license keys that were sent via email to the contact providedwhen you ordered the enVision appliance.6
RSA SIEM Deployment GuideStep 2: Adding Cisco devices in RSA enVision to receive logsRSA enVision collects, analyzes, and stores logs from event sources throughoutan organization’s IT environment. The logs and the descriptive metadata thatenVision adds are stored in the LogSmart Internet Protocol Database (IPDB).Event sources are the IP assets on the network, such as servers, switches, routers,storage arrays, operating systems, and firewalls.The enVision administrator configures event sources to send their logs to theCollector or configures the Collector to poll event sources and retrieve their logs.As a result, the Collector receives all system logs in their original form, withoutfiltering, normalization, or compression.Cisco Adaptive Security Appliance Configuration InstructionsCisco ASA generates ASA syslog events. It also generates IDS events by CiscoASA Security Services Module.To configure Cisco ASA to generate syslog events:To configure enVision to enable SDEE for ASA IPS AIP-SSM Events:1. Log in to enVision.2. Depending on your enVision version, do one of the following:– If you are using an enVision version prior to 4.0, Click Overview SystemConfiguration Services Device Services Manage Secure IDS(XML) Service– If you are using enVision version 4.0 or newer, Click Overview SystemConfiguration Services Device Services Manage SDEE ServiceenVision displays the Manage Secure IDS (XML) Service or Manage SecureSDEE Service window.3. Perform one of the following actions:– Click Add to add an IDS server.– Click the IP Address of the server to modify an IDS server.The system displays the Add/Modify Secure IDS (XML) Server window.1. Connect to the ASA box via telnet or SSH.2. Enter the enable mode by typing the following command:enable3. Enter the configure mode by typing the following command:config terminal4. Type the following lines:no logging timestamplogging trap debugginglogging host inside 10.4.200.115(where 10.4.200.115 is enVision’s IP address)5. Press Ctrl Z to exit config mode.6. Type the following command to save the configuration changes:copy running-config startup-configSmart Business Architecture7
RSA SIEM Deployment Guide4. Complete the window as follows:FieldValueIP addressHost-ip value of the of the Cisco ASA SSM.UsernameUser account on the Cisco ASA SSM with administrativeprivileges.PasswordPassword to the user account with administrativeprivileges.Verify PasswordPassword to the user account with administrativeprivileges.5. Click Apply.The system saves the information and displays the Manage Secure IDS(XML) Service window.6. Click Start Service (or Restart Service).2. You must apply access-list to the sensor to allow enVision access to the sensor.Complete the following task on the Cisco Secure IDS/IPS event source.a. Access the Cisco IDS/IPS console and log on using administrativecredentials.b. Type the following commands:configure terminalservice hostnetwork-settingsc. Configure the access-list to allow enVision host or the network that hostsenVision to access the sensor. Here are some examples:access-list 10.4.200.0/24 (to allow a network)access-list 10.4.200.66 (to allow a host)d. Exit the configuration mode, confirming to save changes when prompted.3. Set up the NIC SDEE Service (prior to enVision 4.0 known as Secure IDS/IPSXML Service) in enVision. See the enVision online Help for instructions onhow to set up this service.7. Click Apply.Cisco Secure IDS/IPS Configuration InstructionsNOTE: Cisco IDS/IPS version 7.0 is supported in the latest enVision 4.0 only.To set up Cisco Secure IDS/IPS to work with enVision:1. (SKIP this step if you are using enVision version 4.0 or newer.) Starting in version 6.1, RDEP is disabled by default (it was replaced with SDEE starting inIDS/IPS 5.0/IPS 5.1). You must enable the RDEP event server on the sensorto allow enVision event collection. Complete the following task on the CiscoSecure IDS/IPS event source.a. Access the Cisco IDS/IPS console and log on using administrativecredentials.b. Type the following commands:configure terminalservice web-serverconfigurable-service rdep-event-serverenabled truec. Exit the configuration mode, confirming to save changes when prompted.Smart Business ArchitectureNOTE: enVision uses the TCP port 443 (open outbound) to obtain informationfrom this device.8
RSA SIEM Deployment GuideCisco IronPort Email Security Appliance Configuration InstructionsYou must complete these tasks to configure Cisco IronPort Email SecurityAppliance:I. Configure Cisco IronPort ESAII. Configure RSA enVision3. To edit the settings of the IronPort Text Mail Logs subscription, follow thesesteps:a. From the top menu, click System Administration Log Subscriptions.b. In the Log Subscriptions window, click mail logs to view the IronPort TextMail Logs subscription.Configure Cisco IronPort Email Security Appliancec. In the Retrieval Method section of the Edit Log Subscription window,select SCP on Remote Server.To configure Cisco IronPort ESA:d. Under SCP on Remote Server, complete the fields as described in Step 2.1. Log on to the IronPort web interface.2. To edit the settings of the Authentication Logs subscription, follow thesesteps:a. From the top menu, click System Administration Log Subscriptions.b. In the Log Subscriptions window, click authentication to view theAuthentication Logs subscription.c. In the Retrieval Method section of the Edit Log Subscription window,select SCP on Remote Server.d. Under SCP on Remote Server, complete the fields as follows.e. Click Submit.NOTE: The same SSH key as in Step 2 is generated. You can ignore thisSSH key.4. To edit the settings of the CLI Audit Logs subscription, follow these steps:a. From the top menu, click System Administration Log Subscription.b. In the Log Subscriptions window, click cli logs to view the CLI Audit Logssubscription.c. In the Retrieval Method section of the Edit Log Subscription window,select SCP on Remote Server.FieldActiond. Under SCP on Remote Server, complete the fields as described in Step 2.Maximum TimeInterval BetweenTransferringType 180.e. Click Submit.ProtocolSelect SSH2.5. Click Commit Changes to save all log settings.SCP HostEnter the IP address of your enVision system.DirectoryType CISCO IRONPORT ESA ironport-IPaddress where ironport-IP-address is the IPaddress of Cisco IronPort ESA.6. In the Uncommitted Changes window, click Commit Changes to apply all logsettings.UsernameType nic sshd.NOTE: The same SSH key as in Step 2 is generated. You can ignore thisSSH key.e. Click Submit.An SSH key is generated.f. Copy the generated SSH key to a new text file, and save the text file asid rsa.pub.NOTE: The entire SSH key must be on a single line and cannot include anyspaces. If necessary, remove spaces.Smart Business Architecture9
RSA SIEM Deployment GuideConfigure RSA enVisionCisco IronPort Web Security Appliance (WSA) Configuration InstructionsTo configure enVision to collect Cisco IronPort ESA messages:To configure IronPort WSA, you must complete these tasks:1. In enVision, add the Cisco IronPort ESA event source to the NIC File ReaderService, and start the NIC File Reader Service. For instructions, see the enVision Help topic “Set Up the NIC File Reader Service.”I. Configure IronPort WSAII. Set up the NIC File Reader ServiceIII. Configure enVision to collect IronPort WSA messagesConfigure IronPort WSANOTE: All logs are optional, however, enVision parses only the logs that areconfigured as follows.To configure Cisco IronPort WSA:1. Log on to the IronPort web interface.2. Select System Administration Log Subscriptions.3. To configure Access Logs, complete these tasks:a. Select Access Logs and use the following settings.– Log Style Apache– Custom Fields %k %p %u %XF– Retrieval Method SCP on Remote Server– Max Time Interval 180– Protocol SSH2– SCP Host IP Address of enVision device2. Copy the id rsa.pub file that you saved to the envision\bin folder on yourenVision system.3. On your enVision system, open a command prompt and change directoriesto envision\bin.4. To install the public key on enVision, type:add winsshd key.bat id rsa.pub– Directory CISCO IRONPORT WSA ironport-IP-address, whereironport-IP-address is the actual IP address of the device, for example,CISCO IRONPORT WSA 1.2.3.4– Username nic sshdb. Click Submit.c. Copy the generated SSH Key to a new text file. Save the text file asid rsa.pub.NOTE: The entire key must be on a single line. Also, remove any spacesfrom the key.Smart Business Architecture10
RSA SIEM Deployment Guide4. To configure W3C Logs, complete these tasks:a. Select W3C Logs and use the following settings:6. To configure IDS Data Loss Logs, complete these tasks:a. Select IDS Data Loss Logs and use the following settings:NOTE: The Selected Log Fields must be in this exact order.– Retrieval Method SCP on Remote Server– Selected Log Fields timestamp , x- elapsed-time ,c-ip ,s-ip , s-port,x-resultcode-httpstatus, sc-bytes, cs-method ,cs-url, cs-username,x-hierarchy-origin, cs-mime-type,x-acltag, x-result-code, cs(UserAgent),x-webcat-code-full– Max Time Interval 180– Retrieval Method SCP on Remote Server– Max Time Interval 180– Protocol SSH2– SCP Host IP Address of enVision device– Directory CISCO IRONPORT WSA ironport-IP-address, whereironport-IP-address is the actual IP address of the device, for example,CISCO IRONPORT WSA 1.2.3.4– Username nic sshdb. Click Submit. The generated SSH Key will be identical to the one initiallygenerated.NOTE: IronPort creates the same SSH Key for all log subscriptions. Thekey only needs to be saved the first time.5. To configure CLI Audit Logs, complete these tasks:– Protocol SSH2– SCP Host enVision IP address– Directory CISCO IRONPORT WSA ironport-IP-address– Username nic sshdb. Click Submit.7. Click Commit Changes.8. Click Commit Changes.Set up the NIC File Reader ServiceSet up the NIC File Reader Service for the device. See Set Up File ReaderService topic in the RSA enVision Online Help for complete instructions.To configure enVision to receive IronPort WSA log files:1. Log on to RSA enVision.2. Click Overview System Configuration Services Device Services Manage File Reader Service.a. Select CLI Audit Logs and use the following settings:– Retrieval Method SCP on Remote Server– Max Time Interval 180– Protocol SSH2– SCP Host enVision IP address– Directory CISCO IRONPORT WSA ironport-IP-address– Username nic sshdb. Click Submit.Smart Business Architecture11
RSA SIEM Deployment Guide3. Click Add.4. To complete the Add/Modify File Reader Device window, select IronPortfrom the File reader type drop-down list.5. In the Site/Node: field, note the site/node from which you are collecting.6. Click Apply.7. To have RSA enVision recognize the configuration change:– On a single-appliance site, enVision starts the NIC File Reader Servicerecognizing the configuration change immediately so no action isnecessary.– On a multiple-appliance site, complete the following:a. Wait 3 minutes.b. Go to the Overview System Configuration Services ManageServices window.c. Select Start/Stop Service to stop the NIC Reader Service on the site/node you noted in Step 5.f. Select Start/Stop Service to start the NIC File Reader Service on thesite/node you noted in Step 5.g. Click Apply.h. Click Refresh until the Status column shows the site/node is running.Configure enVision to collect IronPort messages1. In enVision, set up the NIC File Reader service for the device.2. Add the device to the NIC File Reader service.3. Start the NIC File Reader service. See the enVision Help for instructions.4. Copy the id rsa.pub file (from Step 5 above) to the envision\bin folder onyour enVision system.5. Open a command prompt on your enVision system.6. Change to the envision\bin folder and run the following command:add winsshd key.bat id rsa.pubCisco MARS Configuration InstructionsImportant: For Cisco MARS, you can set up one of two collection methods, theoriginally supported Syslog collection and the newly added File Reader Serviceto collect raw message logs. The collection methods function differently. TheSyslog collection method collects Cisco MARS log messages. The File ReaderService collects the logs of the event sources which Cisco MARS is reporting on.To configure Cisco MARS, you must complete these tasks:I. Configure Cisco MARS to send logs to RSA enVision for syslog collectionII. Set up the NIC File Reader ServiceIII. Create a Windows user accountIV. Create an SFTP user accountV. Configure Cisco MARS for File Reader Service to collect raw message logsSet Up the NIC File Reader ServiceSet up the NIC File Reader Service for the event source. For complete instructions,see the RSA enVision Help topic “Set Up File Reader Service.”To configure RSA enVision to receive Cisco MARS log files:d. Click Apply.e. Click Refresh until the Status column shows the site/node is stopped.Smart Business Architecture1. Log on to enVision.2. Click Overview System Configuration Services Device Services Manage File Reader Service.12
RSA SIEM Deployment Guide3. Click Add.Create an SFTP User Account4. Make a note of the value in the Site/Node field. This is the site/node fromwhich you are collecting.To create an SFTP user account:5. Enter the IP address of your Cisco MARS appliance.6. To complete the Add/Modify File Reader Device window, from the Filereader type drop- down list, select CiscoMars Syslog.NOTE: The “Cisco Mars Syslog” file reader type option is available only ifyou have installed the March 2010 Event Source Update.7. Click Apply.On a single appliance site, enVision restarts the NIC File Reader Service,recognizing the configuration change immediately so no action is necessary.8. On a multiple appliance site, to restart the NIC File Reader Service, followthese steps:1. Click Start Administrative Tools WinSSHD Control Panel.2. On the Server tab, click Edit Settings.3. Click Configuration Access Control Windows Accounts.4. Select the nic sshd account and click Copy.5. Change the Windows account name to the user account that you created inActive Directory Users and Computers, and complete the fields as follows:a. Ensure that Password authentication is set to Allowed.b. Ensure that Public key authentication is set to Disabled.c. Ensure that Permit SCP is set to No.d. Ensure that Permit SFTP is set to Yes.a. Wait three minutes.6. Click OK.b. Click Overview System Configuration Services Manage Services.7. Click OK to commit the changes, and close the WinSSHD Settings window.c. Select Start/Stop Service to stop the NIC File Reader Service on the site/node that you noted in Step 4.Configure Cisco MARS for File Reader Service toCollect Raw Message Logsd. Click Apply.NOTE: To configure Cisco MARS for File Reader Service to collect raw messagelogs, you must obtain RSA enVision 4.0 Service Pack 3, bug fix (EBF) ENV-32744.e. Click Refresh until the Status column shows that the site/node is stopped.f. Select Start/Stop Service to start the NIC File Reader Service on the site/node that you noted in Step 4.g. Click Apply.h. Click Refresh until the Status column shows that the site/node is running.To collect raw message logs on Cisco MARS:1. Log on to your Cisco MARS appliance.2. Under the Device Configuration and Discovery Information section, click Admin System Maintenance Data Archiving, and complete the fields as follows.Create a Windows User Accounta. In the Archiving Protocol field, select SFTP.To create a Windows user account:b. In the Remote Host IP field, enter the IP address of your enVision appliance.1. Click Start Administrator Tools Active Directory Users and Computers.2. Right click Users, and select New User.3. In the New Object – User window, complete the fields using ciscomars asthe user log on name.4. Click Next.5. Enter your password for the account and click Next.c. In the Remote Path field, type /CiscoMars Syslog IP address of CiscoMARSd. In the Remote Storage Capacity in Days field, leave the default as 10 days.e. In the Username field, enter the user name that you created for the SFTPaccount on enVision.f. In the Password field, enter the password that you created for the SFTPaccount on enVision.NOTE: Make a note of this password as you will need this password again at alater step.Smart Business Architecture13
RSA SIEM Deployment Guide3. Click Apply.4. Click Activate.NOTE: The Activate button remains red until it is clicked.5. Click Close to close the Activating Changes window.Step 3: Reporting on RSA EnvisionRSA enVision provides 100 standard reports that gather common networksecurity and traffic analysis statistics into tables and graphs. Administrators cancopy and modify these reports or create custom reports to meet specific reporting needs. Administrators and users with the appropriate permissions can create,manage, and run both scheduled and unscheduled reports. Optionally, a reportcan run once on a specified day or run repeatedly at specified times. RSA enVision can email generated reports to departments and people who need themsuch as IT, human resources, the CIO office, compliance officers, and managers.RSA enVision provides reports for security, host, network, storage, and otherdevices. RSA enVision also provides a number of report packages to satisfycompliance needs such as Sarbanes-Oxley Act (SOX) and Health InsurancePortability and Accountability Act (HIPAA).An enVision report consists of a single
5 Immediately after you configure RSA enVision 4.0, RSA strongly recom- mends that you download and install two Content Updates: Event Source Update Package and VAM & Signature Content Update Package. Go to RSA SecurCareOnline https://knowledge.rsasecurity.com. Click on Products. Under RSA enVision click Content Updates. Complete the