Transcription
T7Rider--ScrubberOperator ManualThe Safe Scrubbing AlternativeRHygenicR Fully Cleanable TanksNorth America / International331040Rev. 04 (02-2009)*331040*www.tennantco.comHomeFind. Go To.
This manual is furnished with each new model. It provides necessary operation and maintenance instructions.Read this manual completely and understand the machine before operating or servicing it.This machine will provide excellent service. However, the best results will be obtained at minimum costs if:S The machine is operated with reasonable care.S The machine is maintained regularly - per the machine maintenance instructions provided.S The machine is maintained with manufacturer supplied or equivalent parts.PROTECT THE ENVIRONMENTPlease dispose of packaging materials,old machine components such asbatteries, hazardous fluids such asantifreeze and oil, in an environmentallysafe way according to local wastedisposal regulations.Always remember to recycle.MACHINE DATAPlease fill out at time of installation for future reference.Model No. -Serial No. -Machine Options -Sales Rep. -Sales Rep. phone no. -Customer Number -Installation Date --Tennant CompanyPO Box 1452Minneapolis, MN 55440Phone: (800) 553--8033 or (763) 513--2850www.tennantco.comFaST--PAK is a US registered and unregistered trademark of Tennant Company.Specifications and parts are subject to change without notice.Copyright E 2004--2009 TENNANT Company, Printed in U.S.A.HomeFind. Go To.
CONTENTSCONTENTSPageSAFETY PRECAUTIONS . . . . . . . . . . . . . . . . . 2OPERATION . . . . . . . . . . . . . . . . . . . . . . . . . . . . 4MACHINE COMPONENTS . . . . . . . . . . . . . 4CONTROLS AND INSTRUMENTS . . . . . . 5HOW THE MACHINE WORKS . . . . . . . . . . 6CONVENTIONAL SCRUBBING . . . . . . 6FOAM SCRUBBING SYSTEM(FaST Model) . . . . . . . . . . . . . . . . . . . 6ec--H2O SCRUBBING (ec--H2O Model) 7BRUSH INFORMATION . . . . . . . . . . . . . . . . 7MACHINE SETUP . . . . . . . . . . . . . . . . . . . . . 8ATTACHING SQUEEGEE ASSEMBLY8INSTALLING BRUSHES/PADS . . . . . . . 8INSTALLING THE FaST--PAK(FaST Model) . . . . . . . . . . . . . . . . . . . 8FILLING THE SOLUTION TANK . . . . . . 9MACHINE OPERATION . . . . . . . . . . . . . . . . 9PRE--OPERATION CHECKLIST . . . . . . 9BEFORE OPERATING . . . . . . . . . . . . . . 9SETTING SCRUB MODES . . . . . . . . . . 10SETTING FaST BUTTON . . . . . . . . 10SETTING ec--H2O BUTTON . . . . . . 10SETTING BRUSH PRESSURE . . . . 10SETTING SOLUTION FLOW(CONVENTIONAL SCRUBBINGONLY) . . . . . . . . . . . . . . . . . . . . . . . . . 10ECONOMY SETTING . . . . . . . . . . . . 11SCRUBBING . . . . . . . . . . . . . . . . . . . . . . 11DOUBLE SCRUBBING . . . . . . . . . . . . . . 13WATER PICKUP MODE(NO SCRUBBING) . . . . . . . . . . . . . . . 14WHILE OPERATING THE MACHINE . 14EMERGENCY STOP BUTTON . . . . . . . 15HOUR METER . . . . . . . . . . . . . . . . . . . . . 15ec--H2O SYSTEM INDICATOR LIGHT 15SOLUTION TANK EMPTY INDICATOR 15RECOVERY TANK FULL INDICATOR . 15BATTERY DISCHARGE INDICATOR . 16FAULT INDICATOR . . . . . . . . . . . . . . . . . 17CIRCUIT BREAKERS . . . . . . . . . . . . . . . 18FUSES . . . . . . . . . . . . . . . . . . . . . . . . . . . . . 18HAZARD LIGHT SWITCH (OPTION) . . 18DRAINING AND CLEANING THE TANKS 19PROPEL SYSTEM TROUBLESHOOTING 21MACHINE TROUBLESHOOTING . . . . . . . 22MAINTENANCE . . . . . . . . . . . . . . . . . . . . . . . . . 24MAINTENANCE CHART . . . . . . . . . . . . . . . 25BATTERIES . . . . . . . . . . . . . . . . . . . . . . . . . . 26GEL BATTERIES . . . . . . . . . . . . . . . . . . . 26LEAD ACID BATTERIES . . . . . . . . . . . . 26CHARGING THE BATTERIES WITHOFF--BOARD CHARGER . . . . . . . . . 27CHECKING ON--BOARD BATTERYCHARGER SETTINGS . . . . . . . . . . . 28CHARGING THE BATTERIES WITH THEON--BOARD CHARGER . . . . . . . . . . 29PageON--BOARD BATTERY CHARGERERROR CODES . . . . . . . . . . . . . . . . . 29ELECTRIC MOTORS . . . . . . . . . . . . . . . . . . 30BELTS (Cylindrical Models) . . . . . . . . . . . . . 30SCRUB BRUSHES AND PADS . . . . . . . . . 31DISK BRUSHES . . . . . . . . . . . . . . . . . . . 31REPLACING DISK BRUSHES OR PADDRIVER . . . . . . . . . . . . . . . . . . . . . . . . . 31REPLACING DISK PADS . . . . . . . . . . . . 32CYLINDRICAL BRUSHES . . . . . . . . . . . . . . 33REPLACING OR ROTATINGCYLINDRICAL BRUSHES . . . . . . . . 33CHECKING CYLINDRICAL BRUSHPATTERN . . . . . . . . . . . . . . . . . . . . . . 34ADJUSTING CYLINDRICAL BRUSHTAPER . . . . . . . . . . . . . . . . . . . . . . . . . 35ADJUSTING CYLINDRICAL BRUSHWIDTH . . . . . . . . . . . . . . . . . . . . . . . . . 36FaST SYSTEM MAINTENANCE(FaST Model) . . . . . . . . . . . . . . . . . . . . . . 36FaST SUPPLY HOSE CONNECTOR . 37ec--H2O SYSTEM (ec--H2O Model) . . . . . . 37ec--H2O MODULE FLUSHPROCEDURE . . . . . . . . . . . . . . . . . . . 37SQUEEGEE BLADES . . . . . . . . . . . . . . . . . 38REPLACING (OR ROTATING) THE REARSQUEEGEE BLADES . . . . . . . . . . . . 38REPLACING SIDE SQUEEGEEBLADES . . . . . . . . . . . . . . . . . . . . . . . . 40ADJUSTING THE SQUEEGEE GUIDEROLLER . . . . . . . . . . . . . . . . . . . . . . . 40LEVELING THE REAR SQUEEGEE . . 40ADJUSTING REAR SQUEEGEE BLADEDEFLECTION . . . . . . . . . . . . . . . . . . . 41SKIRTS AND SEALS . . . . . . . . . . . . . . . . . . 42DISK SCRUB HEAD FLOOR SKIRT . . 42RECOVERY TANK SEAL . . . . . . . . . . . . 42SOLUTION TANK SEALS . . . . . . . . . . . 42TIRES . . . . . . . . . . . . . . . . . . . . . . . . . . . . . . . 42PUSHING, TOWING, AND TRANSPORTINGTHE MACHINE . . . . . . . . . . . . . . . . . . . . . 43PUSHING OR TOWING THE MACHINE 43TRANSPORTING THE MACHINE . . . . 43MACHINE JACKING . . . . . . . . . . . . . . . . . . . 44STORAGE INFORMATION . . . . . . . . . . . . . 44FREEZE PROTECTION . . . . . . . . . . . . . 44SPECIFICATIONS . . . . . . . . . . . . . . . . . . . . . 46GENERAL MACHINEDIMENSIONS/CAPACITIES . . . . . . . . . 46GENERAL MACHINE PERFORMANCE 46POWER TYPE . . . . . . . . . . . . . . . . . . . . . 47TIRES . . . . . . . . . . . . . . . . . . . . . . . . . . . . 47FaST SYSTEM (OPTION) . . . . . . . . . . . 47ec--H2O SYSTEM (OPTION) . . . . . . . . . 47MACHINE DIMENSIONS . . . . . . . . . . . . 48INDEX . . . . . . . . . . . . . . . . . . . . . . . . . . . . . . . 491T7 331040 (02--09)HomeFind. Go To.
SAFETY PRECAUTIONSSAFETY PRECAUTIONSThe following symbols are used throughout thismanual as indicated in the descriptions:WARNING: To warn of hazards orunsafe practices that could result insevere personal injury or death.FOR SAFETY: To identify actions thatmust be followed for safe operation ofequipment.This machine is designed solely for cleaningsmooth flooring in an indoor environment. Tennantdoes not recommend using this machine in anyother environment.The following information signals potentiallydangerous conditions to the operator orequipment. Read this manual carefully. Knowwhen these conditions can exist. Locate all safetydevices on the machine. Then, take necessarysteps to train machine operating personnel.Report machine damage or faulty operationimmediately. Do not use the machine if it is not inproper operating condition.WARNING: Batteries emit hydrogen gas.Explosion or fire can result. Keepsparks and open flame away. Keepcovers open when charging.WARNING: Flammable materials cancause an explosion or fire. Do not useflammable materials in tank(s).WARNING: Flammable materials orreactive metals can cause an explosionor fire. Do not pick up.FOR SAFETY:1. Do not operate machine:-- Unless trained and authorized.-- With brake disabled.-- Unless operation manual is read andunderstood.-- In flammable or explosive areas.-- In areas with possible falling objects.2. Before starting machine:-- Make sure all safety devices are inplace and operate properly.-- Check brakes and steering for properoperation.3. When using machine:-- Go slow on inclines and slipperysurfaces.-- Use care when backing machine.-- Report machine damage or faultyoperation immediately.-- Follow mixing and handlinginstructions on chemical containers.4. Before leaving or servicing machine:-- Stop on level surface.-- Turn off machine and remove key.5. When servicing machine:-- Do not push or tow the machine oninclines with the brake disabled.-- Avoid moving parts. Do not wear loosejackets, shirts, or sleeves whenworking on machine.-- Block machine tires before jackingmachine up.-- Jack machine up at designatedlocations only. Block machine up withjack stands.-- Use hoist or jack that will support theweight of the machine.-- Wear eye and ear protection whenusing pressurized air or water.-- Wear protective gloves when handlingbatteries or battery cables.-- Disconnect battery connections beforeworking on machine.-- Avoid contact with battery acid.-- Wear protective gloves and eyeprotection when handling vinegar.-- Do not power spray or hose offmachine. Electrical malfunction mayoccur.-- Use Tennant supplied or equivalentreplacement parts.6. When loading/unloading machineonto/off truck or trailer:-- Drain tanks before loading machine.-- Turn off machine.-- Use truck or trailer that will supportthe weight of the machine.-- Block machine tires.-- Lower scrub head and squeegeebefore tying down machine.-- Tie machine down to truck or trailer.-- Use a ramp that can support themachine weight and operator.-- Do not operate the machine on a rampincline that exceeds an 11 degreeangle2T7 331040 (02--09)HomeFind. Go To.
SAFETY PRECAUTIONSThe safety labels appear on the machine in thelocations indicated. If these or any label becomesdamaged or illegible, install a new label in itsplace.BATTERY CHARGING LABEL -LOCATED ON THE SEAT PANELFLAMMABLE SPILLSLABEL -LOCATED ON THESEAT PANELFOR SAFETY LABEL -LOCATED ON THESEAT PANELFLAMMABLE MATERIALS LABEL -LOCATED UNDER THE SOLUTION FILLPORT AND NEXT TO FOOT PEDALSELECTRICAL COMPONENTS, USEGROUNDING STRAP BEFOREOPENING PANEL LABEL -LOCATED ON ELECTRICAL PANELUNDER THE SEAT3T7 331040 (02--09)HomeFind. Go To.
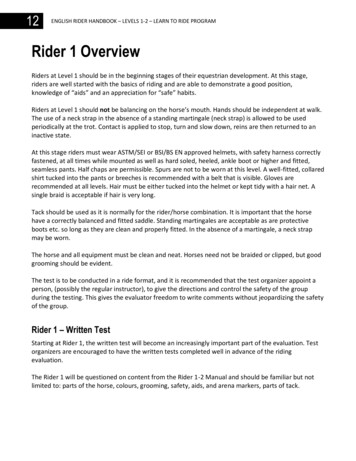
OPERATIONOPERATIONMACHINE .K.Recovery tank drain hoseRecovery tank coverRecovery tankOperator seatBatteriesRear squeegeeSide squeegeeScrub headSteering wheelSolution tankTool Box oroptional FaST--PAK compartmentec- H2O System Module (option)L. Solution tank fill capM.N.O.P.Q.R.S.T.U.4Solution tank drain hoseSqueegee hoseFront solution tank coverHour meterCircuit breakers100 A FuseBattery charging connectorPropel pedalBrake pedalT7 331040 (02--09)HomeFind. Go To.
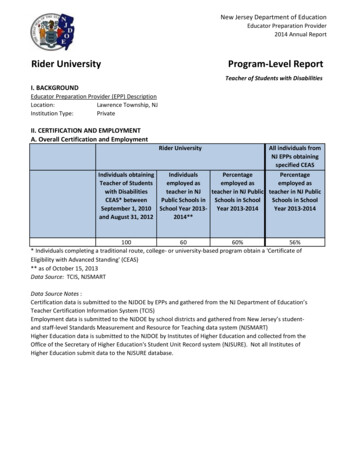
OPERATIONCONTROLS AND INSTRUMENTSABDCKec- H2O PSolution tank empty indicatorRecovery tank full indicatorBattery charge level indicatorsFault indicatorEmergency Stop ButtonDirectional switchHorn buttonOn/Off key switchOne Step scrub buttonFaST button (option)ec- H2O system on/off switch (option)ec- H2O system indicator light (option)Vacuum fan / squeegee buttonBrush Pressure increase button ( )Brush Pressure decrease button (--)Solution increase button ( )Solution decrease button (--)Control panel cover5T7 331040 (02--09)HomeFind. Go To.
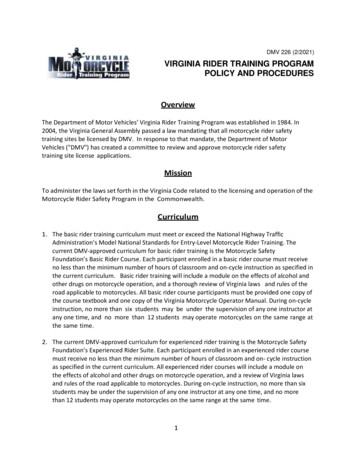
OPERATIONFOAM SCRUBBING SYSTEM (FaST MODEL)HOW THE MACHINE WORKSThe scrub components of the machine are asolution tank, scrub brushes or pads, a squeegee,a vacuum fan, and a recovery tank.The buttons on the control panel control themachine scrubbing functions. The One StepScrub button turns the preset scrub functions onand off. The FaST button (option) enables theFaST (Foam Scrubbing Technology) system. Theec--H2O button (option) enables the ec--H2O(electrically converted water) system. Thevacuum fan / squeegee button turns the vacuumfan on/off and raises and lowers the squeegee.The brush pressure buttons control the scrubbrush pressure, and the solution buttons controlthe solution flow.Unlike conventional scrubbing, the optional FaST(Foam Scrubbing Technology) system operatesby injecting the FaST--PAK concentrate agent intothe system with a small amount of water and air.This mixture creates a large volume of expandedwet foam.The expanded foam mixture is then dispersedonto the floor while the machine is scrubbing.When the squeegee picks up the mixture, thepatented foaming agent has collapsed and isrecovered into the recovery tank.The steering wheel controls the path of themachine travel. The directional switch controls theforward or reverse direction of the machine. Thepropel pedal controls the speed of the machine.The brake pedal slows and stops the machine.There are two different types of scrub headsavailable, cylindrical and disk. Both scrub headsare available in two different widths. The Diskscrub head is available in 650 mm (26 in) wide and800 mm (32 in) wide. The Cylindrical scrub head isavailable in 700 mm (28 in) wide and 800 mm (32in) wide.NOTE: The amount and type of soilage play animportant role in determining the type of brushesor pads to use. For specific recommendations,see the BRUSH INFORMATION section of thismanual or contact a Tennant representative.CONVENTIONAL SCRUBBINGWater and detergent from the solution tank flow tothe floor through a solution valve. The brushesuse the detergent and water solution to scrub thefloor clean. As the machine propels forward, thesqueegee wipes the dirty solution from the floor.The suction created by the vacuum fan thendraws the dirty solution from the squeegee intothe recovery tank.The Safe Scrubbing AlternativerThe FaST system can be used with all doublescrubbing and heavy duty scrubbing applications.Using the FaST system improves safety and canincrease productivity by 30% by reducing yourdump/fill cycle. It will also reduce chemical usageand storage space. One FaST--PAK ofconcentrated agent can scrub up to 90,000 m2 (1million square feet).NOTE: Do not use the FaST system withconventional cleaning detergents in the solutiontank. Drain, rinse and refill the solution tank withclear cool water before operating the FaSTsystem. Conventional cleaning detergents maycause failure to the FaST system.6T7 331040 (02--09)HomeFind. Go To.
OPERATIONec- H2O SCRUBBING (ec- H2O Model)The ec--H2O (electrically converted water) systemoperates by producing electrically converted waterfor cleaning.Normal water passes through a module where it isoxygenated and charged with an electric current.The electrically converted water changes into ablended acidic and alkaline solution forming aneutral pH cleaner. The converted water attacksthe dirt, breaks it into smaller particles, and pulls itoff the floor surface allowing the machine to easilyscrub away the suspended soil. The convertedwater then returns to normal water in the recoverytank.The ec--H2O system can be used with all doublescrubbing applications.NOTE: Do not enable the ec--H2O system withconventional cleaning detergents in the solutiontank. Drain, raise and refill the solution tank withclear cool water only before operating theec--H2O system. Conventional cleaningdetergents/ restorers may cause failure to theec--H2O solution system.NOTE: Storage or transporting machinesequipped with ec--H2O in freezing temperaturesrequires special procedures. Follow the freezeprotection procedure located in the STORAGEINFORMATION section.BRUSH INFORMATIONFor best results, use the correct brush type for thecleaning application. The following arerecommended brush applications.Non-scuff polypropylene brush (Cylindricaland Disk) -- This brush uses a softer, generalpurpose polypropylene bristle to lift lightlycompacted soilage without scuffing high-glosscoated floors.Nylon brush (Cylindrical and Disk) -- Softernylon bristles are recommended for scrubbingcoated floors. Cleans without scuffingSuper abrasive bristle brush (Cylindrical andDisk) -- Nylon fiber impregnated with abrasive gritto remove stains and soilage. Strong action onany surface. Performs well on buildup, grease, ortire marks.Surface preparation pad -- This maroon pad isfor very aggressive floor stripping.Heavy duty stripping pad -- This black pad is forstripping floors. Cuts through old heavy finisheseasier to prepare the floor for recoating.Stripping pad -- This brown pad is for strippingfloors. Quickly and easily cuts through old finish toprepare the floor for recoating.Scrubbing pad -- This blue pad is for scrubbingfloors. Removes dirt, spills, and scuffs. Leaves aclean surface ready for recoating.Buffing pad -- This red pad is for buffing floors.Quickly cleans and removes scuff marks whilepolishing the floor to a high gloss.Polishing pad -- This white pad is for polishingfloors. Maintains a high gloss. Use for buffing verysoft finishes and lower traffic areas, and polishingsoft waxes on wood floors.7T7 331040 (02--09)HomeFind. Go To.
OPERATIONMACHINE SETUPATTACHING SQUEEGEE ASSEMBLY1. Stop machine on a level surface.2. Turn the machine ON/OFF key switch off.FOR SAFETY: Before leaving or servicingmachine, stop on level surface, and turn offmachine.3. Place the rear squeegee under the squeegeemount bracket and fasten with the two knobs.4. Connect the vacuum hose to the squeegeeassembly. Loop the hose as shown using thehose clip provided.4. Squeeze the button on the FaST supply hoseconnector, then pull the empty FaST--PAK outfrom the compartment.The squeegee deflection is set at the factory.If the squeegee blade needs adjustments, seeADJUSTING REAR SQUEEGEE BLADEDEFLECTION section of this manual.5. Remove the perforated knock outs from thenew FaST--PAK carton. Do Not remove thebag from the carton. Pull out the hoseconnector located on the bottom of the bagand remove the hose cap from the connector.INSTALLING BRUSHES/PADSTo install the brushes or pad, see REPLACINGDISK SCRUB BRUSHES OR PAD DRIVER orREPLACING CYLINDRICAL SCRUB BRUSHESsection of this manual.INSTALLING THE FaST--PAK (FaST Model)1. Stop machine on a level surface.2. Turn off the machine ON/OFF key switch.FOR SAFETY: Before leaving or servicingmachine, stop on level surface, and turn offmachine.3. Open the FaST--PAK compartment door andslide the empty FaST--PAK approximately halfway out from the FaST--PAK compartmentdoor.NOTE: The FaST--PAK Floor CleaningConcentrate is specially designed for use with theFaST system scrubbing application. NEVER usea substitute. Other cleaning solutions may causeFaST system failure.6. Insert the new FaST--PAK approximately halfway into the FaST--PAK compartment.7. Connect the FaST--PAK hose connector tothe FaST supply hose connector, slide theFaST--PAK the rest of the way into theFaST--PAK compartment, and close theFaST--PAK compartment door.8. When replacing an empty FaST--PAK carton,you must scrub with the FaST system for afew minutes before the detergent will reach itsmaximum foaming.8T7 331040 (02--09)HomeFind. Go To.
OPERATIONFILLING THE SOLUTION TANKThe machine is equipped with a fill port at the rearof the machine.MACHINE OPERATIONPRE--OPERATION CHECKLIST- Check the battery fluid and charge level.- Check the tank cover seals for damage andwear.- Clean the vacuum fan inlet filter.- Check the condition of the scrubbing brushes.Remove any string, banding, plastic wrap, orother debris wrapped around them.- Cylindrical brushes: Check that the debris trayis empty and clean.WARNING: Flammable materials cancause an explosion or fire. Do not useflammable materials in tank(s).FOR CONVENTIONAL SCRUBBING: Open thesolution tank fill port and partially fill it with water(not to exceed 60 C / 140 F). Pour the requiredamount of detergent into the solution tankaccording to mixing instructions on the bottle.Then continue filling the solution tank with warmwater until the water level is just below the fill port.FOR SAFETY: When using machine, followmixing and handling instructions on chemicalcontainers.FOR FaST or ec- H2O SCRUBBING: Use coolclean water only (less than 21 C / 70 F). Do notadd any conventional floor cleaning detergents,system failure may result.NOTE: When filling the solution tank with abucket, make sure that the bucket is clean. Do notuse the same bucket for filling and draining themachine.ATTENTION: For Conventional Scrubbing,only use recommended cleaning detergents.Machine damage due to improper detergentusage will void the manufacturer’s warranty.- Check the squeegees for damage, wear andfor deflection adjustment.- Check the vacuum hose for debris orblockage.- Drain and clean the recovery tank.- Check the brakes and steering for properoperation.- Check the service records to determinemaintenance requirements.- FaST Scrubbing: Check the FaST--PAK(option) concentrate agent level. Replacecarton as needed. See the INSTALLING THEFaST--PAK AGENT section of the manual.- For FaST or ec- H2O Scrubbing: Ensurethat all conventional cleaning agents aredrained and rinsed from the solution tank.- For FaST or ec- H2O Scrubbing: Ensurethat the solution tank is filled with clear coolwater only.BEFORE OPERATINGPick up oversized debris before scrubbing. Pickup pieces of wire, string, twine, etc., that couldbecome wrapped around the scrub brush.Plan the scrubbing in advance. Try to arrangelong runs with minimum stopping and starting. Doan entire floor or section at one time.Pre--sweep the area to prevent streaking.9T7 331040 (02--09)HomeFind. Go To.
OPERATIONSETTING SCRUB MODESSETTING BRUSH PRESSUREBefore scrubbing, select the type of scrubbing willbe used, FaST (option), ec--H2O (option) orconventional scrubbing. Then set the preferredbrush pressure and solution flow settings.Under normal conditions, the brush pressureshould be set to the minimum setting (the bottomlight). Under heavy grime conditions, the brushpressure should be set to the maximum setting(the top light). Travel speed and floor conditionswill affect scrubbing performance.SETTING FaST BUTTONThe FaST button enables the FaST system tocome on when the One Step Scrub button is on.The light next to the button will come on when it isin this mode.NOTE: The solution flow cannot be adjusted whenthe machine is in the FaST mode.With the One Step Scrub button on, press eitherthe Brush Pressure increase button ( ) or theBrush Pressure decrease button (--) to set thescrubbing pressure for the surface being cleaned.The new pressure setting will default to thissetting when the machine is powered on or off.SETTING SOLUTION FLOW(CONVENTIONAL SCRUBBING ONLY)SETTING ec--H2O BUTTONThe ec--H2O button enables the ec--H2O systemto come on when the One Step Scrub button ison. The light next to the button will come on whenit is in this mode.NOTE: The ec--H2O system indicator light will notturn on until the machine starts scrubbing (Seepage 15).NOTE: The solution flow cannot be adjusted whenthe machine is set for FaST or ec--H2O scrubbing.Under normal soilage conditions the solution flowlevel should be set to the lowest setting (thebottom light). Under heavy grime conditions, thesolution flow level should be set to the highersettings (middle or top lights). Travel speed andfloor conditions will affect scrubbing performance.ec--H2O SystemIndicator Light10T7 331040 (02--09)HomeFind. Go To.
OPERATIONWith the One Step Scrub button on, press eitherSolution increase button ( ) or Solution decreasebutton (--) to set the solution flow level for thesurface being cleaned. The new solution flowsetting will default to this setting when themachine is powered on or off.SCRUBBINGFOR SAFETY: Do not operate machine, unlessoperator manual is read and understood.1. Turn the On/Off key switch on.2. Select the preferred scrubbing settings (SeeSETTING SCRUB MODES).ECONOMY SETTINGThe machine will operate for a longer time if theBrush Pressure and Solution Flow settings are inthe Economy setting. The bottom lights of theBrush Pressure and Solution Flow settings are onwhen the machine is in the Economy setting.3. Press the One Step Scrub button. The lighton the button is illuminated. All the presetscrubbing functions will turn on.NOTE: Open the control panel cover to adjust theBrush Pressure and Solution Flow Setting whilescrubbing if necessary.NOTE: DO NOT turn the ec--H2O/FaST systemon during conventional scrubbing. Conventionalcleaning detergents/restorers may cause failure tothe FaST/ec--H2O solution system. Drain, rinseand refill solution tank with cool clean waterbefore operating the FaST/ec--H2O system.4. Place the directional switch in the directionthe machine is to be moved (forward orreverse).NOTE: The machine can scrub in both forward orreverse. The horn will sound when in reverse.11T7 331040 (02--09)HomeFind. Go To.
OPERATION6. Release the propel pedal to stop the machine.Scrubbing functions stop and the automaticpark brake will engage when the machinestops.7. The Brake pedal can be used to control themachine if quicker stopping is needed or ifoperating on an incline. Do not operatemachine on inclines exceeding 7% (4 ) whenscrubbing.FOR SAFETY: When using machine, go slowon inclines and slippery surfaces.NOTE: The squeegee automatically raises whenthe machine is driven backwards. This preventsdamaging the squeegee. When the machine isplaced in reverse, the vacuum fan will shut offafter a short delay.5. Press the propel pedal to begin scrubbing.WARNING: Flammable materials orreactive metals can cause an explosionor fire. Do not pick up.8. Press the One Step Scrub button to stopscrubbing. The light next to the One StepScrub button will turn off and the scrubbingfunctions will turn off after a short delay.12T7 331040 (02--09)HomeFind. Go To.
OPERATIONDOUBLE SCRUBBINGFor heavily soiled areas, use the double scrubbingmethod.Double scrubbing can be performed using theFaST SCRUBBING SYSTEM (option),ec--H2O SCRUBBING SYSTEM (option) orCONVENTIONAL SCRUBBING methods.Place the side squeegees back on to the machinebefore scrubbing the floor the second time.NOTE: It is easier to put the side squeegeesback on to the machine with the scrub headpartially lowered. This allows clearance to installthe pins.Disk brushes: Before double scrubbing, removethe side squeegees to keep them from channelingwater while double scrubbing. To remove the sidesqueegees, lower the scrub head, then pull thepins on the front and rear ends of the squeegees.If the machine is equipped with the accessorybasket, you may hang the side squeegees fromthe hooks.Press the vacuum fan button again to lower thesqueegee and to turn on the vacuum fan. Thelight above the vacuum fan button will come on.Then scrub the floor a second time picking up thecleaning solution.WARNING: Flammable materials orreactive metals can cause an explosionor fire. Do not pick up.To double scrub, press the One Step Scrubbutton, then the vacuum fan button. The lightabove the vacuum fan button will turn off, thesqueegee will raise and the vacuum fan will stopoperating. Then scrub the area.Let the cleaning solution set on the floor for 3--5minutes.13T7 331040 (02--09)HomeFind. Go To.
OPERATIONWATER PICKUP MODE (NO SCRUBBING)The machine can be used to pick up water ornon--flammable liquid spills without scrubbing.To pick up water or non--flammable liquid spills,check to make sure that the One Step Scrubbutton is not activated. The light next to the OneStep Scrub button must be off.When scrubbing dead end aisles, start at theclosed end of the aisle and scrub out towards theopening.Adjust the machine speed, brush pressure, andsolution flow as required when scrubbing. Use theminimal brush pressure and solution flow settingsas possible.Keep the machine moving to prevent damagingfloor finishes.If poor scrubbing performance is observed, stopscrubbing and refer to MACHINETROUBLESHOOTING.Conventional Scrubbing: Pour a recommendedfoam control solution into the recovery tank ifexcessive foam appears.WARNING: Flammable materials orreactive metals can cause an explosionor fire. Do not pick up.Then press the vacuum fan button. The lightabove the vacuum fan button will turn on, thesqueegee will lower and the vacuum fan will startoperating. Then pick up the water ornon--flammable liquid spill.ec- H2O SCRUBBING: If an alarm sounds andthe ec--H2O system indicator light begins to blinkred, the ec--H2O module must be flushed toresume ec--H2O operation (See ec--H2OMODULE FLUSH PROCEDURE on page 37)NOTE: When the alarm sounds and the lightblinks red, the machine will bypass the ec--H2Osystem. To continue scrubbing, turn the ec--H2Oswitch off and change over to conventionalscrubbing.Change or rotate pads as necessary.Observe the battery discharge indicator to ensurethere is adequate charge for machine operation.Observe the solution tank indicator to ensure thesolution tank is not empty. Always empty recoverytank before refilling the solution tank.Observe the recovery tank indicator to ensure therecovery is not full.Remove the key when leaving the machineunattended.Perform the Daily Maintenance Procedures afterscrubbing (see MACHINE MAINTENANCE).WHILE OPERATING THE MACHINEDrive as straight a path as possible. Avoidbumping into posts or scraping the sides of themachine. Overlap the scrub paths by severalcentimeters (a few inches).Avoid turning the steering wheel too sharply whenthe machine is in motion. The machine is veryresponsive to the movement of the steering wheel.Avoid sudden turns, except in emergencies.14T7 331040 (02--09)HomeFind. Go To.
OPERATIONEMERGENCY STOP BUTTONThe Emergency Stop Button halts all power to themachine in case of an emergency. Press thebutton to halt the machine power. To restart themachine, turn the Emergency Stop Button to theright. Then turn the on/off switch to the off positionand then to the on position.NOTE: This button should not be used for normalstopping as premature wear to the parking brakemay occur.ec- H2O SCRUBBING: If an alarm sounds andthe ec--H2O system indicator light begins to blinkred, the ec--H2O module must be flushed toresume ec--H2O operation (See ec--H2OMODULE FLUSH PROCEDURE on page 37)NOTE: When the alarm sounds and the lightblinks red, the machine will bypass the ec--H2Osystem. To continue scrubbing, turn the ec--H2Oswitch off and change over to conventionalscrubbing.SOLUTION TANK EMPTY I
manual or contact a Tennant representative. CONVENTIONAL SCRUBBING Water and detergent from the solution tank flow to the floor through a solution valve. The brushes use the detergent and water solution to scrub the floor clean. As the machine propels forward, the squeegee wipes the dirty solution from the floor. The suction created by the .