Transcription
OWNER’S MANUAL & OPERATING INSTRUCTIONS4000 PSI / 4.0 GPMWireless Remote Electric StartPRESSURE WASHERMODEL NUMBER71351SAVE THESE INSTRUCTIONSImportant Safety Instructionsare included in this manual.MADE IN CHINAREV 71351-2012051810006 Santa Fe Springs RoadSanta Fe Springs CA 90670USA / 1-877-338-0999www.championpowerequipment.com
Have questions or need assistance?Do not return this product to the store!WE ARE HERE TO HELP!Visit our website:www.championpowerequipment.comfor more info: Product Info & Updates Frequently Asked Questions Tech Bulletins Product Registration– or –Call our Customer Care Team Toll-Free at:1-877-338-0999*We are always working to improve our products. Therefore, the enclosed product may differ slightly from the image on the cover.
713514000 PSI / 4.0 GPMWireless Remote Electric StartPressure WasherTable of ContentsIntroduction . . . . . . . . . . . . . . . . . . . . . . . . . . . . . 1Pressure Washer . . . . . . . . . . . . . . . . . . . . . . . . 1Accessories . . . . . . . . . . . . . . . . . . . . . . . . . . . . 1This Booklet . . . . . . . . . . . . . . . . . . . . . . . . . . . 1Manual Conventions . . . . . . . . . . . . . . . . . . . . . . . . 2Safety Rules . . . . . . . . . . . . . . . . . . . . . . . . . . . . . 3Controls and Features . . . . . . . . . . . . . . . . . . . . . . . 5Pressure Washer . . . . . . . . . . . . . . . . . . . . . . . . 5Utility Panel. . . . . . . . . . . . . . . . . . . . . . . . . . . . . 6Wireless Remote Control. . . . . . . . . . . . . . . . . . . . 7Parts Included. . . . . . . . . . . . . . . . . . . . . . . . . . 8Assembly . . . . . . . . . . . . . . . . . . . . . . . . . . . . . . . 9Remove the Pressure Washer from theShipping Carton . . . . . . . . . . . . . . . . . . . . . . . . 9Install the Wheel Kit. . . . . . . . . . . . . . . . . . . . . . . 9Install the Support Leg. . . . . . . . . . . . . . . . . . . . . 9Connect the Battery . . . . . . . . . . . . . . . . . . . . . . . 9Install the Vented Oil Cap . . . . . . . . . . . . . . . . . . . 9Attach the Hose Hanger . . . . . . . . . . . . . . . . . . . 10Attach the Wand Holder . . . . . . . . . . . . . . . . . . . 10Attach the Gun Holder . . . . . . . . . . . . . . . . . . . . 10Install the Hoses . . . . . . . . . . . . . . . . . . . . . . . 10Attach the Pressure Gun . . . . . . . . . . . . . . . 10Connect to Garden Hose . . . . . . . . . . . . . . . 10Attach the Detergent Hose . . . . . . . . . . . . . . . 10Add Engine Oil . . . . . . . . . . . . . . . . . . . . . . . . . 11Add Fuel. . . . . . . . . . . . . . . . . . . . . . . . . . . . . 11Operation . . . . . . . . . . . . . . . . . . . . . . . . . . . . . . 12Pressure Washer Location. . . . . . . . . . . . . . . . . 12Before Starting the Engine . . . . . . . . . . . . . . . . 12Wireless Remote Start. . . . . . . . . . . . . . . . . . . . . 12Starting the Engine Without the Remote . . . . . . . 12Distance from Cleaning Surface . . . . . . . . . . . . 13High Pressure Wash . . . . . . . . . . . . . . . . . . . . . 13Low Pressure Wash . . . . . . . . . . . . . . . . . . . . . 13Detergent Use. . . . . . . . . . . . . . . . . . . . . . . 13System Flush . . . . . . . . . . . . . . . . . . . . . . . 13Depressurize System . . . . . . . . . . . . . . . . . . . . 14Operating Tips. . . . . . . . . . . . . . . . . . . . . . . . . 14Stopping the Engine. . . . . . . . . . . . . . . . . . . . . 14Maintenance . . . . . . . . . . . . . . . . . . . . . . . . . . . . 15Engine Maintenance. . . . . . . . . . . . . . . . . . . . . 15Oil . . . . . . . . . . . . . . . . . . . . . . . . . . . . . . . 15Pump Oil. . . . . . . . . . . . . . . . . . . . . . . . . . .Spark Plugs . . . . . . . . . . . . . . . . . . . . . . . .Air Filter. . . . . . . . . . . . . . . . . . . . . . . . . . .Cleaning . . . . . . . . . . . . . . . . . . . . . . . . . . . . .Adjustments . . . . . . . . . . . . . . . . . . . . . . . .Maintenance Schedule . . . . . . . . . . . . . . . . .Pressure Washer Maintenance . . . . . . . . . . . . . .Cleaning Spray Nozzle . . . . . . . . . . . . . . . . .Storage . . . . . . . . . . . . . . . . . . . . . . . . . . . . . . . .Engine Storage . . . . . . . . . . . . . . . . . . . . . . . .Pressure Washer Storage . . . . . . . . . . . . . . . . .Disconnecting the Battery. . . . . . . . . . . . . . . . .Charging the Battery. . . . . . . . . . . . . . . . . . . . .Winter Storage . . . . . . . . . . . . . . . . . . . . . . . .Specifications . . . . . . . . . . . . . . . . . . . . . . . . . . .Engine Specifications . . . . . . . . . . . . . . . . . . . .Pressure Washer Specifications . . . . . . . . . . . . .Fuel . . . . . . . . . . . . . . . . . . . . . . . . . . . . . . . .Oil . . . . . . . . . . . . . . . . . . . . . . . . . . . . . . . . .Spark Plugs . . . . . . . . . . . . . . . . . . . . . . . . . .Maintenance Valve Clearance . . . . . . . . . . . . . .IC Warning. . . . . . . . . . . . . . . . . . . . . . . . . . . .Pressure Washer Parts Diagram. . . . . . . . . . . . .Pressure Washer Parts List . . . . . . . . . . . . . . . .Engine Parts Diagram . . . . . . . . . . . . . . . . . . .Engine Parts List . . . . . . . . . . . . . . . . . . . . . . .Troubleshooting . . . . . . . . . . . . . . . . . . . . . . . . . .Warranty . . . . . . . . . . . . . . . . . . . . . . . . . . . . . . .Warranty Qualifications. . . . . . . . . . . . . . . . . . .Repair/Replacement Warranty . . . . . . . . . . . . . .Do not return the unit to the place ofpurchase . . . . . . . . . . . . . . . . . . . . . . . . . . . .Warranty Exclusions . . . . . . . . . . . . . . . . . . . . .Normal Wear . . . . . . . . . . . . . . . . . . . . . . .Installation, Use and Maintenance . . . . . . . . .Other Exclusions . . . . . . . . . . . . . . . . . . . . .Limits of Implied Warranty andConsequential Damage . . . . . . . . . . . . . . . . . . .Contact Information . . . . . . . . . . . . . . . . . . . . .Address . . . . . . . . . . . . . . . . . . . . . . . . . . .Customer Service . . . . . . . . . . . . . . . . . . . .Technical Service . . . . . . . . . . . . . . . . . . . . 1515161616161616171717. 17. 171718181818. 181818. 18192021222324242424242424242424242424
ENGLISH tions on your purchase of a Champion PowerEquipment pressure washer. CPE designs and buildspressure washers to strict specifications. With properuse and maintenance, this pressure washer will bringyears of satisfying service.Champion Power Equipment manufactures and sellsaccessories designed to help you get the most fromyour purchase. To find out more about our accessories,please visit our website at:www.championpowerequipment.comPressure WasherThis BookletThis unit is a gasoline engine driven pressure washer. It isdesigned for use in cleaning with or without detergent andis suitable for decks, patios, house siding, vehicles, lawnfurniture, barbecue grills, gardening tools and more.Every effort has been made to ensure the accuracy andcompleteness of the information in this manual. We reservethe right to change, alter and/or improve the product andthis document at any time without prior notice.Record the model and serial numbers as well as date and place of purchase for future reference. Have thisinformation available when ordering parts and when making technical or warranty inquiries.Champion Power Equipment Support1-877-338-0999Model Number71351Serial NumberDate of PurchasePurchase LocationFor Oil Type see ‘Add Engine Oil‘ section. For Fuel Type see ‘Add Fuel‘ section.1REV 71351-20120518
71351 ENGLISHManual ConventionsThis manual uses the following symbols to help differentiate between different kinds of information. The safety symbolis used with a key word to alert you to potential hazards in operating and owning power equipment.Follow all safety messages to avoid or reduce the risk of serious injury or death.DANGERDANGER indicates an imminently hazardoussituation which, if not avoided, will result in deathor serious injury.WARNINGWARNING indicates a potentially hazardoussituation which, if not avoided, could result indeath or serious injury.CAUTIONCAUTION used without the safety alert symbolindicates a potentially hazardous situation which, ifnot avoided, may result in property damage.NOTEIf you have questions regarding your pressurewasher, we can help. Please call our help line at1-877-338-0999CAUTIONCAUTION indicates a potentially hazardoussituation which, if not avoided, may result in minoror moderate injury.REV 71351-201205182
ENGLISH 71351Safety RulesWARNINGRead this manual thoroughly before operating yourpressure washer. Failure to follow instructions couldresult in serious injury or death.WARNINGThe engine exhaust from this product containschemicals known to the state of California to causecancer, birth defects, or other reproductive harm.DANGEREngine exhaust contains carbon monoxide, acolourless, odourless, poison gas. Breathing carbonmonoxide will cause nausea, dizziness, fainting ordeath. If you start to feel dizzy or weak, get to freshair immediately.Operate pressure washer outdoors only in a wellventilated area.DO NOT operate the pressure washer insideany building, including garages, basements,crawlspaces and sheds, enclosure or compartment,including the pressure washer compartment of arecreational vehicle.DO NOT allow exhaust fumes to enter a confinedarea through windows, doors, vents or otheropenings.DANGER CARBON MONOXIDE, using a pressurewasher indoors CAN KILL YOU IN MINUTES.DANGERRotating parts can entangle hands, feet, hair,clothing and/or accessories.Traumatic amputation or severe laceration can result.Keep hands and feet away from rotating parts.Tie up long hair and remove jewelry.Operate equipment with guards in place.DO NOT wear loose-fitting clothing, danglingdrawstrings or items that could become caught.WARNINGThis product contains a button battery. Ifswallowed, it could cause severe injury or death injust 2 hours. Seek medical attention immediately.3REV 71351-20120518WARNINGSparks can result in fire or electrical shock.When servicing the pressure washer:Disconnect the spark plug wire and place it where itcannot contact the plug.DO NOT check for spark with the plug removed.Use only approved spark plug testers.WARNINGRunning engines produce heat. Severe burns canoccur on contact. Combustible material can catchfire on contact.DO NOT touch hot surfaces.Avoid contact with hot exhaust gases.Allow equipment to cool before touching.Maintain at least three feet of clearance on allsides to ensure adequate cooling.Maintain at least five feet of clearance fromcombustible materials.WARNINGDO NOT let water in the pump freeze.See Storage section in the manual for instructionsregarding winter storage.If water has frozen in the pressure washer, thaw thepressure washer in a warm room before starting.DO NOT pour hot water on or into the pump;internal parts will be damaged and your warrantywill be voided.WARNINGNEVER spray flammable liquids or use pressurewasher in areas containing combustible dust, liquids,or vapour.NEVER operate this machine in a closed building orin or near an explosive environment. DO NOT remove fuel tank cap or fill fuel tank whileengine is hot or running (allow engine to cool twominutes before refueling). Always fill the tank slowly. Never disconnect the high pressure discharge hosefrom the machine while the system is pressurized.
71351 ENGLISHDANGERSafety RulesWARNINGFuel and fuel vapours are highly flammable andextremely explosive.Fire or explosion can cause severe burns or death.Unintentional startup can result in entanglement,traumatic amputation or laceration.Rapid retraction of the starter cord will pull hand andarm towards the engine faster than you can let go.Unintentional startup can result in entanglement,traumatic amputation or laceration.Broken bones, fractures, bruises or sprains could result.When adding or removing fuel:When starting engine, pull the starter cord slowlyuntil resistance is felt and then pull rapidly to avoidkickback.Turn the pressure washer off and let it cool for atleast two minutes before removing the fuel cap.Loosen the cap slowly to relieve pressure in the tank.Only fill or drain fuel outdoors in a well-ventilated area.DO NOT pump gas directly into the pressure washerat the gas station. Use an approved container totransfer the fuel to the pressure washer.DO NOT overfill the fuel tank.Always keep fuel away from sparks, open flames,pilot lights, heat and other sources of ignition.DO NOT light or smoke cigarettes.When starting the pressure washer:DO NOT attempt to start a damaged pressurewasher.Make certain that the gas cap, air filter, spark plug,fuel lines and exhaust system are properly in place.Allow spilled fuel to evaporate fully beforeattempting to start the engine.Make certain that the pressure washer is restingfirmly on level ground.When operating the pressure washer:DO NOT move or tip the pressure washer duringoperation.DO NOT tip the pressure washer or allow fuel or oilto spill.When transporting or servicing the pressure washer:Make certain that the fuel shutoff valve is in the offposition and the fuel tank is empty.Disconnect the spark plug wire.When storing the pressure washer:Store away from sparks, open flames, pilot lights,heat and other sources of ignition.DANGERKeep clear of nozzle.DO NOT point the pressure wand at a person, ananimal or yourself.Always wear safety glasses or goggles andprotective equipment (hearing protection, gloves,rubber boots, protective clothing) when operating orperforming maintenance. Never put hand or fingers over the spray tip whileoperating the unit. Never try to stop or deflect leaks with any body part. Always engage the trigger safety latch in the safeposition when spraying is stopped even if only for afew moments.CAUTIONImproper treatment or use of the pressure washer candamage it, shorten its life and void your warranty.Use the pressure washer only for intended uses.Operate only on level surfaces.DO NOT expose pressure washer to excessivemoisture, dust, or dirt.DO NOT allow any material to block the cooling slots.DO NOT use the pressure washer if:–– Equipment sparks, smokes or emits flames–– Equipment vibrates excessivelyCAUTIONNEVER run the unit dry.Be sure the water supply is completely turned onbefore operating the unit.REV 71351-201205184
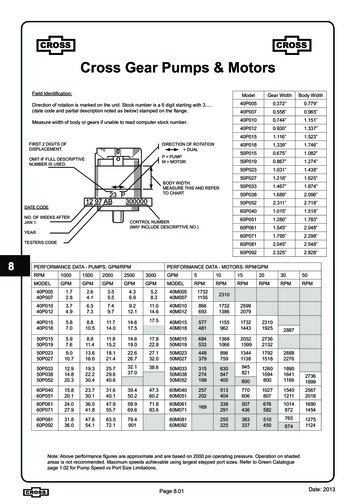
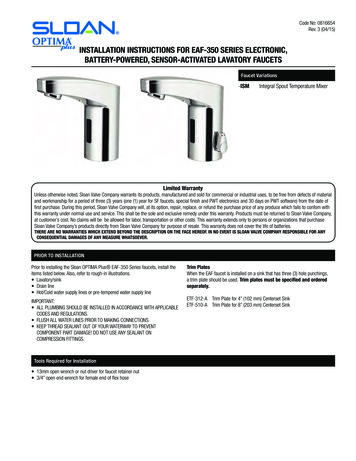
ENGLISH 71351Controls and FeaturesRead this owner’s manual before operating your pressure washer. Familiarize yourself with the location and functionof the controls and features. Save this manual for future reference.Pressure Washer1312111012983764(1)55High Pressure Hose Hanger – Used to hold thehigh pressure hose when not in use.(7)Oil Filler Cap – Check and fill engine oil level.(8)Battery(2)Fuel Valve Knob(9)Utility Panel – See Utility Panel section.(3)Air Filter – Protects the engine by filtering dustand debris from the intake air.(10) Wand Holder – Used to hold the wand when notassembled and in use.(4)Recoil Starter – Used to start the engine.(11) Handle(5)Quick Drain Oil Draining System– Used to quicklydrain the engine oil.(12) Gun Holder – Used to the hold gun when notassembled and in use.(6)25.4 cm (10 in.) Never Flat Wheels(13) Fuel Tank – 25 L (6.5 gal.)REV 71351-20120518
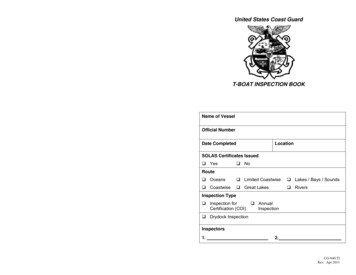
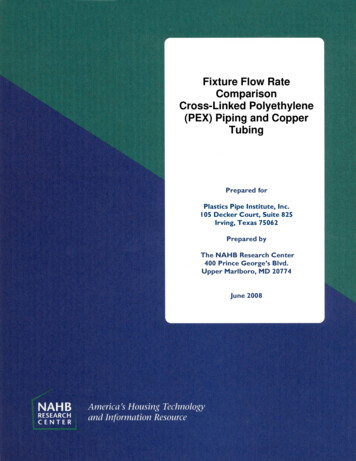
71351 ENGLISHControls and FeaturesUtility Panel12345(1)Ignition Switch – Used to start or stop thepressure washer.(4)Quick Connect Hose Output – Used to easilyconnect and disconnect the high pressure hose.(2)Battery Switch – Enables/disables startingelectrically – via remotely or by Ignition Switch.(5)Garden Hose Input – Used to connect the watersupply to unit.(3)Quick Connect Nozzle Storage – Used to store thequick connect nozzles when not in use.REV 71351-201205186
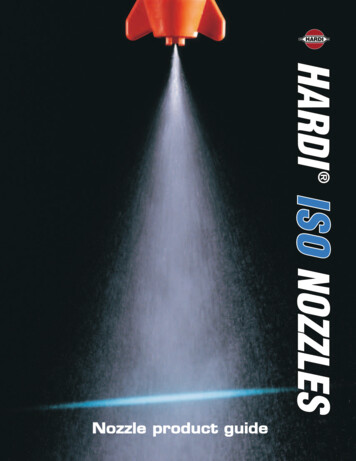
Controls and FeaturesWireless Remote ControlThis pressure washer is equipped with a wireless remotecontrol system for starting and stopping. The systemconsists of (4) main components:1. Receiver Control Module (RCM)2. Wireless Remote3. Battery Switch4. Ignition SwitchThe Remote Control functions are enabled when:1. The Ignition Switch is in the “ON” position, AND2. The Battery Switch is in the “ON” position.The Remote Control functions are disabled if either ofthe above conditions is not met.To start the pressure washer by Remote Control, pressthe “START” button on the Remote one time. Theengine will attempt to start (6) times. The RCM controlsthe Auto Choke during each attempt to start. If thepressure washer does not start, call Champion CustomerCare team for assistance at 1-877-338-0999.To stop the pressure washer by Remote Control, pressthe “STOP” button on the Remote one time.Remote Control Power ConsumptionWhile the Ignition Switch is in the “ON”: position, theRCM is active and waiting for a remote signal. Thisfunction requires electrical current from the battery.If the Ignition Switch is left in the “ON” position forextended periods (several weeks), the battery can becompletely drained.Moving the Ignition Switch to the “OFF” positiondisables the Remote functions, but the RCM stillconsumes approximately 2 mA from the battery.To prevent battery drain, press the Battery Switch to the“OFF” position. This disconnects power to the RCM sothere is no current draw on the battery.7REV 71351-20120518ENGLISH 71351
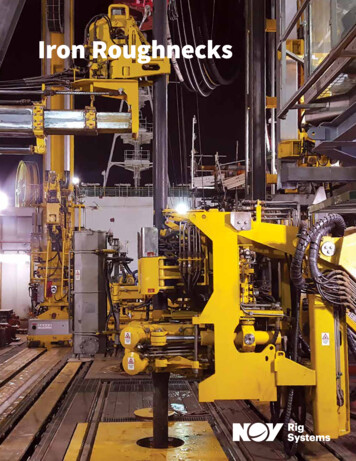
71351 ENGLISHControls and FeaturesParts IncludedYour 71351 Gasoline Powered Pressure Washer shipswith the following parts:Wheel �––10” Wheel. . . . . . . . . . . . . . . . . . . .Flange Bolt (M10x120 for Wheel) . . . .Bushing. . . . . . . . . . . . . . . . . . . . . .Flat Washer 10. . . . . . . . . . . . . . . . .Nut (M10) . . . . . . . . . . . . . . . . . . . .Support Leg w/Vibration Mounts. . . . .Flange Bolt (M8x25 for Mounts) . . . . .Flange Bolt (M8x16 for Support Leg). .Nut (M8). . . . . . . . . . . . . . . . . . . . .222221226.11241115.24 m (50 ft.) High Pressure Hose. .Detergent Hose. . . . . . . . . . . . . . . . .Hose Hanger . . . . . . . . . . . . . . . . . .Flange Bolt (M8x45 for Pothook). . . . .1112.11122Gun re Gun. . . . . . . . . . . . . . . . .Wand . . . . . . . . . . . . . . . . . . . . . .Wand Holder (Clamp). . . . . . . . . . .Bolt (M5x12 for Clamps) . . . . . . . . .Gun Holder . . . . . . . . . . . . . . . . . .Flange Bolt (M8x50 for Gun Holder) .Hoses––––––––50 ft. HighPressure ��Oil Funnel . . . . . . . . . . .Spark Plug Socket. . . . . .Remote. . . . . . . . . . . . .Bolt M5x10 (For Battery).Nut (M5). . . . . . . . . . . .REV 71351-201205188
ENGLISH 71351AssemblyYour pressure washer requires some assembly. This unitships from our factory without oil. It must be properlyserviced with fuel and oil before operation.If you have any questions regarding the assembly of yourpressure washer, call our help line at 1-877-338-0999.Please have your serial number and model number available.Install the Support Leg1. Attach the support leg to the pressure washer framewith cap screws (M8x16) and nuts (M8).2. Tip the pressure washer slowly so that it rests on thewheels and support leg.Remove the Pressure Washer from theShipping Carton1. Set the shipping carton on a solid, flat surface.2. Remove everything from the carton except thepressure washer.3. Carefully cut each corner of the box from top to bottom.Install the Wheel KitCAUTIONThe wheel kit is not intended for over-the-road use.You will need the following tools to install the wheels: 17 mm wrench OR adjustable wrench (not included) Socket wrench with a 16 mm socket (not included) Pliers (not included)1. Before adding fuel and oil, tip the pressure washer onit’s side.2. Slide the M10x120 wheel bolt through the washer,sleeve and wheel.3. Slide the bolt through the mount point on the frame.4. Fasten securely with the M10 nut.5. Repeat steps 2-4 to attach the second wheel.9REV 71351-20120518Connect the Battery1. Remove the protective cover from the red ( ) lead onthe battery.2. Attach the red ( ) lead to the red ( ) terminal on thebattery with the cap screw (M5x10) and secure withthe lock washer (M5).3. Repeat steps 1-2 for the black (–) battery lead.Install the Vented Oil CapBefore using the pressure washer:1. Unscrew the red shipping plug. A 17 mm or 11/16”wrench may be used.2. Remove the vented plug from the plastic bag.3. Screw the vented plug into the pump by hand. Do notover tighten.
71351 ENGLISHAttach the Hose Hanger1. Slide Hose Hanger over the top of frame (recoil side).2. Align Hose Hanger with mounting points on frame.3. Slide the bolt (M8x45) through the mount point onthe frame.4. Fasten securely with the M8 nut.AssemblyInstall the HosesAttach the Pressure Gun1. Attach the wand with nozzle to the gun.2. Connect the high pressure hose to the outlet connection on thepump.3. Connect the other end of the high pressure hose to the gun.Connect to Garden HoseSecure a garden hose (not included) to the inletconnection on the pump.Attach the Detergent HoseAttach the Wand Holder (Clamps)Connect the clear detergent hose to the brass barb onthe pumps outlet connector.1. Align Clamp with mounting points on frame (powerpanel side).2. Slide the bolt (M5x12) through the mount point onthe frame.3. Fasten securely.4. Repeat steps 1-3 for second clamp.Place the filter end of the detergent hose into pressurewasher detergent (not included).Attach the Gun Holder1. Align Gun Holder with mounting point on frame(Handle side).2. Slide the bolt (M8x50) through the mount point onthe frame.3. Fasten securely.NOTEDetergents can only be applied at low pressure setting.REV 71351-2012051810
ENGLISH 71351AssemblyAdd Engine OilCAUTIONDO NOT attempt to crank or start the engine beforeit has been properly filled with the recommendedtype and amount of oil. Damage to the pressurewasher as a result of failure to follow theseinstructions will void your warranty.NOTEThe recommended oil type is 10W-30 4-cycle automotive oil.1. Place the pressure washer on a flat, level surface.2. Remove oil fill cap/dipstick to add oil.3. Add 1.1 L (1.16 qt.) of oil and replace oil fill cap/dipstick. Once oil has been added, a visual checkshould show oil about 1-2 threads from running out ofthe fill hole.Add Engine Oil Cont’d.NOTEThe pressure washer engine shaft has a sealed,pre-lubricated ball bearing that requires noadditional lubrication for the life of the bearing.Add Fuel1. Use clean, fresh, regular unleaded fuel with aminimum octane rating of 85 and an ethanol contentof less than 10% by volume.2. DO NOT mix oil with fuel.3. Clean the area around the fuel cap.4. Remove the fuel cap.5. Slowly add fuel to the tank. DO NOT overfill. Allowapproximately ¼ inch of space for fuel expansion.6. Screw on the fuel cap and wipe away any spilled fuel.CAUTIONUse regular unleaded gasoline with a minimumoctane rating of 85.4. Check engine oil level daily and add as needed.CAUTIONThe engine is equipped with a low-oil-shutoff andwill stop when the oil level in the crankcase fallsbelow the threshold level.NOTECheck oil often during the break-in period. Refer to theMaintenance section for recommended service intervals.11REV 71351-20120518Do not mix oil and gasoline.Fill tank to approximately ¼” below the top of thetank to allow for fuel expansion.DO NOT pump gas directly into the pressure washerat the gas station. Use an approved container totransfer the fuel to the pressure washer.DO NOT fill fuel tank indoors.DO NOT fill fuel tank when the engine is running or hot.DO NOT overfill the fuel tank.DO NOT light cigarettes or smoke when filling thefuel tank.WARNINGPouring fuel too fast through the fuel screen mayresult in blow back of fuel at the operator while filling.
71351 ENGLISHOperationPressure Washer LocationStarting the Engine without RemoteThis pressure washer must have at least 1.5 m (5 ft.)of clearance from combustible material. Leave at least91 cm (3 ft.) of clearance on all sides of the pressurewasher to allow for adequate cooling, maintenance andservicing. Place the pressure washer in a well ventilatedarea. DO NOT place the pressure washer near ventsor intakes where exhaust fumes could be drawn intooccupied or confined spaces. Carefully consider wind andair currents when positioning pressure washer.1. Make certain the pressure washer is on a flat, levelsurface.2. Turn the Fuel Valve to the “ON” position.3. Press the Battery Switch to “ON.”4. ELECTRIC START: Press and hold the ignition switchto the “START” position. Release as the enginebegins to roll over. If the engine fails to start withinfive seconds, release the switch and wait at least tenseconds before attempting to start the engine again.5. RECOIL START: Pull the starter cord slowly untilresistance is felt and then pull rapidly.Before Starting the Engine1. Turn the water ON.2. Pull the trigger on the pressure gun to purge allair from the pump and hose. This may take severalminutes.3. Do not start the engine until a steady stream of wateris flowing from the nozzle.Wireless Remote StartWireless remote starting is only possible within24 m (80 ft.) of the pressure washer.Do not attempt to adjust the carburetor choke. The remotesystem will automatically close and open the choke.1. Make certain the pressure washer is on a flat, levelsurface.2. Press the Ignition Switch to “ON.”3. Press the Battery Switch to “ON.”4. Turn the Fuel Valve to the “ON” position. (see below)NOTEIf the engine does not start after 2 pulls, relievepump pressure by pulling the trigger on the pressurewasher gun.NOTEIf the engine starts but does not run make certainthat the pressure washer is on a flat, level surface.The engine is equipped with a low oil sensor that willprevent the engine from running when the oil levelfalls below a critical threshold.5. To start the engine, press and release the “START”button on the handheld Remote Control device. DONOT hold the button down, only press the buttononce. The engine will attempt to start 6 times.6. If the pressure washer fails to start, check thebattery condition and cable connections.REV 71351-2012051812
ENGLISH 71351OperationDistance from Cleaning SurfaceThe distance between the spray nozzle and the cleaningsurface is another factor that affects the impact force ofthe water. The impact force of the water increases as thenozzle is moved closer to the surface. You can vary theimpact force by controlling1. The nozzle’s fan pattern.2. The nozzle’s angle to the cleaning surface.3. The nozzle’s distance from the cleaning surface.Never use a narrow high impact stream on a surface thatis susceptible to damage. Avoid spraying windows witha narrow high impact stream or turbo nozzle. Doing somay break the glass.1. Before triggering the gun, select a nozzle with a widefan pattern.2. Place the nozzle approximately 1.22 m (4 ft.) awayfrom the cleaning surface. Then hold the nozzle at a45 degree angle to the cleaning surface. Trigger thegun.3. Vary the fan pattern spray angle and the distanceto the cleaning surface until optimum cleaningefficiency is achieved without damaging the surface.High Pressure WashCAUTIONAlways engage the trigger safety latch when the unitis not in use.The trigger safety latch prevents the gun from beingtriggered accidentally. Push the latch fully down toengage it.Your unit is equipped with a quick connect nozzle port.Choose the appropriate nozzle tip for the job you areperforming.CAUTIONThe narrow high impact spray can damage somesurfaces.A wide fan pattern distributes the impact of the waterover a larger area resulting in excellent cleaning actionwith reduced risk of surface damage. Clean large surfaceareas quickly using a wide fan pattern.13REV 71351-20120518Low Pressure WashDetergent UseThe use of detergents can dramatically reduce cleaningt
Equipment pressure washer . CPE designs and builds pressure washers to strict specifications . With proper use and maintenance, this pressure washer will bring years of satisfying service . Pressure Washer This unit is a gasoline engine driven pressure washer . It is designed for use in cleaning with or without detergent and