Transcription
026-1903 Rev 4 19-APR-2010E2 Controller Wiring Practices
1640 Airport Road Suite #104Kennesaw, GA 30144Phone 770-425-2724Fax 770-425-9319ALL RIGHTS RESERVEDThe information contained in this manual has been carefully checked and is believedto be accurate. However, Computer Process Controls, Inc. assumes no responsibilityfor any inaccuracies that may be contained herein. In no event will Computer ProcessControls, Inc. be liable for any direct, indirect, special, incidental, or consequentialdamages resulting from any defect or omission in this manual, even if advised of thepossibility of such damages. In the interest of continued product development, Computer Process Controls, Inc. reserves the right to make improvements to this manual,and the products described herein, at any time without notice or obligation.FCC COMPLIANCE NOTICEThis device complies with Part 15 of the FCC Rules. Operation is subject to the following two conditions: (1) this device may not cause harmful interference, and (2) thisdevice must accept any interference received, including interference that may causeundesired operation.CE COMPLIANCE NOTICEClass A Product Information for Einstein, E2 Controllers:The CPC Einstein and E2 controllers are Class A products. In a domestic environmentthis product may cause radio interference in which case the user may be required totake adequate measures. This covers: All Einstein family product types: RX - Refrigeration Controller(830-xxxx), BX - Building/HVAC Controller (831-xxxx), and all version models: (300, 400, 500). All E2 family product types: RX - Refrigeration Controller (834-xxxx),BX - Building/HVAC Controller (835-xxxx), CX- Convenience StoreController (836-xxxx), and all version models: (300, 400, 500).
Table of Contents1 OVERVIEW . 11.1. “NOISE” AND ITS EFFECTS. 11.2. SOURCES OF NOISE . 12 AVOIDING NOISE-GENERATING DEVICES . 22.1. CONTROL TECHNIQUES VARIABLE-SPEED DRIVES . 23 AVOIDING HIGH VOLTAGE WIRING . 34 USING THE CORRECT CABLE. 44.1. RS485 COMMUNICATION WIRING .4.2. ANALOG OUTPUT WIRING (CONTROL TECHNIQUES VSDS) .4.3. ECHELON NETWORK WIRING .4.4. ETHERNET NETWORK WIRING .4.4.1. Shielding.4.4.2. Maximum Cable Length .4444455 POWER WIRE GAGE SELECTION . 66 NETWORK STRUCTURE, BIASING, AND TERMINATION RESISTANCE . 76.1. RS485 NETWORKING.6.1.1. Terminating and Biasing an I/O Networks and MODBUS Networks.6.2. ECHELON NETWORKING .6.2.1. Echelon Network Termination .77897 CABLE AND DEVICE GROUNDING . 107.1. GENERAL GROUNDING GUIDELINES .7.1.1. Ground Wire Specifications .7.1.2. Ground Source Specifications.7.2. POWER INPUT AND RS485/MODBUS GROUNDING .7.2.1. E2 .7.2.2. RS485 I/O and MODBUS Devices (except Control Link) .7.2.3. Control Link Modules .7.3. EMI-RESISTANT RS485 NETWORK GROUNDING PRACTICES .7.4. VSD DRIVE GROUNDING PRACTICES .7.4.1. Analog Output Cable Grounding.7.5. ECHELON CABLE GROUNDING .7.5.1. EMI-Resistant Echelon Network Grounding (For High-EMI Environments) .E2 Controller Wiring Practices101010101011111112131313Table of Contents v
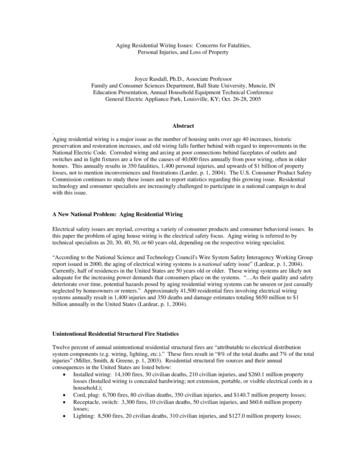
1OverviewOne of the most common causes of communication problems experienced by CPC site controllers isexcess electromagnetic interference (EMI), commonly referred to as electrical noise or just “noise.”Because refrigeration and HVAC controls are typically installed in motor rooms and utility rooms, theyare often in close proximity to other electricaldevices that generate EMI, such as power lines ormotors.Noise can be picked up by any length of wire.Just as an antenna helps a radio receive AM and FMradio signals, a long length of wire between a controller and I/O board or sensor can also act as anantenna for noise.CPC site controllers such as the E2, as well asthe peripheral I/O boards and unit controllers towhich it communicates, go through rigorous testingto ensure (1) that they are not overly susceptible tonoise, and (2) that the devices themselves do not generate excess noise. Regardless, every long wire usedin network, power, and signal wiring can potentially be an antenna for EMI. Unless proper noiseabatement wiring practices are used, even one wiringmistake could result in enough noise to impede ordisable an RS485, Echelon, or Ethernet network.This document is meant to provide a list ofguidelines that should always be followed when wiring RS485 (I/O networks, MODBUS), Echelon, andEthernet networks in an E2 control system.1.1. Periodic outages of communication between the maincontroller (E2) and its peripheral devices. This is mostoften indicated by a large number of “ControllerOffline” alarms in the E2 Alarm Log, which usuallyreturn to normal.Inability to commission devices during setup. Duringcommissioning, the E2 attempts to find a device andread its commissioning information - on a noisy network, the E2 may fail to find devices or require several retries before finding them. Noise may also causecommissioning to proceed very slowly.Intermittent Ethernet connections to E2 (ping works,but UltraSite or InSite cannot make connection to theE2).Communication outages that occur when changes aremade to network connections to the E2. Example: theI/O network devices stop communicating when theEthernet cable is plugged into the E2.Reboots of the E2, in situations where excessive noiseis present.1.2.Sources of NoiseThe most common causes of noise in an E2 controller installation are: Wiring that comes close to an electrical device thatgenerates lots of noise,Routing cable that runs parallel and/or in close proximity to wires that carry high AC voltage and current,Network cable that does not meet specifications,Power wiring from the transformer secondary that isthe wrong wire gage,Improper network structure or termination resistance,andCable that is not grounded or that is grounded improperly.“Noise” and its EffectsNoise, in the context of this document, refers toEMI induced on a network wire or connector thatresult in signals that hinder the controllers’ ability toreceive and send network messages. Just as loudaudio noise in a room makes it harder for people tocommunicate with each other through speech, anoisy network makes it hard for a control device toread messages sent from other controllers.You should suspect a noisy network if your E2control system experiences any of the followingproblems:“Noise” and its EffectsOverview 1
2Avoiding Noise-Generating DevicesThere are a number of electrical devices commonly used in supermarkets and buildings that generate noise. Motor starters, contactors, or other electrical equipment that switches ON and OFF. Switching heavyelectrical loads ON and OFF will generate noise.Inverters for variable-speed motors. Inverters generate a constant amount of high levels of noise.Fluorescent light ballasts. Light ballasts also generateconstant noise.Arc welders (excessive intermittent noise).The best way to eliminate network noise comingfrom a noise-generating device is to keep all networked devices and cable runs as far away from thedevice as possible. Cable runs should be routedaround noise-generating devices, and the E2 (as wellas the devices the E2 is networked with) should bephysically located far away from noise-generatingdevices.In addition, CPC requires that all MODBUS network connections to Control Techniques VSDs use aCT Drive Interface (P/N 535-2725). This assembly,which plugs into the RJ45 MODBUS jack on theVSD, provides the noise filtering circuitry recommended by Control Techniques, and it also providesa screw terminal connector for easier daisy chainingto the MODBUS network.For further information on noise abatement whenusing Control Techniques VSDs, consult the manufacturer’s instructions and follow all recommendedguidelines for installing the drive and reducing noise.Furthermore, when using VSDs, it is highly recommended you follow the EMI-resistant wiring guidelines outlined in Section 7.3., EMI-Resistant RS485Network Grounding Practices.The minimum distance devices and cablingshould be kept away from noise generators is 1 ft.(0.3m) with 5 ft. (1.5 m) being the ideal minimumdistance. The minimum distance may be more orless depending on the amount of noise generated bythe device - refer to the device’s user manual formore information.2.1.Control Techniques Variable-Speed DrivesE2 controllers whose versions are 2.40F01 andabove feature the ability to communicate with certainmodels of Control Techniques variable-speed drives(VSDs) using a MODBUS network connection.Control Techniques and CPC both require allVSDs that will network with E2 controllers to beinstalled with line filters to minimize noise. If installing an E2 network into a site that already hasinstalled VSDs, verify the drives were installed withline filters before networking them to an E2. Contactyour Control Techniques representative to obtain linefilters and assistance with installation.2 E2 Controller Wiring Practices026-1903 Rev 4 19-APR-2010
3Avoiding High VoltageWiringA common mistake made by wiring techniciansis to wire communication cabling in parallel with120VAC, 240VAC, or 480VAC power wiring (sometimes together in the same conduit). High voltagewiring radiates noise in all directions perpendicularfrom the direction of the wire. When a communication wire is run parallel and in close proximity to ahigh voltage wire, the electromagnetic field from thehigh voltage wire will induce noise on the communication cable. The amount of noise induced dependson the voltage and current of the wire, the distancebetween the two wires, and the angle between thetwo wire runs (with parallel being the highest induction).To avoid noise induced from high-voltage wiring:1.If possible, wire serial, Echelon, and Ethernet wiringaway from high-voltage wire. Communicationcabling should be kept a minimum of 3 in. (7.6 cm)apart at all points, with 12 in. (30 cm) being theideal minimum distance.2.Do not wire communication wire and high-voltagewire in the same conduit. Always separate the powerwiring in a separate grounded rigid steel conduit if thetwo wires must be run close together and in parallel.3.Avoid running even part of the communication wiringin close parallel with high voltage wiring. A run ofparallel wire as short as a few inches could yieldenough noise to affect network communication. If thewires must cross each other in close proximity, crossthem perpendicular to each other so the amount ofnoise is minimized (see Figure 3-1).Figure 3-1 - Examples of Good & Bad Cable RoutingControl Techniques Variable-Speed DrivesAvoiding High Voltage Wiring 3
44.1.Using The Correct CableRS485 CommunicationWiringCPC specifies all RS485 I/O and MODBUS wiring used by the E2 must be Belden 8641 (24AWG,300V, CPC P/N 135-8641); Belden 8761 (22 AWG,300V not stocked by CPC); or a 600V-shielded22AWG equivalent stocked by CPC (P/N 135-0600).These are two-connector shielded twisted pair cablethat support a maximum daisy chain cable distance of4000 feet (1219 m) between the E2 and the enddevice on the network.Provided the cable can be routed away fromnoise generators and running in parallel with highvoltage wire, any of the three specified cables willprovide adequate shielding from external noise.4.2.Analog Output Wiring(Control TechniquesVSDs)If using a MultiFlex analog output or 4AO boardto drive a Control Techniques VSD, you MUST useshielded cable between the analog point and the VSDdrive speed input. Use the same two-connectorshielded cable specified for RS485 use: Belden 8641(24AWG, 300V, CPC P/N 135-8641); Belden 8761(22 AWG, 300V not stocked by CPC); or a 600Vshielded 22AWG equivalent stocked by CPC (P/N135-0600).4 E2 Controller Wiring Practices4.3.Echelon Network WiringCPC specifies one type of cable for Echelon Network wiring: a Level 4, twisted pair, stranded,shielded cable that meets all requirements for Echelon LonWorks networks. This cable is available inboth plenum and non-plenum varieties from CPC(see part numbers in Table 4-1). This cable is theonly cable type supported by CPC.Cable TypeCPC Part Number1 pair, non-plenum135-23001 pair, plenum135-2301Table 4-1 - Recommended Wiring4.4.Ethernet Network Wiring4.4.1. ShieldingStandard, unshielded CAT5/5e cable can be usedfor wiring E2s to an Ethernet network as long as thecable is not run near sources of electrical noise. Otherwise, if the cable will be used in a noisy environment, shielded CAT5e cable (Belden 1533, plenum;1533R for non-plenum) should be used. For this typeof cable, you should use shielded RJ45 connectorsmeant for solid conductor wire (L-Com TDS8PC5or equivalent). When connecting CAT5e cable toshielded RJ45 connectors:026-1903 Rev 4 19-APR-2010
1.2.Carefully strip the outer sheath insulation back 1”.Roll back the foil shield insulation and wrap the drainwire around the foil (Figure 4-1). Do not remove anyinsulation from the conductors.Untwist the wires to within 1/8” of the jacket. Arrangethe wires according to TIE/EAI 586A & 586B (Figure 4-2). For straight patch cables, wire both ends586A; for crossover cables, wire one end 586A andthe other 586B. Insert wires into the loading bar. Trimexcess wires.3.Hold the connector in front of you with the lockingtab down. Orient the wires so connector pin 1 alignswith cable pin 1, etc. (Pin 1 is on the far left). Slidethe wires into the CAT5e connector. The cable jacketshould extend into the connector about 1/4” for strainrelief (Figure 4-3).4.Insert the plug into a crimp tool. Firmly squeeze thehandles to set the contacts and secure the cable.12345678Connector shownw/locking tab down,Pin 1 @ far left.Jacket w/shield inserted1/4" into connectorFigure 4-3 - CAT5e Cable End Loaded Into Connector4.4.2. Maximum Cable LengthAn Ethernet cable should be no longer than 328feet (100 meters) from E2 to switch or hub. Exceeding this length will cause communication problems.Figure 4-1 - CAT5e Shielded Cable w/ 1" Stripped JacketFigure 4-2 - 586A & 586B Cable End Wire Color DiagramEthernet Network WiringUsing The Correct Cable 5
5Power Wire Gage SelectionThe gage of wire used to connect networkeddevices to the transformer secondary also plays a significant part in noise reduction. Most CPC controllers and I/O devices are powered by 24VACtransformers. Power wiring from the transformer secondary should be either 18AWG, 16AWG, or14AWG, depending upon the total wire length to alldevices and the total VA of all devices powered.To determine the correct wire gage to use:1.Add together the VA ratings of all devices that will bepowered by the transformer. Table 5-1 shows the VAdevices for the E2 controller and the most commonRS485 I/O and Echelon devices used in an E2 24NoMultiFlex 16624YesMultiFlex I/O(except ESR)1524NoESR88024NoMultiFlex ESR8024YesTD3424NoGateway524Yes 3.18AWG: 462 VA (feet)Estimate the total length of wire necessary to powerthe devices, measured from the transformer secondaryto the last device that will be connected. Using themaximum wire lengths calculated in step 2, choose agage of wire whose maximum wire length is longerthan the total length of wire you will be using.Example: A 24VAC transformer will be usedto power three MultiFlex 168AOs. The totallength of power wire needed is 15 feet. Sincethe total VA of the three MultiFlex boards is45VA, 18AWG wire may not be used, since462 / 45 10.2 feet maximum. 16AWG wireand 14AWG wire may both be used, sincewith 45VA these wires would have maximumdistances of 16.7 ft. and 26.7 ft. respectively.Table 5-1 - VA Ratings for CPC I/O Devices2.Use the total VA calculated in step 1 in the followingequations to determine the maximum wire lengthallowable for each wire gage: 14AWG:16AWG:1200 VA (feet)750 VA (feet)6 E2 Controller Wiring Practices026-1903 Rev 4 19-APR-2010
66.1.Network Structure, Biasing, and Termination ResistanceRS485 NetworkingThe RS485 Input/Output (I/O) Network connectsall input and output communication boards togetherin a single open communications loop. This loop, or“daisy chain,” connects the E2 to multiple input andoutput communication boards, and terminates at thelast input or output board on the network. A diagramof this network arrangement is shown in Figure 6-1.I/O Network daisy chains must be terminatedAND biased at both ends of the daisy chain (Figure6-2).MODBUS daisy chains must be terminated atboth ends of the daisy chain, but must only be biasedat ONE end. Biasing the E2 is the preferred methodof network biasing. Most third-party MODBUSdevices have no termination or network bias capabilities and will require use of a MODBUS terminationblock (see Section 6.1.1.1., MODBUS TerminationBlocks). Others, like the Control Link, have threejumpers similar to CPC I/O devices. For thesedevices, set the termination jumper (middle) to theUP position and leave the biasing jumpers in theDOWN position. (Figure 6-2)RS485 I/O NETWORKSTERMINATED & BIASED(ALL 3 JUMPERS SETTO "UP" POSITION)MODBUS NETWORKSFigure 6-1 - I/O Network ConfigurationsDaisy chains are the only allowable networkstructure for CPC RS485 I/O networks. Branchingand “star configurations” can seriously affect network performance and therefore are not allowed.6.1.1. Terminating and Biasing anI/O Networks and MODBUSNetworksProper termination and biasing is an importantpart of reducing I/O network noise. All CPC-manufactured devices with RS485 ports are equipped withthree on-board jumpers that can provide the resistance necessary to terminate and bias the networkendpoint. The middle jumper provides the termination resistance, while the two outside jumpers provide biasing.RS485 NetworkingTERMINATED & BIASED(ALL 3 JUMPERS SETTO "UP" POSITION)TERMINATED, NO BIAS(MIDDLE JUMPER SETTO "UP" POSITION)OR USE MODBUSTERMINATION BLOCKFigure 6-2 - I/O Network and MODBUS Termination andBiasing6.1.1.1.MODBUS Termination BlocksThird-party devices may or may not have onboard termination jumpers — consult the manufacturer’s instructions for termination information.Network Structure, Biasing, and Termination Resistance 7
If an end device does not have termination jumpers, CPC offers a termination block that can be usedto terminate MODBUS network endpoints (CPC P/N535-2711). Connect this block just before the enddevice (Figure 6-3) and connect the shield to earthground, keeping the exposed shield wire length asshort as possible (3 inches ideal maximum length).First, all devices in a subnet are connected in anunbroken chain without branches or “star configurations” (see Figure 6-5). Then, if more than one E2 ispresent on-site, all chains are connected so that theentire network forms a large unbroken chain, called adaisy chain (see Figure 6-6). This allows for alldevices in the Echelon Network to be hard wiredtogether for trouble free communication.RECOMMENDEDE2E2Figure 6-3 - MODBUS Termination Block (P/N 535-2711)FROM LASTDEVICEAT END OFDAISY-CHAINUNBROKENCHAINSHIELDWIRE(CONNECTTO EARTHGROUND)E226513125revFigure 6-5 - Echelon Wiring - SubnetsTBE2sHAINDAISY CEND OFFigure 6-4 - MODBUS Term Block End-of-Chain Install6.2.Echelon NetworkingEchelon devices are networks together into configurations called segments. A segment is a group ofup to 64 Echelon devices that are connected togetheron an unbroken series of wires.The recommended way of constructing an Echelon Network is called daisy-chaining. In the daisychain network configuration, devices are arranged bysubnets, which consist of one E2 and all Echelondevices associated with the E2.8 E2 Controller Wiring PracticesE226513131revFigure 6-6 - Echelon Wiring, pt. 2026-1903 Rev 4 19-APR-2010
6.2.1. Echelon Network TerminationEchelon networks require the devices on eachend of the daisy chain to be terminated with a 105ohm resistor across the signal-carrying leads. MostCPC-manufactured Echelon devices have on-boardtermination jumpers that, when set to the “terminated” position, provide the required terminationresistance (refer to the device’s own installation documentation). If the device does not have terminationjumpers, CPC offers an Echelon termination block(P/N 535-2715) that may be wired in series rightbefore the end device (see Figure 6-7) or at the endof an Echelon network run (necessary for TD3 installations) (Figure 6-8). The termination block providesthe necessary 105-ohm resistance for network termination.Figure 6-7 - Echelon Termination Block (P/N 535-2715)Figure 6-8 - Termination Block Usage With TD3sEchelon NetworkingNetwork Structure, Biasing, and Termination Resistance 9
7Cable and DeviceGroundingProper grounding is an essential part of reducingnetwork noise. Failure to properly ground power andnetwork wiring is one of the most common causes ofcritical noise problems. Follow these guidelineswhen installing RS485/MODBUS and Echelon networks, and refer to them when troubleshooting problematic installations to ensure the grounding iscorrect.7.1.General GroundingGuidelinesA good ground wire provides a low-DC-resistance path between the cable’s or device’s groundconnection and the earth ground. However, becauseof the presence of high frequency AC noise, theground wire itself must also be limited in length, orelse it may become an “antenna” and add noise to thenetwork.7.1.1. Ground Wire SpecificationsThe length of all ground wires should be kept to6 inches (15.3 cm) or less. Use a 14AWG strandedwire or larger.7.1.2. Ground Source SpecificationsThe best “good” earth ground sources to use arelisted below, in priority order: A large metal panel or plate that is connected to agood electrical ground. A panel or plate that is at least3 feet by 3 feet (0.9 m by 0.9 m) is desirable.Earth grounded steel rack.If none of these types of earth ground sources areavailable, as a last resort use one of the followingtypes of earth grounds. These are not ideal andshould not be used unless absolutely necessary: Electrical system earth ground.Note: If grounding against a metal plate orpanel that is coated or painted, scrape awaythe coating to expose the bare metal beforemaking the ground attachment, and use a toothwasher.7.2.Power Input and RS485/MODBUS GroundingFor E2s networked with RS485 I/O Networkdevices, such as MultiFlex, or MODBUS devicessuch as Control Link RSCs or CDs, grounding mustbe done on both the power inputs and the networkconnector terminals for each device in the network(including the E2).7.2.1. E27.2.1.1.Grounding the EARTHGROUND TerminalThe Power Interface Board (PIB) on the E2 hasan earth ground connector (J3) next to the power connector on the lower right corner of the board. Connect this connector to an earth ground source using aground wire at least 14AWG and no longer than sixinches. To further ensure the ground path is complete: Scrape away any paint or coating (if grounding to apanel or chassis)Use the shortest piece of 14AWG stranded wire available.If grounding to the door of a panel, make a second14AWG wire connection between the panel door andthe chassis (do not rely on the hinges of the panel toprovide ground connection to the chassis.7.2.1.2.Grounding the RS485 NetworkCableProvided all power connectors are properlygrounded, the shield wire for all cables connecting toan E2 network connector may be connected to thecenter (0V) terminal of the network connector.Metal electrical conduit, connected to an earth groundWater pipes (metal, assuming there are no plastic sections).10 E2 Controller Wiring Practices026-1903 Rev 4 19-APR-2010
If the network is experiencing problems withEMI or is known to be in a high-noise environment,follow the EMI-resistant wiring guidelines forgrounding the shield wire outside the E2 enclosure(Section 7.3.1., Ground the Shield Outside of theE2).should be at least 14AWG stranded, no longer thansix inches, and should be routed away from all highvoltage wiring leading from the power input and therelay outputs.7.2.2. RS485 I/O and MODBUS Devices (except Control Link)7.2.2.1.Grounding the Power Connector TerminalEach RS485 I/O and MODBUS device, including both devices that are powered by center-tappedtransformers and devices powered by non-centertapped transformers, must have the 0V terminal ofthe power connector connected to a separate earthground. “Separate” earth ground means you mayNOT wire the 0V connectors of multiple boards inseries and ground at one point. Each 0V terminalmust be earth grounded separately. Connect each 0Vterminal for all networked devices earth grounds,using ground wires at least 14AWG and no longerthan six inches.7.2.2.2.Figure 7-1 - Earth Ground Connection Location7.3.Grounding the Network CableThe shield wires of the network cable are normally connected to the center (0V) terminal of theRS485 I/O connector. Provided the power inputs areproperly grounded, you do not need to connect thecenter (0V) terminals to separate earth grounds, sincethe center pins of both the power and network connectors are common on the board.If the network is experiencing problems withEMI or is known to be in a high-noise environment,follow the EMI-resistant wiring guidelines forgrounding the shield wire outside the E2 enclosure(Section 7.3.1., Ground the Shield Outside of theE2).7.2.3. Control Link ModulesThe Control Link Module does not have aground terminal on its power output. The onlyground connection on the Control Link that needs tobe earth grounded is the “Common” terminal on thetop input block (see Figure 7-1). The ground wireEMI-Resistant RS485 Network Grounding PracticesEMI-Resistant RS485Network GroundingPracticesIf you are experiencing network problems thatmight be related to noise, it is best to eliminate thenoise path at the device itself and through earthgrounding prevent the noise from traveling throughthe cable into the E2.Begin by identifying potential sources of noise,and identifying what I/O or MODBUS devices arenear the noise source or connected (by cable) to thenoise source (refer to Section 1.2. and Section 2 forcommon noise sources). For example, a MultiFlex168AO connected to a VSD drive by analog outputcable would be a possible source of harmful noise.For I/O and MODBUS devices connected to ornear high-noise devices:1.Ensure the power connect
4 E2 Controller Wiring Practices 026-1903 Rev 4 19-APR-2010 4 Using The Correct Ca-ble 4.1. RS485 Communication Wiring CPC specifies all RS485 I/O and MODBUS wir-ing used by the E2 must be Belden 8641 (24AWG, 300V, CPC P/N 135-8641); Belden 8761 (22 AWG, 300V not stocked by CPC); or a 600V-shielded 22AWG equivalent stocked by CPC (P/N 135 .