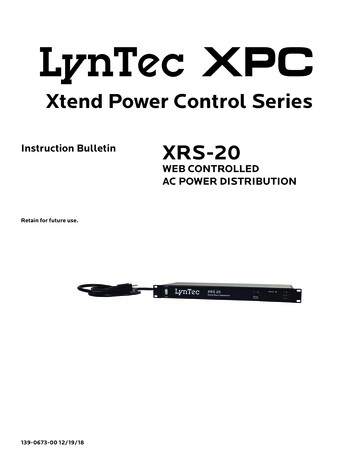
Transcription
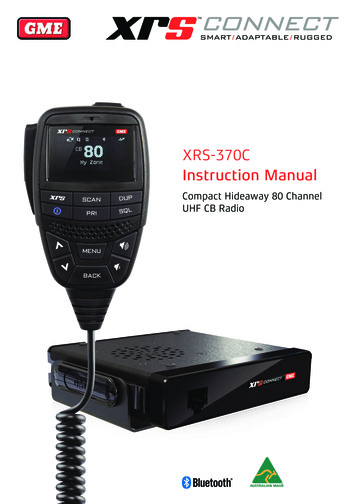
XRS-370CInstruction ManualCompact Hideaway 80 ChannelUHF CB Radio
CONTENTSINTRODUCTION. 1SCANNING . 4Select a zone.10Important information concerningUHF CB radio.1Scan groups.4Edit a zone name.10Programming the scan memories.4Add channels to a new zone.11Emergency channels.1Auto skip.5Edit existing channels in a zone.11Telemetry channels.1Open Scan.5To select programmable button options.12FEATURES . 1Selecting Open Scan.5Functions.12Transmit (TX).1Priority Scan.5Radio settings.12Receive (RX).1Selecting Priority Scan.6Radio setting options table.13Scanning and memory functions.1Network Scan (Net-Scan).6Scan settings.13Signal processing.1Enabling Net-Scan.6SelCall.13Privacy functions.1Using Net-Scan.6INSTALLATION. 14Physical properties.1Ending the Scan.6General.14User controls and interface.2CTCSS AND DCS. 6Installation.14XRS CONNECT APP. 2Choosing CTCSS or DCS.6Installing the cradle.14Pairing.2CTCSS tone set compatibility.7Mounting the cradle.14GENERAL OPERATION. 2Busy Lockout.7Fitting the radio.15Front panel.2Monitor function.7Removing the radio.15Rear panel.2SELECTIVE CALLING. 7Fitting the controller microphone.15Controller microphone.2SelCall identification number.7DC power connection.15GENERAL. 2SelCall naming .8Power.2The Quiet mode.8Radio remains ON when the ignitionswitch is OFF.15Volume.2Sending a SelCall.8Selecting channels.2Receiving a SelCall.8Squelch.2Quiet mode.8Adjusting the Squelch level.2Setting up the Quiet mode.8Signal meter.3Activating the Quiet mode.8Brightness.3Receiving signals in the Quiet mode.8Transmitting.3Scanning in the Quiet mode.8Time-out timer.3Group Calling.9Busy Lockout.3Programming and sending Group Calls.9Voice scrambler.3Call acknowledge in Group mode.9Beep tone volume.3Storing Group Call idents.9Dynamic Volume Control (DVC).3Receiving Group Calls.9Selecting the active speaker.3MENU OPTIONS. 9Microphone gain.3Context menu examples.9Squelch tail.4MENU TABLE. 10Repeater and duplex mode.4Receive-only channels (zones).10Priority channel.4ACCESSORIES SUPPLIED XRS-370C 5 watt UHF CB Radio Mounting Cradle (MB009) XRS Connect Speaker Microphone (MC664B) Microphone Extension Lead (LE040) 8 pin to 8 pin Adaptor (AD008) Microphone Clip (MB206) DC Lead (LE09) Screw Pack Quick Start GuideRadio turns ON and OFF with theignition switch.15High voltage detection.15Antenna connection.15Noise suppression.16Wiring.16FREQUENCY AND SUBTONE TABLES. 16CTCSS tone frequencies.16DCS codes.17UHF CB operating frequencies.17SPECIFICATIONS. 18Electrical.18Mechanical specificationsand connections.18STANDARD COMMUNICATIONSCONTRACT WARRANTY AGAINSTDEFECTS. 19
INTRODUCTIONYour GME XRS-370C 80 channel radio is Australian designed andmanufactured and is the most advanced UHF Citizen Band radioavailable. It combines the very latest in electronic hardware withthe most up-to-date computer aided design and manufacturingtechniques to produce an extremely compact mobile radio withoutstanding specifications, features and performance.In the event additional telemetry/telecommand channels areapproved by the ACMA, these channels shall be added to thosecurrently listed where voice transmission is inhibited.Currently transmissions on channels 61, 62 and 63 are alsoinhibited and these channels are reserved for future use.FEATURESThe XRS Connect speaker microphone with OLED display and frontmounted speaker provides clear sound and total control fromthe palm of your hand allowing your radio to be mounted almostanywhere in your vehicle.Transmit (TX)XRS Connect are the first UHF CB radios with an app to configureand control the radio. Visit gme.net.au/GETXRS for moreinformation.Receive (RX)IMPORTANT INFORMATION CONCERNING UHF CB RADIOThe use of the Citizen Band radio service is licensed in Australia bythe Australian Communications and Media Authority (ACMA) Radiocommunications (Citizens Band Radio Station Class Licence andin New Zealand by the Ministry of Economic Development NewZealand (MED)).A General User Radio Licence for Citizens Band radio and operationis subject to conditions contained in those licences.The class licence for users and equipment operating in the CB/PRS477 MHz band was amended in 2011 to include 80 channels. Thisradio meets the 80 channel standard.Individually Programmable DUPLEX Function: User selectablefor only those individual channels in your area that have repeaters,leaving the others free for use as extra simplex channels.Squelch Tail: Can be switched off to eliminate the audible noiseburst normally heard when the Squelch closes.User Programmable Receive Channels: 8 zones of 50 channelsper zone for a total of 400 additional receive-only channels.Digital Signal-Strength Meter: Provides a numeric signalstrength indication in numbers from 0 to 9 .Scanning and memory functionsMicroprocessor Controlled Frequency Synthesiser: Allowsuser programmable control of scanning, channel memories andselected feature options.Programmable Scan Function: Scans the selected UHF CBchannels with Open, Priority and Network scan functions available.NOTE: While operating on the UHF CB band you may stillencounter older 40 channel radios on channels 1 to 40, with thepossibility of minor interference and varying levels of receivedvolume.Priority Channel: A user programmable Priority channel forinstant recall at the press of a key. If the incoming speech sounds loud and distorted, simplyDigital Signal Processing (DSP): Measures, filters andcompresses standard analogue audio signals and converts theminto digital format. Allows advanced RF and audio processingtechniques to be applied to maximise the radio’s performance.adjust your radio volume for best performance or alternatively,enable the radio’s Dynamic Volume Control feature which willautomatically compensate for this effect. If an older 40 channel radio is transmitting nearby on a channeladjacent it may cause interference to your reception. Simplymove up or down a few channels from your currently selectedchannel.The above situations are not a fault of the radio but a symptom ofoperating older 40 channel and newer 80 channel radios within thesame band. Any possibility of interference will decrease over timeas the population of 40 channel radios ages and decreases.Further information and updates are available from the ACMA atwww.acma.gov.au and the MED, Radio Spectrum Management at:www.rsm.govt.nzEmergency channels he ACMA has allocated channels 5/35 for emergency use only.TChannel 5 is the primary Simplex Emergency Channel.Where a Channel 5 repeater is available, you should select Duplexon CH 5.NOTE: Channel 35 is the input channel for the Channel 5 repeatertherefore Channel 35 should also not be used for anything otherthan emergency transmissions.Telemetry channelsACMA regulations have allocated channels 22 and 23 for telemetryonly applications and have prohibited the transmission of speechon these channels. Consequently your radio has a transmit inhibitapplied to channels 22 and 23.BACK TO CONTENTSSignal processingAdvanced Signal Management (ASM): Identifies interferencecaused by strong local signals on adjacent channels and preventsthese from opening your Squelch. ASM also minimises distortionon reception by fine tuning the receiver frequency to match that ofthe incoming signal.Dynamic Volume Control (DVC): Automatically compensatesfor variations in received audio level to provide a constant audiooutput level to the speaker.Privacy functionsVoice Inversion Scrambler: When activated, scrambles your voiceso that communications are only intelligible to others using thesame scrambler technology.Inbuilt CTCSS and DCS: User selectable Continuous Tone CodedSquelch System and Digital Coded Squelch system provides silentoperation on individual channels.In-Built SelCall with Quiet Mode: Provides selective calling ofindividuals or groups with fully user-adjustable 5-tone transmittedSelCall Ident. Also allows alphanumeric naming of up to 20 Identsfor easier caller identification.Physical propertiesOver Voltage Protection: Special over voltage detection circuitryprotects the radio and warns of excessive voltage conditions onthe display.Rugged Construction: With die-cast chassis.PAGE 1
Controller microphoneUser controls and interfaceFull Function Controller Microphone: Includes front mountedspeaker to channel clear audio towards the user.OLED Display: Bright, high contrast, dot matrix OLED display isreadable under all lighting conditions.A more detailed description of these key functions isincluded right.XRS CONNECT APPThe GME XRS Connect app is the easy way to customise, updateand maintain your XRS Connect radio. To download the free XRSConnect app for iOS or Android go to the App Store or Google Playand search for ‘XRS Connect’. Register the XRS Connect app andreceive an additional one year warranty – available for alimited time.XRS Connect are the first UHF CB radios with an app to configureand control the radio. Visit gme.net.au/GETXRS for moreinformation.MicrophonePush to talkProgrammable(XRS) functionkeyProgrammable(Top) FunctionKeyOLED akerMenu/EnterVolume Channel/DownVolume -BackPairingTo pair your Smart Device with your XRS Connect radio, openthe XRS Connect app, go to the ‘My Radio’ tab and select‘Connections’. Locate your radio in the list and select ‘Pair’. Next,press ’Connect’ next to your radio in the list, and your app willreturn to the ‘My Radio’ screen and the icon on your radioshould change toto show that the Bluetooth wirelesstechnology enabled pairing is successful.Once connected, select the ‘Read from Radio’ button to readyour radio’s settings into the app. After you have configured yourpreferences in the app, select ‘Write to Radio’ to update your radiowith your new settings.NOTE: The Bluetooth wireless technology enabled connectionbetween your smart device and your XRS Connect radio must bemade through the XRS Connect app. You will not be able to pairyour smart device to your XRS Connect radio using the normalBluetooth wireless technology enabled settings option on yoursmart device.The XRS Connect app is compatible with iOS 9.0 and above andAndroid 5.0 and above. A full list of compatible devices andapplication software is available at gme.net.au/GETXRSGENERAL OPERATIONFront panelGENERALPowerPress and hold thekey to turn the radio on. Press and hold thekey to turn the radio off.VolumePress theor keys to adjust the volume. Presstoincrease the volume or to decrease the volume. The volumelevel is displayed on the OLED Display in values from 01 (min) to31 (max).If no sound is heard, briefly press the SQL key to temporarilyun-mute the radio then adjust the volume while listening to thebackground noise. When finished, briefly press the SQL key againto re-mute the radio.NOTE: At the minimum volume setting there is still sufficientvolume to be heard in a quiet cabin environment.Selecting channelsTo select a channel, press thekey. Pressorto selecta higher channel orto select a lower channel. The selectedchannel is displayed on the OLED Display.Press and hold either key to advance quickly through the channels.SquelchThe Squelch is used to eliminate any annoying background noisewhen there are no signals present. The Squelch can be opened orclosed using the SQL key. When the Squelch is open the receiver’sbackground noise can be heard and theicon is displayed.When the Squelch is closed the receiver remains quiet while thereare no signals present but any incoming signals will override theSquelch and be heard in the speaker.Microphone socketRear panelAdjusting the Squelch levelThe Squelch sensitivity level has been factory set to provideoptimum performance under most operating conditions. Ifrequired, the sensitivity level can be adjusted to suit changingconditions.12V DCsocketExtensionspeaker socketBACK TO CONTENTSAntennasocketTo adjust the Squelch sensitivity, refer to the MENU / RADIOSETTINGS options. The default squelch sensitivity level is 3.PAGE 2
Signal meterThe signal meter indicates the relative strength of the incomingsignal in numerical format. Signal strengths are displayed on theright of the Channel Display in values from 0 to 9. Signals abovestrength 9 are displayed as 9 .BrightnessThe OLED display and keys are backlit for easier viewing undera wide range of lighting conditions. The backlight remains onwhenever the radio is switched on. The brightness level can besmoothly adjusted in steps from 0 to 10. To adjust the brightnesslevel, refer to the MENU / RADIO SETTINGS options.A Dim function can also be assigned to the programmable XRSkey to quickly switch the brightness level to minimum for low lightviewing. This saves having to manually readjust the brightnesslevel when moving into low light environments.To assign the Dim function to a key, refer to theMENU / PROG BUTTONS options.TransmittingPrior to transmitting, always check the channel is clear. This canbe done by listening to the channel or by visually checking thattheicon is not visible or the signal meter is not indicating asignal.To transmit, press the PTT on the microphone. Theicon willappear. Hold the microphone about 3-5 cm from your face andspeak at a normal voice level. The microphone is quite sensitive soit is not necessary to raise your voice or shout. Release the PTTwhen you have finished talking, theicon will disappear.IMPORTANT: Always listen to ensure the channel is free beforetransmitting.Time-out timerThe radio has a built-in time-out timer that automaticallylimits transmissions to a maximum of 3 minutes of continuousoperation. This feature is required by the ACMA to preventaccidental blocking of the frequency should your PTT becomejammed or be otherwise pressed accidentally.When the time-out timer activates, the radio will give a low tonefor a few seconds and the transmitter will be temporarily disabled.Release the PTT to restore normal operation.Busy LockoutWhen enabled, the Busy Lockout function detects when someoneis transmitting on the channel and prevents your radio fromtransmitting over them. If you press the PTT when the channel isbusy the radio will emit a warning beep and theicon won’tbe displayed. If this happens, look for theicon on the displayas an indicator that the channel is already in use. If the channelis busy, simply wait until the channel is clear and press the PTTagain.scrambled communications with owners of non-GME radios. Oncethe scrambler has been activated your transmission and receptionwill only be intelligible to others using the same scramblertechnology.To enable or disable the voice scrambler, refer to theMENU / RADIO SETTINGS options.NOTE: To avoid interference with other services or users, thescrambler cannot be enabled on channels 5, 11, 22, 23, 31-38, 61,62, 63, 71-78 or on any channel that has been set to Duplexmode (1-8)Beep tone volumeThe Beep tone provides audible feedback whenever the keys arepressed. The Beep tone volume can be adjusted in values from0 – 10. To switch the beep off, select 0.To adjust the volume of the Beep tone, refer to theMENU / RADIO SETTINGS options.Dynamic Volume Control (DVC)The modulation level of signals heard on the UHF CB band hasalways varied considerably resulting in noticeable differences inreceived audio volume between stations.Generally, users have compensated for this by adjusting theVolume control for each incoming signal.With the introduction of 80 channel narrowband transmissionsthat use lower levels of modulation, the differences in receivedaudio volume is likely to increase further.Your XRS-370C radio is able to automatically compensate for thesevariations by utilising a Dynamic Volume Control. When activatedthrough the menu, this feature automatically compensates forvariations in received audio level resulting in a constant audiooutput level to the speaker.To activate the Dynamic Volume Control, refer to theMENU / RADIO SETTINGS options.Selecting the active speakerThe XRS-370C has two speakers - one mounted inside the radioand the other mounted inside the microphone.By default, sound is reproduced by both speakers; however ifyou prefer, one of these speakers can be switched off, leavingeither the radio’s internal speaker or the microphone’s speaker toreproduce sound.To select which speakers are turned on, refer to the MENU /RADIO SETTINGS options.Microphone gainWhen Busy Lockout is disabled, you should check that thechannel is clear before pressing the PTT to avoid transmittingover others who may be already transmitting on the channel.The microphone gain controls the sensitivity of the microphone toyour voice input level. If you are quietly spoken or are operatingin a quiet environment you can increase the microphone gain tomake your voice sound clearer. If your voice is quite loud or youare working in a noisy environment and wish to minimise theamount of background noise that is picked up, you should reducethe microphone gain.To enable or disable Busy Lockout, refer to theMENU / RADIO SETTINGS options.To adjust the microphone gain, refer to theMENU / RADIO SETTINGS options.Voice scramblerNOTE: The Microphone Gain provides a ‘fine’ adjustment to themicrophone sensitivity. A wider adjustment range is availablethrough the XRS Connect App.Your radio incorporates a simple voice scrambler using bandinversion. The scrambler is compatible with the majority ofscramblers used by other manufacturers, allowing you to enjoyBACK TO CONTENTSPAGE 3
Squelch tailThe Squelch Tail is the short burst of noise that is heard in thespeaker at the end of a transmission just before the Squelchcloses. To some it is a reassuring confirmation that it is their turnto transmit but in some applications it may be an annoyanceespecially when listening through an earpiece or headphones.The Squelch Tail can be turned off, reducing it to a faint click asthe Squelch closes.To enable or disable the Squelch Tail, refer to the MENU / RADIOSETTINGS options.Repeater and duplex modeDuplex operation allows the radio to transmit on a differentfrequency to that which it receives. This allows operation throughrepeater stations.A repeater station consists of a linked transmitter/receivercombination installed in a prominent location. The repeateris designed to receive signals on a designated channel andretransmit them on another channel. Repeaters are usuallymounted on hills or tall buildings. The increase elevation greatlyimproves both the receiving and transmitting range of therepeater allowing it to receive and retransmit signals to radios thatwould otherwise be out of range of each other.Normally, UHF CB radios transmit and receive on the samefrequency - known as Simplex operation. However, tocommunicate through repeaters, your radio must be able totransmit and receive on different channels - otherwise known asDuplex operation. Your radio is fitted with a Duplex key to allowyou to operate through repeaters.The Duplex function can only be selected on channels 1 - 8 and41 - 48 as these are the channels that have been allocated forrepeater use. When Duplex is selected, your radio receives on theselected channel (e.g. CH 1) but transmits 30 channels higher (CH31). The repeater hears your signal on CH 31 and retransmits it onCH 1 for others to hear.only be used in Simplex mode if there are no repeaters in or nearyour location that operate on the selected channel. In particular,avoid operating in Simplex mode on any of the repeater inputchannels 31 - 38 and 71 - 78 unless you are absolutely sure thatthere are no repeaters in range using that channel. Inadvertentlytransmitting on an active repeater input frequency in simplexmode could cause interference to other users on that repeaterwho might not be audible to your radio.Priority channelThe Priority channel feature allows you to instantly recall anyone of the 80 CB channels in your radio. This feature can be usedto provide instant access to your working channel or your localrepeater channel at the press of key. It is also used in conjunctionwith the Priority Scan mode.To store a Priority channel1 Select the required channel.2 Press and hold the PRI key. The channel number will flash fora few seconds then a high beep will be heard as the channel isstored. The ‘PRI’ icon will now be visible whenever that channelis selected.NOTE: The Priority channel can also be set through the Menu.To recall a Priority channel1 Briefly press the PRI key. The radio will immediately switch tothe Priority channel and ‘PRI’ will be displayed.NOTE: If the radio was scanning when the Priority channel wasrecalled, the scan will be cancelled.SCANNINGYour radio incorporates a scan function allowing selected groupsof channels to be scanned for signals. Channels can be scanned ata rate of 50 channels per second.When a signal is found, scanning will pause to allow the signal tobe heard then resume scanning when the channel is clear again.Scan groupsYour radio supports three Scan Groups - Open Scan, Priority Scanand Network Scan.Open Scan lets you sequentially scan from 2 to 80 user-selectableCB channels.Priority Scan lets you constantly monitor your priority channelwhile scanning a group of user-selectable CB channels.Your XRS-370C radio allows you to enable or disable Duplex modeon individual repeater channels. In this way any repeater channelsthat are not being used with repeaters in your area can be used inSimplex mode for normal direct radio-to-radio communications.To enable Duplex on a repeater channel1 Select the required repeater channel (1 - 8, 41 - 48).2 Briefly press the DUP key. Theicon will appear on thedisplay accompanied by a high beep.To remove Duplex from a repeater channel1 Select the required repeater channel (1 - 8, 41 - 48). If duplex iscurrently selected, theicon will be displayed.2 Briefly press the DUP key. Theicon will disappear from thedisplay accompanied by a low beep.Network Scan allows a group of radio users to maintaincommunications even when the band is congested by monitoringa small group of user selectable channels. If the operating channelbecomes busy with users from outside your group, Net-Scan willautomatically select a new free channel from the scan group andtransparently switch all users in your group to the new channel.To select Open Scan, Priority Scan or Network Scan, refer to theMENU / SCAN SETTINGS options.Programming the scan memoriesEach Scan Group has its own separate channel memory allowingyou complete freedom to program your choice of channels intoeach group.To add or remove channels from the selected Scan memory:1 Select the required channel using the2 Check to see if theorkey.icon is displayed on that channel.IMPORTANT: Channels 1 - 8, 31 - 38, 41 - 48 and 71 - 78 shouldBACK TO CONTENTSPAGE 4
Ifis displayed, the selected channel is already in the scanmemory. To remove it, press and hold SCAN. A low beep will beheard andwill disappear. Ifis not displayed, the selected channel is not in the scanmemory. To add it, press and hold SCAN. A high beep will beheard andwill appear on that channel.Repeat to add or remove other channels in the scan memory.channel before you press SCAN. e.g. to make channel 24 yourworking channel, simply select channel 24 before pressing SCAN.To begin scanningBriefly press SCAN. A high beep will be heard, ‘SCANNING’ will bedisplayed and theicon will animate. During this time the scanmode and the number of channels being scanned will be displayedalong with the selected Zone.IMPORTANT: When adding channels to Net-Scan, please considerthe following: The transmitter on your radio is inhibited on channels 22, 23 andchannels 61, 62, 63 as required by the ACMA. This makes thesechannels unsuitable for use as Net-Scan channels. You should not include any repeater channel unless you haveconfirmed that the channel is not allocated to repeaters in yourarea. Using an active repeater channel in Net-Scan may result ininterference to repeater users on that channel.NOTE: If there are less than 2 channels programmed into the scanmemory when you press SCAN, a low beep will be heard and thecommand will be ignored.Auto skipIf a busy channel is found, scanning will pause to allow the signalto be heard and will remain there for as long as the channelremains busy. Once the channel has been clear for 5 seconds,scanning will resume automatically.While scanning, if an active channel in your Scan Group becomesa nuisance by constantly interrupting the scan, briefly pressorwhile the radio is paused on that channel. The busy channelwill be temporarily removed from the Scan Group to allow time forthe channel to become clear again and scanning will continue fromthe next channel in the sequence. After 30 seconds the skippedchannel will be reinstated in the scan sequence.If the unwanted active channel continues to interrupt the scaneven after the 30 second skip period has elapsed, hold SCANwhile the radio is paused on that channel. The ‘nuisance’ channelwill be completely removed from the Scan Group for the durationof that scan session. To restore the channel, simply stop andrestart the scan session using the SCAN key (or switch the radioOff then On again).NOTES:1 You can skip as many busy channels from the Scan Group asyou wish, however if you attempt to skip the last remainingchannel, all the previously skipped channels will be restored tothe Scan Group.2 The length of the skip period can be adjusted through the XRSConnect App.Open ScanOpen Scan allows a group of channels to be scanned in anascending sequence. If a signal is found, the scan will pause onthat channel. During this time you can press the PTT on themicrophone and talk on the channel. Once the channel has beenclear for 5 seconds the scan will resume.Operating in the Open Scan modeIf you don’t wish to listen to a busy channel, briefly pressorwhile the radio is paused on that channel. The busy channelwill be temporarily removed from the Scan Group to allow time forthe channel to become clear again and scanning will continue. Theskipped channel will be reinstated in the scan sequence after 30seconds (see Auto Skip).If you press the PTT while the radio is scanning
GME XRS Connect app is the easy way to customise, update and maintain your XRS Connect radio. To download the free XRS Connect app for iOS or Android go to the App Store or Google Play and search for 'XRS Connect'. Register the XRS Connect app and receive an additional one year warranty - available for a limited time.