Transcription
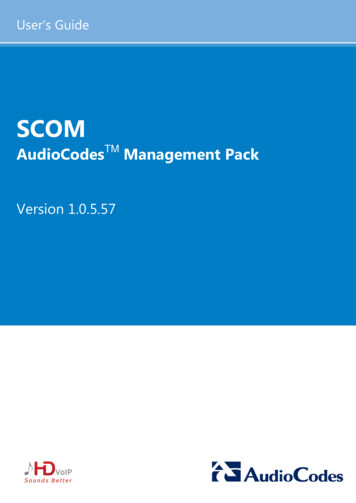
Citrix SCOM Management Pack 1.4 for ShareFileNov 27, 20 17Citrix SCOM Management Pack for ShareFile is an availability and performance management solution that extends end-toend service monitoring capabilities of Microsoft System Center Operations Manager (SCOM) to include the Citrix ShareFile(ShareFile) infrastructure. It fully integrates the topology, health, and performance data into SCOM, providing an end‐to‐end operations overview across the ShareFile infrastructure and enabling delivery of effective business servicemanagement.Citrix SCOM Management Pack for ShareFile provides the following features:Monitoring StorageZones Connector services availabilityMonitoring of Internet Information Services (IIS) application pool and website statuses on the StorageZones ControllercomputerReceiving alerts regarding SSL certificate expiry on StorageZones Controller computerPresentation components including the T opology, State, Alert, and Performance viewsPerformance monitoring of ShareFile user accounts and StorageZones Controller instancesArchitectureT he following diagram shows how Citrix SCOM Management Pack for ShareFile connects the SCOM managementplatform and the Citrix enterprise infrastructure.https://docs.citrix.com 1999-2017 Citrix Systems, Inc. All rights reserved.p.1
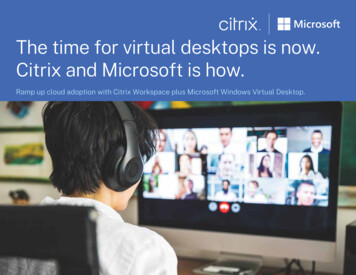
Deployment scenariosCitrix SCOM Management Pack for ShareFile can be installed and configured in highly restrictive network environments,provided that the required ports and protocols are enabled in the firewalls.Deployment scenario with direct connectionT he following diagram shows a sample deployment with a direct connection between the SCOM management server andthe SCOM agent (Microsoft Monitoring Agent in this example) deployed in the DMZ. T he diagram also depicts protocolsand ports that must be enabled in the firewalls in order for the Citrix SCOM Management Pack for ShareFile Agent service(Citrix MPSHF Agent ) to be fully functional.https://docs.citrix.com 1999-2017 Citrix Systems, Inc. All rights reserved.p.2
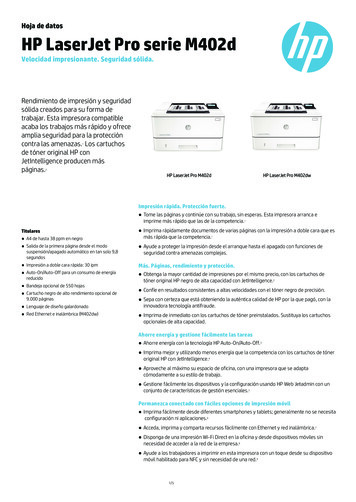
Deployment scenario with SCOM gateway serverT he following diagram shows a sample deployment with a SCOM gateway server within the DMZ, managing theconnection between the SCOM management server and the SCOM agent (Microsoft Monitoring Agent in this example).T he diagram also depicts protocols and ports that must be enabled in the firewalls in order for the Citrix SCOMManagement Pack for ShareFileAgent service (Citrix MPSHF Agent ) to be fully functional.https://docs.citrix.com 1999-2017 Citrix Systems, Inc. All rights reserved.p.3
https://docs.citrix.com 1999-2017 Citrix Systems, Inc. All rights reserved.p.4
What's newNov 27, 20 17Citrix SCOM Management Pack 1.4 for ShareFile introduces the following new or enhanced features:Support f or Citrix ShareFile versions. Citrix SCOM Management Pack for ShareFile now supports ShareFile Versions5.0, 5.0.1, and 5.1.FIPS Compliance. Citrix SCOM Management Pack for ShareFile now uses FIPS (Federal Information ProcessingStandards) compliant algorithms and can monitor FIPS-compliant systems.TLS 1.2 support. Citrix SCOM Management Pack for ShareFile is enhanced to monitor Citrix ShareFile that has T LS(T ransport Layer Security) protocol Version 1.2 enabled.Known issuesT he following is a list of known issues in this product version.Issue ID: SCOM-898Symptom: In the ShareFile MP Configuration tool, modifications of the Enable Proxy option are not immediatelyreflected in the Enabled column in the main window.Action: None. T he tool properly enables or disables configuration entries. T he column shows the correct option valuesafter the configuration changes are applied (by clicking OK in the main window) and the tool is started again.Issue ID: SCOM-770Symptom: Health states of several aggregate rollup monitors are not propagated up to the Customer Managed Zoneslevel; they are not propagated at all. Examples of such monitors are:– Availability Health Rollup From StorageZone Service Group to StorageZone Controller Monitor– Configuration Health Rollup From StorageZone Service Group to StorageZone Controller MonitorAction: None. T here is no workaround available.Issue ID: SCOM-514Symptom: In the output of the Check Requirements and Configuration for Citrix MPSHF Agent task in the SCOMOperations console, user names and folder names that contain non-ASCII characters are not displayed correctly. Forexample, Spanish characters çñ appear as in such a name.Action: None. Apart from the visual glitch, the functionality of the product is not affected in any way. You cantherefore safely ignore the symptom.Issue ID: SCOM-459Symptom: During a Citrix SCOM Management Pack for ShareFile upgrade on the SCOM management server computer,the Setup Wizard fails to import the included management packs. T his issue occurs when the effective installation folderof the new product version differs from the installation folder of the earlier version.Action: After you close the Setup Wizard, manually import the management packs. For instructions, see sectionManually importing included management packs into SCOM in Optimize.Issue ID: SCOM-411https://docs.citrix.com 1999-2017 Citrix Systems, Inc. All rights reserved.p.5
Symptom: After upgrading the product from the version 1.1, the %ProgramData%\Comtrade folder is left on the localsystem. T his issue occurs on the SCOM management server computer as well as on the agent-managed computers.Action: Manually remove the residuary folder by using an operating system tool.UpgradingNote: Earlier product versions were released under the name Comtrade Management Pack for Citrix ShareFile.Upgrade is available only for the following version: 1.1. During the upgrade process, the included management packs of theearlier product version are automatically upgraded; they prior removal is not required.To upgrade the Citrix SCOM Management Pack for ShareFile to its current version, do the following:1. Prepare your environment for installation of the new product version. For instructions, see Preparing for theinstallation in Install and configure.2. Check if the .mpb file that was installed by the product is locked by any program, for example, SCOM Operations consoleor Windows PowerShell. T his includes programs in both active and disconnected sessions. If the file is locked, exit thelocking program, for example, exit the SCOM Operations console or close the Windows PowerShell window.Tip: T o check if a file is locked, try renaming it and then reverting to its original file name. Inability to rename the fileindicates a locking program. You can identify it by using the Handle utility of Sysinternals Suite (see the Handle webpageon the Microsoft T echNet website).3. Install the product (its server-side part) on the SCOM management server computer. For instructions, see Installing theproduct on the SCOM management server computer in Install and configure.Note: Installation process upgrades the product and preserves local configuration data.4. Verify the installation on the SCOM management server computer. For instructions, see Verifying the installation on theSCOM management server computer in Install and configure.5. On the SCOM management server computer, move the mpshf config.dat file from the%ProgramData%\ComTrade\MPShare\ShareFile MP directory to the %ProgramData%\Citrix\CitrixMPShare\ShareFileMP directory.6. Configure access to the shared folder for agent installation. For instructions, see Configuring access to the shared folderfor agent installation in Install and configure.7. Install the product (its agent-side part) on the StorageZones Controller computers. For instructions, see Installing theproduct on the StorageZones Controller computers in Install and configure.Important: In the Run T ask – Install Citrix MPSHF Agent dialog box, set the UpgradeAgent task parameter to the truevalue.8. Verify the installation and configuration on the StorageZones Controller computers. For instructions, see Verifying theinstallation and configuration on the StorageZones Controller computers in Install and configure.https://docs.citrix.com 1999-2017 Citrix Systems, Inc. All rights reserved.p.6
System requirementsNov 27, 20 17Before installing Citrix SCOM Management Pack for ShareFile, make sure that your environment meets the requirementslisted in this section.Sof tware requirementsCitrix SCOM Management Pack for ShareFile requires a supported version of the following products that it integrates with:Citrix ShareFileMicrosoft System Center Operations ManagerNote: Make sure that Microsoft .NET Framework 4.5.2 or later is available on the ShareFile StorageZones Controllers.Supported versions of Citrix ShareFileCitrix SCOM Management Pack for ShareFile is compatible with the following Citrix ShareFile versions:Product version (StorageZones Controller)SupportedCitrix ShareFile 5.1 Citrix ShareFile 5.0.1 Citrix ShareFile 5.0 Citrix ShareFile 4.1 Citrix ShareFile 4.0 Citrix ShareFile 3.4 Citrix ShareFile 3.0 Citrix ShareFile 2.3 Supported versions of SCOMCitrix SCOM Management Pack for ShareFile is compatible with the following SCOM versions:Microsof t System Center Operations Manager versionSupportedMicrosoft System Center Operations Manager 2016 Microsoft System Center Operations Manager 2012 R2 1https://docs.citrix.com 1999-2017 Citrix Systems, Inc. All rights reserved.p.7
Microsoft System Center Operations Manager 201211 T his entry covers the following configurations: base release, base release SP1 (Service Pack 1).Language supportCitrix SCOM Management Pack for ShareFile can be deployed and operates correctly in environments with the followinglanguages and locale settings:LanguageLocale identif ierSupportedEnglishen Spanishes https://docs.citrix.com 1999-2017 Citrix Systems, Inc. All rights reserved.p.8
Install and configureNov 27, 20 17T his chapter contains instructions that you must follow to install and configure Citrix SCOM Management Pack forShareFile. Perform all procedures in the documented order of precedence.Preparing f or the installationBefore installing Citrix SCOM Management Pack for ShareFile, make sure the following general prerequisites are fulfilled:Your environment meets the software requirements.For software requirements, see the Software requirements section in System requirements.You know the credentials (user name, password) for accessing the following:ShareFile account ( Subdomain .sharefile.com or Subdomain .sharefile.eu)For access, the ShareFile master administrator user (master administrator) is used.ShareFile network file shareFor access, an operating system user account is used that has read permissions on the on-premises network file share(network share). T his must be a domain user account.Note: Several network shares may be configured in ShareFile for the same ShareFile account.If ShareFile deployment includes a proxy server, you have the following information about the proxy server available:Server’s fully qualified domain name or IP addressProxy service listening portAuthentication modeUser name and password (and domain, in case of NT LM) of the user account used for authenticatingIP addresses of StorageZones Controller computers that utilize connections through the proxy serverA computer is chosen on which a SCOM management server resides and where the server side of Citrix SCOMManagement Pack for ShareFile will be installed. T his computer is referred to as SCOM management server computer.SCOM agent is installed on all the computers that host ShareFile StorageZones Controller instances, and thesecomputers are configured as agent-managed computers in the SCOM management group.Firewalls allow communication of Citrix SCOM Management Pack for ShareFile Agent with other components. T hey areconfigured as follows:On the network file share computer, inbound network traffic from the StorageZones Controller computer is enabledon the T CP ports 139 and 445.If you have a ShareFile deployment that does not include a proxy server:On the StorageZones Controller computer, outbound network traffic to the ShareFile control plane is enabled on theT CP port 443.If you have a ShareFile deployment that includes a proxy server:On the proxy server computer, outbound network traffic to the ShareFile control plane is enabled on the T CP port443.Installing the product on the SCOM management server computerT he server-side part of Citrix SCOM Management Pack for ShareFile must be installed on the SCOM management servercomputer.To install Citrix SCOM Management Pack for ShareFile on the SCOM management server computer, do the following:1. Log on to the management server computer. Use a user account that has local administrative privileges and SCOMhttps://docs.citrix.com 1999-2017 Citrix Systems, Inc. All rights reserved.p.9
administrative privileges.2. In Windows Explorer, locate the Citrix SCOM Management Pack for ShareFile Version .exe file (where Version isthe current software version), and double-click it to invoke the installation process. Wait for the Setup Wizard to appear.3. In the Welcome page of the Setup Wizard, click Next.4. In the View Relevant Product Configuration page, click Next.5. In the License Agreement page of the Setup Wizard, carefully read the end user license agreement. If you accept theterms of the agreement, click Next.6. In the Destination Folder page, define the Citrix SCOM Management Pack for ShareFile installation folder. Citrixrecommends that you install Citrix SCOM Management Pack for ShareFile to the default folder.Proceed as follows:T o install the product to the default folder listed in the Setup Wizard, no special actions are required.T o install the product to a different folder, follow the substeps:1. Click Change.2. In the Browse For Folder dialog box, browse to the desired installation folder, select it, and click OK.Click Next.7. In the Configure Post-Install Actions page of the Setup Wizard, decide whether the Setup Wizard should automaticallyimport the included management packs into SCOM.To let the Setup Wizard import the management packs, select the Automatically import the Management Packoption. Citrix recommends this choice.To import the management packs into SCOM manually at a later time, leave the Automatically import theManagement Pack option unselected. For instructions on how to import or reimport the management packs, seeManually importing included management packs into SCOM.8. Click Install. T he Setup Wizard displays the Installing the product page and starts copying the installation files.9. After the installation completes, the installation completion page is displayed.If you let the Setup Wizard to automatically import the management packs, click Next. In the opposite case, click Finish toclose the Setup Wizard.10. If you let the Setup Wizard to automatically import the management packs, it displays the Executing post-installactions page. Attend the import process.11. In the post-installation completion page, review the management packs import log, and click Finish to close the SetupWizard.Configuring access to the shared f older f or agent installationNote: Steps of this procedure must be followed only once on a SCOM management server computer. In case youpreviously installed and configured any of the following Citrix Management Pack products on the same computer, you maynot need to repeat the steps:Citrix SCOM Management Pack for Provisioning ServicesCitrix SCOM Management Pack for StoreFrontCitrix SCOM Management Pack for Web InterfaceCitrix SCOM Management Pack for XenAppCitrix SCOM Management Pack for XenApp and XenDesktophttps://docs.citrix.com 1999-2017 Citrix Systems, Inc. All rights reserved.p.10
Citrix SCOM Management Pack for XenMobileTo configure access to the shared folder for agent installation, do the following:1. Log on to the SCOM management server computer. Use a user account that has local administrative privileges.2. Choose a local user account (local to the computer with the shared folder) or a domain user account that will haveaccess to the shared folder.Important: Citrix recommends creating a new, dedicated user account that you will use only for deployment of theCitrix SCOM Management Pack for ShareFile Agent to managed computers.3. Using an operating system administrative tool, add the user account to the CitrixMPShareUsers user group.4. Launch the SCOM Operations console.5. In the Administration view, in the left pane, expand Run As Conf iguration, and then click Accounts.6. In the T asks pane, expand Actions, and then click Create Run As Account.7. In the Create Run As Account Wizard window, click Next.8. In the Run As account type drop-down menu, leave the default selection (Windows).9. In the Display name text box, type a name that the SCOM Operations console will use to refer to the newly createdSCOM user account. Click Next.10. In the User name text box, type the user name of the operating system user account that you chose in step 2.https://docs.citrix.com 1999-2017 Citrix Systems, Inc. All rights reserved.p.11
11. In the Password and Confirm password text boxes, type the valid password of the operating system user account.12. In the Domain text box, update the value if needed. Click Next.13. Depending the effective security policy in your SCOM environment, select either the Less secure or More secureoption.Note: Selecting More secure requires manual steps to be performed in SCOM for each newly added managed computer.14. Click Create.15. After the message about successful account creation appears, click Close.https://docs.citrix.com 1999-2017 Citrix Systems, Inc. All rights reserved.p.12
16. In the left pane, under Run As Configuration, click Profiles.17. In the Profiles list, double-click Citrix Management Pack Network Share Account.18. In the Run As Profile Wizard window, in the Introductory page, click Next. In the General Properties page, click Next.19. In the Run As Accounts page, click Add.20. In the Add a Run As Account dialog box, in the Run as account list, select the newly created SCOM user account.https://docs.citrix.com 1999-2017 Citrix Systems, Inc. All rights reserved.p.13
21. Select the A selected class, group, or object option.22. Click Select and then select Class.23. In the Class Search dialog box, in the Filter by (optional) text box, type Windows Computers.24. Click Search.25. In the Available items list, select All Windows Computers.26. Click OK to close the Class Search dialog box.27. Click OK to close the Add a Run As Account dialog box.28. Click Save to update the profile. T his may take a while.29. Click Close to close the Run As Profile Wizard window.Verif ying the installation on the SCOM management server computerTo verify that the Citrix SCOM Management Pack for ShareFile installation on the management server computer is correct,do the following:1. Log on to the management server computer.2. Go to Start Control Panel and click Programs and Features (actions of this step may differ on operating systemsearlier than Windows Server 2016).3. Check for the presence of the following entry in the Name column:Citrix SCOM Management Pack f or ShareFilehttps://docs.citrix.com 1999-2017 Citrix Systems, Inc. All rights reserved.p.14
4. T o check if the CitrixMPShare shared folder is correctly configured, open a Command Prompt window and run thefollowing commands in sequence (their outputs in case of success are also shown):commandCOPYnet share findstr -i Citrix\CitrixMPSharecommandCOPYnet use \\ ManagementServerHostName \CitrixMPShare/USER: DomainName \ UserName outputCOPYThe command completed successfullycommandCOPYdir \\ ManagementServerHostName \CitrixMPShareoutputhttps://docs.citrix.comCOPY 1999-2017 Citrix Systems, Inc. All rights reserved.p.15
FolderContents In these instances, %ProgramData% refers to the actual value of this operating system variable. ManagementServerHostName is the name of the SCOM management server computer. DomainName is the domainor computer name and UserName is the name of the user account that you chose in step 2 of the proceduredocumented in Configuring access to the shared folder for agent installation. FolderContents is the list of the contentsof the CitrixMPShare folder.Note: T he shared folder is vital for installation of the Citrix SCOM Management Pack for ShareFile agent and deploymentof its configuration to the managed computers.5. Launch the SCOM Operations console.6. In the Monitoring view, expand the items in the left pane until they match the following figure.7. In the Administration view, expand Administration Management Packs and click Installed Management Packs(the navigation pane structure may differ in SCOM versions earlier than 2016).8. Verify that the following management pack versions are listed in the results pane:Citrix Management Pack for ShareFile1.4.136.0Citrix Management Pack Library1.0.8.0Configuring SCOM agent to act as proxy on StorageZones Controller computersSCOM agent on each computer where ShareFile StorageZones Controller is installed must be configured to act as a proxyagent. T his configuration enables the agent to relay or forward information from or about other computes and networkdevices to the SCOM management server.To configure the SCOM agent instances to act as proxy agents, do the following:1. Launch the SCOM Operations console and connect to the management server.2. In the Administration view, expand Device Management, and then click Agent Managed.3. For each ShareFile (StorageZones Controller) computer, follow the steps:1. Right-click the host name, and select Properties.https://docs.citrix.com 1999-2017 Citrix Systems, Inc. All rights reserved.p.16
2. Click the Security tab.3. Select the Allow this agent to act as proxy and discover managed objects on other computers option.4. Click OK.Note: On a Citrix StorageZones Controller that is running on a Windows Server 2008 R2 system updated with Service Pack1, the Citrix MPSHF Agent service stops abnormally. It logs the following entries into the Applications and Services Logs partof the operating system event log:Faulting module name: mshtml.dllException code: 0xc0000005Faulting module path: C:\Windows\System32\mshtml.dllAction: Restart the Citrix MPSHF Agent service either remotely (by using a corresponding SCOM task in the Actions paneof the SCOM Operations console) or directly on the StorageZones Controller computer (by using an administrativeoperating system tool).Providing inf ormation f or accessing ShareFile account and network share locationProviding inf ormation f or ShareFile account accessCredentials of the master administrator must be provided to Citrix SCOM Management Pack for ShareFile for probing theShareFile account.To provide the master administrator credentials, do the following:1. Log on to the management server computer. Use a user account that has local administrative privileges.2. Go to Start All apps Citrix (actions of this step may differ on operating systems earlier than Windows Server 2016).3. Click ShareFile MP Conf iguration.Note: Configuration changes are applied only when you click OK in the main window of the ShareFile MP Configurationtool.4. In the Citrix Management Pack Configuration window, in the ShareFile Accounts tab, click Add.5. In the Add ShareFile user account dialog box, type the following data in the respective text boxes:ShareFile subdomain (omit the https:// and .sharefile.com or .sharefile.eu parts of the URL)Master administrator user namePasswordhttps://docs.citrix.com 1999-2017 Citrix Systems, Inc. All rights reserved.p.17
6. Click OK.7. Repeat steps 4 to 6 for each additional ShareFile account you plan to monitor.8. Optional. To modify data of an entry, click Modif y. In the Modify ShareFile administrative account dialog box, modify thedata as required, and then click OK.9. Optional. To remove an entry, click Remove and then click Yes.10. Click OK to apply the configuration changes and close the window.Note: If you modify configuration data for a ShareFile account where Citrix SCOM Management Pack for ShareFile Agentis already installed on the StorageZones Controller computers, run the Update Configuration on Citrix MPSHF Agent taskfrom the SCOM Operations console to refresh the local configuration data.Providing inf ormation f or network share location accessNetwork share locations and the corresponding access credentials must be provided to Citrix SCOM Management Packfor ShareFile for the monitored ShareFile account.To provide the network file share locations and access credentials, do the following:1. Log on to the management server computer. Use a user account that has local administrative privileges.2. Go to Start All Programs Citrix ShareFile Management Pack.3. Click ShareFile MP Conf iguration.Note: Configuration changes are applied only when you click OK in the main window of the ShareFile MP Configurationtool.4. In the Citrix Management Pack Configuration window, in the Network Shares tab, click Add.5. In the Add ShareFile network share user account dialog box, type the following data in the respective text boxes:Network share location (in the UNC format)Domain namehttps://docs.citrix.com 1999-2017 Citrix Systems, Inc. All rights reserved.p.18
Operating system user namePassword6. Click OK.7. Repeat steps 4 to 6 for each additional network share location that is configured for the ShareFile account.8. Optional. To modify data of an entry, click Modif y. In the Modify ShareFile network share user account dialog box,modify the data as required, and then click OK.9. Optional. To remove an entry, click Remove and then click Yes.10. Click OK to apply the configuration changes and close the window.Note: If you modify configuration data for ShareFile account where Citrix SCOM Management Pack for ShareFile Agent isalready installed on the StorageZones Controller computers, run the Update Configuration on Citrix MPSHF Agent taskfrom the SCOM Operations console to refresh the local configuration data.Providing proxy server-related inf ormationImportant: Perform this procedure only if StorageZones Controller instances in your ShareFile deployment are configuredto use a proxy server.With ShareFile deployments in which proxy server is used, you must provide additional data to Citrix SCOM ManagementPack for ShareFile Agent.To provide data required for communication with a proxy server, do the following:1. Log on to the management server computer. Use a user account that has local administrative privileges.2. Go to Start All Programs Citrix ShareFile Management Pack.3. Click ShareFile MP Configuration.Note: Configuration changes are applied only when you click OK in the main window of the ShareFile MP Configurationhttps://docs.citrix.com 1999-2017 Citrix Systems, Inc. All rights reserved.p.19
tool.4. In the Citrix Management Pack Configuration window, in the Proxy Configuration tab, click Add.5. In the Add Network proxy user account window, click Enable Proxy.6. In the Proxy Server group box, type the following data in the respective text boxes or select appropriate values:Proxy server address in either of the following formats: ProxyComputerFQDN ProxyComputerIPaddress T he http:// prefix is added automatically.Port number that the proxy server uses for connectionsProxy server authentication mode7. In the StorageZone Controllers group box, enter the IP addresses of the StorageZones Controller computers that areusing the proxy server.8. If you selected Basic or NT LM authentication mode, in the Credentials group box, type the following data in therespective text boxes:User name and password of the user account used for authenticatingDomain of the user account (if the NT LM authentication mode is selected)9. Verify that the provided data matches the values configured in the Networking page of the ShareFile StorageZonesController console. Click OK.10. For each additional proxy server that you want to provide data for, click Add and repeat steps 4 through 9.11. Optional. To modify the configuration data of an entry, click Modif y. In the Add Network proxy user account window,https://docs.citrix.com 1999-2017 Citrix Systems, Inc. All rights reserved.p.20
modify the data as required, and then click OK.12. Optional. To remove configuration data for a proxy server, select its entry, click Remove, and then click Yes.13. Click OK to apply the configuration changes and close the window.Note: If you modify configuration data for ShareFile account where Citrix SCOM Management Pack for ShareFile Agent isalready installed on the StorageZones Controller computers, run the Update Configuration on Citrix MPSHF Agent taskfrom the SCOM Operations console to refresh the local configuration data.Installing the product on the StorageZones Controller computersOn the ShareFile StorageZones Controller computers, only ShareFile Management Pack Agent must be installed. You caninstall it either by using an SCOM task or manually.To install Citrix SCOM Management Pack for ShareFile Agent on a ShareFile StorageZones Controller computer remotely,by using an SCOM task, do the following:1. Launch the SCOM Operations console and connect to the management server.2. In the Monitoring view, in the left pane, expand Citrix Library, and then click ShareFile StorageZone ControllerComputers.3. In the ShareFile StorageZones Controller Computers pane, select a ShareFile StorageZones Controller computer fromthe ShareFile StorageZones Controller Computers list.4. In the Tasks pane, expand ShareFile StorageZones Controller Computer Role Tasks, and then click Install CitrixMPSHF Agent.5. In the Run Task – Install Citrix MPSHF Agent dialog box, adjust the task parameters as follows:UpgradeAgent: T his option, when set to true, causes uninstallation of the existing Citrix SCOM Management Packfor ShareFile Agent from the agent-managed compute
Citrix SCOM Management Pack 1.4 for ShareFile Nov 27, 2017 Citrix SCOM Management Pack for ShareFile is an availability and performance management solution that extends end-to-end service monitoring capabilities of Microsoft System Center Operations Manager (SCOM) to include the Citrix ShareFile (ShareFile) infrastructure.