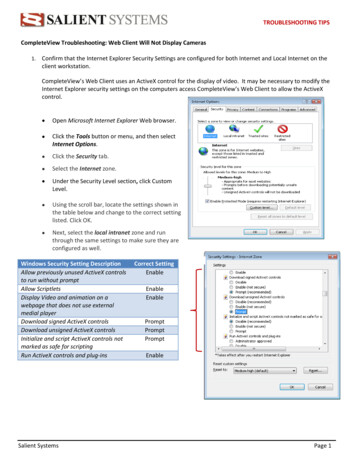
Transcription
58MVPVariable-Speed 2-StageElectronic Condensing FurnaceVisit www.carrier.comTroubleshooting GuideNOTE: Read the entire instruction manual before starting theinstallation.SAFETY CONSIDERATIONSINDEXPAGEInstructions .1Example .2Sequence of Operation.1-5Self-Test Mode.2Heating Mode.2Heating Mode-Two Stage.2Emergency Heat Mode.2-3Cooling Mode .3Heat Pump Mode.3-4Continuous Fan Mode .4Component Test.4-5Bypass Humidifier Mode.5Dehumidification Mode .5Zone Mode .5Start Here.6Service Label/Fault Code Instructions .7-8Improper Operation With No Flashing Fault Code .9Not Enough Cooling Airflow .10High-Fire Temperature Rise Too Low (Cold Blow) .11LEDs 1, 2, 3, or 4 On Solid.11-12RED LED2 Flashing .12Fault Code 11—No Fault in Recent History Display .13Fault Code 12—Blower Calibration Lockout.13-15Fault Code 13—Limit Switch Lockout.15-16Fault Code 14—Ignition Lockout.17Fault Code 21—Invalid Model Selection.17Fault Code 22—Set Up Error.18Fault Code 23—Invalid Blower Airflow Selection .18Fault Code 24—Secondary Voltage Fuse Is Open.19-20Fault Code 31—High-Pressure Switch Fault.21-22Fault Code 32—Low-Pressure Switch Fault .23-24Fault Code 33—Limit Switch Fault.24-25Fault Code 34—Ignition Proving Fault .26-27Fault Code 41—Blower Outside Valid Speed Range .27-28Fault Code 42—Inducer Outside Valid Speed Range.29-30Fault Code 43—Pressure Switch Calibration Fault.30-31Fault Code 44—Blower Calibration Fault .32Cleanup and Start-Up Instructions .33APPENDIX A—Board Layout & Wiring Schematic .34-35APPENDIX B—Isolation Circuits .36APPENDIX C—Pressure Check Diagram .36APPENDIX D—Quick Motor Test Procedure .37-39APPENDIX E—Variable-Speed Condensing Furnace Duct Staticand Blower Operation.40-44APPENDIX F—Quick Reference Information .45APPENDIX G—Thermostat Staging Algorithm .46-47INSTRUCTIONSThis guide uses your expertise and observations to lead you to thetrouble spot as efficiently as possible. This is only intended as aguide and should not be used blindly. Your experience andexpertise are of high value when troubleshooting this unit. Do notdisregard all of your instincts.The microprocessor furnace control was designed with diagnosticcapabilities built in. LEDs are used to flash a fault code which willlead you to 1 of the subsections as listed in the Index.You should ALWAYS begin in the START HERE subsection(see Index for page number) which will guide you to theappropriate subsection where a minimal number of steps will beused to correct the problem. If you are very experienced at howthis furnace operates and you suspect the problem is either theblower motor, inducer motor, or furnace control board, you can usethe quick motor test procedure at the end of the troubleshootingguide to isolate the problem or direct you to appropriate section inmain troubleshooting guide.Once in a subsection, read the statement or question. A statementwill have a number in the "GO TO" column. Do whatever thestatement says, then proceed to step indicated in the "GO TO"column.If the step is a question (a question will have a number in the"YES" or "NO" column), answer it "YES" or "NO." If the answeris "YES," go to step indicated in "YES" column. If the answer is"NO," go to step indicated in "NO" column.Let’s try our guide out using the EXAMPLE section below, andsee how it works. Suppose that the problem is a defectivelow-pressure switch (for example will not make). This is aninternal problem and cannot simply be seen. We go to the STARTHERE section to Step 1.Additional Service Tools are available for current variable speedcondensing furnaces. The Advanced Product Monitor KitKGAFP0101APM includes a harness and diskette that allowscommunication with the control board through a personal computer (RS-485 adapter required). The ICM Motor Simulator KitKGASD0101FMS is a plug-in device to help trooubleshoot ICMinducer and blower motors and control boards. Reference pricepages for current kit numbers.SEQUENCE OF OPERATIONFurnace control must be grounded for proper operation, orcontrol will lock out. Control is grounded through green wirerouted to gas valve and burner box screw.Using schematic diagram (see Appendix A), follow sequence ofoperation through different modes. This furnace has a new controlsystem. Read and follow wiring diagram carefully.NOTE: If 115-v power supply to furnace or blower access panelswitch is interrupted during a call for heat, blower operates atlow-heat speed for 60 sec when power is restored before heatingcycle is resumed.Manufacturer reserves the right to discontinue, or change at any time, specifications or designs without notice and without incurring obligations.Book 1 4PC 101Catalog No. 535-754Printed in U.S.A.Form 58MVP-8SMPg 19-99Replaces: 58MVP-6SMTab 6a 8a
EXAMPLEStart Here SectionSTEP1.2.5.7.ACTIONStep 1 tells us to record status of LEDs 1-4 and go to Step 2.Step 2 asks the question, "Are any LEDs flashing?". If low-pressure switch was defective, a lowpressure switch fault code would be flashing, so the answer is "YES." We go to Step 5.Step 5 asks the question, "Is RED LED2 flashing?". If low-pressure switch was defective, a lowpressure switch fault code would be flashing, so the answer is "NO". We go to Step 7.Step 7 tells us to go to low-pressure switch fault subsection.Step 1—Self-Test ModeYES—NO—GO TO253—67———INDEX7. Blower on delay—The blower starts 60 sec after flame senseif cycle started in low heat or 35 sec after flame sense if cyclestarted in high heat.The control center goes through a brief self test whenever 115-v or24-v power is interrupted. The self test takes approximately 2 secto complete. After power is restored, red (microprocessor) LEDbriefly comes on. Then green LED comes on for 1 sec, followed by1 sec where both yellow and green LEDs are on. During this time,the microprocessor is checking itself.NOTE: The blower starts at approximately 400-500 RPM. After20 sec, the motor is turned off for 1/10 of a sec where a coast downcalibration is done to evaluate resistance of the conditioned airduct system. The microprocessor then determines blower RPMrequired to provide proper airflow for heating mode.Step 2—Heating Mode8. Electronic Air Cleaner—The EAC-1 terminal is energizedwhenever the blower operates.When thermostat calls for heat, R-W/W1 circuit closes.1. Prepurge period—The inducer motor is turned on and slowlycomes up to speed. When low-pressure switch closes, inducermotor RPM is noted by microprocessor, and a 25 sec prepurgeperiod begins. The RPM is used to evaluate vent systemresistance. This evaluation is then used to determine requiredRPM necessary to operate inducer in low-heat mode.9. Blower off delay—When thermostat is satisfied, the R-W/W1signal is terminated, de-energizing gas valve (stopping gasflow to burners) and HUM terminal is de-energized.The blower reduces its speed to low-heat RPM. The blowerand EAC remain operating 90, 135, 180, or 225 sec (depending on blower off time selection). The furnace is factory set fora 90 sec blower off delay.NOTE: The heat cycle can start in either high or low heat. If ahigh-heat cycle is initiated, the inducer continues increasing itsspeed after low-pressure switch closes. When high-pressure switchcloses, inducer motor RPM is noted by microprocessor before the25 sec prepurge period begins. The RPM is used to evaluate ventsystem resistance. This evaluation is then used to determinerequired RPM necessary to operate inducer in high-heat mode.10. Post purge—The inducer continues operating for 15 sec aftergas valve is de-energized.Step 3—Heating Mode—Two StageThe control center provides 2-stage heating using a single-stagethermostat. The control center maximizes comfort while optimizing efficiency to meet the demands of the conditioned area whena thermostat R-W/W1 signal is received.2. Humidifier (HUM)—The HUM terminal is energized whenever the inducer prepurge period is completed.3. Ignitor warm up—At end of prepurge period, the hot surfaceignitor (HSI) is energized for a 17-sec HSI warm-up period.If thermostat control over furnace staging is desired, a 2-stagethermostat can be used. When control center receives a thermostatR-W/W1 and R-W2 signal, high heat is energized and whenR-W/W1 signal is received, low heat is energized. This methodoverrides microprocessor control of high or low heat.4. Ignition sequence—After HSI ignitor warm-up period iscompleted, the gas valve opens, permitting gas flow to burnerswhere it is ignited. After 5 sec, the HSI is de-energized and a2-sec flame-sensing period begins.NOTE: When using 2-stage thermostat operation with R-W/W1and R-W2 signals, setup switch SW-2 MUST be in ON position.NOTE: The initial heat mode after 115-v or 24-v power interruption will be LOW HEAT. Low heat remains energized for 16minutes before high heat is initiated, providing thermostat is stillcalling for heat.The heat cycle operates as stated in Heating Mode section.To allow for greater comfort, a 2-stage thermostat control isrecommended when zone systems are used.After the initial cycle, the microprocessor evaluates the length oflow- and high-heat operating times and calculates optimum lengthof low and high heat for next heat cycle. This accommodates theheat load requirement seen as a result of thermostat operating time.See Appendix G for details on thermostat staging algorithm.Step 4—Emergency Heat ModeNOTE: The furnace should not be operated in emergency heatmode for extended periods of time. Operation is only recommended to provide heat until replacement components can beobtained or fault resolved.5. Flame sensing—When burner flame is sensed, the controlcenter holds gas valve open and begins blower on delayperiod.In this mode, the microprocessor is bypassed and the motorsoperate at full speed with high-heat operation. The heat exchangers, motors, and electronics can be overstressed and may reducethe life of the components if operated for an extended period.NOTE: Ignition sequence repeats 3 additional times before alockout occurs. Lockout automatically resets after 3 hr, or can bemanually reset by turning 115-v or 24-v power off (not atthermostat) for 3 sec minimum, then turning on again.NOTE: No safeties are bypassed when using emergency heatmode.6. Inducer speed reduction—If cycle starts in low heat, inducerspeed reduces slightly after the flame sense. If cycle starts inhigh heat, inducer speed increases 15 sec after flame sense.The reduction in speed in low heat is to optimize combustionfor maximum efficiency.Emergency heat mode can be selected using setup switch SW-4.SW-4 should be used when a fault condition exists or difficult toresolve problems occur. This allows heating until the fault can becorrected.2
4. Cooling unit—The cooling unit stops when thermostat R-Ysignal is terminated.In emergency heat mode, the normal heat mode outlined inHeating Mode section is not followed. The following sequencewill occur:5. Blower off delay—When thermostat is satisfied, the R-Y/Y2and R-G signals are terminated, and blower remains operatingfor 90 sec. On newer style control boards (See Fig. 1), theblower airflow will drop by 21 percent during the off-delayperiod when the DE jumper is connected. The DE jumper isonly removed to enable the DEHUM input for use with athermidistat or humidistat for dehumidification purposes.When thermostat calls for heat, the R-W/W-1 circuits close.1. Prepurge period—The inducer motor is turned on IMMEDIATELY operating at maximum speed, closing low- andhigh-pressure switches. Prepurge begins 25 sec after highpressure switch closes.2. Blower on—The blower motor is turned on IMMEDIATELYand slowly increases to maximum speed as soon as a call forheat is received. No blower calibration occurs.Step 6—Heat Pump ModeWhen furnace is operating in heat pump heating mode, R-Y/Y2and R-G circuits are closed energizing heat pump, and bloweroperates at cooling speed. When heat pump defrost is required,R-W/W1 circuits close starting gas heat cycle, and blower adjuststo low-heat speed.3. Electronic Air Cleaner—The EAC-1 terminal does notop
Visit www.carrier.com Manufacturer reserves the right to discontinue, or change at any time, specifications or designs without notice and without incurring obligations. Book 1 4 Tab 6a 8a PC 101 Catalog No. 535-754 Printed in U.S.A. Form 58MVP-8SM Pg 1 9-99 Replaces: 58MVP-6SM. Step 1—Self-Test Mode The control center goes through a brief self test whenever 115-v or 24-v power is File Size: 283KBPage Count: 48