Transcription
WORLD CLASS HI-FI MADE IN ENGLAND
For user instructions in your language, please visit www.rega.co.uk and go to the download section of yourchosen product page.Pour obtenir les instructions aux utilisateurs dans votrelangue, veuillez visiter www.rega.co.uk et vous rendredans la section téléchargement de la page de votreproduit choisi.Eine Gebrauchsanleitung in Ihrer Sprache finden Sie aufwww.rega.co.uk im Download-Bereich der Seite zu demvon Ihnen gewählten Produkt.Puoi trovare le istruzioni d’uso su www.rega.co.ukcliccando sulla sezione Download della pagina delprodotto scelto.Para encontrar las instrucciones de usuario en su idioma,visite www.rega.co.uk y en la sección de descargasencontrará el producto que ha elegido.Para instruções do utilizador no seu idioma, visite www.rega.co.uk e entre na secção de transferências da páginado produto escolhido.Ga voor verdere instructies in uw taal naar www.rega.co.uk en vervolgens naar de downloadsectie van deproductpagina van uw keuze.Find brugsvejledningen på dit sprog ved at gå til www.rega.co.uk og fortsætte til downloadafsnittet på siden fordet produkt, du har valgt.För bruksanvisning på ditt språk, besök www.rega.co.uk och gå till nedladdningssektionen på din valdaproduktsida.Instrukcje użytkowania w danym języku są dostępnena stronie www.rega.co.uk, gdzie można ściągnąć częśćstrony, której dotyczy wybrany produkt.
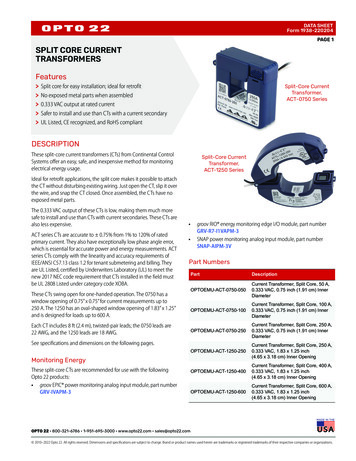
EN1PLANAR 1 PLUSDABCLOCATED BENEATH THEPLATTERTHE ON/OFF SWITCH IS LOCATEDUNDERNEATH THE PLINTHAB331/3 rpmADC45 rpmSETTING UP YOUR PLANAR 1 PLUSCarefully unpack the turntable, always keeping it upright. Check thebelt is fitted around the drive pulley (A) and sub-platter (B). Removethe packing card (C) from beneath the sub-platter (B) and fit the platter(1) and mat. Push the balance weight (4) fully onto the rear of thetonearm (3) until it reaches the stop point as shown (D). Connect thephono output to an appropriate line level input (see page 2). Connectthe power supply to the rear of the turntable (see page 2). Carefullyremove the stylus guard from the cartridge (2). Turn on the Planar 1Plus via the on/off switch located on the underside of the plinth (5). Change the speed by moving the drive belt from the 331/3 and 45 stepsof the pulley (A). The RB110 tonearm (3) is preset for bias adjustment,no other set-up is required.v4www.rega.co.ukMADE IN ENGLAND
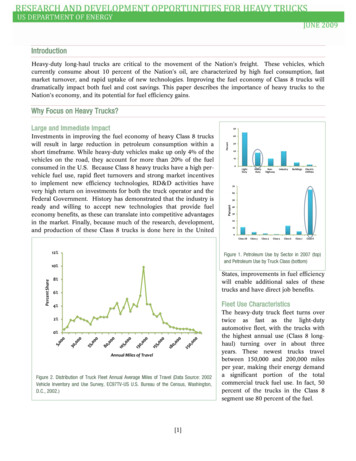
ENPLANAR 1 PLUS2BUILT-IN PHONO STAGEPOWER CONNECTIONThe built-in phono stage is a high specification pre-amplifier. It isdesigned to amplify the signal from a moving magnet cartridge to asuitable level for all line level inputs of an appropriate system or audioamplifier. This allows simple connection to a wide variety of productsusing either the standard twin phono to phono lead (supplied) or phonoto 3.5 mm plug (not supplied).Plug in the Rega PS1 350 mA power supply in to the wall socket. Set-upis now complete. Simply switch on, sit back and enjoy!WARNINGOnly use the supplied mains adaptors with this product.SERVICENote: A 3.5 mm to phono lead must only be plugged into an appropriateinput. DO NOT CONNECT TO A HEADPHONE OUTPUT SOCKET (as foundon a mobile device or similar), as this could damage both the deviceand player.OUTPUT CONNECTIONSConnect the output sockets of the built-in phono stage to a suitable‘line level’ input on your amplifier using the appropriate phono leads.IMPORTANT: Many amplifiers have a built-in phono stage. Neverconnect the P1 Plus to an integrated phono stage. These are usuallymarked ‘Phono’ or ‘Disk’ input.IMPORTANT: Please turn down the volume on the amplifier beforeswitching the unit on or off.OUTPUT CONNECTIONSWith the unit disconnected from the mains, only clean with a microfibre cloth (lightly damp if necessary). Do not remove any coverings;there are no user serviceable parts inside. If the unit performs erraticallyor emits smoke or odour, disconnect from the power supply and take itto a qualified service technician.WARRANTYAll Rega products are covered by a lifetime warranty againstmanufacture defects. This warranty does not cover wear and tear. Anyunauthorised modifications or failure to follow the Rega recommendedguidelines may invalidate the warranty. If returning goods for inspectionto your retailer, the original packaging must be used to preserve thewarranty. Damage caused during transport due to incorrect packagingmay invalidate your warranty. Replacement packaging is available fromany Rega retailer. Your statutory rights are not affected.POWER CONNECTIONNote: Some amplifiers and all in one systems offer adjustable gainsettings. If this option is available, we recommend that the connectionused for the turntable is set to the lowest gain setting to avoid anyunnecessary background noise.Note: When switching the P1 Plus on or off, a noise may be heardthrough the speakers. This is the phono stage powering up momentarilyafter the turntable. This is perfectly normal.POSITIONINGAs with any turntable, take care when positioning. Always place it ona firm level surface. Never place the turntable on the same surfaceas desktop or bookshelf loudspeakers as the energy created by theloudspeakers can distort the music and affect performance. Tooptimise performance, the turntable should be mounted on a hi-fi rackor the dedicated Rega wallbracket.PS1 (UK)INPUTOUTPUT230 V AC 50 Hz 0.07 A24 V AC 350 mA ACPS1 (EURO)INPUTOUTPUT230 V AC 50 Hz24 V AC 350 mA ACPS1 (AUS/NZ)INPUT230 V AC 50 Hz 0.07 AOUTPUT24 V AC 350 mA ACPS1 (Korea)INPUTOUTPUT220 V AC 60 Hz24 V AC 350 mA ACPS1 (USA)INPUTOUTPUT115 V AC 60 Hz24 V AC 350 mA ACPS1 (Japan)INPUTOUTPUTMADE IN ENGLANDwww.rega.co.ukv4100 V AC 50/60 Hz24 V AC 350 mA AC
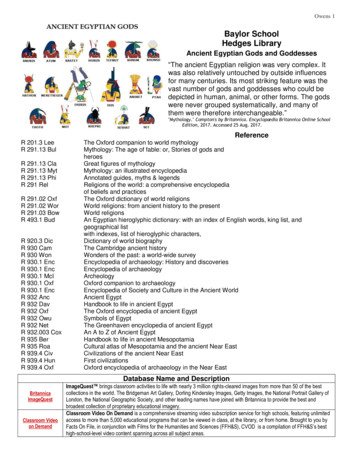
FR3PLANAR 1 PLUSDABCSITUÉS SOUS LE PLATEAULE BOUTON ON/OFF EST SITUÉSUR LE DESSOUS DU SOCLEAB331/3 rpmADC45 rpmINSTALLATION DE LA PLANAR 1 PLUSDéballez soigneusement le tourne-disque en le maintenant toujoursbien droit. Vérifiez que la courroie est placée autour de la poulied’entraînement (A) et du disque d’entraînement (B). Enlevez lecarton de présentation (C) d’en dessous du disque d’entraînement(B) et installez le plateau (1) et le tapis. Enfoncez complètementle contrepoids (4) sur l’arrière du bras de lecture (3) jusqu’à ce qu’ilatteigne le point d’arrêt comme illustré (D). Branchez la sortie phonoà une entrée ligne appropriée. Reliez l’alimentation à l’arrière dutourne-disque. Retirez soigneusement la protection de la tête delecture de la cellule (2). Allumez le Planar 1 à l’aide du bouton on/offsitué sur le dessous du socle (5). Modifiez la vitesse en déplaçant lacourroie d’entraînement de la position 331/3 à la position 45 sur la poulie(A). Le bras de lecture RB110 (3) est préréglé pour compenser la forcecentripète, aucune autre installation n’est nécessaire.v4www.rega.co.ukMADE IN ENGLAND
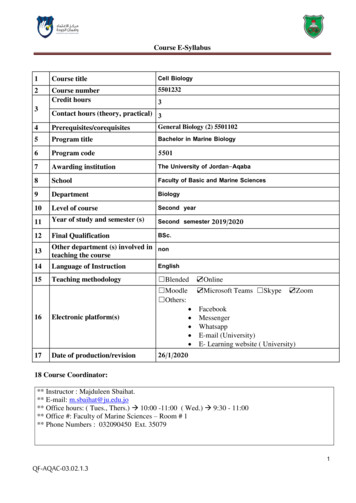
FRPLANAR 1 PLUS4ETAGE PHONO INTÉGRÉRACCORDEMENT D’ALIMENTATIONL’étage phono intégré est un pré-amplificateur de grande qualité. Il est conçu pourBranchez le raccordement d’alimentation Rega PS1 350 mA à la prisemurale. L’installation est maintenant terminée. Allumez le tournedisque, asseyezvous confortablement et profitez de la musique !amplifier le signal d’une cellule à aimant mobile à un niveau approprié pour toutesles entrées de niveau ligne d’un système ou d’un amplificateur audio. Ceci permetune connexion simple à une grande variété de produits en utilisant le câble phono-AVERTISSEMENTphono standard (fourni) ou phono à la prise de 3,5 mm (non fournie).Utilisez uniquement les adaptateurs secteur fournis avec ce produit.Remarque: Un câble phono de 3,5 mm ne doit être branché qu’à une entréeappropriée. NE PAS CONNECTER À UNE PRISE DE SORTIE CASQUE (telle queENTRETIENcelle trouvée sur un appareil mobile ou similaire), car cela pourrait endommagerDébranchez tout d’abord l’appareil, nettoyez-le ensuite uniquement à l’aide d’unl’appareil et le lecteur.chiffon doux à microfibres (légèrement humide si nécessaire). Ne retirez aucuncouvercle ; l’appareil ne contient aucune pièce nécessitant un entretien. Si l’appareilBRANCHEMENTS DE SORTIEse met à fonctionner de façon irrégulière ou à dégager de la fumée ou des odeurs,Branchez les prises de sortie de l’étage phono intégré à une entrée de ligne dedébranchez-le et faites-le inspecter par un technicien qualifié.niveau qui convient sur votre amplificateur en utilisant les câbles phono appropriés.GARANTIEIMPORTANT: Beaucoup d’amplificateurs possèdent un étage phono intégré. NeTous les produits Rega sont couverts par une garantie à vie contre les vices debranchez jamais le P1 Plus à un étage phono intégré. Ils sont généralement qualifiésfabrication. Cette garantie ne couvre pas l’usure normale. Si vous effectuez desd’entrées « Phono » ou « Disk ».modifications non autorisées ou si vous ne respectez pas les lignes directricesde Rega, vous risquez de perdre votre garantie. Si vous décidez de retourner desIMPORTANT: Veuillez baisser le volume de l’amplificateur avant d’allumer ouarticles à votre revendeur à des fins d’inspection, vous devez utiliser l’emballaged’éteindre la platine.d’origine afin de préserver votre garantie. Les dommages causés durant le transportpar un emballage inadéquat peuvent annuler votre garantie. Vous pouvez obtenir unnouvel emballage auprès de n’importe quel revendeur Rega. Vos droits statutairesne s’en trouveront pas affectés.BRANCHEMENTS DE SORTIERACCORDEMENTD’ALIMENTATIONRemarque: Certains amplificateurs et systèmes tout-en-un permettent desréglages de gain. Si cette option est disponible, nous recommandons que lebranchement utilisé pour le tourne-disque soit réglé au niveau de gain le plus baspour éviter tout bruit de fond inutile.Remarque: Quand vous allumez ou éteignez le P1 Plus, vous pouvez entendreun bruit dans les enceintes. Il s’agit de l’étage phono qui se met sous tensionmomentanément après le tourne-disque. C’est tout à fait normal.POSITIONNEMENTComme avec tous les tourne-disques, faites attention lorsque vous le positionnez.Placez-le toujours sur une surface plane et solide. Ne placez jamais le tournedisque sur la même surface que les enceintes de bureau ou de bibliothèque, carl’énergie créée par les enceintes peut altérer la musique et affecter la performance.Pour optimiser la performance, le tourne-disque doit être installé sur une étagèrehi-fi ou un support mural dédié Rega.PS1 (UK)INPUTOUTPUT230 V AC 50 Hz 0.07 A24 V AC 350 mA ACPS1 (EURO)INPUTOUTPUT230 V AC 50 Hz24 V AC 350 mA ACPS1 (AUS/NZ)INPUT230 V AC 50 Hz 0.07 AOUTPUT24 V AC 350 mA ACPS1 (Korea)INPUTOUTPUT220 V AC 60 Hz24 V AC 350 mA ACPS1 (USA)INPUTOUTPUT115 V AC 60 Hz24 V AC 350 mA ACPS1 (Japan)INPUTOUTPUTMADE IN ENGLANDwww.rega.co.ukv4100 V AC 50/60 Hz24 V AC 350 mA AC
DE5PLANAR 1 PLUSDABCUNTERHALB DESPLATTENTELLERSDIE EIN/AUS-TASTE BEFINDETSICH AN DER UNTERSEITEAB331/3 rpmADC45 rpmEINRICHTEN IHRES PLANAR 1 PLUSPacken Sie Ihren Plattenspieler vorsichtig aus und halten Sie ihndabei immer aufrecht. Prüfen Sie, dass der Riemen um dieAntriebsscheibe (A) und den Antriebsteller gelegt ist. Entfernen Siedie Verpackungskarte (C) von unterhalb des Antriebstellers (B) undlegen Sie den Plattenteller (1) und die Auflage auf. Schieben Sie dasGegengewicht (4) ganz an das hintere Ende des Tonarms (3), bis es denEndpunkt (D) erreicht, wie abgebildet. Verbinden Sie den PhonoAusgang des Plattenspielers mit einem entsprechenden Line-Eingang. Schließen Sie das Netzteil an der Rückseite des Plattenspielers an. Entfernen Sie vorsichtig den Nadelschutz vom Tonabnehmer (2). Schalten Sie den Planar 1 Plus über die Ein/Aus-Taste an der Unterseitedes Plattenspielers (5) ein. Ändern Sie die Geschwindigkeit, indemSie den Antriebsriemen zwischen der 331/3- und der 45-Führung an derAntriebsscheibe (A) umlegen. Die Justage des RB110 Tonarms (3) istbereits erfolgt.v4www.rega.co.ukMADE IN ENGLAND
DEPLANAR 1 PLUS6EINGEBAUTE PHONOSTUFESTROMANSCHLUSSDie integrierte Phonostufe ist ein hochwertiger Vorverstärker. Sie verstärkt dasVerbinden Sie das Rega PS1 350 mA-Netzteil mit der Wandsteckdose. Nun ist derSignal von Moving-Magnet-Tonabnehmern für alle Line-Eingänge eines geeignetenPlattenspieler bereit. Einfach einschalten, zurücklehnen und genießen!Audio- Systems oder Verstärkers. Mittels eines Chinch-Kabels (im Lieferumfangenthalten) oder eines Chinch- 3,5mm Miniklinkenkabels (separat erhältlich) ist soWARNHINWEISder einfache Anschluss an eine Vielzahl von Geräten möglich.Verwenden Sie nur das mitgelieferte Netzteil mit ihrem Gerät.Hinweis:DASMINIKLINKENKABEL DARF NUR ANGEEIGNETEEINGÄNGESERVICEANGESCHLOSSEN WERDEN. NICHT MIT EINEM KOPFHÖRERAUSGANG VERBINDEN !Das Gerät von der Stromversorgung trennen und nur mit einem MikrofasertuchAN EINEM MOBILEN GERÄT ODER ÄHNLICHEN KOMPONENTEN KÖNNTE DIES ZUMreinigen (leicht angefeuchtet, falls erforderlich). Nehmen Sie keine AbdeckungenEINEM SCHADEN AM GERÄT UND DEM PLATTENSPIELER FÜHREN!ab. Es sind keine Teile enthalten, die vom Benutzer gewartet werden müssen.Läuft das Gerät unregelmäßig oder entweicht Rauch oder ein Geruch, trennen SieAUSGANGSANSCHLÜSSEdie Netzversorgung und bringen Sie die Anlage zu einem qualifizierten Service-Verbinden Sie die Ausgänge der integrierten Phonostufe mithilfe der geeignetenTechniker.Phonokabel mit einem entsprechenden Line-Eingang an Ihrem Verstärker.GARANTIEWICHTIG: Viele Verstärker verfügen über eine integrierte Phonostufe. Verbinden SieSämtlicheden P1 Plus niemals mit einer integrierten Phonostufe. Diese sind in der Regel alsFabrikationsfehler. Diese Garantie gilt nicht für normale Abnutzungserscheinungen.„Phono“- oder „Disk“-Eingang markiert.Nicht autorisierte Änderungen oder ein Nichtbefolgen der empfohlenen antieaufRichtlinien können zum Verfall der Garantieleistung führen. Wenn Sie Ihrem HändlerWICHTIG: Drehen Sie bitte die Lautstärke am Verstärker herunter, bevor Sie denWaren zur Prüfung senden, muss die Original-Verpackung verwendet werden,Plattenspieler ein- oder ausschalten.damit die Garantieleistung gewährleistet bleibt. Transportschäden aufgrund vonunsachgemäßer Verpackung könnten zum Erlöschen Ihrer Garantie führen. EineErsatzverpackung ist bei jedem Rega-Händler erhältlich. Ihre gesetzlichen Rechtewerden nicht nweis: Bei einigen Verstärkern sowie Komplettsystemen ist der Eingangspegelverstellbar. Sollte diese Option verfügbar sein, empfehlen wir, den für denPlattenspieler verwendeten Anschluss auf die niedrigste Verstärkung zu setzen, umunnötige Hintergrundgeräusche zu vermeiden.Hinweis: Beim Ein- oder Ausschalten des P1 Plus ist es möglich, dass ein Geräuschüber die Lautsprecher zu hören ist. Das ist die Phonostufe, die sich kurz nach demPlattenspieler einschaltet. Das ist absolut normal.POSITIONIERUNGWie bei allen Plattenspielern ist die Positionierung wichtig. Stellen Sie denPlattenspieler immer auf einen ebenen Untergrund. Stellen Sie den Plattenspielerniemals auf die gleiche Oberfläche wie Desktop-oder Regallautsprecher, da diedurch die Lautsprecher generierte Energie die Musik verzerren und die Wiedergabebeeinträchtigen könnte. Für eine optimale Klangqualität sollte der Plattenspielerauf einem HiFi-Rack oder einer speziellen Rega-Wandhalterung montiert werden.PS1 (UK)INPUTOUTPUT230 V AC 50 Hz 0.07 A24 V AC 350 mA ACPS1 (EURO)INPUTOUTPUT230 V AC 50 Hz24 V AC 350 mA ACPS1 (AUS/NZ)INPUT230 V AC 50 Hz 0.07 AOUTPUT24 V AC 350 mA ACPS1 (Korea)INPUTOUTPUT220 V AC 60 Hz24 V AC 350 mA ACPS1 (USA)INPUTOUTPUT115 V AC 60 Hz24 V AC 350 mA ACPS1 (Japan)INPUTOUTPUTMADE IN ENGLANDwww.rega.co.ukv4100 V AC 50/60 Hz24 V AC 350 mA AC
IT7PLANAR 1 PLUSDABCSOTTO IL PIATTOL’INTERRUTTORE È SITUATO NELLAPARTE INFERIORE DELLA BASEAB331/3 rpmADC45 rpmINSTALLAZIONE DI PLANAR 1 PLUSDisimballare con attenzione il giradischi tenendolo sempre rivolto versol’alto. Controllare che la cinghia sia montata intorno alla puleggiadi trasmissione (A) e al sottopiatto (B). Rimuovere il cartoncinodell’imballaggio (C) dal sottopiatto (B) e montare il piatto (1) e iltappetino. Spingere il contrappeso (4) fino in fondo sul retro delbraccio (3) finché non raggiunge il punto d’arresto come mostrato (D). Collegare l’uscita fono a un ingresso di linea adatto. Collegarel’alimentatore sul retro del giradischi. Rimuovere con attenzionela protezione della puntina dalla testina (2). Accendere il Planar 1Plus utilizzando l’interruttore situato nella parte inferiore della base (5). Potete modificare la velocità di rotazione spostando la cinghia ditrasmissione della puleggia (A) da 331/3 a 45 giri. Il braccio RB110(3) è preconfigurato per la regolazione del bias; non servono ulterioriconfigurazioni.v4www.rega.co.ukMADE IN ENGLAND
ITPLANAR 1 PLUS8STADIO PHONO INTEGRATOALIMENTAZIONELo stadio phono integrato è un preamplificatore di altissimo livello. È stato studiatoInserire l’alimentatore Rega PS1 350 mA nella presa. La configurazione è oraper amplificare il segnale da una testina a magnete mobile a un livello adattocompleta. Accendi il giradischi, siediti in poltrona e goditi la musica!per tutti gli ingressi di linea di un sistema o amplificatore audio appropriato. Ciòconsente semplicità di connessione a una varietà di prodotti utilizzando il cavoAVVERTENZAdoppio standard phono- phono (in dotazione) o un cavo phono-mini jack conUsare solo gli adattatori elettrici forniti con questo prodotto.spinotto da 3,5 mm (non incluso).MANUTENZIONENota: Lo spinotto da 3,5 mm deve essere inserito unicamente in un ingressoCon l’apparecchio scollegato dalla presa di corrente, pulire usando semplicementeadatto. NON COLLEGARE A UNA PRESA DI USCITA CUFFIA, PER ESEMPIO SU UNun panno in microfibra (leggermente inumidito se necessario). Non smontareDISPOSITIVO MOBILE O SIMILE PERCHÉ POTREBBE DANNEGGIARE IL DISPOSITIVOl’involucro: all’interno non vi sono parti a cui l’utente possa fare la manutenzione.E IL GIRADISCHI.Se l’apparecchio funziona in modo irregolare o emette fumo o odore, scollegarel’alimentazione e portarlo da un tecnico qualificato.USCITECollegare le prese d’uscita dello stadio fono integrato a un ingresso di linea adattoGARANZIAsull’amplificatore usando i cavi phono forniti.Tutti i prodotti Rega sono coperti da una garanzia a vita contro i difetti difabbricazione. Questa garanzia esclude l’usura. Le modifiche non autorizzate oIMPORTANTE: Molti amplificatori dispongono di uno stadio phono integrato. Nonil mancato rispetto delle linee guida raccomandate da Rega possono invalidarecollegare mai il P1 Plus a uno stadio phono integrato. Gli ingressi sono solitamentela garanzia. Se l’apparecchio viene rimandato al rivenditore per l’ispezione, deveindicati con “Phono” o “Disk”.essere utilizzato l’imballaggio originale per preservare la garanzia. I danni provocatidurante il trasporto dovuti a un imballaggio inadatto possono invalidare la garanzia.IMPORTANTE: Abbassare il volume dell’amplificatore prima di accendere eImballaggi sostitutivi sono disponibili presso qualsiasi rivenditore Rega. Sono fattispegnere l’apparecchio.salvi i diritti di legge del consumatore.USCITEINGRESSO ALIMENTATORENota: Alcuni amplificatori e sistemi multifunzione offrono impostazioni del gainregolabili. Se questa opzione è disponibile, raccomandiamo di impostare laconnessione usata per il giradischi sul valore di gain più basso per evitare sgradevolirumori di sottofondo.Nota: Quando si accende o si spegne il P1 Plus, attraverso gli altoparlanti si puòsentire del rumore. È lo stadio fono che si accende momentaneamente dopo ilgiradischi ed è del tutto sareopportuniaccorgimentiduranteilposizionamento. Posizionare sempre l’apparecchio su una superficie solida e piana.Non posizionare mai il giradischi sulla stessa superficie di altoparlanti da tavolo o dalibreria poiché l’energia prodotta dagli altoparlanti può distorcere la musica e influiresulle prestazioni. Per ottimizzare le prestazioni, il giradischi deve essere montato suun mobiletto hi-fi o a parete con la staffa Rega apposita.PS1 (UK)INPUTOUTPUT230 V AC 50 Hz 0.07 A24 V AC 350 mA ACPS1 (EURO)INPUTOUTPUT230 V AC 50 Hz24 V AC 350 mA ACPS1 (AUS/NZ)INPUT230 V AC 50 Hz 0.07 AOUTPUT24 V AC 350 mA ACPS1 (Korea)INPUTOUTPUT220 V AC 60 Hz24 V AC 350 mA ACPS1 (USA)INPUTOUTPUT115 V AC 60 Hz24 V AC 350 mA ACPS1 (Japan)INPUTOUTPUTMADE IN ENGLANDwww.rega.co.ukv4100 V AC 50/60 Hz24 V AC 350 mA AC
ES9PLANAR 1 PLUSDABCSITUADOS DEBAJO DELPLATOEL INTERRUPTOR DE ENCENDIDO/APAGADO ESTÁ SITUADO DEBAJODEL PLINTOAB331/3 rpmADC45 rpmCONFIGURACIÓN DEL PLANAR 1 PLUSDesembale el tocadiscos con cuidado, manteniéndolo siempre enposición vertical. Compruebe que la correa está colocada alrededorde la polea de transmisión (A) y el subchasis (B). Retire la tarjetade embalaje (C) situada debajo del subchasis (B) y encaje el plato (1)y la alfombrilla. Empuje el contrapeso (4) totalmente hacia la parteposterior del brazo fonocaptor (3) hasta que llegue al punto de parada,como se indica (D). Conecte la salida de phono a una entrada denivel de línea apropiada. Conecte la fuente de alimentación a laparte posterior del tocadiscos. Retire con cuidado la protecciónde la aguja de la cápsula (2). Encienda el Planar 1 Plus mediante elinterruptor de encendido/apagado situado en la parte inferior del plinto(5). Cambie la velocidad moviendo la correa de transmisión desde lospasos 331/3 y 45 de la polea (A). El brazo de lectura RB110 (3) está preconfigurado para compensar la fuerza centrípeta o antideslizamiento;no se necesita ninguna otra configuración.v4www.rega.co.ukMADE IN ENGLAND
ESPLANAR 1 PLUS10AMPLIFICADOR DE PREVIO DE PHONOCONEXIÓN ELÉCTRICAEl amplificador de previo de phono que incorpora es de alta prestaciones. EstáConecte la fuente de alimentación Rega PS1 350 mA a la toma de pared. Ahoradiseñado para amplificar la señal de una capsula de imán móvil (MM) a unla configuración está completada. Simplemente encienda la unidad, ¡relájese ynivel adecuado para todas las entradas de línea de un sistema apropiado o undisfrute!amplificador de audio. Esto permite la conexión simple a una amplia variedadde productos que utilizan entrada de audio estándar con el cable de audioADVERTENCIA(suministrado) o el conector de 3.5 mm (no incluido).Utilice solamente los adaptadores de red suministrados con este producto.Nota: Si se usa, un cable de 3,5 mm solo debe conectar a una entrada adecuada.MANTENIMIENTONO CONECTAR A LA CONEXIÓN DE SALIDA DE AURICULARES. POR EJEMPLO, ENLimpiar solamente con un paño de microfibra (ligeramente humedecido, de serUN DISPOSITIVO MÓVIL O SIMILAR, YA QUE ESTO PODRÍA DAÑAR EL DISPOSITIVOnecesario) con la unidad desconectada de la red. No retire ninguna cubierta, noY EL REPRODUCTOR.hay piezas que requieran mantenimiento por parte del usuario en el interior. Si launidad tiene un rendimiento errático o emite humos u olores, desconéctela de laCONEXIONES DE SALIDAfuente de alimentación y llévela a un servicio técnico cualificado.Conecte las tomas de salida del preamplificador de phono integrado a una entradade ‘nivel de línea’ apropiada de su amplificador, utilizando los cables de phonoGARANTÍAapropiados.Todos los productos de Rega están cubiertos por una garantía de por vida contradefectos de fabricación. Esta garantía no cubre el desgaste. La garantía puedeIMPORTANTE: Muchos amplificadores poseen un preamplificador de phonoquedar invalidada si no se siguen las directrices recomendadas por Rega o si seintegrado. No conecte nunca el P1 Plus a un preamplificador de phono integrado.realizan modificaciones no autorizadas. Si se devuelve la mercancía al proveedorGeneralmente estos se marcan como entrada ‘Phono’ (fonográfica) o ‘Disk’ (depara su inspección, se debe usar el embalaje original para conservar la garantía. Losdisco).daños causados durante el transporte debidos a un embalaje incorrecto puedeninvalidar la garantía. Cualquier distribuidor de Rega tiene disponibles embalajes deIMPORTANTE: Baje el volumen en el amplificador antes de encender o apagar larepuesto. Sus derechos legales no se ven afectados.unidad.CONEXIONES DE SALIDACONEXIÓN ELÉCTRICANota: Algunos amplificadores y sistemas todo en uno ofrecen configuracionesde ganancia regulables. Si esta opción está disponible, recomendamos que laconexión utilizada para el tocadiscos esté ajustada en la configuración de gananciamás baja para evitar cualquier ruido de fondo innecesario.Nota: Al encender o apagar el P1 Plus, se puede oír un ruido a través de losaltavoces. Proviene del encendido momentáneo del preamplificador de phonodespués del encendido del tocadiscos. Esto es totalmente normal.COLOCACIÓNAl igual que con cualquier tocadiscos, tenga cuidado al colocarlo. Colóquelo siempresobre una superficie firme y nivelada. Nunca coloque el tocadiscos en la mismasuperficie que altavoces de escritorio o estantería, ya que la energía creada por losaltavoces puede distorsionar la música y afectar al rendimiento. Para optimizar elrendimiento, el tocadiscos se debe instalar en un estante de alta fidelidad o en elsoporte de pared Rega especialmente diseñado para ello.PS1 (UK)INPUTOUTPUT230 V AC 50 Hz 0.07 A24 V AC 350 mA ACPS1 (EURO)INPUTOUTPUT230 V AC 50 Hz24 V AC 350 mA ACPS1 (AUS/NZ)INPUT230 V AC 50 Hz 0.07 AOUTPUT24 V AC 350 mA ACPS1 (Korea)INPUTOUTPUT220 V AC 60 Hz24 V AC 350 mA ACPS1 (USA)INPUTOUTPUT115 V AC 60 Hz24 V AC 350 mA ACPS1 (Japan)INPUTOUTPUTMADE IN ENGLANDwww.rega.co.ukv4100 V AC 50/60 Hz24 V AC 350 mA AC
PT11PLANAR 1 PLUSDABCLOCALIZADO POR BAIXODO PRATOO INTERRUPTOR ON/OFF ESTÁLOCALIZADO POR BAIXO DO PLINTOAB331/3 rpmADC45 rpmCONFIGURAÇÃO DO SEU REGA PLANAR 1 PLUSRetire cuidadosamente o gira-discos da embalagem, e coloque-onuma superfície horizontal. Verifique se a correia está instalada emvolta da polia de transmissão (A) e do subprato (B). Retire o cartão(C) que vem colocado por baixo do subprato (B) e coloque o prato(1) e o tapete. Coloque o contrapeso (4) no tubo traseiro do braço(3), e desloque-o no sentido da seta até que ele atinja o batente dobraço, conforme mostrado na imagem (D). Ligue a saída phonodo gira-discos a uma entrada de linha do seu amplificador. Ligueo transformador fornecido à parte de trás do gira-discos. Retirecuidadosamente a proteção da agulha da cabeça (2). Ligue o Planar 1Plus através do interruptor on/off (ligar/desligar) localizado na parte debaixo do plinto (5). A alteração da velocidade de 331/3 para 45 RPM éfeita deslocando a correia de transmissão na polia (A). O braço RB110(3) está predefinido para ajuste do bias, não sendo necessário qualqueroutro ajuste.v4www.rega.co.ukMADE IN ENGLAND
PTPLANAR 1 PLUS12PRÉ AMPLIFICADOR DE PHONO INCORPORADOLIGAÇÃO DA ALIMENTAÇÃOO módulo de phono incorporado é um pré-amplificador de alta qualidade.Ligue o transformador de alimentação Rega PS1 350 mA à tomada eléctrica. AFoi concebido para amplificar o sinal minúsculo de uma cabeça MM (magnetoconfiguração do seu gira-discos Rega está agora concluída. Basta ligar, sentarsemóvel) para um nível adequado compatível com as entradas de de linha de ume desfrutar!amplificador de áudio. Esta solução permite ligar o gira-discos Rega Planar 1 Plusa uma grande variedade de equipamentos, através do cabo standard rca-rcaAVISO(fornecido), ou de um cabo rca-jack 3,5 mm (não fornecido).Utilize apenas o transformador de alimentação fornecido com o P1 Plus.Nota: A ficha de 3,5 mm só deve ser ligada a uma entrada de linha analógica.LIMPEZANÃO LIGAR A UMA TOMADA DE SAÍDA DE AUSCULTADORES. POR EXEMPLO, NUMCom o gira-discos desligado, utilize um pano de microfibras (ligeiramente húmido,DISPOSITIVO MÓVEL OU SEMELHANTE, VISTO QUE ISSO PODERIA DANIFICAR Ose necessário). Não remova as tampas que estão fixas na base inferior do gira-DISPOSITIVO E O PRÉ DE PHONO INCORPORADO.discos; não existem peças no interior que necessitem de manutenção por parte doutilizador. Se o gira-discos apresentar um funcionamento irregular ou emitir fumoLIGAÇÕES DE SAÍDAou odor, desligue-o da corrente e contacte o serviço de assistência da Audio Team.Ligue as fichas de saída do pré de phono do gira-discos Rega Planar 1 Plus a umaGARANTIAentrada de linha do seu amplificador com os cabos adequados.Todos os produtos Rega estão cobertos por uma garantia contra defeitos deIMPORTANTE: Muitos amplificadores já possuem uma entrada de phonofabrico. Esta garantia não cobre alterações não autorizadas no gira-discos ou danosincorporada. Nunca ligue o P1 Plus a uma entrada de phono do amplificador. Estasprovocados pela não observância das recomendações indicadas neste manual. Noentradas estão geralmente marcadas como entrada “Phono’”ou “Disk”.caso do envio do gira-discos para verificação, o mesmo deve ser devidamenteembalado utilizando a embalagem original. Os danos causados durante oIMPORTANTE: Mantenha o amplificador desligado, ou com o volume no mínimotransporte devidos a mau acondicionamento ou à utilização de uma embalagemantes de ligar ou desligar o cabo que liga o gira-discos ao amplificador.não adequada, podem invalidar a garantia.LIGAÇÕES DE SAÍDA DO PRÉLIGAÇÃO DODE PHONOTRANSFORMADORNota: Alguns amplificadores e sistemas tudo-em-um oferecem entradas de linhacom ganho ajustável. No caso de ligar o gira-discos a uma entrada deste tipo,recomendamos que seja selecionada a posição de ganho mais baixo no sentido dereduzir o ruído de fundo.Nota:Ao ligar ou desligar o P1 Plus, pode ser ouvido um ruído através dosaltifalantes. Isto é perfeitamente normal.POSICIONAMENTOTal como acontece com qualquer gira-discos, O P1 Plus deve ser posicionado comcritério. Coloque-o sempre sobre uma superfície estável e nivelada. Evite colocaro gira-discos na mesma superfície onde estão colocadas as colunas de som,para evitar que a vibração induzida pelas colunas afete o desempenho do giradiscos. Para otimizar o desempenho, o P1 Plus idealmente deve ser colocado numaprateleira para hi-fi ou no suporte de parede Rega dedicado.PS1 (UK)INPUTOUTPUT230 V AC 50 Hz 0.07 A24 V AC 350 mA ACPS1
une connexion simple à une grande variété de produits en utilisant le câble phono-phono standard (fourni) ou phono à la prise de 3,5 mm (non fournie). Remarque: Un câble phono de 3,5 mm ne doit être branché qu'à une entrée appropriée. NE PAS CONNECTER À UNE PRISE DE SORTIE CASQUE (telle que