Transcription
DMRHW220GL eng.book 1 �後2時12分Operating InstructionsHDD RecorderModel No. DMR-HW220Thank you for purchasing this product.For optimum performance and safety, please read these instructions carefully.Please keep this manual for future reference. This HDD Recorder is for viewing and recording free to view channels only. It does not receivepay TV or encrypted channels.VQT4G61GLuntil2012/05/21
DMRHW220GL eng.book 2 �後2時12分Safety precautionsWARNINGCAUTIONUnit To reduce the risk of fire, electric shock orproduct damage,- Do not expose this unit to rain, moisture,dripping or splashing.- Do not place objects filled with liquids, such asvases, on this unit.- Use only the recommended accessories.- Do not remove covers.- Do not repair this unit by yourself. Referservicing to qualified service personnel.- Do not let metal objects fall inside this unit.- Do not place heavy items on this unit.Unit Do not place sources of naked flames, such aslighted candles, on this unit. This unit may receive radio interference causedby mobile telephones during use. If suchinterference occurs, please increase separationbetween this unit and the mobile telephone. This unit is intended for use in moderateclimates.AC mains lead To reduce the risk of fire, electric shock orproduct damage,- Ensure that the power supply voltagecorresponds to the voltage printed on this unit.- Insert the mains plug fully into the socketoutlet.- Do not pull, bend, or place heavy items on thelead.- Do not handle the plug with wet hands.- Hold onto the mains plug body whendisconnecting the plug.- Do not use a damaged mains plug or socketoutlet. Install this unit so that the AC mains lead can beunplugged from the socket outlet immediately ifany problem occurs.SD card Keep the Memory Card out of reach of childrento prevent swallowing.2VQT4G61Placement Place this unit on an even surface. To reduce the risk of fire, electric shock orproduct damage,- Do not install or place this unit in a bookcase,built-in cabinet or in another confined space.Ensure this unit is well ventilated.- Do not obstruct this unit’s ventilation openingswith newspapers, tablecloths, curtains, andsimilar items.- Do not expose this unit to direct sunlight, hightemperatures, high humidity, and excessivevibration.
DMRHW220GL eng.book 3 ページ2012年4月27日Batteries Danger of explosion if battery is incorrectlyreplaced. Replace only with the typerecommended by the manufacturer. Mishandling of batteries can cause electrolyteleakage and may cause a fire.- Do not mix old and new batteries or differenttypes at the same time.- Do not heat or expose to flame.- Do not leave the battery(ies) in a car exposedto direct sunlight for a long period of time withdoors and windows closed.- Do not take apart or short circuit.- Do not recharge alkaline or manganesebatteries.- Do not use batteries if the covering has beenpeeled off.- Remove batteries if you do not intend to usethe remote control for a long period of time.Store in a cool, dark place. When disposing the batteries, please contactyour local authorities or dealer and ask for thecorrect method of disposal.金曜日午後2時12分Supplied accessoriesPlease check and identify the suppliedaccessories.(Product numbers correct as of May 2012. Thesemay be subject to change.)Remote control (N2QAYB000781):Batteries for remote control:AC mains lead:RF coaxial cable:Audio/Video cable:1 pc.2 pcs.1 pc.1 pc.1 pc. Do not use AC mains lead with other equipment.Indemnity concerning recorded contentPanasonic does not accept any responsibility fordamages directly or indirectly due to any type ofproblems that result in loss of recording or editedcontent (data), and does not guarantee anycontent if recording or editing does not workproperly. Likewise, the above also applies in acase where any type of repair is made to the unit(including any other non-HDD relatedcomponent).VQT4G613
DMRHW220GL eng.book 4 �後2時12分Table of contentsSafety precautions . . . . . . . . . . . . . . . . . . . . . .2Supplied accessories . . . . . . . . . . . . . . . . . . . .3Getting startedHDD and media information . . . . . . . . . . . . . . .6- Recordable/playable contents . . . . . . . . . . . . . . . . .6- Notes . . . . . . . . . . . . . . . . . . . . . . . . . . . . . . . .7Unit care . . . . . . . . . . . . . . . . . . . . . . . . . . . . . .9Control reference guide . . . . . . . . . . . . . . . . .10Connection . . . . . . . . . . . . . . . . . . . . . . . . . . .12- Basic connections . . . . . . . . . . . . . . . . . . . . . . .12- Other TV connection . . . . . . . . . . . . . . . . . . . . . .13- Amplifier/receiver connections . . . . . . . . . . . . . . .14- Network connection . . . . . . . . . . . . . . . . . . . . . .16Settings . . . . . . . . . . . . . . . . . . . . . . . . . . . . . .17- TV operation buttons . . . . . . . . . . . . . . . . . . . . .17- Easy Setting . . . . . . . . . . . . . . . . . . . . . . . . . . .18- Easy Network Setting . . . . . . . . . . . . . . . . . . . . .19FUNCTION MENU screen . . . . . . . . . . . . . . .21Watching broadcastsWatching broadcasts . . . . . . . . . . . . . . . . . . .22- Using Channel List . . . . . . . . . . . . . . . . . . . . . . .22- Using TV Guide system . . . . . . . . . . . . . . . . . . . .23- Using channel information . . . . . . . . . . . . . . . . . .23- Operations while watching broadcast . . . . . . . . . . .24- REWIND LIVE TV/PAUSE LIVE TV . . . . . . . . . . . .24RecordingRecording TV programmes. . . . . . . . . . . . . . .26- Operation during Recording . . . . . . . . . . . . . . . . .27Timer recording. . . . . . . . . . . . . . . . . . . . . . . .28- Manually programming timer recording . . . . . . . . . .28- Timer recording options . . . . . . . . . . . . . . . . . . . .29- Timer recording from channel information . . . . . . . .29- Notes on timer recording . . . . . . . . . . . . . . . . . . .29- To confirm and edit a timer programme . . . . . . . . . .30Playing back videoPlaying titles on the HDD . . . . . . . . . . . . . . . .31- DIRECT NAVIGATOR (VIDEO) screen . . . . . . . . . .31Playing titles on the media . . . . . . . . . . . . . . .34Operation during play . . . . . . . . . . . . . . . . . . .35- General operations. . . . . . . . . . . . . . . . . . . . . . .35- 3D video playback . . . . . . . . . . . . . . . . . . . . . . .37Editing videoDeleting recorded titles . . . . . . . . . . . . . . . . . .38Editing recorded titles . . . . . . . . . . . . . . . . . . .394VQT4G61Copying videoCopying titles . . . . . . . . . . . . . . . . . . . . . . . . .42PhotoPlaying photos . . . . . . . . . . . . . . . . . . . . . . . .44- DIRECT NAVIGATOR (PHOTO) screen . . . . . . . . .44- Photo play option . . . . . . . . . . . . . . . . . . . . . . . .45- Slideshow Settings. . . . . . . . . . . . . . . . . . . . . . .45Editing photos . . . . . . . . . . . . . . . . . . . . . . . . .46Copying photos. . . . . . . . . . . . . . . . . . . . . . . .47- Selecting and copying the photos . . . . . . . . . . . . .47- Copying automatically . . . . . . . . . . . . . . . . . . . . .47MusicPlaying music . . . . . . . . . . . . . . . . . . . . . . . . .48- Copying music to HDD . . . . . . . . . . . . . . . . . . . .48- Playing music recorded on HDD . . . . . . . . . . . . . .49- Operations during music play . . . . . . . . . . . . . . . .50Editing music/playlist . . . . . . . . . . . . . . . . . . .51With Other EquipmentCopying the HD Video or the SD Video . . . . .52- Copying HD Video (AVCHD) . . . . . . . . . . . . . . . .52- Copying SD Video (MPEG2) . . . . . . . . . . . . . . . .53Smart Home Networking (DLNA) . . . . . . . . . .54- Using this unit as Server . . . . . . . . . . . . . . . . . . .54- Using this unit as Client . . . . . . . . . . . . . . . . . . . .55- Using this unit as Media Renderer . . . . . . . . . . . . .56Convenient functionsFormat SD card . . . . . . . . . . . . . . . . . . . . . . .57Registering the external HDD (USB HDD) . . .58- Connecting the USB HDD . . . . . . . . . . . . . . . . . .58- Disconnecting the USB HDD . . . . . . . . . . . . . . . .58- Registering the USB HDD . . . . . . . . . . . . . . . . . .59VIERA Link functions . . . . . . . . . . . . . . . . . . .60VIERA Connect (Enjoying Internet Service) . . . . .61- To enjoy video communication (e.g., SkypeTM) . . . . .61Playback menu . . . . . . . . . . . . . . . . . . . . . . . .62Changing the unit’s settings (Setup). . . . . . . .64- Common procedures . . . . . . . . . . . . . . . . . . . . .64- Digital TV Tuning . . . . . . . . . . . . . . . . . . . . . . . .66- HDD / USB HDD . . . . . . . . . . . . . . . . . . . . . . . .68- Picture . . . . . . . . . . . . . . . . . . . . . . . . . . . . . .69- Sound . . . . . . . . . . . . . . . . . . . . . . . . . . . . . . .69- Display . . . . . . . . . . . . . . . . . . . . . . . . . . . . . .70- Connection . . . . . . . . . . . . . . . . . . . . . . . . . . .70- Network. . . . . . . . . . . . . . . . . . . . . . . . . . . . . .71- Others . . . . . . . . . . . . . . . . . . . . . . . . . . . . . .73
DMRHW220GL eng.book 5 ページ2012年4月27日Software (Firmware) Update . . . . . . . . . . . . .Other operations . . . . . . . . . . . . . . . . . . . . . .- Entering text . . . . . . . . . . . . . . . . . . . . . . . . . .- Switching the aspect ratio of the screen . . . . . . . . .- HOLD function . . . . . . . . . . . . . . . . . . . . . . . . .7677777777金曜日午後2時12分About descriptions in these operatinginstructions Pages to be referred to are indicated as “ ”.TroubleshootingTroubleshooting guide . . . . . . . . . . . . . . . . . .- General operation . . . . . . . . . . . . . . . . . . . . . . .- Displays . . . . . . . . . . . . . . . . . . . . . . . . . . . . .- TV screen and video . . . . . . . . . . . . . . . . . . . . .- Sound . . . . . . . . . . . . . . . . . . . . . . . . . . . . . .- Recording, timer recording and copying . . . . . . . . .- Play . . . . . . . . . . . . . . . . . . . . . . . . . . . . . . .- Edit . . . . . . . . . . . . . . . . . . . . . . . . . . . . . . . .- Photo . . . . . . . . . . . . . . . . . . . . . . . . . . . . . .- USB . . . . . . . . . . . . . . . . . . . . . . . . . . . . . . .- TV Guide . . . . . . . . . . . . . . . . . . . . . . . . . . . .- Broadcast . . . . . . . . . . . . . . . . . . . . . . . . . . . .- VIERA Link . . . . . . . . . . . . . . . . . . . . . . . . . . .- Network . . . . . . . . . . . . . . . . . . . . . . . . . . . . .- Reset . . . . . . . . . . . . . . . . . . . . . . . . . . . . . .- Messages on the unit’s display . . . . . . . . . . . . . .- When you experience problems withEasy Network Setting . . . . . . . . . .78787979808081818181818282828383. . . . . . . . . . 85ReferenceSpecifications . . . . . . . . . . . . . . . . . . . . . . . .Licenses . . . . . . . . . . . . . . . . . . . . . . . . . . . .Limited Warranty . . . . . . . . . . . . . . . . . . . . . .Index . . . . . . . . . . . . . . . . . . . . . . . . . . . . . . .87909293Getting startedWatching broadcastsRecordingPlaying back videoEditing videoCopying videoPhotoMusicWith Other EquipmentConvenient functionsTroubleshootingReferenceVQT4G615
DMRHW220GL eng.book 6 �後2時12分Getting startedGetting startedHDD and media informationRecordable/playable contents(–: Impossible)Media typeStandard symbolBuilt-in hard disk drive(HDD)[HDD]External HDD ( 58)§1, 2[USB HDD]SD Cards[SD]USB able contents VideoAVCHD/AVCHD 3DJPEGMPO (3D photo)MP3Video AVCHD/AVCHD 3D§3SD Video (MPEG2)§4JPEG MP4MPO (3D photo)AVCHD/AVCHD 3D§3, 5SD Video (MPEG2)§4 MP4MPEG2MKV DivX JPEG MP3MPO (3D photo) JPEG MPO (3D photo)–Referred to as “USB HDD” in these operating instructions.It cannot be recorded directly. (Only compatible with copying from the built-in HDD)Recorded with AVCHD format compatible devices (Panasonic video camera, etc.). It may not beable to play back depending on the device.Recorded with SD-Video format compatible devices (Panasonic video camera, etc.). It can beplayed back only after copying to HDD. ( 53)It cannot be played back directly from the USB memory. Playback is possible by copying to theHDD. ( 52) [USB] Video images of the copyright-protected DivX contents stored on USB device can be output only through the HDMIoutput terminal. With certain recording states and folder structures, the play order may differ or playback may not be possible.Playable contents on a DLNA serverWhen this unit works as a DLNA client ( 55), following contents are playable. Recorded video§ JPEG AVCHD§ MPO (3D photo) MP4 MP3 MPEG2 FLACOnly when the server is another DIGA. ( 54) Depending on the server, the contents other than stated above can be played back.§6VQT4G61
DMRHW220GL eng.book 7 �後2時12分Getting startedNotesAbout extension of filesFile formatJPEGMPO (3D photo)MP3DivXSubtitle text files§MKVSubtitle text sa”“.txt”“.MPEG” �“.m2ts”“.MTS”The video file and subtitles text files are inside the same folder, and the file names are the sameexcept for the file extensions. Some files may not be played back even if they have these extensions.§VQT4G617
DMRHW220GL eng.book 8 �後2時12分Getting startedHDD and media informationNotes for the USB devicesMedia handling This unit does not guarantee connection with allUSB devices. This unit supports USB 2.0 High Speed. Although this unit can use USB 3.0 devices asUSB 2.0 devices, in certain cases USB 3.0devices cannot be used due to differingconnector shape, larger current ratings, etc.(Use of USB 2.0 devices is recommended.) USB memories support FAT12, FAT16 andFAT32 file systems. USB memories support DivX and MKV files lessthan 4 GB. Do not touch the terminal surface of the SDcards.Notes for the SD cards Compatible SD card- SD Memory Card(from 8 MB to 2 GB, FAT12 and FAT16formats)- SDHC Memory Card(from 4 GB to 32 GB, FAT32 format)- SDXC Memory Card(48 GB, 64 GB, exFAT format) Using miniSD card or microSD cardMini-type and micro-type cards can also beused, but must be used with adaptor cards(optional).To format an SD cardRefer to “Format SD card”. ( 57) Usable memory is slightly less than the card capacity. If the SD card is formatted on other equipment, the timenecessary for recording may be longer or the card may notbe able to be used on this unit. In these cases, format thecard on this unit. SDHC Memory Cards and SDXC Memory Cards can beused in equipment that is compatible with the appropriatecards. (SDHC Memory Cards can also be used inequipment compatible with SDXC Memory Cards.)8VQT4G61DO NOT Do not expose the terminals of the SD card towater, garbage or other strange things. Do not place in the following areas:- In hot places, such as under the directsunlight.- In very dusty or humid areas.- Locations susceptible to significant differencein temperature (condensation can occur).- Where static electricity or electromagneticwaves occur.
DMRHW220GL eng.book 9 �後2時12分Getting startedUnit careHDD/USB HDD handling careWhen moving the unit The HDD is a high precision deviceThe HDD is a high precision recordinginstrument and is easily susceptible to damage.Therefore, be careful of the following pointswhile the unit is turned on, especially duringoperation, otherwise the HDD and the recordedcontent may be damaged:- Do not subject the unit to any vibration andshock.- Do not remove the AC mains lead from thehousehold mains socket.1 Switch the unit to standby mode. (Wait until“BYE” disappears from the display.)2 Remove the AC mains lead from thehousehold mains socket.3 Move only after the unit has come to acomplete stop (approx. 3 minutes) in order toavoid subjecting to vibration and shock. (Evenafter the unit is switched to standby mode, theHDD continues operating for a short time.) The HDD is a temporary storage deviceThis unit cannot save (backup) the HDD titles tomedia. You have to be very careful whenhandling the unit and editing the title. If the HDD or USB HDD is damaged, therecorded content cannot be recovered.Setup precautions Place the unit on a surface that is flat andnot subject to vibration or impact. Do not place on anything that generates heatlike a Set Top Box, etc. Place in an area where condensation doesnot occur. Conditions where condensationmay occur- When there is an extreme change intemperature (e.g., when subjected to an airconditioner or when cooled air directly impactsthe unit).- When there is high humidity or a lot of steamin the room.Cleaning Wipe with a soft, dry cloth. Never use alcohol, paint thinner or benzine toclean this unit. Before using chemically treated cloth, carefullyread the instructions that came with the cloth.When requesting this unit for repairThe registration of the USB HDD may becancelled in the process of repairing this unit.You can use the USB HDD again byre-registering, but all recorded content already onthe USB HDD will be lost. In such cases, therecorded content (data) cannot be recovered.In the above situation, without turning the uniton, let the unit adjust to the room temperatureand wait 2–3 hours until condensation is gone. Do not block the cooling fan on the rear ofthe unit. The unit may breakdown if cigarette smokeor bug spray/vapour, etc. gets inside theunit.VQT4G619
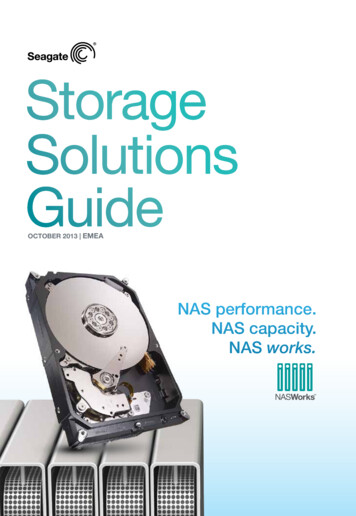
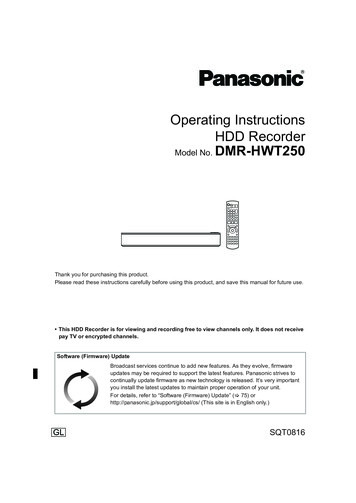
DMRHW220GL eng.book 10 �後2時12分Getting startedControl reference guideInstructions for operations are generally described using the remote control.VQT4G61 TV VOLDRIVE INPUTSELECT AVCH PAGE2abc 3def1 7pqrs 8 tuv 9wxyz 0 INTERNET SLOW/SEARCHSKIPSTATUSPLAY/x1.3EXITPAUSE LIVE K CHAPTER TIME SLIP DISPLAYSETUP REWIND LIVE TVPAUSESTOP RADIO/TVLAST VIEW CH4ghi 5jkl 6mnoN EC TIO M NUFUN10 DIRECT NAVIGATORRemote control1 Transmit the remote control signal Point it at remote control signal sensor onthis unit. ( 11)2 Switch the unit from on to standby mode orvice versa3 Select drive (HDD, SD or USB)4 Select channels and title numbers, etc./Enternumbers or characters5 Switch to the previously watched channel( 22)6 Basic operations for recording and play,REWIND LIVE TV/PAUSE LIVE TV ( 24)7 Show Information ( 23, 32, 35)8 Selection/OK, Frame-by-frame ( 35)9 Show DIRECT NAVIGATOR ( 31): Show OPTION menu ( 39, 46, 51); Colour buttons (red, green, yellow, blue) (Usein accordance with instruction on the screen.) Start recording ( 26) Select audio ( 24, 36) Show the Timer Recording screen ( 28)? Create chapter ( 36)@ Show Setup menu ( 64)A To delete unwanted recorded titles, timerprogrammes, photos or music ( 38)B TV operation buttons ( 17)C Channel select ( 22)/Change pages in theDIRECT NAVIGATOR screen etc.D Show the VIERA Connect screen ( 61)E Switching to the radio channel list ( 22)F Start up a video communication ( 61)G Exit the menu screenH Show the TV Guide screen ( 23)I Show the FUNCTION MENU screen ( 21)J Return to previous screenK Show subtitles ( 24, 36)L Show Teletext ( 24)M Show Playback Menu ( 62)N Skip the specified time ( 36)O Skip approx. 1 minute forward ( 35)P Skip approx. 10 seconds backward ( 35)DELMANUAL SKIP-10s 60s Insert batteriesInsert so the poles (i and j) match those in theremote control.R6/LR6, AA(Alkaline or manganese batteries)
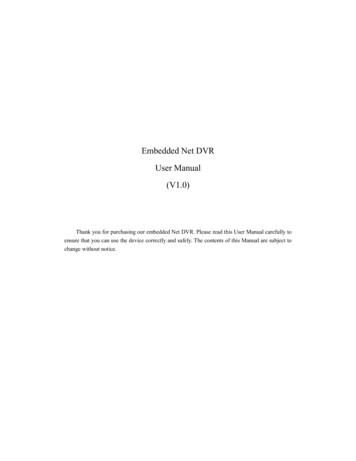
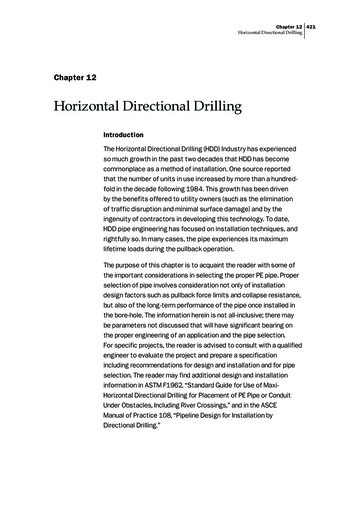
DMRHW220GL eng.book 11 �後2時12分Getting startedMain unit USB memory Pull to flip downthe front panel.SD card1 Standby/on switch (Í/I)Press to switch the unit from on to standbymode or vice versa. In standby mode, the unitis still consuming a small amount of power.2 Recording indicator The indicator will light up while recording. The indicator will blink while recording ispaused and before recording starts.3 CALL LED The LED will light up when this unit receivesincoming call etc. of the videocommunication. ( 61)4 Remote control signal sensor Angle: Approx. 20 up and down, 30 left andright Distance: Within approx. 7 m in front of theunit5 Start PAUSE LIVE TV ( 24)6 USB port7 SD card slot When removing the SD card, press on thecentre of the card and pull it straight out.8 Channel select ( 22)9 Start recording ( 26): Stop; Start play Display1HDDSD2COPYSD USBPLAY3 456 78SD card slot indicatorCopying indicatorDrive (HDD or SD) indicatorRemote control signal indicatorMain display section indicator- Current time- Playback counter- Various messages ( 83)6 Playback indicator7 USB port indicator8 Timer recording indicator This indicator lights up when the timerrecording standby is activated.12345 While writing to/reading from the media, do not switch theunit to standby mode or remove the media. Such actionmay result in loss of the media contents.VQT4G6111
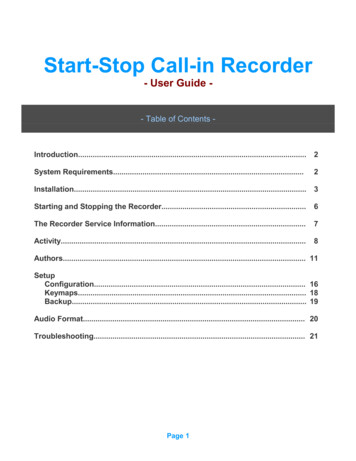
DMRHW220GL eng.book 12 �後2時12分Getting startedConnectionBasic connections3D programmes can be played back when this unit is connected to a 3D compatible TV. Before connection, turn off all equipment and read the appropriate operating instructions.To the aerialAerial cableRF coaxial cable(supplied)Cooling fanThis unit’s rear panelHDMI cableAC mains lead(supplied) Connect only after all otherconnections are complete.HDMIVHF/UHFRF INTV’s rear panelHousehold mains socket(AC 220 to 240 V, 50 Hz)If the TV does not have the HDMI terminalConnect the TV with the Audio/Video cable. ( 13)To connect and register the USB HDD (optional)Refer to “Registering the external HDD (USB HDD)”. ( 58)To connect the Communication Camera (optional)Refer to “VIERA Connect (Enjoying Internet Service)”. ( 61)About HDMI cable Use the High Speed HDMI cables. Non-HDMI-compliant cables cannot be utilized. When outputting 1080p signal, please use HDMI Cables 5.0 meters or less. Recommended Panasonic HDMI cable part number:RP-CDHS15 (1.5 m), RP-CDHS30 (3.0 m), RP-CDHS50 (5.0 m), etc.12VQT4G61
DMRHW220GL eng.book 13 �後2時12分Getting startedWhen the unit is not to be used for a long timeTo save power, unplug it from the householdmains socket. This unit consumes a smallamount of power, even when the unit is instandby mode.[approx. 0.2 W (“Power Save in Standby” isactivated and “RF OUT ( Aerial Signal )” is setto “Off”)] The HDMI connection supports VIERA Link “HDAVIControl” ( 60). You cannot connect this unit to DVI devices that areincompatible with HDCP.Depending on the device, images may not display properlyor at all when connecting with a DVI/HDMI switching cable.(Audio cannot be output.) If you are connecting to a TV that is only compatible with2 channel audio output, audio with 3 channels or more willbe down mixed and output as 2 channels, even ifconnecting with an HDMI cable.Other TV connection Connect to terminals of the same colour.AUDIO IN VIDEO INRLTVAudio/Video cable(supplied) 3D video playback is not possible with this connection. Do not connect video signals through a video recorder.Due to copy guard protection the picture may not bedisplayed properly.VQT4G6113
DMRHW220GL eng.book 14 �後2時12分Getting startedConnectionAmplifier/receiver connectionsHDMI terminal3D programmes can be played back whenthis unit is connected to a 3D compatibleamplifier/receiver and a 3D compatible TV. You will not be able to view 3D programmeswith this connection if your amplifier/receiveris not 3D compatible. Amplifier/receiver not compatible with 3D3D programmes can be played back whenthis unit is connected to a 3D compatibleTV. This connection only supports up to 5.1ch.Amplifier/receiverTVTVHDMIHDMI IN(ARC compatible)(ARC compatible)HDMI cableHDMIcableAmplifier/receiverHDMI OUTHDMI IN(ARC compatible)HDMI cable VIERA Link function is possible by connecting to a TV oramplifier/receiver compatible with VIERA Link. When using a TV or an amplifier/receiver that does notdisplay “ARC compatible” on the HDMI terminal, it isnecessary to connect the TV and the amplifier/receiver witha digital audio cable to enjoy the TV audio on theamplifier/receiver.14VQT4G61HDMIHDMI(ARC compatible)HDMI cable VIERA Link function is possible by connecting to a TV oramplifier/receiver compatible with VIERA Link. When using a TV or an amplifier/receiver that does notdisplay “ARC compatible” on the HDMI terminal, it isnecessary to connect the TV and the amplifier/receiver witha digital audio cable to enjoy the TV audio on theamplifier/receiver.
DMRHW220GL eng.book 15 �後2時12分Getting startedDIGITAL AUDIO OUT terminalAUDIO OUT terminal Connect to terminals of the same colour.OPTICAL INAmplifier/receiverAUDIO INRLAmplifier/receiverOptical digitalaudio cableAudio cable When you do not want the audio to be output from the TV,set “HDMI Audio Output” to “Off” ( 64, 71).VQT4G6115
DMRHW220GL eng.book 16 �後2時12分Getting startedConnectionNetwork connectionWireless LAN connectionFollowing functions will be available when this unitis connected to the network. Smart Home Networking (DLNA) ( 54) VIERA Connect (Enjoying Internet Service)( 61) Updating the software (firmware) of this unitfrom Internet ( 76)For details about connection method, refer to theinstructions supplied with the connectedequipment.After you make the LAN cable/Wireless LANconnection, the network setting is needed.( 19, Easy Network Setting)LAN cable connectionLAN (ethernet) cableBroadband router, etc.Internet Use category 5 or above straight LAN cables (STP) whenconnecting to peripheral devices. Inserting any cable other than a LAN cable in the LANterminal can damage the unit.16VQT4G61Wireless router, etc.Internet For up-to-date compatibility information on your Wirelessrouter refer tohttp://panasonic.jp/support/global/cs/(This site is in English only.) The unit is not compatible with public wireless LANservices. Precautions of Wireless LAN connectionThe following limits are in place regarding theusage of this unit. You must be aware of theselimits before using this unit.Panasonic will in no way be responsible for anyincidental damage which may arise due to afailure to obey these limits, or to any condition ofuse or disuse of this unit. Data transmitted and received over radiowaves may be intercepted and monitored. This unit contains delicate electroniccomponents.Please use this unit in the manner in which itwas intended and follow the following points:- Do not expose this unit to high temperaturesor direct sunlight.- Do not bend, or subject this unit to strongimpacts.- Keep this unit away from moisture.- Do not disassemble or alter this unit in anyway.
DMRHW220GL eng.book 17 �後2時12分Getting startedSettingsTV operation buttonsThe TV can be operated from the TV operationbuttons of the remote control. Perform the setting if you cannot operate the TVwith the TV operation buttons.While pressing [TV Í], enter the code withthe number buttons.TV VOLDRIVE INPUTSELECT AVCHPAGE2abc 3def14ghi 5jkl 6mno7pqrs 8 tuv 9wxyz0CHINTERNETRADIO/TVSLOW/SEARCHLAST VIEWSKIPREWIND LIVE TVPAUSESTOPSTATUSTV operation buttons( right)PLAY/x1.3PAUSE LIVE TVEXITN EC TIO M NUFUNDIRECT NAVIGATORGUIDEOKOPTIONRETURNRGYBRECAUDIOTEXTSTTLTo exit the screenSelect and enter buttonsFUNCTION MENU ( 21)To return to the previousscreenPROG/CHECK CHAPTER TIME SLIP DISPLAYSETUPDELMANUAL SKIP-10s 60sSetup ( 64)Manufacturer and Code SUBISHIMIVAR24YAMAHA18/41 If the brand of your TV is not listed or the codenumber is invalid for the TV, this remote controlis not compatible with your TV. If your TV brand has more than one code listed, select theone that allows correct operation.VQT4G6117
DMRHW220GL eng.book 18 �後2時12分Getting startedSettings4Easy Setting123Turn on the TV, then select the appropriateAV input to suit the connections to this unit.Press [Í] on the remote control or [Í/I] onthis unit. The Easy Setting will start at the initialpower on.Follow the on-screen instructions andperform the settings. When the Download from TV screenappears, the setting information on the TVis acquired by this unit. ( 60) When the Auto Setup screen appears, theunit searches for the terrestrial digitalchannels. It takes about 3 minutes.Digital TV Auto TuningProgressCH 6This will take about 3 minutes.Channel NameRF Ch353569TypeDigital TVDigital TVQuality1010Digital TV: 2SearchingSet “Power Save” to “On”, “On Timer” or“Off”, then press [OK].Power Save in StandbyPower SaveOnFrom12AMTo6AM OnIt will go into the Power Save in Standbymode. On TimerSet the start and stop time and then press[OK]. “Power Save in Standby” is activatedwhen the set time comes. OffIt is possible to start quickly from standbymode. (Quick Start mode) If you use Home Network function ( 72),select “Off”. This function is not availablewith other settings.When “Easy Setting has been completed.”appears, Easy Setting is complete.RETURNAfter tuning has been completed, clock willbe set automatically.If the clock setting screen appears, set thetime manually ( 74, Clock).To stop partwayPress [RETURN].To
For optimum performance and safety, please read these instructions carefully. Please keep this manual for future reference. This HDD Recorder is for viewing and recording free to view channels only. It does not receive pay TV or encrypted channels. HDD Recorder Model No. DMR-HW220 until 2012/05/21 GL