Transcription
USB-Blaster Download CableUser Guide101 Innovation DriveSan Jose, CA ment Version:Document Date:2.3May 2007
Copyright 2007 Altera Corporation. All rights reserved. Altera, The Programmable Solutions Company, the stylized Altera logo, specific device designations, and all other words and logos that are identified as trademarks and/or service marks are, unless noted otherwise, the trademarks andservice marks of Altera Corporation in the U.S. and other countries. All other product or service names are the property of their respective holders. Altera products are protected under numerous U.S. and foreign patents and pending applications, maskwork rights, and copyrights. Altera warrantsperformance of its semiconductor products to current specifications in accordance with Altera's standard warranty, but reserves the right to makechanges to any products and services at any time without notice. Altera assumes no responsibility or liability arising out of the application or use of any information, product, or service described herein except as expressly agreed to in writing by AlteraCorporation. Altera customers are advised to obtain the latest version of device specifications before relying on any published information and before placing orders for products or services.Printed on recycled paperiiAltera Corporation
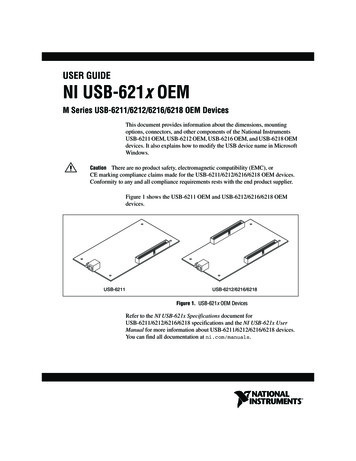
ContentsChapter 1. Setting Up the USB-Blaster Download CableIntroduction .Device Support .Power Requirements .Software Requirements .Hardware Setup .Software Setup .Installing the USB-Blaster Driver on Windows 2000 and Windows XP Systems .Installing the USB-Blaster Driver on Linux .Setting Up the USB-Blaster Hardware in the Quartus II Software ter 2. USB-Blaster SpecificationsOverview .USB-Blaster Connections .Voltage Requirements .Cable-to-Board Connection .USB-Blaster Plug Connection .Circuit Board Header Connection .Operating Conditions .USB-Revision .References .Altera 62–7iii
ContentsivUSB-Blaster Download Cable User GuideAltera Corporation
About this User GuideRevision HistoryDateThe table below displays the revision history for the chapters in this UserGuide.VersionMay 20072.3Changes Made Updated “Introduction”.Added warning note about USB-Blaster cable in “Hardware Setup” section.Added information on Linux setup in “Installing the USB-Blaster Driver on Linux”section.Added feetpara note on driver information just before the “Setting Up the USBBlaster Hardware in the Quartus II Software” section.Updated USB-Blaster installation procedure for QII 6.1 (32-bit or 64-bit) in“Installing the USB-Blaster Driver on Windows 2000 and Windows XP Systems”section.March 20072.2Update to “Installing the USB-Blaster Driver on Windows 2000 and Windows XPSystems” section.July 20062.1Minor update to Chapter 2.June 20062.0Added USB-Blaster Revision section, updated Figure 2–1, Table 2–1, andTable 2–7. Added Table 2–6.December 2004Update to conditions in Table 2–2.November 20041.1Re-release.July 20041.0First publication.Altera CorporationvPreliminary
How to Contact AlteraHow to ContactAlteraFor the most up-to-date information about Altera products, refer to thefollowing table.Contact (1)ContactMethodAddressTechnical supportWebsitewww.altera.com/supportTechnical n@altera.comProduct literatureWebsitewww.altera.com/literatureAltera literature servicesEmailliterature@altera.comNon-technical support (General)Emailnacomp@altera.com(Software Licensing) Emailauthorization@altera.comNote to table:(1)TypographicConventionsYou can also contact your local Altera sales office or sales representative.This document uses the typographic conventions shown below.Visual CueMeaningBold Type with InitialCapital LettersCommand names, dialog box titles, checkbox options, and dialog box options areshown in bold, initial capital letters. Example: Save As dialog box.bold typeExternal timing parameters, directory names, project names, disk drive names,filenames, filename extensions, and software utility names are shown in boldtype. Examples: fMAX, \qdesigns directory, d: drive, chiptrip.gdf file.Italic Type with Initial CapitalLettersDocument titles are shown in italic type with initial capital letters. Example: AN75: High-Speed Board Design.Italic typeInternal timing parameters and variables are shown in italic type.Examples: tPIA, n 1.Variable names are enclosed in angle brackets ( ) and shown in italic type.Example: file name , project name .pof file.Initial Capital LettersKeyboard keys and menu names are shown with initial capital letters. Examples:Delete key, the Options menu.“Subheading Title”References to sections within a document and titles of on-line help topics areshown in quotation marks. Example: “Typographic Conventions.”viUSB-Blaster Download Cable User GuideAltera CorporationPreliminary
About this User GuideTypographic ConventionsVisual CueCourier typeMeaningSignal and port names are shown in lowercase Courier type. Examples: data1,tdi, input. Active-low signals are denoted by suffix n, e.g., resetn.Anything that must be typed exactly as it appears is shown in Courier type. Forexample: c:\qdesigns\tutorial\chiptrip.gdf. Also, sections of anactual file, such as a Report File, references to parts of files (e.g., the AHDLkeyword SUBDESIGN), as well as logic function names (e.g., TRI) are shown inCourier.1., 2., 3., anda., b., c., etc.Numbered steps are used in a list of items when the sequence of the items isimportant, such as the steps listed in a procedure. Bullets are used in a list of items when the sequence of the items is not important. vThe checkmark indicates a procedure that consists of one step only.1The hand points to information that requires special attention.cThe caution indicates required information that needs special consideration andunderstanding and should be read prior to starting or continuing with theprocedure or process.wThe warning indicates information that should be read prior to starting orcontinuing the procedure or processesrThe angled arrow indicates you should press the Enter key.fThe feet direct you to more information on a particular topic.Altera CorporationPreliminaryviiUSB-Blaster Download Cable User Guide
Typographic ConventionsviiiUSB-Blaster Download Cable User GuideAltera CorporationPreliminary
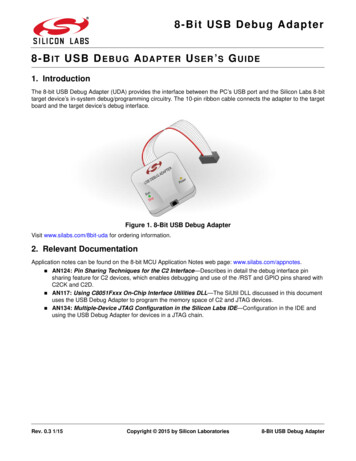
Chapter 1. Setting Up theUSB-Blaster Download CableIntroductionThe USB-Blaster download cable interfaces a USB port on a hostcomputer to an Altera FPGA mounted on a printed circuit board. Thecable sends configuration data from the PC to a standard 10-pin headerconnected to the FPGA. You can use the USB-Blaster cable to iterativelydownload configuration data to a system during prototyping or toprogram data into the system during production.Device SupportThe USB-Blaster download cable allows you to program and configureAltera devices. Specifically, you can do the following: Download configuration data to FPGA devices: Stratix II, Stratix II GX, Stratix GX, and Stratix family of devices Cyclone II and Cyclone family of devices APEX II and APEX 20K family of devices ACEX 1K devices Mercury devices FLEX 10K, FLEX 10KE, and FLEX 10KA family of devices Excalibur devicesDownload configuration data to User Flash Memory (UFM) devices: MAX II family of devicesDownload configuration data to EEPROM-based devices: MAX 3000 and MAX 7000 family of devicesPerform in-system programming of advanced configuration devices: EPC2, EPC4, EPC8, EPC16, and EPC1441 devicesPerform in-system programming of serial configuration devices: EPCS1, EPCS4, EPCS16, and EPCS64 devicesIn addition, the USB-Blaster download cable supports target systemsusing 5.0 V TTL, 3.3 V LVTTL/LVCMOS, and single-ended I/Ostandards from 1.5 V to 3.3 V.Power RequirementsThe USB-Blaster download cable requires the following power sources: Altera CorporationMay 20075.0 V from the USB cableBetween 1.5 V and 5.0 V from the target circuit board1–1Preliminary
Hardware SetupSoftware RequirementsThe USB-Blaster download cable is only available for Windows 2000,Windows XP, and Linux systems.Use the Quartus II software version 4.0 or later to configure your device.The USB-Blaster download cable also supports the following: Hardware SetupQuartus II Programmer (for programming and configuration)Quartus II SignalTap II Logic Analyzer (for logic analysis)Quartus II Programmer (standalone version)Quartus II SignalTap II logic analyzer (standalone version)This section describes how to install and set up the USB-Blaster downloadcable for device configuration or programming.1For plug and header dimensions, pin names, and operatingconditions, see Chapter 2, “USB-Blaster Specifications.”Connect your USB-Blaster download cable to the circuit board asinstructed below.1.Disconnect the power cable from the circuit board.2.Connect the USB cable to the USB port on your PC and to theUSB-Blaster port.3.Connect the USB-Blaster download cable to the 10-pin header on thedevice board. Figure 1–1 shows the USB-Blaster download cableand the circuit board connector.wTo avoid damaging the USB-Blaster cable, first unplug the cablefrom the 10-pin header on the target board before unpluggingthe cable from the USB port on your PC. It is safest to removepower first from the target board before unplugging theUSB-Blaster cable.1–2USB-Blaster Download Cable User GuideAltera CorporationMay 2007
Setting Up the USB-Blaster Download CableFigure 1–1. The USB-Blaster Download CableTARGBLASSID TEREPIN1ETSIDE10-pin Female Connector(connects to target printedcircuit board 10-pin maleheader)4.Reconnect the power cable to reapply power to the circuit board.1Software SetupThe Found New Hardware wizard may open and prompt youto install a new hardware driver. Close the wizard and install thehardware driver using the instructions provided in “Installingthe USB-Blaster Driver on Windows 2000 and Windows XPSystems” below.This section describes the following: Installing the USB-Blaster driverSetting up the USB-Blaster hardware in the Quartus II softwareInstalling the USB-Blaster Driver on Windows 2000 andWindows XP SystemsThis section describes how to install the USB-Blaster driver on Windows2000 and Windows XP systems.Before you begin the installation, verify the USB-Blaster driver is locatedin your directory: \ Quartus II system directory \drivers\usb-blaster1Altera CorporationMay 2007If the driver is not in your directory, download the USB-Blasterdriver from the Altera web SB-Blaster Download Cable User Guide
Software SetupTo install the driver, follow the directions below:1.Plug in the USB-Blaster download cable to the PC.2.On the Found New Hardware Wizard window, click No, not thistime and then click Next to continue.3.Select Install from a list of specific location (Advanced) and clickNext to continue.4.Select Don’t search. I will choose the driver to install. Click Next.5.Select Sound, video and game controllers, and click Next tocontinue.6.Select Have Disk and browse to the location of the driver on yoursystem: \ Quartus II system directory \drivers\usb-blaster. ClickOK.1For Quartus II version 6.1 and later, select the appropriate driverversion based on the 64-bit or 32-bit Quartus II version.7.Select Altera USB-Blaster and click Next to continue.8.Click Next to install the driver.9.Click Continue Anyway when the Hardware Installation warningappears.10. Click Finish in the Completing the Add/Remove Hardware Wizardwindow. Reboot your system.Installing the USB-Blaster Driver on LinuxThis section describes how to install the USB-Blaster driver on Linux.The Quartus II software uses the built-in USB drivers (usbfs) on RedHatLinux to access the USB-Blaster download cable. By default, root is theonly user allowed to use usbfs. You must change the permission on theports before you can use the USB-Blaster download cable to programdevices with the Quartus II software.You must have system administration (root) privileges to configure theUSB-Blaster download cable drivers.1.Add the following lines to the /etc/hotplug/usb.usermap file.1–4USB-Blaster Download Cable User GuideAltera CorporationMay 2007
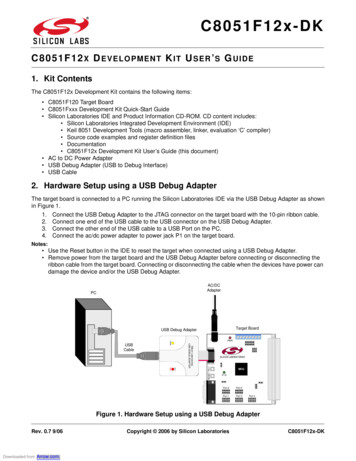
Setting Up the USB-Blaster Download Cable## Altera USB-Blaster#usbblaster 0x03 0x09fb 0x6001 0x0 0x0 0x0 0x0 0x0 0x00x0 0x0 0x0usbblaster 0x03 0x09fb 0x6002 0x0 0x0 0x0 0x0 0x0 0x00x0 0x0 0x0usbblaster 0x03 0x09fb 0x6003 0x0 0x0 0x0 0x0 0x0 0x00x0 0x0 0x02.Create a file named /etc/hotplug/usb/usbblaster and add thefollowing lines to it.#!/bin/sh# USB-Blaster hotplug script# Allow any user to access the cablechmod 666 DEVICEf3.Make the file executable.4.Complete your installation by setting up the programminghardware in the Quartus II software as described in the followingsection.Refer to www.altera.com/support/software/drivers for moreinformation on USB-Blaster driver installation.Setting Up the USB-Blaster Hardware in the Quartus II SoftwareUse the following steps to set up the USB-Blaster hardware in theQuartus II software:Altera CorporationMay 20071.Start the Quartus II software.2.Choose Programmer (Tools menu).3.Click Hardware Setup. The Hardware Settings tab of the HardwareSetup dialog box is displayed (Figure 1–2).1–5USB-Blaster Download Cable User Guide
Software SetupFigure 1–2. Hardware Setup Dialog Box4.From the drop-down menu, select USB-Blaster [USB-0](Figure 1–2).5.Click Close to close the Hardware Setup dialog box.6.In the Mode list, select the desired mode (Programmer window).Table 1–1 describes each mode.1The USB-Blaster supports the Joint Test Action Group (JTAG),Passive Serial Programming, and Active Serial modes.Table 1–1. Programming ModesModeMode DescriptionJoint Test Action Group(JTAG)Programs or configures all Altera devicessupported by Quartus II software, excludingFLEX 6000.In-Socket ProgrammingNot supported by the USB-Blaster.Passive Serial ProgrammingConfigures all Altera devices supported byQuartus II software excluding MAX 3000 andMAX 7000 devices.Active Serial ProgrammingPrograms a single EPCS1, EPCS4, EPCS16, andEPCS64 serial configuration device.1–6USB-Blaster Download Cable User GuideAltera CorporationMay 2007
Setting Up the USB-Blaster Download CablefFor details about programming devices and creating secondaryprogramming files, see the Programming & Configuration chapter of theIntroduction to Quartus II Handbook.For further information, see the Programming module of the Quartus IIonline tutorial.For further information, refer to the following topics in the Quartus IIsoftware Help menu: Altera CorporationMay 2007Changing the Hardware SetupProgrammer IntroductionOverview: Working with Chain Description FilesOverview: Converting Programming Files1–7USB-Blaster Download Cable User Guide
Software Setup1–8USB-Blaster Download Cable User GuideAltera CorporationMay 2007
Chapter 2. tionsThis chapter provides comprehensive information about theUSB-Blaster download cable including the following: USB-Blaster connections Voltage requirements Cable-to-board connection USB-Blaster plug connection Circuit board header connection Operating conditions USB-Blaster RevisionThe USB-Blaster cable has a USB universal plug that connects to the PCUSB port, and a 10-pin female plug that connects to the circuit board. Datais downloaded from the USB port on the PC through the USB-Blastercable to the circuit board via the connections discussed in this section.Voltage RequirementsThe USB-Blaster VCC(TRGT) pin must be connected to a specific voltagefor the device being programmed. Connect pull-up resistors to the samepower supply as the USB-Blaster VCC(TRGT). See Table 2–1.Table 2–1. USB-Blaster VCC(TRGT) Pin Voltage Requirements(Part 1 of 2)Device FamilyMAX II deviceUSB-Blaster VCC Voltage RequiredAs specified by VCCIO of Bank 1MAX 7000S device5VMAX 7000AE and MAX 3000A devices3.3 VMAX 7000B device2.5 VStratix, Stratix II, Stratix GX, and Stratix II GX devicesAs specified by VCCSELCyclone II, Cyclone, APEX II, APEX 20K, and Mercury devicesAs specified by VCCIOFLEX 10K, FLEX 8000, and FLEX 6000 devices5VFLEX 10KE device2.5 VFLEX 10KA and FLEX 6000A devices3.3 VAltera CorporationMay 20072–1
USB-Blaster ConnectionsTable 2–1. USB-Blaster VCC(TRGT) Pin Voltage Requirements(Part 2 of 2)EPC2 device5 V or 3.3 VEPC4, EPC8, and EPC16 devices3.3 VEPCS1, EPCS4, EPCS16, and EPCS64 devices3.3 VCable-to-Board ConnectionA standard USB cable connects to the USB port on the device. Figure 2–1shows a block diagram of the USB-Blaster download cable.Figure 2–1. USB-Blaster Block DiagramUSBVCCVCCUSBReceptacleUSB InterfaceChipEPM7064AETC44Voltage TranslatorCircuitryPin 110-PinFemale PlugVCCI/OI/OsI/OI/OI/OsI/OI/OI/OI/OI/OUSB-Blaster Plug ConnectionThe 10-pin female plug connects to a 10-pin male header on the circuitboard containing the target device. Figure 2–2 shows the dimensions ofthe female plug.2–2USB-Blaster Download Cable User GuideAltera CorporationMay 2007
USB-Blaster Download Cable User GuideFigure 2–2. USB-Blaster 10-Pin Female Plug Dimensions0.425 Typ.108642975310.250 Typ.0.100 Sq.0.025 Sq.0.700 Typ.Dimensions are shown in inches. Spacing between pin centers is 0.1 inches.Table 2–2 identifies the 10-pin female plug pin names and thecorresponding programming mode.Table 2–2. USB-Blaster Female Plug Signal Names & Programming ModesAS ModePS ModeJTAG ModePinSignal NameDescriptionSignal NameDescriptionSignal NameDescription1DCLKClock signalDCLKClock signalTCKClock signal2GNDSignal groundGNDSignal groundGNDSignal ground3CONF DONEConfiguration doneCONF DONEConfigurationdoneTDOData fromdevice4VCC(TRGT)Target power supplyVCC(TRGT)Target powersupplyVCC(TRGT)Target igurationcontrolTMSJTAG statemachine control6nCECyclone chip enable–No connect–No connect7DATAOUTActive serial data outnSTATUSConfigurationstatus–No connect8nCSSerial configurationdevice chip select–No connect–No connect9ASDIActive serial data inDATA0Data to deviceTDIData to device10GNDSignal groundGNDSignal groundGNDSignal groundAltera CorporationMay 20072–3USB-Blaster Download Cable User Guide
Operating Conditions1The circuit board must supply VCC(TRGT) and ground to theUSB-Blaster cable for the I/O drivers.Circuit Board Header ConnectionThe circuit board's 10-pin male header, which connects to the USB-Blastercable's 10-pin female plug, has two rows of five pins. These pins areconnected to the device’s programming or configuration pins. Figure 2–3shows the dimensions of a typical 10-pin male header.Figure 2–3. 10-Pin Male Header DimensionsTop ViewSide View0.1000.1000.025 Sq.0.235Dimensions are shown in inches.OperatingConditionsTables 2–3 through 2–5 summarize the maximum ratings, recommendedoperating conditions, and DC operating conditions for the USB-Blastercable.Table 2–3. USB-Blaster Cable Absolute Maximum RatingsSymbolParameterVCC(TRGT)Target supply voltageVCC(USB)ConditionsWith respect to groundMinMaxUnit–0.35.5VUSB supply voltageWith respect to ground–0.56.0VIIInput currentTDO or dataout–10.010.0mAIoOutput current for Rev. A andRev. B cable–20.020.0mATCK, TMS, TDI, nCS, nCE–50.050.0mAOutput current for Rev. C cable2–4USB-Blaster Download Cable User GuideAltera CorporationMay 2007
USB-Blaster Download Cable User GuideTable 2–4. USB-Blaster Cable Recommended Operating ConditionsSymbolVCC(TRGT)ParameterConditionsTarget supply voltage, 5.0-V operationMinMaxUnit4.755.25VTarget supply voltage, 3.3-V operation3.03.6VTarget supply voltage, 2.5-V operation2.3752.625VTarget supply voltage, 1.8-V operation1.711.89VTarget supply voltage, 1.5-V operation1.431.57VMaxUnitTable 2–5. USB-Blaster Cable (Rev. A & B) DC Operating ConditionsSymbolParameterVIHHigh-level input voltageVILLow-level input voltageVOHVOLICC(USB)ConditionsMinVCC(TRGT) –0.2V0.15V5.0-V high-level output voltage VCC(TRGT) 4.5 V, IOH 1 mA4.4V3.3-V high-level output voltage VCC(TRGT) 3.0 V, IOH 1 mA2.9V2.5-V high-level output voltage VCC(TRGT) 2.375 V, IOH 1 mA2.275V1.8-V high-level output voltage VCC(TRGT) 1.71 V, IOH 1 mA1.61V1.5-V high-level output voltage VCC(TRGT) 1.43 V, IOH 1 mA1.33V5.0-V low-level output voltageVCC(TRGT) 5.5 V, IOL 1 mA0.125V3.3-V low-level output voltageVCC(TRGT) 3.6 V, IOL 1 mA0.125V2.5-V low-level output voltageVCC(TRGT) 2.625 V, IOL 1 mA0.125V1.8-V low-level output voltageVCC(TRGT) 1.89 V, IOL 1 mA0.125V1.5-V low-level output voltageVCC(TRGT) 1.57 V, IOL 1 mA0.125V150mAOperating current (No Load)Altera CorporationMay 2007(TypicalICC(USB) 80 mA)2–5USB-Blaster Download Cable User Guide
USB-RevisionTable 2–6. USB-Blaster Cable (Rev. C) DC Operating tionsHigh-level input voltageLow-level input voltageMinMaxUnitVCC(TRGT) 2.0 V2.0VVCC(TRGT) 2.0 VVCC(TRGT)VVCC(TRGT) 2.0 V0.8VVCC(TRGT) 2.0 V0V5.0-V high-level output voltage VCC(TRGT) 4.5 V, IOH -10 mA3.8V3.3-V high-level output voltage VCC(TRGT) 3.0 V, IOH -8 mA2.3V2.5-V high-level output voltage VCC(TRGT) 2.375 V, IOH -6 mA1.8V1.8-V high-level output voltage VCC(TRGT) 1.71 V, IOH -4 mA1.2V1.5-V high-level output voltage VCC(TRGT) 1.43 V, IOH -2 mA1.0V5.0-V low-level output voltageVCC(TRGT) 5.5 V, IOL 10 mA0.8V3.3-V low-level output voltageVCC(TRGT) 3.6 V, IOL 8 mA0.7V2.5-V low-level output voltageVCC(TRGT) 2.625 V, IOL 6 mA0.6V1.8-V low-level output voltageVCC(TRGT) 1.89 V, IOL 4 mA0.5V1.5-V low-level output voltageVCC(TRGT) 1.57 V, IOL 2 mA0.4VOperating current (No Load)(Typical ICC(USB) 80 mA)150mAUSB-RevisionTable 2–7 indicates the revision and description of the USB-Blaster.Table 2–7. USB-RevisionRevisionDescriptionsRoHS CompliantRev. A (1)10-pin female connector is connected to theUSB-Blaster through a ribbon cable.NoRev. B10-pin female connector is connected to theUSB-Blaster through a flexible PCB cable.NoRev. CHardware upgrade to meet the RoHSlead-free requirement. 10-pin femaleconnector is connected to the USB-Blasterthrough a flexible PCB cable.YesNote to Table 2–7:(1)Revision B and Revision C cable has a "Rev. B" and "Rev. C" marking on the casing.However, you can identify the Revision A cable if the cable is using a ribbon cableand does not have the revision marking.2–6USB-Blaster Download Cable User GuideAltera CorporationMay 2007
USB-Blaster Download Cable User GuideReferencesFor more information on configuration and in-system programmability(ISP), see the following sources: Altera CorporationMay 2007AN 39: IEEE 1149.1 (JTAG) Boundary-Scan Testing in Altera DevicesAN 95: In-System Programmability in MAX DevicesAN 250: Configuring Cyclone FPGAsConfiguring Stratix II Devices chapter in Volume 2 of the Stratix IIDevice HandbookConfiguring Stratix and Stratix GX Devices chapter in the Stratix DeviceHandbookConfiguring Cyclone II Devices chapter in the Cyclone II HandbookSerial Configuration Devices Data SheetProgramming & Configuration chapter in the Introduction to Quartus IImanualThe Programming module of the Quartus II online tutorialRefer to the following glossary definitions in the Quartus II Help: “USB-Blaster Cable” (general description) “Configuration scheme” (general description) “Programming files” (general description)Refer to the following procedures in the Quartus II Help: Programming a Single Device or Multiple Devices in JTAG orPassive Serial Mode Programming a Single Device in Active Serial ProgrammingModeRefer to the following introduction and overview topics in theQuartus II Help: Programmer Introduction Overview: Working with Chain Description Files Overview: Converting Programming Files2–7USB-Blaster Download Cable User Guide
References2–8USB-Blaster Download Cable User GuideAltera CorporationMay 2007
system: \ Quartus II system directory \ drivers\usb-blaster. Click OK. 1 For Quartus II version 6.1 and later, select the appropriate driver version based on the 64-bit or 32-bit Quartus II version. 7. Select Altera USB-Blaster and click Next to continue. 8. Click Next to install the driver. 9. Click Continue Anyway when the Hardware .