Transcription
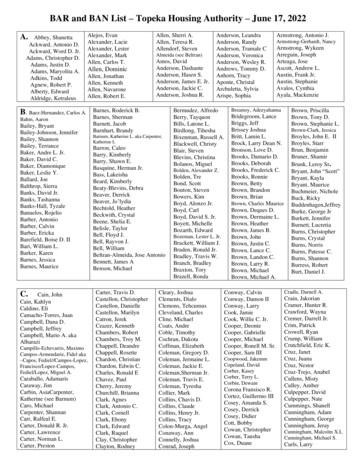
O’Hailey: Appendix Bonus MaterialsInk and PaintAnimation by Shani Varo, Cleanup by Jason Walling, 2009, SCAD group project.Lecture NotesFigure AIP.1Rough lined animation inked in Flash (left) and Toon Boom (right).On the group project Jaguar McGuire, the time came to test an ink-and-paint pipeline. Whileshots were still moving through their 2D and 3D animation stages, the rough animation stage hadbeen completed for a few 2D shots that did not have 3D animation. We had many shots in whichjust the cat character was shown on screen. The animations that we will work with in thisappendix are in a rough animation stage. There are more inbetweens to be added and, of course,cleanup still needs to take place.All of the cat images in this appendix have been animated by the ever talented and hard-workingShani Vargo during the SCAD 2009 BFA Animation course.While working out what software would be best to use for ink and paint, we also wanted to testhow rough of a line quality could be used? The art director and director looked at John Henry,101 Dalmatians, and other rough-lined animation examples as inspiration. We then took therough animation and decided to test ink and paint with it as is, without cleanup. We didn’t expectCopyright 2010 Elsevier Inc. All rights reserved.
the final line to stay as rough as it was in the rough animation stage; it would be cleaned upsomewhat. However, pushing this extremely rough line through for pipeline testing would giveus a worst-case scenario.The following is what we uncovered in these tests.Toon BoomThe first test was to try and use Toon Boom. This software has wonderful tools that help speedup the ink-and-paint process. Because we were dealing with a fast-approaching deadline and hadan extremely small staff by the time we reached the back end of the process, we wanted to see ifthe software would work for our look so that we could use these advanced tools.This is the process we went through. You can test it out for yourselves. The files for this processcan be found in the companion data for this appendix.Test 1: Bringing Rough-Lined Raster Animation into Toon BoomThe rough animation was completed using Flash and a Cintiq tablet. Inside of Flash, however,there is not a way to export raster images that are not compressed. Because most of our otherpipeline included exporting movie files (without compression), this wasn’t that large of asetback.Figure AIP.2Flash does not export tga or tiff sequences.1. You can start with the file JM ani shot 06 v4.swf. Import this swf into a new Flashdocument if you want to click along.Copyright 2010 Elsevier Inc. All rights reserved.
2. First, export a movie file from Flash by selecting File Export Movie. Then in AfterEffects bring the movie in and export a tga image sequence under File Export ImageSequence. You can see in Figure AIP.3 that the alpha channel is present. (It is alwaysgood to check now before getting into the ink-and-paint package.)Figure AIP.3Getting a sequence of tgas from a movie file.3. Next, start a new scene in Toon Boom, making sure to match the correct frame rate andimage size (Figure AIP.4).Figure AIP.4A new scene in Toon Boom.Copyright 2010 Elsevier Inc. All rights reserved.
4. Locate the Exposure Sheet tab at the bottom of the screen. By default it has a drawinglevel there. We’ll see the difference between drawing levels and image levels in thistutorial. Right-click on the drawing level and choose Import and Vectorize FromFile . (For my students, usually a “ ” in a name means that another window is going tobe opened—not all the time, but usually that is the meaning.)Figure AIP.5Drawing level in the Exposure Sheet tab.Figure AIP.6Importing and vectorizing raster images.Copyright 2010 Elsevier Inc. All rights reserved.
5. The file browser opens up. Toon Boom does not autorecognize an image sequence. Youwill have to shift-select all of the images to import. Click Open.Figure AIP.7Shift-select all images.6. A preview window opens where you can see what exactly the vectorization is going tolook like. You have the ability to smooth or sharpen your image. Toon Boom works greatfor drawn cleanup lines. However, it generalized the rough animation line into what onewould expect from a vector algorithm. You might be able to get an interesting look fromthis by-product of vectorization.Copyright 2010 Elsevier Inc. All rights reserved.
Figure AIP.8Vectorization preview.7. In Figure AIP.9, you can see that the cat animation is visible on the disk and in theexposure sheet. Remember that the image you see on the disk is a preview and at rendertime it will appear smoother. To see a render, you would select Play Preview Movie.Figure AIP.9Cat images vectorized and in exposure sheet.Copyright 2010 Elsevier Inc. All rights reserved.
Stepping back for a moment, we tested some of the other settings in step 4, Import andVectorize. What would happen if you had selected Vectorization Type: With Texture? Gladyou asked. We wondered too.Figure AIP.10Testing vectorization with texture.You will notice right away that the clumpy vectorization does not happen. Instead the rough lineis maintained. However, in our testing we were unable to ink and paint an image brought in thisway. Perhaps more testing is needed.We will now continue to paint the vectorized cat that looks simplified. We will use the autopaintfeature in Toon Boom to see if it will speed up our painting process:1. First we will turn on the Onion Skinning feature to allow us to work with multipleimages. Click View Onion Skin Turn Onion Skin On.Copyright 2010 Elsevier Inc. All rights reserved.
Figure AIP.11Turning on the Onion Skinning feature.2. Next, locate the color palette and add colors for your scene. The nice thing about ToonBoom is that these colors can be changed even after everything is painted, and all of thepainted cels will be updated—an absolutely necessary feature when working with artdirectors.Figure AIP.12The color palette.Copyright 2010 Elsevier Inc. All rights reserved.
3. To paint, select the correct color and the painting tool. They can be found in the toolboxon the left of the screen or under Tools Drawing Tools Paint.Figure AIP.13Selecting the paint tool.4. While using the paint tool, hold down the Shift Alt buttons on the keyboard. This willcause the paint tool to do its best to autopaint the rest of the animation! It tries to track thevector areas and paint them the color you have selected. It works for many frames; forother frames, it becomes confused. You will have to go through each frame to doublecheck. You were going to go through each frame anyway. Autopaint has reduced theamount of clicking you were going to have to do. The image in Figure AIP.13 wascompletely autopainted. Many frames afterward looked perfect as well. Some needed tobe touched up (Figure AIP.14).Figure AIP.14Holding Shift and Alt to autopaint the animation can give good results on the first frame.Copyright 2010 Elsevier Inc. All rights reserved.
Figure AIP.15Autopaint can miss some areas but ultimately saves clicks.5. A useful method for inking and painting is to be able to drag a box around small areas sothat you can fill them in. In Toon Boom this tool is called Paint Unpainted, and it isfound under the Paint tool option in the toolbox.Figure AIP.16Paint Unpainted for small areas.Copyright 2010 Elsevier Inc. All rights reserved.
Toon Boom has many timesaving features in its ink-and-paint portion. New versions continue towork on compositing and production-driven features. You can see the rough animation with itsink and paint from Toon Boom in the file cat 6 IP TB.swf. Just to prove this is the roughversion, you can see the final version in the companion data titled catHighres.mp4.Figure AIP.17Final painted image and test render.Figure AIP.AAAnimation by Shani Varo, Cleanup by Jason Walling, 2009, SCAD group project.Copyright 2010 Elsevier Inc. All rights reserved.
Test 2: Keeping Animation in Flash for Ink and PaintFor this test we stayed completely inside of Flash for rough animation and ink and paint. This letus keep our rough line, and we stayed completely within the vector. We made sure to keep ourink and paint on separate layers in case any compositing tricks need to be done later on.1. Inside of Flash, duplicate the ink layer and rename it paint. Lock and hide the originalink layer.2. Select the paint bucket tool and create the color needed.Figure AIP.18Selecting paint bucket and color in Flash.3. In the options area for the paint bucket, select Close Large Gaps. This will allow us tofill in areas of our cat that have sketchy lines. There are still some areas that have gapsthat are too large to fill.Copyright 2010 Elsevier Inc. All rights reserved.
Figure AIP.19Setting for Close Large Gaps.4. To fill the gaps that are too large for the paint bucket tool, select the brush tool andchoose the option Paint Behind.5. Paint in the areas of the ink line (with the paint color) where there are large gaps (FigureAIP.20).Figure AIP.20Copyright 2010 Elsevier Inc. All rights reserved.
Using the paintbrush to close the gaps.6. With this paint in place, you can now use the paint bucket tool once again to fill theunpainted areas.Figure AIP.21The completely painted tail.7. Use the paintbrush with the Paint Behind option to continue to paint in small areas.Figure AIP.22Use the paintbrush with the Paint Behind option to touch up small areas.In the companion data for this appendix, you can see the rough animation with ink and paintfrom Flash in the file cat 6 IP Flash.swf.Copyright 2010 Elsevier Inc. All rights reserved.
Rough lined animation inked in Flash (left) and Toon Boom (right). On the group project Jaguar McGuire, the time came to test an ink-and-paint pipeline. While shots were still moving through their 2D and 3D animation stages, the rough animation stage had been completed for a few 2D shots that did not have 3D animation. We had many shots in which