Transcription
0Addendum Manual :Cast-on abutment for BL Implant* The pictures are concept images.
Addendum Manual :Cast-on abutment for BL ImplantAddendum Manual : Cast-on abutment for BL Implant Table of Contents1. Cement-retained superstructure . 2 to 71 Cast-on abutment . 2 to 31-1 Precautions for the use of cast-on abutments . 41-2 Fabrication of a cement-retained superstructure using a cast-on abutment (custom abutment) . 5 to 72. Screw-retained superstructure . 8 to 121 Cast-on abutment . 8 to 91-1 Precautions for the use of cast-on abutments . 101-2 Fabrication of a screw-retained superstructure using a cast-on abutment . 11 to 12Technical information on the welding technique. 13 to 141
Addendum Manual :AddendumManual :Cast-on abutment for BL ImplantCast-on abutment for BL Implant1. Cement-retained superstructure1Cast-on abutment Intended use Fabrication of provisional crowns for cement- or screw-retained superstructures Fabrication of provisional bridges for cement- or screw-retained superstructures Gold alloy (Ceramicor, manufactured by CENDRES METAUX)1. Cement-retainedsuperstructure MaterialCast-on abutment Characteristics Available for the fabrication of provisional restorations Can be customized by milling and building up resin Intended use Creation of an emergence profile Tightening torque NP 20 N cm RP 30 N cm WP 30 N cm Indicated driver Hexalobular driver Sterilization condition Unsterilized* Make sure to sterilize an unsterilized component before attaching it to the implant body in the oral cavity.2
Addendum Manual :Cast-on abutment for BL ImplantBasic surgical procedure for cast-on abutmentsPrimary surgery Implant placement. Attach cover screw or healing abutment.Tightening methodManual (manual tightening)Indicated driver1. Cement-retainedsuperstructureHexalobular driver SHTemporary prosthesis Provisional restoration (attachment of temporary abutment)Tightening torqueNP20 N cmRP/WP30 N cmIndicated driverHexalobular driverFinal prosthesis Attachment of abutment/final prosthesisTightening torqueNP20 N cmRP/WP30 N cmIndicated driverHexalobular driver3
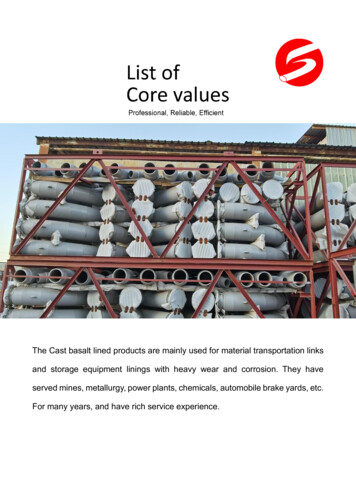
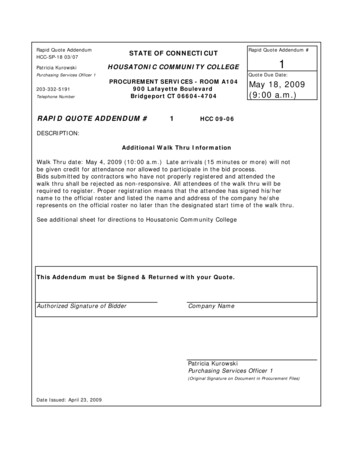
Addendum Manual :Addendum Manual :Cast-on abutment for BL ImplantCast-on abutment for BL ImplantVariations in cast-on abutment .5WP4.7/5.25.5Cuff height(H1)Height(H2)2141. Cement-retainedsuperstructureProduct drawing(Unit: mm)Diameter ofcompatibleimplant(Φ)Precautions for the use of cast-on abutmentsAs a standard, an abutment is installed at least 3 months after implant placement in the mandible and at least 6 months after implant placementin the maxilla. Before abutment placement, please ensure that the soft tissues and bone have healed.2)This product is not sterilized.3)Obtain X-ray images as needed and confirm that there is no gap between the abutment and implant body.4)Before attaching the abutment, thoroughly clean the inside of the implant body and eliminate foreign material, including blood.5)A lab screw is used for laboratory work. Because the shape of a lab screw is the same as that of an abutment screw, carefully check the productlabel before use to avoid confusion.6)The tightening torque for a tightened screw is slightly decreased because of initial plastic deformation of the screw itself. Retightening restoresthe fastening force, brings the components closer, and prevents loosening. Retighten the abutment screw two or three times.7)8)Use an alternatively available abutment screw at the time of replacement during maintenance.Do not store the products in an area exposed to high temperature, humidity, or direct sunlight. To prevent the risk of infection, never use implantbodies dropped on the floor or contaminated by foreign material such as saliva. Please discard such implants.9)When tightening the abutment or operating a dedicated tool, be careful so that the patient does not accidentally swallow them.10) Do not subject the abutment to excessive force, which can deform or damage it.11) Check the package before opening it. Do not use the abutment, if the package is damaged.12) Do not use any tool other than dedicated ones, otherwise you can damage the implant body.13) Please read the package inserts before use and thoroughly understand the function, method of use, and surgical procedure.4
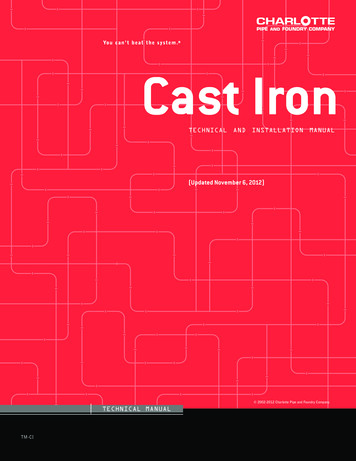
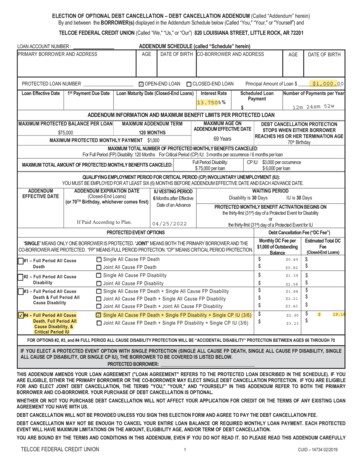
Addendum Manual :Cast-on abutment for BL Implant1-11-2Step 1Fabrication of a cement-retained superstructure using a cast-on abutment (custom abutment)Adjustment of the cast-on abutment Attach the cast-on abutment to an analog model.1. Cement-retainedsuperstructureTechnical pointsFor a single tooth, use cast-on abutment ST (with an antirotationmechanism). With reference to the height of the adjacent teeth and clearance of the opposing tooth,perform milling to adjust the post as necessary.NotesAdjust the height while taking care not to grind the goldalloy portion.5Gold alloyportion
Addendum Manual :Addendum Manual :Cast-on abutment for BL ImplantCast-on abutment for BL ImplantStep 2Wax-up Considering the anatomic form, fabricate a wax-up of the final post form on the cast-onStep 31. sting/casting Following spruing and investment of the waxed-up superstructure, perform the castingprocedure using the conventional technique.6
Addendum Manual :Cast-on abutment for BL ImplantStep 4Correction of form/polishing Correct the form of the cast superstructure and polish it.In particular, take care while polishing the portion that comes in contact with the1. Cement-retainedsuperstructuregingiva. Check the relationship with the gingiva, perform the necessary adjustments, andcreate the framework for the final prosthesis. Build up facing material, correct the form, and polish the surface. The procedure isnow complete.7
Addendum Manual :Addendum Manual :Cast-on abutment for BL ImplantCast-on abutment for BL Implant2. Screw-retained superstructure1Cast-on abutment Intended use Fabrication of cement-retained superstructures using custom abutments Fabrication of screw-retained superstructures (single tooth or multiple teeth) Material Gold alloy (Ceramicor, manufactured by CENDRES METAUX)Cast-on abutment Criteria for selection Insertion of single-tooth implants2. Screw-retainedsuperstructure Insertion of multiple-tooth implants Applicable even when the clearance of the opposing tooth isinadequate(for screw-retained superstructures) Tightening torque NP 20 N cm RP 30 N cm WP 30 N cm Indicated driver Hexalobular driver Sterilization condition Unsterilized* Make sure to sterilize an unsterilized component before attaching it to the implant body in the oral cavity.8
Addendum Manual :Cast-on abutment for BL ImplantBasic surgical procedure for cast-on abutmentsPrimary surgery Implant placement Attachment of a cover screw or healing abutmentTightening methodManual (manual tightening)Indicated driverHexalobular driver SHTemporary prosthesis2. Screw-retainedsuperstructure Provisional restoration (attachment of temporary abutment)Tightening torqueNP20 N cmRP/WP30 N cmIndicated driverHexalobular driverFinal prosthesis Attachment of the abutment/final prosthesisTightening torqueNP20 N cmRP/WP30 N cmIndicated driverHexalobular driver9
Addendum Manual :Addendum Manual :Cast-on abutment for BL ImplantCast-on abutment for BL ImplantVariations in cast-on abutment WP4.7/5.25.5Cuff height(H1)Height(H2)214Precautions for the use of cast-on abutments1)As a standard, an abutment is installed at least 3 months after implant placement in the mandible and at least 6 months after implant placement2)This product is not sterilized.3)Obtain X-ray images as needed and confirm that there is no gap between the abutment and implant body.4)Before attaching the abutment, thoroughly clean the inside of the implant body and eliminate foreign material, including blood.in the maxilla. Before abutment placement, please ensure that the soft tissues and bone have healed.5)2. Screw-retainedsuperstructureProduct drawing(Unit: mm)Diameter ofcompatibleimplant(Φ)A lab screw is used for laboratory work. Because the shape of a lab screw is the same as that of an abutment screw, carefully check the productlabel before use to avoid confusion.6)The tightening torque for a tightened screw is slightly decreased because of initial plastic deformation of the screw itself. Retightening restoresthe fastening force, brings the components closer, and prevents loosening. Retighten the abutment screw two or three times.7)8)Use an alternatively available abutment screw at the time of replacement during maintenance.Do not store the products in an area exposed to high temperature, humidity, or direct sunlight. To prevent the risk of infection, never use implantbodies dropped on the floor or contaminated by foreign material such as saliva. Please discard such implants.9)When tightening the abutment or operating a dedicated tool, be careful so that the patient does not accidentally swallow them.10) Do not subject the abutment to excessive force, which can deform or damage it.11) Check the package before opening it. Do not use the abutment, if the package is damaged.12) Do not use any tool other than dedicated ones, otherwise you can damage the implant body.13) Please read the package inserts before use and thoroughly understand the function, method of use, and surgical procedure.10
Addendum Manual :Cast-on abutment for BL Implant1-21-2Fabrication of a screw-retained superstructure using a cast-on abutmentStep 1Adjustment of the cast-on abutment Attach the cast-on abutment to an analog model.Technical pointsFor a single tooth, use cast-on abutment ST (with an antirotationmechanism). For multiple teeth, use cast-on abutment R (without2. Screw-retainedsuperstructurean antirotation mechanism). With reference to the height of the adjacent teeth and clearance of the opposing tooth,perform milling to adjust the post as necessary.11
Addendum Manual :Addendum Manual :Cast-on abutment for BL ImplantCast-on abutment for BL ImplantStep 2Wax-up Considering the anatomic form, fabricate a wax-up on the cast-on abutment.Step 3Spruing/investing/castingStep 42. Screw-retainedsuperstructure Following spruing and investment of the waxed-up superstructure, perform thecasting procedure using the conventional technique.Correction of form/polishing Correct the form of the cast superstructure and polish it. The procedure is nowcomplete.In particular, take care while polishing the portion that comes in contact with thegingiva.12
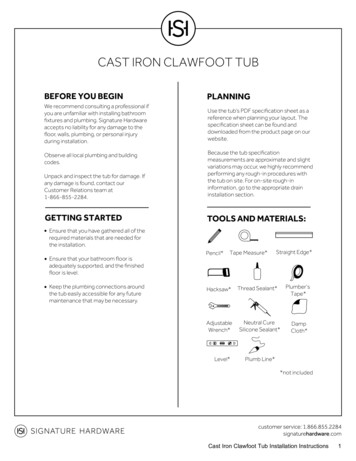
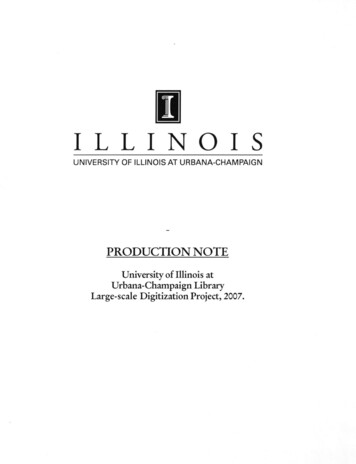
Addendum Manual :Cast-on abutment for BL ImplantTechnical information on the welding techniquePrecautions for use of the welding techniqueThe cast-on abutment and gold cylinder have a high degree of flexibility and canbe used for a wide variety of applications. This enables the clinician to createcustom abutments and screw-retained superstructures with high precision.During welding, a metal-to-metal bond is formed through the interface reaction(diffusion) of two alloy materials, which takes place when theCENDRES METAUX Ceramicor (gold alloy) base and the cast alloy are wettedin molten metal.2. Screw-retainedsuperstructureIn the BL implant system, the welding technique is used for the cast-onabutment/gold cylinder.To ensure secure welding, it is important to pay attention to the conditions andmethod of use at each step.Wax-up Ensure that you add wax to the cast-on abutment on an analog and do not let the waxflow over the junction. Do not use a metal instrument to adjust excess wax because such instruments candamage the gold alloy base. Ensure that the wax layer on the gold alloy base is sufficiently thick (at least 0.75 mm). Following completion of the wax-up, remove the oil film and excess wax from the jointand inner surface of the implant using a swab.Spruing With regard to the direction of spruing, avoid a sprueThe figure shows a cast-on abutment for TL implants.that is orthogonal to the long axis of the abutment sothat the cast pressure is not directly transmitted toSetting up air ventthe abutment. Consider installing a vent as a measure againstback pressure. Perform the investment procedure without using apattern cleaner.The figure shows a cast-on abutment for TL implants.13
Addendum Manual :AddendumManual :Cast-on abutment for BL ImplantCast-on abutment for BL ImplantInvestment and ring incineration Do not use any investment material of the rapid heating type. Make sure to use an investment material of the conventional heatingtype. Use an investment material that suits the alloy used. Before handling the investment material, thoroughly check the manufacturer’s instruction manual. Be careful about the temperature rise during burning of the ring.Be careful when using burnout-type plastic, pattern resin, and plastic sprues for cast-on abutments.During the incineration of resin-based material, the softening temperature is approximately 190 C. The material is expected to swellrapidly at this temperature. This type of swelling can damage the investment material; therefore, avoid rapid heating. Moreover,gradually increase the temperature from room temperature to approximately 300 C.2. Screw-retainedsuperstructureFor the holding temperature and time, check the instruction manual for the investment material being used.Casting Select an alloy for welding from the following: gold alloy for dental casting; ISO 22674:2006 Type 3 and Type 4 equivalent (an alloy witha gold content of 65% or more and a total gold and platinum group element content of 75% or more, or a total gold and platinum groupelement content of 25% or more and less than 75%).Use an alloy with an elongation equal to or greater than 5%. For a single crown, select a weld body with a maximum height of 12.0 mm and a maximum diameter of 12.0 mm. In addition, ensurethat the weld body is 0.75 mm or more in thickness.When correcting the angle of the welding body, set up the dental axis within 15 to the long axis of the implant. Maintain a casting temperature of 1,200 C or lower. After casting, let the casting ring stand to cool to a room temperature. When removing the welding body from the ring, do not subject it to a strong impact with a hammer or any other device. Do not sandblast to remove the investing material. Otherwise, the fit will be compromised.14
Addendum Manual :Cast-on abutment for BL ImplantKYOCERA Asia Pacific Pte. Ltd.Medical division298 Tiong Bahru Road #13‐03/05 Central Plaza Singapore 168730TEL:65‐6271‐0500 FAX:65‐6271‐0600Kyocera Dental NetFINESIA is a registered trademark of KYOCERA Corporation.The information included in this manual is as of December 2017.Reproduction or copying of this manual, in whole or in part, withoutpermission is prohibited.D-108-1 2017 KYOCERA Corporation
1-1 1-2 Fabrication of a cement-retained superstructure using a cast-on abutment (custom abutment) Step 1 Adjustment of the cast-on abutment Attach the cast-on abutment to an analog model. Technical points For a single tooth, use cast-on abutment ST (with an antirotation mechanism).