Transcription
Submitting an application via BrowardCounty’s ePermitting systemContentsINTRODUCTION . 2Accessing the online application . 3Creating an Account . 4ePermits Home Page . 7CREATING A NEW APPLICATION . 8Select which Permit you are Applying For. 8Project Information . 9Location . 11Related Parties . 14Document Upload . 16Electronically Signing the Application . 18Submit Application . 19ADDITIONAL RESOURCES . 211
INTRODUCTIONThis document will guide you through the process of applying for a Development and EnvironmentalReview Approval using the ePermits online application. This system can also be used to apply forSurface Water license and Statement of Responsibility Regarding Asbestos (SRRA) approval.There are 6 steps involved in submitting an application:1. Project Information: In this section, you must provide information about your project. Thismight include information about the type of work being done, the type of property and propertydetails, land use, and a project name.2. Location: In this section, you will be asked to provide information about the location, such asthe address, folio number, and jurisdiction.3. Related Parties: In this section, you must provide owner and other related party details.4. Document Upload: In this section, you may upload documents in PDF format. You may alsoneed to provide details such as drawing title, engineer/architect project #, and issue/revisiondate, as applicable. This is also where you will select whether you will electronically or digitallysign and seal your documents.5. Sign Application: In this section, you must electronically sign your entire application anddesignate whether you prefer to have your application reviewed electronically or in-person.6. Submitting you Application: After you have completed these steps, you are now ready tosubmit and release your application for review. When you submit your application, you willreceive your electronic signature reports for all documents that must be electronically signedand sealed.In the Development and Environmental Review Approval application, you will have the option ofeither saving your application without releasing it or immediately releasing it for review. If youhave multiple development and environmental review applications, you might prefer to submitthem all at the same time.2
Accessing the online applicationBefore you can access the online application, you will need to have a user-id and password.If you do not have a user-id, then you will need to get one. You do this by clicking on the “Register.”If you already have an account, click on “Sign In” and you will be asked to enter your email address andpassword.(NOTE: If you are applying as an unregistered guest, you will not need to Sign In or create a usernameand password. Please skip to the Creating a New Application section on page 8.)3
Creating an Account Enter your information in the proper fields. Enter the number in the Captcha picture in the space provided. Click “Create My Account.”You will receive an email asking you to verify your email address and complete your accountregistration. If you do not receive this email, please check your spam folder. Click the hyperlink in the email to finish creating your account.4
You will then be asked if you wish to access ePermits or Uploader App. Select the ePermits checkbox. Then click “Request Access.”Your access request should be approved immediately, and you can sign in to your ePermits account. You must disable your pop-up blocker or allow all pop-ups from the ePermits website at thistime.Internet Explorer: Menu Bar Tools Pop-up Blocker Turn Off Pop-Up Blocker5
Google Chrome: Settings Show advanced settings Privacy Contents settings Pop-ups Allow all sites to show pop-ups OR Manage exceptions (to allow pop ups from the currentsite)Mozilla Firefox: Tools Options Content Uncheck “Block pop-up windows”Once you have created an account, you will have access to your main dashboard (“My Home Page”).Most of the actions you will want to take are located on the left side panel. You may create newapplications, manage your existing projects/applications, and update your applications via these links. To access the ePermits home page, first sign in. Next, click on ePermits on the left-hand panel.Once you reach the Broward County ePermits My Home Page, you are ready to begin your application.6
ePermits Home PageOn the ePermits home page there are several actions you can take, depending on where you are at inthe application process.You can: Apply for a permit by creating a new application Manage your existing projects and applications or follow projects created by other users Update your application by uploading documents, paying fees, signing and sealing documents(which generates the electronic report), or signing your application7
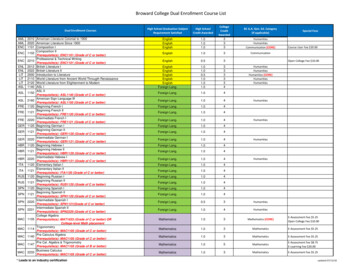
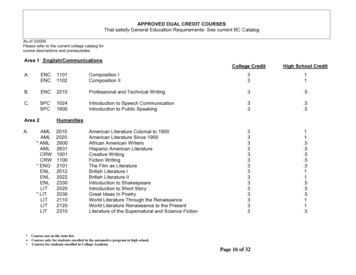
CREATING A NEW APPLICATIONSo let’s apply for a new permit. To begin, select Submit Application on left side of screen.Select which Permit you are Applying ForYou will be given a drop down list of permits that you can apply for using the system.In this example, we will apply for a Development and Environmental Review (DER) Approval. It isimportant to note that the detailed questions will differ based on the type of permit you are applyingfor, as specified in Chapter 27. (A brief list of projects that require a Development and EnvironmentalReview Approval can also be found in the Environmental Review Approval Guide.) Select the type of permit you are applying for from the Permit Type drop down box. Click “Next” to proceed.NOTE: You must create a separate ePermits application for Asbestos (SRRA), but you may add it to thesame Project by choosing the “Select from a list of Projects you have previously created” button whenfilling out the Project Information section of your SRRA application.8
Project InformationThe first step in the application process is to describe the type of project you will be working on. Select the type of project you need the permit for. Then click “Next.” Now select whether your project will use the land for residential, non-residential, or mixedpurposes. Then click “Next.”You will now be asked more specific questions based on what you selected for land use type. Enter the relevant data and then click “Next.”9
Now, you must enter the project name.You may Select one of your own pre-existing projects, Search the system for existing projects entered byothers, or Add a new project. If you would like to add an application to an existing project you made, click “Select.” Thenchoose the project from a list. If you would like to use an existing project is by another user, click“Search.” To create a new project, select “Add.”If you are Adding a new project, a pop-up window will appear, and you will be asked to provide a ProjectName. REMINDER: If the window does not appear you may need to disable your pop-up blocker. Enter a Project Name.This name will allow you to search for your applications later on, so it should be something you willremember and associate with the project. If this permit is for a larger development, you will find theproject name on the plans. Individual homeowners may select a project name of their choice. (Forexample, it might include your last name and project type, such as Lastname Residential Project.) Save the project name and click “Next” to proceed to the next section.10
LocationIn this section, you must provide location details.First, you must either Select an existing location or Add a new location. If you are not using a location that is not already in the system, click “Add” to add locationinformation. (If you are using a location already in the system, click “Select” and choose from thelist.)A separate window will appear requesting more details. If your property has an address, fill in the address details in the boxes provided. Then click“Save.” If your property has not yet been assigned an address, please check the “I Do Not Have anAddress” box.A new text box will appear, and you may enter a description of the location. Save the location details.On the next page, you will be asked to enter the Folio Numer.11
If you already know the Folio Number, enter it in the space provided.You may also search for the folio number by clicking on the Property Appraiser link.You will be redirected to an external site in a pop-up window. Click on Property Search.You may now search for the Folio number by: Owner, Address, Subdivision, Property ID, Sales, or TimeShare.12
The ID # on the top right-hand side is the Folio Number. Please make a note of the ID number and Abbreviated Legal Description. Go back to the EPermits screen and enter the Folio Number.IMPORTANT: The number must be entered WITHOUT spaces. (Example: 504104270010) Next, select the Jurisdiction of the property. Now enter a Legal Description, also found on the Property Appraisal screen. Click “Next” to proceed to the Related Parties section.13
Related Parties On the next page, you must Select or Add Owner(s). To add a new owner, select “Add.”(To choose an existing owner, click “Select.”)A pop-up window will appear. Please enter the new owner details. When finished, click “Save.”IMPORTANT: At this time, you will be unable to change the owner details once you have saved theowner profile, so make sure that all of the information is complete and correct. If you need to makechanges, you must delete the related party entry and enter the entire profile again.14
Click “Next.” Add new applicants/agent or Select existing applicant/agents by clicking on the appropriateicon(s).A window will pop up for you to enter or select the related party details. If you are adding a new related party, enter the information and click “Save.” Click “Next” to proceed to the Document Upload section.15
Document UploadNext, you will upload any documents required for your permit. The required documents vary dependingon the type of permit.(Unregistered guests are unable to upload documents. Please proceed to the Electronically Signing theApplication section on page 18.) Click the blue Click the Then, click on the(“Upload”) icon to upload documents.(“Add Files”) icon to add files. Select the documents you would like to upload.(“Start Upload”) icon to upload your selected documents.IMPORTANT: Only documents in PDF format are accepted at this time.16
Once you have uploaded your documents, you will be required to provide some additional information. Enter the Drawing Title, Engineer/Architect Project #, and Issue/Revision Date. These can befound on your plans. Next, provide the discipline and a brief description for each document you uploaded.You must also select whether to (1) Electronically Sign and Seal, (2) Digitally Sign and Seal, or (3) NotSign and Seal each document. Check the appropriate boxes to sign and seal your documents.How do I sign and seal my electronic documents?Requirements for electronic signing and sealing of plans and documents are set forth by the regulations of theappropriate professional board of licensing. The ePermit system allows for documents to be signed and sealed by twomethods.a. Electronic Sign and Seal - The “electronic sign and seal” method utilizes the “e-sign” process that is built into theePermit system. This method is free, but requires a one page signature document to be printed and manually signedand sealed by the registered professional(s). The signature document(s) must be submitted in original form toconform with the professional licensing regulations.b. Digital Sign and Seal – The “digital sign and seal” method requires purchasing a subscription from a third partydigital signature provider, such as Globalsign and Verisign. When we receive a document that has been signed andsealed digitally, we can instantly confirm the documents validity which allows for immediate processing. Theadvantage of “digital sign and seal” is it eliminates the need for a paper document to be produced and distributed,allowing for 100% paperless and streamlined processing.(A list detailing which documents must be signed and sealed can be found in Article IV Section 27-176 of Chapter27. Florida State statutes determine which format. Engineers and Architects may use electronic sign & seal.)17
Electronically Signing the ApplicationOn the next page, you will be asked to electronically sign your application. Type your name to sign the application.You have the option of having the County review your application electronically or in-person. Check the box if you prefer electronic review.Important: If you leave the box unchecked, you must appear in person to have your application reviewed. Click “Next” to proceed to the submission page.18
Submit ApplicationOnce you have completed all five sections, you may choose to either submit your application forprocessing or save it to complete at a later time. Once the application is released, you will be unable tomake further changes to the actual application. You will however, be able to upload additionaldocuments and pay fees. If you would like to submit, select Yes. Then click “Submit.”If you are not ready to submit your application, select No. Then click “Submit.”NOTE: Unregistered guests will not be able to submit without releasing their application for review.Regardless of your answer, you will receive a an electronic signature report and a confirmation withyour application’s ePermit ID.(If chose not to release your application yet, you may still access your application later by logging in toyour account and selecting My Applications on the left side panel. You can still upload documents afteryou have submitted your application.)19
Once you submit and release your application, an Electronic Signature report will be produced for anyelectronically signed and sealed plans/documents you have uploaded. Please save or print a copy foryour records. This document is to be signed, sealed, and delivered by the relevant professionals (eitherelectronically or in person, as required). Click “Next” to receive your final submission confirmation. This will include your ePermit ID andProject Name, which you can use to search for your application later on.20
ADDITIONAL RESOURCES Chapter 27 of Broward County’s Code of Ordinances contains the majority of regulations andrelevant definitions you might need throughout your d county/codes/code of ordinances?nodeId PTIICOOR CH27POCOThe Environmental Review Approval Guide offers a good introduction to the approval processfor this permit type, including a list of projects that require development and environmentalapproval, as well as the various issues that are examined during the nt/Documents/ReviewApprovalGd.pdfThe property search (to find the legal description and folio number) on Broward County’sproperty appraiser web site can be found here:http://www.bcpa.net/RecMenu.aspFlorida Statutes on electronically or digitally signing and sealing documents:o Engineers http://www.flsenate.gov/Laws/Statutes/2014/471.025 https://www.flrules.org/gateway/ruleno.asp?id 61G15-23.003o Architects http://www.flsenate.gov/Laws/Statutes/2012/481.321 https://www.flrules.org/gateway/ruleno.asp?id 61G1-16.00521
and sealed by the registered professional(s). The signature document(s) must be submitted in original form to conform with the professional licensing regulations. b. Digital Sign and Seal – The “digital sign and seal” method requires purchasing a subscription from a third party digital signature pr