Transcription
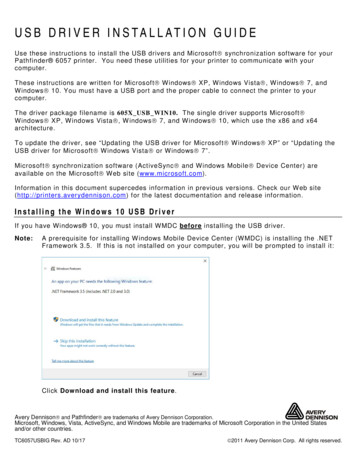
U S B D R I V E R I N S TA L L AT I O N G U I D EUse these instructions to install the USB drivers and Microsoft synchronization software for yourPathfinder 6057 printer. You need these utilities for your printer to communicate with yourcomputer.These instructions are written for Microsoft Windows XP, Windows Vista , Windows 7, andWindows 10. You must have a USB port and the proper cable to connect the printer to yourcomputer.The driver package filename is 605X USB WIN10. The single driver supports Microsoft Windows XP, Windows Vista , W indows 7, and Windows 10, which use the x86 and x64architecture.To update the driver, see “Updating the USB driver for Microsoft Windows XP” or “Updating theUSB driver for Microsoft Windows Vista or Windows 7”.Microsoft synchronization software (ActiveSync and Windows Mobile Device Center) areavailable on the Microsoft Web site (www.microsoft.com).Information in this document supercedes information in previous versions. Check our Web site(http://printers.averydennison.com) for the latest documentation and release information.Installing the Windows 10 USB DriverIf you have Windows 10, you must install W MDC before installing the USB driver.Note:A prerequisite for installing W indows Mobile Device Center (W MDC) is installing the .NETFramework 3.5. If this is not installed on your computer, you will be prompted to install it:Click Download and install this feature.Avery Dennison and Pathfinder are trademarks of Avery Dennison Corporation.Microsoft, Windows, Vista, ActiveSync, and Windows Mobile are trademarks of Microsoft Corporation in the United Statesand/or other countries.TC6057USBIG Rev. AD 10/17 2011 Avery Dennison Corp. All rights reserved.
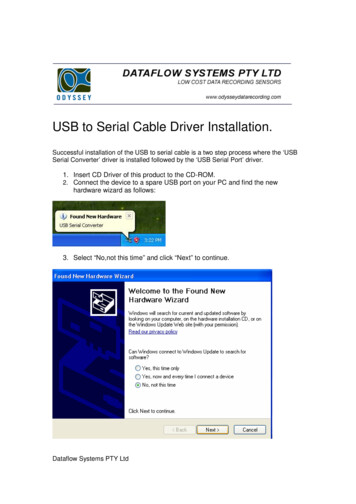
1.Download the latest USB drivers from our web site. Save the driver to your computer. Youmust unzip the driver folder for installation.2.Turn on the printer and wait for the desktop to load.3.Use the designated USB cable to connect the USBport on the printer to the USB port on your computer.Refer to the Operator’s Handbook available on ourweb site.4.Go to your computer’s Start menu and selectControl Panel, Devices and Printers.5.Double click on Pathfinder 6057.6.Select the Hardware tab.7.Select Properties, Change Settings, thenUpdate Driver.2
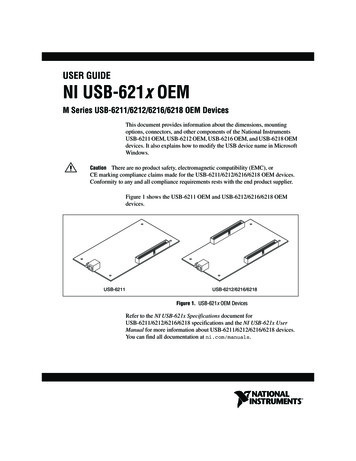
8.Select Browse my computer for driver software.9.Click Browse then navigate to the location on your computer’s hard drive where you saved thedownloaded driver file. Make sure Include subfolders is selected. Click Next.10. Click Install.While the driver is installing, you see:11. Click Close when the driver installation is complete.3
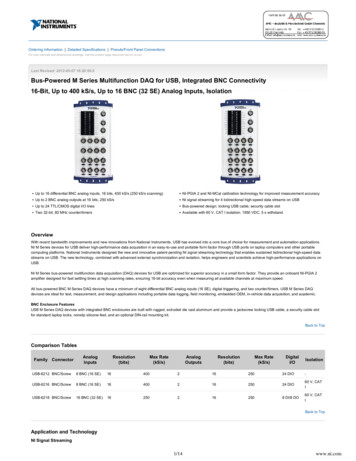
Working with Windows XPIf your computer has the Windows XP operating system, you need: the Pathfinder 6057 driver for Windows XP found on our Web site. Microsoft ActiveSync .Installing the USB Driver1.Download the latest drivers from our Web site (save the fileto your computer’s hard drive).2.Turn on the printer.3.Use the designated USB cable to connect the USB port onthe printer to the USB port on your computer. Refer to theOperator’s Handbook available on our web site for moreinformation.4.When the Found New Hardware Wizard box opens, selectInstall from a list or location (Advanced), then click Next.4
5.Select Search for the best driver in these locations then select Include this location in thesearch (specify the location on your computer’s hard drive where you saved the driver file).C:\6.Click Next to continue through the installation by following the instructions on the screen.7.When you see the following message box, click Continue Anyway.5
8.Click Finish.9.Download and install the latest ActiveSync synchronization software from the Microsoft Website.6
Using Microsoft ActiveS ync Synchronization Softw are1.Turn on the printer, wait for the desktop to load,then connect the USB cable to your computerand printer.2.ActiveSync automatically detects your printer.When prompted to set up a Partnership, selectNo, then click Next.3.Once installation is complete, you see“Connected.”Transferring Files to the PrinterTo transfer data files to the printer:1.Open the folder with your data files on yourcomputer.2.Turn on the printer and wait for the desktop toload.3.Connect the USB cable to your computer andprinter.4.Click Explore on the ActiveSync utility after itconnects to the printer. A new window appearscalled Mobile Device.4.Open the destination folder for the data files onthe Mobile Device (printer).5.Drag the files from your computer to the MobileDevice folder.7
Updating the USB driver for Microsoft Window s XP1.Download the Pathfinder 6057 Update driver from our Web site. Save it to your computer.2.Turn on the printer and wait for the desktop to load.3.Attach the USB cable to your computer and printer.Note:If the ActiveSync Partnership dialog box appears, click No.4.On your computer, from the Start menu select Settings, Control Panel, then System.5.On the Hardware tab, click Device Manager.6.Double click Windows CE USB Devices.7.Right click Pathfinder 6057 and select Properties.8.Select the Driver tab and click Update Driver.9.Select No, not this time and click Next.10. Select Install from a list or specific location (Advanced) and click Next.8
11. Select Don’t search, I will choose the driver to install and click Next.12. Select Browse, navigate to the updated driver and click OK.13. Click Continue Anyway.14. Click Finish.15. Close the Properties window, disconnect the USB cable from the printer, then click Yes torestart your computer.9
Working with Microsoft Windows Vista or Windows 7If your computer has the Windows Vista or Windows 7 operating system, you need: the Pathfinder 6057 driver for Windows Vista or Windows 7. Windows Mobile Device Center (W MDC).Note:A prerequisite for installing W indows Mobile Device Center (WMDC) is installing the .NETFramework 3.5. Older operating systems may come with .NET Framework 3.5 alreadyinstalled. If it is not installed on your computer, you will be prompted to install it.Click Download and install this feature.Installing the USB Driver1.Download the latest drivers from our Web site (save the file to your computer’s hard drive). Youmust unzip the driver folder for installation.Note:If you have a Windows 32-bit Operating System, you must install WMDC (for 32-bit)before following the instructions below. Within the 6057 W indows Vista /W indows 7USB Driver folder, double click on the file “drvupdate-x86” and follow the instructions on thescreen.2.Turn on the printer and wait for the desktop to load.3.Use the designated USB cable to connect the USBport on the printer to the USB port on your computer.Refer to the Operator’s Handbook available on ourweb site for more information.4.Go to your computer’s Start menu and selectControl Panel, Devices and Printers.5.Double click on Pathfinder 6057.10
6.Select the Hardware tab.7.Select Properties, Change Settings, then Update Driver.11
8.Select Browse my computer for driver software.Click Browse then navigate to the location on your computer’s hard drive where you saved thedownloaded driver file. Make sure that Include subfolders is selected. Click Next.Note: If the Windows security message appears, click Install.9.12
While the driver is installing, you see:Note:If you have a Windows 64-bit Operating System, W MDC installs automatically followingdriver installation.Once W MDC detects that the 6057 printer is plugged in to the computer, you see:13
Using Microsoft Window s Mobile Device Center (WMDC)1.Click Connect without setting up your device.2.Click File Management then Browse the contents of your device. You can view the files onyour printer and add and/or remove files.Note:14When you double-click a folder in the Mobile Device folder, it may take a few seconds toopen.
Updating the USB driver1.Download the Pathfinder 6057 driver for Windows Vista /Windows 7 from our Web site.Save it to your computer.2.Turn on the printer and wait for the desktop to load.3.Attach the USB cable to your computer and printer.Note:You must unzip the driver folder for installation.4.Turn on the printer and wait for the desktop to load.5.Use the designated USB cable to connect the USB port on the printer to the USB port on yourcomputer. Refer to the Operator’s Handbook availableon our web site for more information.6.Go to your computer’s Start menu and select ControlPanel, Devices and Printers.7.Double click on Monarch 605x.8.Select the Hardware tab.15
9.Select Properties then Update Driver.10. Select Browse my computer for driver software.11. Click Browse then navigate to the location on your computer’s hard drive where you saved thedownloaded driver file. Make sure that Include subfolders is selected. Click Next.Note: If the Windows security message appears, click Install.16
USB Driver folder, double click on the file "drvupdate-x86" and follow the instructions on the screen. 2. Turn on the printer and wait for the desktop to load. 3. Use the designated USB cable to connect the USB port on the printer to the USB port on your computer. Refer to the . Operator's Handbook. available on our web site for more .