Transcription
EC200OPERATING MANUALwww.anyload.comPage 1 of 16AL-manual-EC200-En-V2
ContentsSection1HeadingSafety1.1 Representation and symbols1.2 Safety recommendations2Your weighing machine2.1 Construction and functions2.1.1 Construction of the weighing machine2.1.2 Functions of the weighing machine2.2 Application, conformity2.2.1 Correct use of the weighing machine2.2.2 Conformity2.3 Data and parameters2.3.1 Technical data3Getting started with your weighing machine3.13.23.33.43.53.63.74Unpacking the equipmentScope of deliveryAssembling your weighing machineChoice of a suitable locationChecking the mains voltageLeveling the weighing machineCalibration of the weighing machineWorking with the application menu using the intelligent keypad4.1 Display messages and key functions4.1.1 Display messages4.1.2 Key functions54.2 Program options4.2.1 Pieces counting4.2.1.1 Counting with a known sample weight4.2.1.2 Counting without a known sample weight4.2.2 Select a pre-stored unit weight4.2.3 High/Low Check Weighing when CountingCalibration - using an external calibration weight6Maintenance and service7Transport and storage7.1 Transportation and shipping7.2 StoragePage 2 of 16AL-manual-EC200-En-V2
1 Safety1.1 Representations and symbolsImportant instructions, which involve safety, are highlighted with the appropriate mark:1.2 Safety recommendationsWhen using the weighing equipment in surroundings with increased safety requirements,the corresponding regulations must be observed.The weighing machine may only be used with the power adapter supplied exclusively for use withthe weighing machine.Before inserting the power adapter, the user must ensure that the operating voltage stated on thepower adapter agrees with the mains voltage.If not, please contact Customer Service at the address above.If the power adapter or its cable is damaged, the weighing machine must immediately bedisconnected from the electricity supply (pull out the power adapter).The weighing machine may only be operated from mains electricity supply with a power adapter whichis in perfect condition.If there should be any reason to believe that it is no longer possible to operate the weighing machinewithout danger, the weighing machine is to be immediately unplugged from the electricity supply (pullout power adapter) and secured against inadvertent operation.In carrying out maintenance work, it is essential to follow the recommendations in Chapter 6Maintenance and service.The weighing machine must not be operated in an area subject to explosion risks.Care must be taken when weighing liquids to ensure that no liquid is spilt into the inside of theweighing machine or into connections on the rear of the equipment or the power adapter. If liquid isspilt on the weighing machine, it must immediately be unplugged from the mains electricity supply (pullout power adapter).The weighing machine may only be operated again after it has first been re-checked by aservice technician.These operating instructions must be read by each operator of the equipment and must be availableat the workplace at all times.Page 3 of 16AL-manual-EC200-En-V2
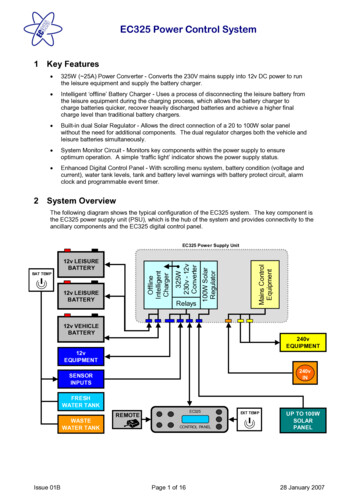
2 Your weighing machine2.1 Construction and functions2.1.1 Construction of the weighing machineThe weighing machine consists of the weighing machine body (1), the scale-pan (2), the adapter (3) andthis operating manual.2.1.2 Functions of the weighing machineThe EC200 Series are high-quality electronic precision weighing machines designed to function ascounting scales with the following specifications.Specifications:Model numberCapacityDivisionWeighing pan SizeEC20050lb/2lb0.001 lb/0.00005lb345x260/114x114mmPackage(Standard carton)540x380x170mmPackage(Master carton)OperatingTemperaturePower source2 Units in one box: 555x395x370mm0 C - 40 C (32-104 )Rechargeable batteries or AC/DCAdapter 10-12V/500mAThe built-in versatile weighing programs allow you to use the EC200-Series weighing machines not onlyfor accurate weighing but also for components counting.FEATURES Auto zero tracking Intelligent applications: weight unit conversion, parts counting Low battery indication Large LED Large heavy gauge stainless steel square pan Second smaller heavy gauge stainless steel pan Stability indication Auto calibration Selectable auto back light Unit switching kg or lb Variable kg or lb reference weight calibration software 1.3 million internal resolution Selectable display resolutions, 50000d, 25000d, 10000d, 6000d, 5000d and etc. Page 4 of 16AL-manual-EC200-En-V2
24 bit A/D processor Highest quality sensor used Die cast aluminum sub-support bottom sensor support and steel thread footing Able to enter unit piece weight on numeric keyboard Able to enter tare weight on numeric keyboard Print out change from kg to g SCALE 3 PortRS232 PortPowerConnectionUSB PortOn/Off SwitchLeveling feetPage 5 of 16AL-manual-EC200-En-V2
2.2 Application, conformity2.2.1 Correct use of the weighing machineThe weighing machine may only be used for the weighing of solid-materials and of liquids filled intosecure containers.The maximum allowable load of the weighing machine must never be exceeded; otherwise the weighingmachine may be damaged.In using the weighing machine in combination with other appliances as well as with appliances producedby other manufacturers, the appropriate regulations for the safe use of the relevant attachments and theirapplication in accordance with instructions must be observed.2.2.2 ConformityThe weighing machine has been manufactured and tested in accordance with the standards andrecommendations set out in the declaration of conformity.The power adapter produced for the operation of the weighing machine and intended exclusively for thisapplication complies with the appropriate electrical protection class.2.3 Data and parameters2.3.1 Technical dataThe following applies to all EC200 series weighing machinesPower supply:. Input: 110 or 230V AC ( /-15-20%); 50 to 60Hz. Output: 10-12v DC 500mAAllowable ambient conditionsTemperature: 0 C - 40 CRelative humidity: 25% - 85%, non-condensingIf you have any questions on the technical data or require detailed technical information on your balance,please contact your technical representative.3 Getting started with your weighing machine3.1 Unpacking the equipmentPage 6 of 16AL-manual-EC200-En-V2
The machine is delivered in an environmentally-friendly carton, specifically developed for thisprecision instrument, which provides optimum protection for the balance during transportation.We suggest that you retain the original packaging in order to avoid transportation damage if re-shippingor transporting the balance and to allow the unit to be stored in the best conditions if it is out ofoperation for an extended period.In order to avoid damage, attention must be given to the following points when unpacking the balance:Unpack the weighing machine carefully. It is a precision instrument.When outside temperatures are very low, the balance should first be stored for some hours in theunopened transport package in a dry room at normal temperature, so that no condensation settles onthe unit when unpacking.Check the weighing machine immediately after unpacking for externally visible damage. If you shouldfind transport damage, please inform your service representative immediately.If the unit is not to be used immediately after purchase but only at a later time, it should be stored in a dryplace where fluctuations in temperature are as small as possible (see Chapter 7 .Transport, storage.).Read through these operating instructions, even if you already have prior experience with weighingequipment, before you work with the unit and pay attention to the Safety recommendations (seeChapter 1 .Safety).3.2 Scope of deliveryInspect delivery for completeness immediately on unpacking all components.Checklist for complete deliveryComponent delivered present yes / noWeighing unit bodyWeighing pan(s)Power adapterOperating manual3.3 Assembling your weighing machineThe weighing machine is delivered in partly dismantled condition. Assemble the individual components inthe following sequence: Place the unit holder in position and add the weighing pan Insert the power adapter cable plug into the socket at the rear of the balance. 3.4 Choice of a suitable locationPage 7 of 16AL-manual-EC200-En-V2
The environment in which your weighing machine is used is very important. Air movement, temperaturechanges, vibrations, direct sunlight, etc. all influence the performance of high precision weighingmachines. Therefore, place your weighing machine on a solid, sturdy surface that is free of air currents,vibration and not in direct sunlight. The surface should not be magnetic and should be located away fromdoors, windows, heaters, air conditioners and fans.To summarize: Put the weighing machine on a solid, firm and preferably vibration-proof, horizontal base Make sure that the weighing machine cannot be shaken or knocked over Protect from direct solar radiation Avoid drafts and excessive temperature fluctuations 3.5 Checking the mains voltageThe following Safety recommendations must be observed when connecting the balance to the mains:The balance may only be operated with the power adapter supplied.Check before connecting the power adapter to the mains supply, that the operating voltage stated on thepower adapter agrees with the local mains voltage.If the operating voltage is not the same as the mains voltage, the power adapter must on no account beconnected to the mains supply. Contact customer service.3.6 Leveling the weighing machineTo function properly, the balance must be precisely horizontal. The balance is fitted with one bubble leveland adjustable feet for level-control, with the aid of which it is possible to compensate for small heightdifferences and / or any unevenness in the surface on which the balance is positioned.The screw feet must be adjusted so that the air bubble is precisely in the center of the sight glass of thebubble level (see Fig. 1)Place the scale horizontally and keep the bubble inside the bubble level aligned with the red circle (SeeFig.1). In order to get exact measurements, the balance must again be carefully leveled after eachrelocation.Fig. 1 Correct leveling with the aid of the bubble level and adjusting feet.Page 8 of 16AL-manual-EC200-En-V2
3.7 Calibration of the weighing machineSince the Earth’s gravity is not the same everywhere, each balance must be adjusted to compensate forthe gravity differences at each location in accordance with the underlying physical weighing principles.This adjustment process, known as calibration and must be carried out on initial installation and aftereach subsequent relocation.In order to ensure exact measurements, it is recommended that the balance should be calibratedregularly using a known external calibration weight (see Section 5 below).4 。 Working with the application menu using the Key-Pad4.1 Display messages and key functions4.1.1 Display messages1. Kg: unit of measure2. lb: unit of measure3. stb: stable indicationPage 9 of 16AL-manual-EC200-En-V2
4. zero: ZERO INDICATOR turns on when scale is in Zero position5. tare: TARE INDICATOR turns on when this function is used6. LoUW: turns on when sample unit weight is not heavy enough for accurate counting7. LoWT: turns on when sample number is not enough for accurate counting8. M : is used when accumulating the counts data; this data is memorized by pressing this key andcan be accumulated up to 99 times.9. S1: SCALE 1 working state10. S2: SCALE 2 working state11. S3: SCALE 3 working state12. LoB: low voltage, please charge battery13. CHG: charged state, red LED lights up when charging, when the battery is fully charged, Redand Green LED lights flash alternately.4.1.2 Key functions1. SCALE/SELECT: Press this button to select available counting scale among scale 1, scale 2, andscale 3. You can only choose to use one of them at a time. SCALE 1: Main counting scale, the bigger platform SCALE 2: Smaller counting scale offers more accuracy SCALE 3: Extra connection platform. When we get the sample weight from SCALE 2,we can use this platform to count more samples. Operation way:press Scale/ select key,WEIGHT line will show flashed [SCALE 1],press Scale/ select key to select then press Enter key to confirm . 2. UNIT key changes the weight units between kg and lb3. ZERO key sets display to zero or subtract the container weight. The zero range is 10% of fullcapacity. ZERO LED indicator will illuminate when you active the ZERO function.4. TARE key subtracts the weight of a container placed on the weighing platform. The tare range is 100% full capacity. Press the TARE key to enable the Auto-Tare function, the TARE LEDindicator will illuminate when you activate the TARE function.Operation way 1 : turn on the scale and wait for ZERO mode then place containerpress TARE key ,WEIGHT line will show flashed 0.0000,TARE LED indicator will light upwhen you activate it.Operation way 2:((new version function)Turn on the scale and wait for ZERO mode. Key indesired Tare weight and press TARE key. ZERO LED indicator will light up when you activateit.5. PRINTER key is used to transmit data to a printer, computer, or other device.It should be connect to PC or printer by USB or RS232.6. ENTER key has the same function as it would on a computer keyboard.Page 10 of 16AL-manual-EC200-En-V2
7. MEM/STORE key is the SAMPLE WEIGHT MEMORY KEY. Press this key to memorize sampleweight, scale can memorize up to 16 different sample weights.eg:if you want to store sample weigh 0.22047 (1/1000 lb)at place 7,please operate asbelow:press [MEM/STORE],WEIGHT line will show flashed [01],press [* ] to select storage place7 then press ENTER to confirm.8. MEM/READ key is the SAMPLE WEIGHT READ KEY. Press this key to recall the memorizedsample weight, if more than one sample weight is memorized continue to press this key until thecorrect sample weight is selected.Operation way: input unit weight storage place by number key then press [MEM/READ] keyto catch unit weight.9. [M ] MEMORY KEY is used when accumulating the counting data. This data is memorized bypressing this key and can be accumulated up to 99 times.Operation way:place weight then press [M ],WEIGHT line will show how many times XX ,UNIT WEIGHT line shows flashed [Add],press Enter key to confirm it and back tocounting mode. M LED indicator will light up when you activate it.。press [TOTAL] key tocall out the total value of accumulation10. MC key is used to clear out the accumulated counting data.Operation way : press MC key when the M LED lights,WEIGHT line will show howmany times XX , UNIT WEIGHT line shows flashed [CLr],press Enter light off.11. SAMPLE key is used when setting the counted number of samples on the platter into the scalememory.12. UNIT WEIGHT is used when setting the known unit weight data into the scale during normaloperation. (1/1000kg or 1/1000lb)13. QTY/SET key is used when wanting to switch between the pieces counting function and quantitycheck weighing function.warning setting of minimum or maximum weight .Press [QTY/SET] key,the display will show CH OFF, press [Enter] key to select CH ON.press[*] key,UNIT WEIGHT line flashed,press number key to input minimum weight.press [*] key,TOTAL line flashed,press number key to input maximum weight.press [QTY/SET] key to exit setting mode and back to weighing mode.If the weight placed under minimum weight at counting mode, the scale will speak out DUDU DU. If the weight placed exceed maximum weight, the scale will speak out DI DI DI.14. NUMERIC (0-9) keys are used for setting numeric data for sample numbers, sample weights orto set a limit for the HI/LO settings.15. [*] Key is used to change the division when the scale is in SCALE 3 mode.16. TOTAL key displays the accumulated total pieces on the scale17. ESC key is used to exit from the current menu18. CE key is used for cancelling the numeric setting data or cancels the previous unit weight data.4.2 Program optionsPage 11 of 16AL-manual-EC200-En-V2
Besides performing accurate simple weighing, your versatile weighing machine can also performpieces counting4.2.1 Pieces counting4.2.1.1 Counting pieces with known sample unit weight- Turn scale on- Wait for "0" to appear on the display.- If necessary, press ZERO key to set the display to “0”- Key in unit weight, press UNIT WEIGHT key to confirm-Store the unit weight by pressing MEM/STORE key, display will show a flashing number forexample “01”, this is the location where the stored sample unit weight can be found. Press [*]key to toggle between 01-16, press the ENTER key to confirm the selection.- Press the SCALE/SELECT key to select either SCALE 1 or SCALE 3, be sure to placethe additional pieces on the scale that is selected.***NOTE: The items being weighed should be within the selected scales capacity.4.2.1.2 Counting pieces without known sample unit weight- Turn scale on- Wait for "0" to appear on the display.- If necessary, press ZERO key to set the display to “0”- Press SCALE/SELECT key to select SCALE 2, press ENTER to confirm-Put a pre-known number of samples onto SCALE 2, key-in the known number using thenumeric keypad.- Press SAMPLE to get the sample unit weight- Press the SCALE/SELECT key to select either SCALE 1 or SCALE 3, be sure to placethe additional pieces on the scale that is selected, it will display the total number of items.***NOTE: The items being weighed should be within the selected scales capacity.4.2.2 Select a pre-stored unit weightKey in the number of the pre-stored weight (01-16) using the numeric key pad, press MEM/READkey and select the pre-stored sample unit weight, press ENTER to confirm.4.2.3 High/Low Check Weighing with Counting- Turn scale on- Wait for "0" to appear on the display.Page 12 of 16AL-manual-EC200-En-V2
- If necessary, press ZERO key to set the display to “0”- Press QTY/SET key, display will show CH OFF or CH ON- Press the ENTER key to select “ON”- Press [*] key, display will show a flashing “0” at UNIT WEIGHT, key in the lower limit usingthe numeric key pad, press [*] gain, display will show a flashing “0” at TOTAL, key in the upperlimit using the numeric keypad.-Press QTY/SET key to confirm the setting and return to weighing mode.- Press the SCALE/SELECT key to select either SCALE 1 or SCALE 3, be sure to placethe additional pieces on the scale that is selected.***NOTE: When adding items onto the scale, the scale will beep in a particular tone if theweight (number of items) is less than the lower limit and beep in another tone if it is higher thanthe upper limit.5 Calibration - Using an External Calibration Weight:Calibration is required when the weighing machine is initially installed or if the scale is moved to asubstantial distance from the original location. 10 minutes warm up of scale is always needed beforecalibration.5.1 Scale 1 Calibration- Turn on scale- As the scale is counting down, press the following buttons in order [1], [3], [1], [1]then press ENTER- Display will show the following: ‘WEIGHT DISPLAY’ shows SCALE 1, ‘UNIT WEIGHT’shows CAL-0, ‘TOTAL DISPLAY’ will show A/D value- Press UNIT key to select whether you will calibrate in kg or lb- Press ENTER to set zero point (UNIT WEIGHT will show CAL-0 flashing for afew seconds and then changes to XXXX to set the calibration weight)- Press [CE] key and then press the corresponding number buttons based off of theamount of weight you are using to calibrate (example: if you are using 5lbs to calibrate thescale you would key in 5lbs).- Calibration weight will show in the UNIT WEIGHT display.- Press the ENTER key, the UNIT WEIGHT display will show flashing XX and thenchanges to XX.XXX lb. Once this occurs the calibration process is complete.Page 13 of 16AL-manual-EC200-En-V2
-***Note: Make sure nothing is loaded on the platform before you are asked to place thecalibration weight. Once calibration is complete you will need to reboot the scale and place thesample test weight on the platter to assure the calibration was completed correctly.5.2 Scale 2 Calibration- Turn on scale- As the scale is counting down, press the following buttons in order [1], [3], [1], [2]then press ENTER- Display will show the following: ‘WEIGHT DISPLAY’ shows SCALE 2, ‘UNIT WEIGHT’shows CAL-0, ‘TOTAL DISPLAY’ will show A/D value- Press UNIT key to select whether you will calibrate in kg or lb- Press ENTER to set zero point (UNIT WEIGHT will show CAL-0 flashing for afew seconds and then changes to XXXX to set the calibration weight)- Press [CE] key and then press the corresponding number buttons based off of theamount of weight you are using to calibrate (example: if you are using 1lb to calibrate thescale you would key in 1lb).- Calibration weight will show in the UNIT WEIGHT display.- Press the ENTER key, the UNIT WEIGHT display will show flashing XX and thenchanges to XX.XXX lb. Once this occurs the calibration process is complete.-***Note: Make sure nothing is loaded on the platform before you are asked to place thecalibration weight. Once calibration is complete you will need to reboot the scale and place thesample test weight on the platter to assure the calibration was completed correctly.5.3 Scale 3 Calibration- First make a connection to SCALE 3 through DB9Page 14 of 16SCALE 3 DB9Load Cell DB91 S-1 S-2 S 2 S 3/6 V 3/6 V 4 V-4 V-5 GND5 GND7-9 NC7-9 NCAL-manual-EC200-En-V2
- Turn on scale- As the scale is counting down, press the following buttons in order [1], [3], [1], [3]then press ENTER- The following must be completed befor;e beginning the calibration process for SCALE 3:- WEIGHT DISPLAY shows SCALE 3- UNIT WEIGHT shows “xxxx” (this is the full capacity of SCALE 3)- TOTAL DISPLAY will show “d xx” (this is the division of SCALE 3)- Press UNIT key to select full capacity in kg or lb- Press CE Key to set the full capacity – key in the number through the numeric keypad- Press (*) to set the division – key in the number through the numeric keypad- Press ENTER to confirm- Now begin the CALIBRATION process:- Press UNIT key to select whether you will calibrate in kg or lb- Press ENTER to set zero point (UNIT WEIGHT will show CAL-0 flashing for afew seconds and then changes to XXXX to set the calibration weight)- Press [CE] key and then press the corresponding number buttons based off of theamount of weight you are using to calibrate (example: if you are using 1lb to calibrate thescale you would key in 1lb).- Calibration weight will show in the UNIT WEIGHT display.- Press the ENTER key, the UNIT WEIGHT display will show flashing XX and thenchanges to XX.XXX lb. Once this occurs the calibration process is complete.-***Note: Make sure nothing is loaded on the platform before you are asked to place thecalibration weight. Once calibration is complete you will need to reboot the scale and place thesample test weight on the platter to assure the calibration was completed correctly.6 Maintenance and serviceThe weighing machine must be treated carefully and cleaned regularly. It is a precision instrument.For maintenance-work, the balance must be separated from the power supply (remove poweradapter plug from socket). Also ensure that the balance cannot be reconnected to the power supplyduring the work by a third party.Page 15 of 16AL-manual-EC200-En-V2
Take care during cleaning that no liquid penetrates into the appliance. If liquid is spilt on the balance,the latter must immediately be disconnected from the electricity supply. The balance may only be usedagain after it has first been checked by a service engineer.The connections on the rear of the appliance and the power adapter may not come into contactwith liquids.Regularly dismantle the weighing pan and the weighing pan holder and remove any dirt or dust fromunder the weighing pan and on the weighing machine housing with a soft brush or a soft, lint-free cloth,moistened with a mild soap solution. The scale and the holder can be cleaned under running water.Take care that both parts are completely dry before they are re-installed on the scale.Never use solvents, acids, alkalis, paint thinners, scouring powders or other aggressive or corrosive chemicalsfor cleaning, since these substances attack the surfaces of the scale housing andcan cause damage.7 Transport, storage7.1 Transportation and shipping of the weighing machineYour weighing machine is a precision instrument. Treat it carefully. Avoid shaking, severe impactsand vibration during the transportation.Take care that there are no marked temperature fluctuations during the transportation and thatthe weighing machine does not become damp (condensation).7.2 Storage of the weighing machineIf you would like to take the weighing machine out of service for an extended period, disconnect itfrom the electricity supply, clean it thoroughly (see Section 6.Maintenance and servicing.) and store itin a place which meets the following conditions: No violent shaking, no vibrations Minimum temperature fluctuations No direct solar radiation Minimum moisture The weighing machine should preferably be dispatched and transported in the original packaging toavoid transportation damage.The weighing machine should preferably be stored in the original packaging, since this providesoptimal protection for the weighing machine.Page 16 of 16AL-manual-EC200-En-V2
EC200 50lb/2lb 0.001 lb/0.00005lb 345x260/114x114mm Package (Standard carton) 540x380x170mm Package (Master carton) 2 Units in one box: 555x395x370mm Operating Temperature 0 C - 40 C (32-104 ) . If the unit is not to be used immediately after purchase but only at a later time, it should be stored in a dry