Transcription
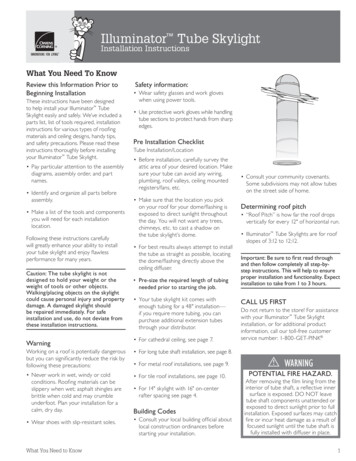
HardieTrim Boards EFFECTIVE SEPTEMBER 2019These instructions are to be used for HardieTrim HZ Boards ONLY and are ONLY VALID in the following states: WA, OR, CA, NV, UT, ID, CO, WY, MT, AZ, NM.IMPORTANT: FAILURE TO FOLLOW JAMES HARDIE WRITTEN INSTALLATION INSTRUCTIONS AND COMPLY WITH APPLICABLE BUILDING CODES MAY VIOLATE LOCAL LAWS, AFFECTBUILDING ENVELOPE PERFORMANCE AND MAY AFFECT WARRANTY COVERAGE. FAILURE TO COMPLY WITH ALL HEALTH AND SAFETY REGULATIONS WHEN CUTTING AND INSTALLINGTHIS PRODUCT MAY RESULT IN PERSONAL INJURY. BEFORE INSTALLATION, CONFIRM YOU ARE USING THE CORRECT HARDIEZONE PRODUCT INSTRUCTIONS BY VISITINGHARDIEZONE.COM OR CALL 1-866-942-7343 (866-9-HARDIE)STORAGE & HANDLING:Store flat and keep dry and covered prior toinstallation. Installing siding wet or saturated mayresult in shrinkage at butt joints. Carry planks onedge. Protect edges and corners from breakage.James Hardie is not responsible for damage causedby improper storage andhandling of theproduct.CUTTING INSTRUCTIONSOUTDOORS1. Position cutting station so that airflow blows dust away from theuser and others near the cutting area.2. Cut using one of the following methods:a. Best: Circular saw equipped with a HardieBlade saw bladeand attached vacuum dust collection system. Shears(manual, pneumatic or electric) may also be used, notrecommended for products thicker than 7/16 in.b. Better: Circular saw equipped with a dust collection feature(e.g. Roan saw) and a HardieBlade saw blade.c. Good: Circular saw equipped with a HardieBlade saw blade.INDOORSDO NOT grind or cut with a power saw indoors. Cut using shears (manual, pneumatic orelectric) or the score and snap method, not recommended for products thicker than 7/16 in.- DO NOT dry sweep dust; use wet dust suppression or vacuum to collect dust.- For maximum dust reduction, James Hardie recommends using the “Best” cuttingpractices. Always follow the equipment manufacturer’s instructions for proper operation.- For best performance when cutting with a circular saw, James Hardie recommendsusing HardieBlade saw blades.- Go to jameshardiepros.com for additional cutting and dust control recommendations.IMPORTANT: The Occupational Safety and Health Administration (OSHA) regulates workplace exposure to silica dust. For construction sites, OSHA has deemedthat cutting fiber cement with a circular saw having a blade diameter less than 8 inches and connected to a commercially available dust collection system permanufacturer’s instructions results in exposures below the OSHA Permissible Exposure Limit (PEL) for respirable crystalline silica, without the need for additionalrespiratory protection.If you are unsure about how to comply with OSHA silica dust regulations, consult a qualified industrial hygienist or safety professional, or contact your JamesHardie technical sales representative for assistance. James Hardie makes no representation or warranty that adopting a particular cutting practice will assureyour compliance with OSHA rules or other applicable laws and safety requirements.HardieTrim boards are decorative non-load bearing trim products.Do not use HardieTrim boards to replace any structural component.TABLE OF CONTENTSGENERAL REQUIREMENTSFLASHING/CLEARANCE REQUIREMENTSFASTENINGFace Nailing RequirementsINSTALLATIONTrimming CornersOpeningsBand BoardsFriezeBatten BoardsFasciaHardieTrim agePagePagePage12334-84444567-89Figure rierHardieTrimCrown MouldingHardiePlankLap SidingGENERAL REQUIREMENTS Wood or steel must be provided for attaching HardieTrim boards.Follow all appicable codes when installing HardieTrim boards.DO NOT install HardieTrim boards, such that they may remain in contact with standing water.DO NOT use stain, oil/alkyd base paint, or powder coating on James Hardie Products.Visit jameshardiepros.com for the most recent version.TR1509 P1/9 09/19
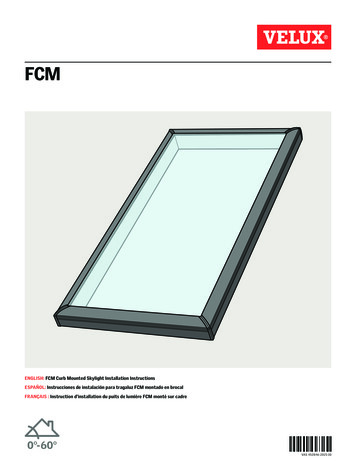
HardieTrim BoardsFLASHING/CLEARANCE REQUIREMENTS NO-COVERHardieTrim may be installed with a minimum1/4 in. clearance when installed vertically tograde, decks, paths, steps, and drivewaysMaintain a minimum 1 in. horizontal clearancebetween James Hardie trim products and decks,paths, steps and driveways.Figure 2Figure 3At the juncture of the roof and vertical surfaces, flashingand counter flashing shall be installed per the roofingmanufacturer’s instructions. Provide a 1 in. clearancebetween the roofing and the bottom edge of the trim.Figure 4sidinghorizontaltrim6 in. min.trimwaterresistivebarrier1 in.min.flashingtrimdeck material1 in. min.flashingjoistvertical trim1/4 in. min.flashingledgerMaintain a 1/4 in. clearance between thebottom of James Hardie products andhorizontal flashing. Do not caulk gap.Drip EdgeFigure 5Figure 6for fascia installation see page 6Mortar/MasonryFigure 7sidingDo notCaulkL-Flashing1/4 in. gapZ-FlashingflashingBlock PenetrationMin. ¼ in.Valley/Shingle Extension(recommended in HZ10)Figure 8Figure 9Z-FlashingMin. ¼ in.Do not caulkExtend shingles atleast 1 in. out fromthe fascia whengutters are presentFigure 104 in.min.CLEARANCE REQUIREMENTS UNDER-COVERMaintain a 1/4 in. clearance for HardieTrim boards installed under cover.Under cover is defined as: Not more than 10 feet below a roof overhang, and Not less than 4 inches horizontally from the edge of the roof overhangVisit jameshardiepros.com for the most recent version.1/4 in.min.clearance10 ft.maxTR1509 P2/9 09/19
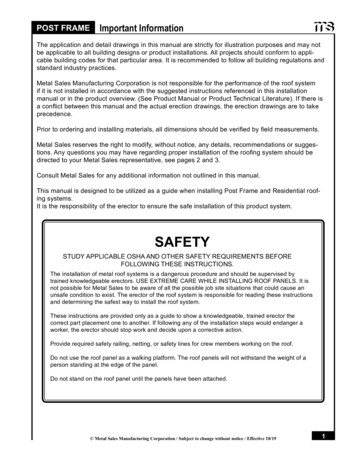
HardieTrim BoardsGENERAL FASTENING REQUIREMENTSFasteners must be corrosion resistant, galvanized, or stainless steel.Electro-galvanized are acceptable but may exhibit premature corrosion.James Hardie recommends the use of quality, hot-dipped galvanized nails.James Hardie is not responsible for the corrosion resistance of fasteners.Stainless steel fasteners are recommended when installing James Hardieproducts near the ocean, large bodies of water, or in very humid climates.Manufacturers of ACQ and CA preservative-treated wood recommendspacer materials or other physical barriers to prevent direct contact of ACQor CA preservative-treated wood and aluminum products. Fasteners usedto attach HardieTrim Tabs to preservative-treated wood shall be of hotdipped zinc-coated galvanized steel or stainless steel and in accordance to2009 IRC R317.3 or 2009 IBC 2304.9.5.”PNEUMATIC FASTENINGJames Hardie products can be hand nailed or fastened with a pneumatic tool.Pneumatic fastening is highly recommended. Set air pressure so that thefastener is driven snug with the surface of the trim. A flush mount attachmenton the pneumatic tool is recommended. This will help control the depth thenail is driven. If setting the nail depth proves difficult, choose a setting thatunder drives the nail. (Drive under driven nails snug with a smooth facedhammer - Does not apply for installation to steel framing).FlushFigure AFinish NailSnugFlushdo notover drivesiding nailsFigure BSiding Naildo notunderdrive nailsDO NOTSTAPLEFACE NAILING REQUIREMENTSUse 2 in. minimum 16 ga. finish nails to attach HardieTrim boards to wood frame construction. ET&F or equivalent fasteners or screws may be used to attach HardieTrimboards to steel frame construction.Fastening instructions are similar for all applications. When using finish nails, position nails no closer than 1/2 in. from the edges of the trim and for all other fasteners nocloser than 3/4 in. Fasteners must be no closer than 1 in. from ends of trim and spaced a maximum of 16 in. O.C. Ensure trim is adequately fastened.James Hardie recommends using stainless steel finish nails when installing HardieTrim products.Minimum fastener guide for finish nailing:Pre-built cornerSite Built Corners1 nail every 16 in. to attach boardstogether 1 nail every 16 in. each board2 nails every 16 in.6 in. 1 nail every 16 in. to attach boardstogether 2 nails every 16 in. each board8 in. 3 nails every 16 in.12 in. 4 nails every 16 in.4 in.Other areas (e.g. windowtrim, and band boards)2 nails every 16 in.plywood orwater-resistivebarrierOSB sheathing1 in. fromends3 nails every 16 in.3 nails every 16 in.Use a 2 in. finish nail to fasten trim together. Longer finish nails may bend.16 in. O.C. maximumfinish nailingpatternVertical trim may be installedwith a 1/4 in. min. clearance*.Figure 11Leave a minimum 1/8 in. gap betweenthe siding and trim, then caulk.*Follow all applicable codes when installing HardieTrim boardsVisit jameshardiepros.com for the most recent version.TR1509 P3/9 09/19
HardieTrim BoardsINSTALLATIONTRIMMING CORNERSTRIM APPLICATION FOR WINDOWS, DOORS & OTHER OPENINGSWhen installing corners or other vertical trim,position boards on the wall and attach (figure 12).Flashing over trim is required per code for all installation methods. (figure 14)Figure 14Pre-Built CornersAlternatively, corners can be pre-built off the wallusing 2 in. finishing nails. Each side of the pre-builtcorner must be secured to the wall (figure 13).Figure 12flashingover trimcornerstudsdo notcaulk alongtop edgewaterresistivebarrierHardieTrimboardsidingButt to SidingTrim the opening priorto the installation of thesiding. Position trimboards on the wall andsecure. Allow properfastener spacing atedges and ends.16 in. max.Butt to Siding2 in. Finish nailFigure 13HorizontalFlashingcornerstudsNOTE: Follow your window/door manufacturer’s installationinstructions for caulking guidance between window and trim.leave a minimum 1/8 in. gap betweensiding and trim, then caulk.2 in. Finish nailBAND BOARDFor band boardapplications, a flashing isrequired over the trim.(figure 15)FRIEZE BOARDSwater resistive barrierlap sidingFigure 15Figure 16HardieTrim boards canbe used as frieze board.(figure 16)sheathing1/4 in. gapHardieTrimfrieze boardblocking/supportif requiredHardieTrimfrieze boardflashingHardieTrim boardcaulk if requiredShimbehindtrimButt-to SidingTrim Over SidingHardiePlanklap sidingVisit jameshardiepros.com for the most recent version.TR1509 P4/9 09/19
HardieTrim BoardsBATTEN BOARDSFigure 17HORIZONTAL PANEL JOINTSAt horizontal panel joints HardieTrim battens must beinstalled according to option 1 or 2 below. Wheninstalling HardieTrim Battens horizontally, they must beinstalled as a panel joint according to option 2.Option 1Figure 17 - No horizontal band board - Make a 22.5 - 45degree weather cut, in the HardieTrim batten, just abovethe 1/4 in. clearance between panels.Option 2Figure 18 - Horizontal Band Board - Install a horizontalband board at the top of the bottom panel. Butt the lowerbatten to the band board and start the top batten at thebottom edge of the top panel. Maintain a 1/4 in.clearance above horizontal flashing.Figure 18HardieTrimBattenupper panelDo not 1/4 in. gapCaulkZ-flashinglowerpanelHardieTrimBattenupper panelDo notCaulk1/4 in. gapZ-flashingHardieTrimBattenlowerpanelVisit jameshardiepros.com for the most recent version.TR1509 P5/9 09/19
HardieTrim BoardsFASCIAHardieTrim board is a decorative non-load bearing trim product. Do not use HardieTrim to replace any structural component.HardieTrim boards can be fastened directly over a 2x sub-fascia or directly to rather tails. Check local building code for relevant codes.Option 1Over sub-fascia: (figure 19)When installing HardieTrim boards over solid 2x sub-fascia use minimum 2 in., 16 gauge corrosion resistant finish nails. (see fastener guide below)roofingFigure 19roof underlaymentroofsheathingdrip edge flashingroof framingHardieTrim boardsub fasciaGutters:James Hardie recommends the use of rain gutters whenever possible.Do not attach gutters directly to HardieTrimUse gutter hangers that attach through the roof sheathing into a raftertail or other structural member.SoffitWhen installing HardieSoffit additional framing/blocking may beneeded depending on application. Refer to HardieSoffit installationinstructions for guidance.HardieSoffit PanelOption 2Direct to rafter tails: (figure 20)When installing HardieTrim boards without the presence of a 2x sub-fascia, a minimum 8d siding corrosion resistant nails must be used to attach HardieTrim boardsDO NOT use finish nails. (refer to fastener guide below).Fascia Fastener GuideFigure 20FASTENER SPACINGDirect to Rafter(min 8d siding)6 in.2 nails every rafter spaced max24 in. O.C.Over 2x Sub-fascia(Minimum 2 in. 16 ga. Finish nails)2 nails spaced maximum16 in. O.C.8 in.3 nails every rafter spaced max24 in. O.C.3 nails spaced maximum16 in. O.C.HardieTrimBoard10 in.4 nails spaced maximum16 in. O.C.RoofingRoofSheathingRoof FramingHardieSoffitPanelVisit jameshardiepros.com for the most recent version.RoofUnderlaymentStyle "D"drip edgeFlashingHardieTrimBoardTR1509 P6/9 09/19
HardieTrim BoardsHARDIETRIM TABSFASTENER REQUIREMENTSFor Corners, Band Boards, Windows, and Door Applications:HardieTrim boards may be installed with HardieTrim Flat Tabs and HardieTrim Corner Tabs which provide concealed fastening. Only HardieTrim Flat and Corner Tabs can beused with HardieTrim boards to create a concealed fastening.Step 1: Attach HardieTrim Flat Tabs to the back side of the trim using four, 18 ga. 1/2 in. L x 1/4 in. W narrow crown corrosion resistant staples, equally spaced inone row, positioned no closer than 1/2 in. from trim edges using a pneumatic staple gun. (figures 21, 22)Step 2: For wood frame construction, attach the trim to the building with minimum 2, 6d siding nails fastened through the HardieTrim Flat Tabs (figure 23). ET&F orequivalent fasteners may be used to attach the HardieTrim Flat Tabs to steel frame construction.Fastener spacing will vary based on application. Refer to fastener table on page 9. Refer to specific sections in these instructions for required fastener spacing by application(window, band board, etc.)For Fascia, Rake, and Frieze board Applications:HardieTrim tabs cannot be used in fascia, rake, or frieze board applications. Follow Face nailing fastening specifications.Installation of HardieTrim tabs in Coastal Regions:James Hardie requires that stainless steel staples & fasteners be used when installing HardieTrim Tabs in coastal regions.Installation of HardieTrim Tabs over Pressure Treated Lumber: HardieTrim tabs shall not come in direct contact with ACQ or CA preservative-treated wood. Refer to theGeneral Fastening section of this document for further information.HardieTrim boards with ColorPlus Technology: Remove the laminate sheet as soon as possible after attaching the trim to the building.Min 2 in.Min 1/2 in.Fasten 4 staples minimum ¼ in. from trim edgeFigure 21Fasten HardieTrimFlat Tab tominimum 7/16 in.OSB with min 2, 6dsiding nailsBack view16 in. O.C. maxFigure 23HardieTrim Flat TabsFigure 22Front viewFigure 24Trim Application for Windows,Doors & Other OpeningsTrim the opening prior to the installation of thesiding. Place a Flat Tab at the end of each trimboard and one tab every 16 in. OC. Attach thetrim boards and Flat Tabs around the opening asshown in figure 24. Use 16 ga. galvanized 2 in.long finish nails to ensure proper fastening ifneeded.3FlushHardieTrimFlat and Corner TabsHardieTrimFlat andCorner Tabs22Siding nailattaches tabto the wall.Do notunderdrive nails.Only use staples tofasten HardieTrim Flat andCorner Tabs to the trim boards.1NOTE: Follow your window/door manufacturers installation instructions for caulking guidance between window and trim.Visit jameshardiepros.com for the most recent version.TR1509 P7/9 09/19
HardieTrim BoardsTRIMMING CORNERSWhen using HardieTrim tabs prebuild outside corners off the wall. Attach HardieTrim Corner Tabs to the back side of the trim using eight(8) - 18 ga. 1/2 in. L x 1/4 in. W narrow crown corrosion resistantstaples using a pneumatic stapler. Ensure the HardieTrim Corner Tabs are fastened tight and straight to the trim boards. (figure 25) For wood frame construction, attach trim to building using min. 6d siding nails fastened through the HardieTrim Corner Tabs attached tominimum 7/16 in. OSB *. (figure 26) Attach a HardieTrim Corner Tab 1 in. from each ends and every 20 in. O.C. TIP: Creating a jig for the work station is recommended to ensure corners are fastened securely and straight. (figure 27)Figure 25Figure 26Figure 27Corner studsUse 4 staples per pieceof trim to fasten theL-shaped tab to thepre-built corner. Usethe nail line on thetabs as a guide.Corner TabSiding nailFasten 2 in. x 4 in.timber blocksto a work benchCorner TabsCorner TabHardieTrim Fasten 2 in. x 8 in. studto the timber blocksBAND BOARDTerminate ends of the Band Board into Trim or Siding or miter cut the edges of the trim at the corners of the building. Place a HardieTrim Flat Tab at the end of each trim boardand one tab every stud at a maximum of 16 in. O.C. The HardieTrim Flat Tabs should be attached to the trim in an alternating pattern to the top and bottom of the band board(figures 21, 22). Use 16 ga. galvanized 2 in. long finish nails to ensure proper fastening if needed.Trim Tab Fastener TableApplicationFlat TabCorner TabFraming MaterialTab is nailed intoFastener(tab to framing)Wood Stud(minimum G 0.42)One 6d corrosion resistant siding nailinstalled through center of tab into framingMinimum APA rated7/16 in. OSBTwo 4d ring shank corrosion resistantsiding nails equally spaced installedthrough tab into framingMinimum 20gauge steelOne No. 8 X 1 in. long X 0.323 in. headdiameter screw (corrosion resistant)installed through flange into framingWood Stud(minimum G 0.42)On each flange, Install one 6dcorrosion resistant siding nail throughtab into framingMinimum APA rated7/16 in. OSBOn each flange, Install two 4d ringshank corrosion resistant siding nailsthrough tab into framingMinimum 20gauge steelOn each flange, Install one No. 8 X 1 in.long X 0.323 in. head diameter screw(corrosion resistant) through tabinto framingVisit jameshardiepros.com for the most recent version.Fastener(tab to trim)Max Tab Spacing(inches on center)Four 18 ga. X 1/2 in.long X 1/4 in. widecorrosion resistantcrown staples, equallyspaced in one row16For each piece of trim,install Four 18 ga. X1/2 in. long X 1/4 in.wide corrosionresistant crown staples,equally space in tworows20TR1509 P8/9 09/19
HardieTrim BoardsFINISHINGCUT EDGE TREATMENTCaulk, paint or prime all field cut edges. James Hardie touch-up kits are required to touch-up ColorPlus products.CAULKINGFor best results use an Elastomeric Joint Sealant complying with ASTM C920 Grade NS, Class 25 or higher or a Latex Joint Sealant complying with ASTM C834.Caulking/Sealant must be applied in accordance with the caulking/sealant manufacturer’s written instructions.PAINTINGDO NOT use stain, oil/alkyd base paint, or powder coating on James Hardie Products. James Hardie products must be painted within 180 days for primed product and 90 daysfor unprimed. 100% acrylic topcoats are recommended. Do not paint when wet. For application rates refer to paint manufacturers specifications. Back-rolling is recommendedif the siding is sprayed.COLORPLUS TECHNOLOGY CAULKING, TOUCH-UP & LAMINATE Care should be taken when handling and cutting James Hardie ColorPlus products. During installation use a wet soft cloth or soft brush to gently wipe off anyresidue or construction dust left on the product, then rinse with a garden hose. Touch up nicks, scrapes and nail heads using the ColorPlus Technology touch-up applicator. Touch-up should be used sparingly.If large areas require touch-up, replace the damaged area with new HardiePlank lap siding with ColorPlus Technology. Laminate sheet must be removed immediately after installation of each course. Terminate non-factory cut edges into trim where possible, and caulk. Color matched caulks are available from your ColorPlus product dealer. Treat all other non-factory cut edges using the ColorPlus Technology edge coaters, available from your ColorPlus product dealer.Note: James Hardie does not warrant the usage of third party touch-up or paints used as touch-up on James Hardie ColorPlus products.Problems with appearance or performance arising from use of third party touch-up paints or paints used as touch-up that are not James Hardie touch-up will not be coveredunder the James Hardie ColorPlus Limited Finish Warranty.PAINTING JAMES HARDIE SIDING AND TRIM PRODUCTS WITH COLORPLUS TECHNOLOGYWhen repainting ColorPlus products, James Hardie recommends the following regarding surface preparation and topcoat application: Ensure the surface is clean, dry, and free of any dust, dirt, or mildew Repriming is normally not necessary 100% acrylic topcoats are recommended DO NOT use stain, oil/alkyd base paint, or powder coating on James Hardie Products. Apply finish coat in accordance with paint manufacturers written instructions regarding coverage, application methods, and application temperature DO NOT caulk nail heads when using ColorPlus products, refer to the ColorPlus touch-up sectionSILICA WARNINGTR1509 P9/9 09/19DANGER: May cause cancer if dust from product is inhaled. Causes damage to lungs and respiratory system through prolonged or repeated inhalation of dust from product. Refer to the current product Safety Data Sheet before use.The hazard associated with fiber cement arises from crystalline silica present in the dust generated by activities such as cutting, machining, drilling, routing, sawing, crushing, or otherwise abrading fiber cement, and when cleaningup, disposing of or moving the dust. When doing any of these activities in a manner that generates dust you must (1) comply with the OSHA standard for silica dust and/or other applicable law, (2) follow James Hardie cuttinginstructions to reduce or limit the release of dust; (3) warn others in the area to avoid breathing the dust; (4) when using mechanical saw or high speed cutting tools, work outdoors and use dust collection equipment; and (5) if noother dust controls are available, wear a dust mask or respirator that meets NIOSH requirements (e.g. N-95 dust mask). During clean-up, use a well maintained vacuum and filter appropriate for capturing fine (respirable) dust or usewet clean-up methods - never dry sweep.WARNING: This product can expose you to chemicals including respirable crystalline silica, which is known to the State of California to cause cancer. For more information go to P65Warnings.ca.gov.RECOGNITION: In accordance with ICC-ES Evaluation Report ESR-2290, HardiePlank lap siding is recognized as a suitable alternate to that specified in: the 2006,2009,&2012 International Residential Code for One- and Two-FamilyDwellings, and the 2006, 2009, & 2012 International Building Code,. HardiePlank lap siding is also recognized for application in the following: City of Los Angeles Research Report No. 24862, State of Florida listing FL#889, Dade County,Florida NOA No. 02-0729.02, U.S. Dept. of HUD Materials Release 1263c, Texas Department of Insurance Product Evaluation EC-23, City of New York MEA 223-93-M, and California DSA PA-019. These documents should also be consultedfor additional information concerning the suitability of this product for specific applications. 2018 James Hardie Building Products, Inc. All rights reserved TM, SM and denote trademarks or registered trademarks of James Hardie Technology Limited.Product warranties, safety information and additional installationinformation are available at jameshardiepros.com
- For maximum dust reduction, James Hardie recommends using the "Best" cutting practices. Always follow the equipment manufacturer's instructions for proper operation. - For best performance when cutting with a circular saw, James Hardie recommends using HardieBlade saw blades.