Transcription
PA279CV SeriesLCD MonitorUser Guide
Table of contentsNotices. ivSafety information. vCare & Cleaning. vii1.1Welcome!. 1-11.2Package contents. 1-11.3Assembling the monitor. 1-21.4Connect cables. 1-31.4.1Rear of the LCD monitor. 1-31.5Monitor introduction. 1-41.5.1Using the Controls button . 1-42.1Adjusting the monitor. 2-12.2Detaching the arm/stand (for VESA wall mount). 2-22.3Outline dimension. 2-33.1OSD (On-Screen Display) menu. 3-13.1.1How to reconfigure. 3-13.1.2OSD Function Introduction. 3-23.2Specifications. 3-133.3Troubleshooting (FAQ). 3-143.4Supported Timing List. 3-15Copyright 2020 ASUSTeK COMPUTER INC. All Rights Reserved.No part of this manual, including the products and software described in it, may be reproduced,transmitted, transcribed, stored in a retrieval system, or translated into any language in any form or by anymeans, except documentation kept by the purchaser for backup purposes, without the express writtenpermission of ASUSTeK COMPUTER INC. (“ASUS”).Product warranty or service will not be extended if: (1) the product is repaired, modified or altered, unlesssuch repair, modification of alteration is authorized in writing by ASUS; or (2) the serial number of theproduct is defaced or missing.ASUS PROVIDES THIS MANUAL “AS IS” WITHOUT WARRANTY OF ANY KIND, EITHER EXPRESSOR IMPLIED, INCLUDING BUT NOT LIMITED TO THE IMPLIED WARRANTIES OR CONDITIONS OFMERCHANTABILITY OR FITNESS FOR A PARTICULAR PURPOSE. IN NO EVENT SHALL ASUS, ITSDIRECTORS, OFFICERS, EMPLOYEES OR AGENTS BE LIABLE FOR ANY INDIRECT, SPECIAL,INCIDENTAL, OR CONSEQUENTIAL DAMAGES (INCLUDING DAMAGES FOR LOSS OF PROFITS,LOSS OF BUSINESS, LOSS OF USE OR DATA, INTERRUPTION OF BUSINESS AND THE LIKE),EVEN IF ASUS HAS BEEN ADVISED OF THE POSSIBILITY OF SUCH DAMAGES ARISING FROM ANYDEFECT OR ERROR IN THIS MANUAL OR PRODUCT.SPECIFICATIONS AND INFORMATION CONTAINED IN THIS MANUAL ARE FURNISHED FORINFORMATIONAL USE ONLY, AND ARE SUBJECT TO CHANGE AT ANY TIME WITHOUT NOTICE,AND SHOULD NOT BE CONSTRUED AS A COMMITMENT BY ASUS. ASUS ASSUMES NORESPONSIBILITY OR LIABILITY FOR ANY ERRORS OR INACCURACIES THAT MAY APPEAR IN THISMANUAL, INCLUDING THE PRODUCTS AND SOFTWARE DESCRIBED IN IT.Products and corporate names appearing in this manual may or may not be registered trademarks orcopyrights of their respective companies, and are used only for identification or explanation and to theowners’ benefit, without intent to infringe.ii
A third-party certification according to ISO 14024Toward sustainable IT productsSay helloto a more sustainable productIT products are associated with a wide range of sustainability risksthroughout their life cycle. Human rights violations are common in thefactories. Harmful substances are used both in products and theirmanufacture. Products can often have a short lifespan because of poorergonomics, low quality and when they are not able to be repaired orupgraded.This product is a better choice. It meets all the criteria in TCO Certified,the world’s most comprehensive sustainability certification for ITproducts. Thank you for making a responsible product choice, that helpdrive progress towards a more sustainable future!Criteria in TCO Certified have a life-cycle perspective and balanceenvironmental and social responsibility. Conformity is verified byindependent and approved verifiers that specialize in IT products, socialresponsibility or other sustainability issues. Verification is done bothbefore and after the certificate is issued, covering the entire validityperiod. The process also includes ensuring that corrective actions areimplemented in all cases of factory non-conformities. And last but notleast, to make sure that the certification and independent verification isaccurate, both TCO Certified and the verifiers are reviewed regularly.Want to know more?Read information about TCO Certified, full criteria documents, news andupdates at tcocertified.com. On the website you’ll also find our ProductFinder, which presents a complete, searchable listing of certifiedproducts.iii
NoticesFederal Communications Commission StatementThis device complies with Part 15 of the FCC Rules. Operation is subjectto the following two conditions: This device may not cause harmful interference, and This device must accept any interference received includinginterference that may cause undesired operation.This equipment has been tested and found to comply with the limits for aClass B digital device, pursuant to Part 15 of the FCC Rules. These limitsare designed to provide reasonable protection against harmful interferencein a residential installation. This equipment generates, uses and canradiate radio frequency energy and, if not installed and used in accordancewith manufacturer’s instructions, may cause harmful interference to radiocommunications. However, there is no guarantee that interference willnot occur in a particular installation. If this equipment does cause harmfulinterference to radio or television reception, which can be determined byturning the equipment off and on, the user is encouraged to try to correctthe interference by one or more of the following measures: Reorient or relocate the receiving antenna. Increase the separation between the equipment and receiver. Connect the equipment to an outlet on a circuit different from that towhich the receiver is connected. Consult the dealer or an experienced radio/TV technician for help.Canadian Department of Communications StatementThis digital apparatus does not exceed the Class B limits for radionoise emissions from digital apparatus set out in the Radio InterferenceRegulations of the Canadian Department of Communications.This class B digital apparatus complies with Canadian ICES-003.The device may fall, causing serious personal injury or death. To preventinjury, this device must be securely attached to the floor/wall in accordancewith the installation instructions.iv
Safety information Before setting up the monitor, carefully read all the documentation thatcame with the package. To prevent fire or shock hazard, never expose the monitor to rain ormoisture. Never try to open the monitor cabinet. The dangerous high voltagesinside the monitor may result in serious physical injury. If the power supply is broken, do not try to fix it by yourself. Contact aqualified service technician or your retailer. Before using the product, make sure all cables are correctly connectedand the power cables are not damaged. If you detect any damage,contact your dealer immediately. Slots and openings on the back or top of the cabinet are provided forventilation. Do not block these slots. Never place this product near orover a radiator or heat source unless proper ventilation is provided. The monitor should be operated only from the type of power sourceindicated on the label. If you are not sure of the type of power supply toyour home, consult your dealer or local power company. Use the appropriate power plug which complies with your local powerstandard. Do not overload power strips and extension cords. Overloading canresult in fire or electric shock. Avoid dust, humidity, and temperature extremes. Do not place themonitor in any area where it may become wet. Place the monitor on astable surface. Unplug the unit during a lightning storm or if it will not be used for along period of time. This will protect the monitor from damage due topower surges. Never push objects or spill liquid of any kind into the slots on themonitor cabinet. To ensure satisfactory operation, use the monitor only with UL listedcomputers which have appropriate configured receptacles markedbetween 100 240V AC. The socket-outlet shall be installed near the equipment and shall beeasily accessible If you encounter technical problems with the monitor, contact aqualified service technician or your retailer. Provide an earthing connection before the mains plug is connected tothe mains. And, when disconnecting the earthing connection, be sureto disconnect after pulling out the mains plug from the mains.v
WARNINGUsage of other than specified head- or earphones can result in hearingloss due to excessive sound pressures.vi
Care & Cleaning Before you lift or reposition your monitor, it is better to disconnect thecables and power cord. Follow the correct lifting techniques whenpositioning the monitor. When lifting or carrying the monitor, grasp theedges of the monitor. Do not lift the display by the stand or the cord. Cleaning. Turn your monitor off and unplug the power cord. Clean themonitor surface with a lint-free, non-abrasive cloth. Stubborn stainsmay be removed with a cloth dampened with mild cleaner. Avoid using a cleaner containing alcohol or acetone. Use a cleanerintended for use with the LCD. Never spray cleaner directly on thescreen, as it may drip inside the monitor and cause an electric shock.The following symptoms are normal with the monitor: The screen may flicker during the initial use due to the nature of thefluorescent light. Turn off the Power Switch and turn it on again tomake sure that the flicker disappears. You may find slightly uneven brightness on the screen depending onthe desktop pattern you use. When the same image is displayed for hours, an afterimage of theprevious screen may remain after switching the image. The screen willrecover slowly or you can turn off the Power Switch for hours. When the screen becomes black or flashes, or cannot work anymore,contact your dealer or service center to fix it. Do not repair the screenby yourself!Conventions used in this guideWARNING: Information to prevent injury to yourself when trying tocomplete a task.CAUTION: Information to prevent damage to the componentswhen trying to complete a task.IMPORTANT: Information that you MUST follow to complete atask.NOTE: Tips and additional information to aid in completing a task.vii
Where to find more informationRefer to the following sources for additional information and for productand software updates.1.ASUS websitesThe ASUS websites worldwide provide updated information on ASUShardware and software products. Refer to http://www.asus.com2.Optional documentationYour product package may include optional documentation that mayhave been added by your dealer. These documents are not part ofthe standard package.Takeback ServicesASUS recycling and takeback programs come from our commitment to thehighest standards for protecting our environment. We believe in providingsolutions for our customers to be able to responsibly recycle our products,batteries and other components as well as the packaging materials.Please go to http://csr.asus.com/english/Takeback.htm for detail recyclinginformation in different region.viii
1.1Welcome!Thank you for purchasing the ASUS LCD monitor!The latest widescreen LCD monitor from ASUS provides a crisper,broader, and brighter display, plus a host of features that enhance yourviewing experience.With these features, you can enjoy the convenience and delightful visualexperience that the monitor brings you!1.2Package contentsCheck your package for the following items:LCD MonitorStand/BaseQuick Start GuideWarranty Card1 x USB Type-C Cable(optional)1x Power Cord1x HDMI Cable (optional)1x DP Cable (optional)Color calibration testing reportProArt welcome card If any of the above items is damaged or missing, contact your retailerimmediately.ASUS LCD Monitor PA279 Series1-1
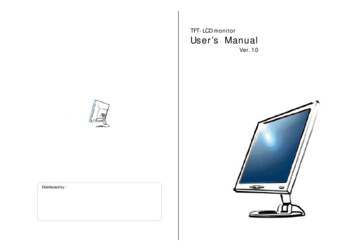
1.3Assembling the monitorTo assemble the monitor:1.Align the screw hole on the arm with the bundled screw on the base.Then insert the base into the arm.2.Fix the base to the arm by fastening the bundled screw.21*Base screw size: M6 x 17mm1-2Chapter 1: Product Introduction
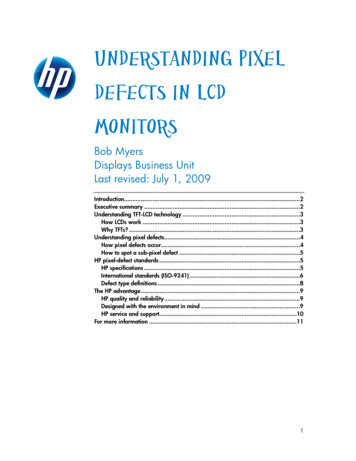
1.4Connect cables1.4.1Rear of the LCD monitor1110121.AC-IN Port2.Power Switch3.HDMI1 Port4.HDMI2 Port5.DP - in Port6.USB3.1 Type-C7.Earphone - out Port8.USB3.1 Type A9.USB3.1 Type A3456 7 8 910. USB3.1 Type A11. USB3.1 Type AThis monitor is Super-Speed USB 3.1 compatible (5 Gbps). The port offersMax. 65W power delivery with output voltage 5V/3A, 9V/3A, 12V/3A,15V/3A and 20V/3.25A. Connecting the USB Type-C cable can inputthe DisplayPort source, output power and enable the USB Type-A ports(downstream) on the monitor. Connecting the USB Type-C to Type-Acable only enables the USB Type-A ports (downstream) on the monitor.ASUS LCD Monitor PA279 Series1-3
1.5Monitor introduction1.5.1Using the Controls buttonUse the control button on the bottom of the monitor to adjust the imagesettings.61.4321Power button/power indicator: Turns the monitor on/off. The color definition of the power indicator is as the below table.2.StatusDescriptionWhiteONAmberStandby modeOFFOFF Menu button:Press this button to display the OSD menu when the OSD is off.Enters the OSD menu.Toggles the Key Lock function between on and off with a long press for 5seconds. Press this button to display the OSD menu when the OSD is off. Exit the OSD menu.3.Close Button:4.Input Select Button 1-45Use this hotkey to switch from HDMI-1, HDMI-2, DisplayPort, USBTpye-C and Enable/Disable Auto Source Detection input signal.Chapter 1: Product Introduction
5.Shortcut 1: Press this button to display the OSD menu when the OSD is off. Default: Brightness hotkey To change the hotkey function, go to the Shortcut Shortcut 1 menu. Press this button to display the OSD menu when the OSD is off. Default: Blue light filter hotkey To change the hotkey function, go to the Shortcut Shortcut 2 menu.6.Shortcut 2:ASUS LCD Monitor PA279 Series1-5
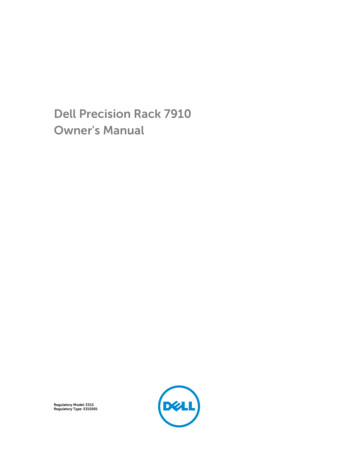
2.1Adjusting the monitor For optimal viewing, we recommend that you look at the full face of themonitor, then adjust the monitor to the angle that is most comfortablefor you. Hold the stand to prevent the monitor from falling when you change itsangle. You can adjust the monitor’s angle from 35 to -5 and it allows 45 swivel adjustment from either left or right.-5 35 45 -45 150mm90 ASUS LCD Monitor PA279 Series90 2-1
2.2Detaching the arm/stand (for VESA wallmount)The detachable stand of this monitor is specially designed for VESA wallmount.To detach the arm/stand2-21.Disconnect power and signal cables. Carefully put the monitorfacedown on its EPS packaging.2.Press the quick release button from rear cover.3.Detach the stand (arm and base) from the monitor. The VESA wall mount kit ( 100 x 100 mm) is purchased separately. Use only the UL Listed Wall Mount Bracket with minimum weight/load 28.8 kg(Screw size: M4 x 10 mm).Chapter 2: Setup
2.3Outline dimensionUnit: mmASUS LCD Monitor PA279 Series2-3
3.1OSD (On-Screen Display) menu3.1.1How to reconfigureProArtPresetProArtPresetASUS PA279CVStandard Mode DisplayPort 3840x2160@60HzStandard ModesRGB ModeRec. 709 ModeDCI-P3 ModeHDRDICOM ModeScenery ModeProArtPresetProArtPresetASUS PA279CVStandard Mode DisplayPort 3840x2160@60HzReading ModeDarkroom ModeRapid Rendering ModeUser Mode 1User Mode 21.Press any button (except the Power button) to display the OSD menu.2.Press the3.Press the buttons as indicated on the screen to navigate through thefunctions. Highlight the desired function and pressto activateit. If the function selected has a sub-menu, press and again tonavigate through the sub-menu functions. Highlight the desired submenu function and pressto activate it.4.Press and to change the settings of the selected function.5.To exit and save the OSD menu, pressorrepeatedly until theOSD menu disappears. To adjust other functions, repeat steps 1-4.Menu button to activate the OSD menu.ASUS LCD Monitor PA279 Series3-1
3.1.21.OSD Function IntroductionProArtPresetThis function contains twelve sub-functions that you can select foryour preference.ProArtPresetProArtPresetASUS PA279CVStandard Mode DisplayPort 3840x2160@60HzStandard ModesRGB ModeRec. 709 ModeDCI-P3 ModeHDRDICOM ModeScenery ModeProArtPresetProArtPresetASUS PA279CVStandard Mode DisplayPort 3840x2160@60HzReading ModeDarkroom ModeRapid Rendering ModeUser Mode 1User Mode 23-2 Standard Mode: Best choice for document editing. sRGB Mode: Compatible with sRGB color space, sRGB mode is the bestchoice for document editing. Rec. 709 Mode: Compatible with Rec. 709 color space. DCI-P3 Mode: Compatible with DCI-P3 color space. HDR: High Dynamic Range. Contains three HDR modes (PQ Optimized,PQ 350, and PQ Basic). DICOM Mode: Compatible with DICOM color space. Scenery Mode: Best choice for scenery photo display. Reading Mode: This is the best choice for book reading. Darkroom Mode: This is the best choice for a weak ambientlightenvironment.Chapter 3: General Instruction
Rapid Rendering Mode: Simulates display as high refresh rateperformance to generate different backlight frequencies.Rapid Rendering Mode can only be activated at 60Hz.To activate this function, you need to do the following: turn offAdaptive-Sync. Brightness and ASCR cannot be adjusted whenusing this function. User Mode 1: Allows you to make color adjustments in the AdvancedSetting. User Mode 2: Allows you to make color adjustments in the AdvancedSetting. ASCR is not user-configurable in standard, sRGB, Rec.709, DCI-P3, HDR,DICOM, and Rapid Rendening Mode. Gamma is not user-configurable in sRGB, DCI-P3, HDR, DICOM and sceneryMode. Color Temp., brightness, contrast, saturation, hue, ProArt Palette/Color and blacklevel are not user-configurable in sRGB mode.Color EngineStandardModesRGBModeRec. eDarkroomModeRapidRenderingModeUserMode 1UserMode 2Color Temp.VNAVV (*1)NAV SaturationVNAVVNAVVNAVVVVHueVNAVVNAVVNAVVVVProArt Palette/ColorVNAVVNAVVVVVNANABlack LevelVVVVNAVVVVVNANAGammaVNAVNANANANAVVVVVV: adjustableNA: function disabled(*1) 6500K & P3-Theater(default) only(*2) 6500K(default) & 9300K only2.Blue Light FilterAdjust the energy level of blue light emitted from LED backlight.ASUS LCD Monitor PA279 Series3-3
ProArtPresetBlue Light FilterASUS PA279CVStandard Mode DisplayPort 3840x2160@60HzLevel 0Level 1Level 2Level 3Level 4 Level 0: No change When Blue Light Filter is activated,the default settings of Standard Mode willbe automatically imported. Between Level 1 to Level 3, the Brightness function is user-configurable. Level 4 is optimized setting. It is compliance with TUV Low Blue LightCertification. The Brightness function is not user-configurable.Please refer to the following to alleviate eye strains:3-4 Users should take some time away from the display if working for long hours.It is advised to take short breaks (at least 5 mins) after around 1 hour ofcontinuous working at the computer. Taking short and frequent breaks is moreeffective than a single longer break. To minimize eye strain and dryness in your eyes, users should rest the eyeperiodically by focusing on objects that are far away. Eye exercises can help to reduces eye strain. Repeat these exercises often. Ifeye strain continues please consult a physician. Eye exercises: (1) Repeatinglook up and down (2) Slowly roll your eyes (3) Move your eyes diagonal. High energy blue light may lead to eye strain and AMD (Age-Related MacularDegeneration). Blue light Filter to reduce 70% (max.) harmful blue light toavoiding CVS (Computer Vision Syndrome).Chapter 3: General Instruction
3.ProArtPaletteProArtPresetProArtPaletteASUS PA279CVStandard Mode DisplayPort 3840x2160@60HzBrightnessContrastSaturationHueColor Temp.GammaBlack LevelProArtPresetProArtPaletteASUS PA279CVStandard Mode DisplayPort 3840x2160@60HzColorColor Reset Brightness: The adjusting range is from 0 to 100. Contrast: The adjusting range is from 0 to 100. Saturation: The adjusting range is from 0 to 100. Hue: Shifts the image color between green and purple Color Temp.: Contains five preset color modes 9300K, 6500K, 5500K,5000K and P3-Theater. Gamma: Contains five gamma modes including 1.8, 2.0, 2.2, 2.4, 2.6. Black Level: To adjust the initialized 1st signal level of darkest gray level. Color:* Six-axis Hue adjustment.* Six-axis Saturation adjustment.* Adjusts the gain levels for R, G, B.* Adjusts the black level offset values for R, G, B.ASUS LCD Monitor PA279 Series3-5
P3-Theater is only available when DCI-P3 Mode is selected. Color Reset:* Current mode color reset:Resets the color settings of current color mode to the factorydefault value.* All modes color reset:Resets the color settings of all color modes to the factory defaultvalue.4.ImageYou can adjust Sharpness, Trace Free, Aspect Control, Input Rangeand ASCR from this main function.ProArtPresetImageASUS PA279CVStandard Mode DisplayPort 3840x2160@60HzSharpnessTrace FreeAspect ControlInput RangeASCR Sharpness: Adjusts the picture sharpness. The adjusting range is from0 to 100. Trace Free: Speeds up the response time by Over Drive technology. Theadjusting range is from lower 0 to faster 100. Aspect Control: Adjusts the aspect ratio to Full, 4:3, 1:1, OverScan.4:3 is only available when input source is in 4:3 format. OverScanis only available for the HDMI input source.3-6 Input Range: Adjust input range to Auto, Full and Limited 16-235. ASCR: Select ON or OFF to enable or disable dynamic contrast ratiofunction.Chapter 3: General Instruction
5.SoundYou can adjust Volume, Mute and Source from this main function.ProArtPresetSoundASUS PA279CVStandard Mode DisplayPort 3840x2160@60HzVolumeMuteSource6. Volume : Adjusts the output volume level. Mute : Select audio mute ON or OFF. Source : decides the monitor sound comes from which source.PIP/PBP SettingThe PIP/PBP Setting allows you to open up sub-window(s) connectedfrom any video source.ProArtPresetPIP/PBP SettingASUS PA279CVStandard Mode DisplayPort 3840x2160@60HzPIP/PBP ModePIP/PBP SourcePIP Size PIP/PBP Mode: Select PIP, PBP or turn it off. PIP/PBP Source: Selects the video input source among, “HDMI-1”,“HDMI-2”, DisplayPort or USB Type-C. PIP Size: Adjust the PIP size to “Small”, “Middle”, or “Large”.ASUS LCD Monitor PA279 Series3-7
Main source and sub source are available as following table.Sub sourceMain Source7.HDMI-1HDMI-2DisplayPortUSB Type-CHDMI-1HDMI-2DisplayPortUSB Type-CNANAOKOKNANAOKOKOKOKNANAOKOKNANAInput SelectSelect the input source from HDMI-1, HDMI-2, DisplayPort, USBType-C. Enable/Disable Auto Source Detection input signal.ProArtPresetInput SelectASUS PA279CVStandard Mode DisplayPort 3840x2160@60HzHDMI-1HDMI-2DisplayPortUSB Type-CAuto Source Detection3-8Chapter 3: General Instruction
8.System SetupASUS PA279CVStandard Mode DisplayPort 3840x2160@60HzSystem SetupAdaptive-SyncUSB SetupPower SavingOSD SetupQuickFitDisplayPort StreamKey LockASUS PA279CVStandard Mode DisplayPort 3840x2160@60HzSystem SetupPower IndicatorONLanguageInformationAll Reset Adaptive-Sync: It can allow a Adaptive-Sync supported graphics sourceto dynamically adjust display refresh rate based on typical content framerates for power efficient, virtually stutter free and low-latency displayupdate.1. *For supported GPUs, minimum PC system and driverrequirements, please contact the GPU manufactures.2. To activate this function, you need to do the following: setDisplayPort Stream to DisplayPort 1.2, turn off Rapid RenderingMode. USB Setup: Configures the USB Type C port setting. The USBSetup parameter affects the output resolution only when the source isconnected to the USB Type C port. Due to the technological differencesbetween USB 2.0 and USB 3.1, THE maximum USB data throughput(bandwidth and other related characteristics) varies and thereforeinfluences the maximum output resolution.ASUS LCD Monitor PA279 Series3-9
* USB 3.1: The data transfer rate according to the 3.1 specificationin USB Type C port can only output the maximum resolution of4K2K 30Hz.* USB 2.0: The data transfer rate according to the 2.0 specificationin USB Type C port can output the maximum resolution of 4K2K60Hz.3-10 The data transfer rate will remain USB 3.1 when using USB Type C to Acable. The USB Setup setting does not affect the resolution if the source isconnected to the DisplayPort or HDMI port. Power Saving: Select normal level for power on hub during powersaving. Select Deep Level for power off hub during power saving. OSD Setup: Adjusts the OSD Timeout, DDC/CI, and Transparency of theOSD screen. QuickFit: Allows users to have a preview of the document or photolayout directly on screen without printing test copies.Chapter 3: General Instruction
*Ruler: This pattern presents physical ruler on top and left side. Youcan press theReturn button for longer than 3 seconds to switchthe measurements between metric and imperial.5101520253051015*Alignment: Facilitates designers and users to organize content andlayout on one page and achieve a consistent look and feel.Alignment Grid*A4: Provides users to view their documents in real size on thescreen.*B5: Provides users to view their documents in real size on thescreen.B5 DisplayPort Stream: Select DP 1.1 if your graphics card is notcompatible with DP 1.1. Key Lock: Disable all key functions. Pressing the down button for morethan five seconds to disable key lock function. Power Indicator: Turn the power LED indicator on/off. language: Select OSD language. The selections are: English, French,German, Spanish, Italian, Dutch, , Russian, Poland, Czech, Croacia,Hungary, Romania, Portugal, Turkey, Simplified Chinese, TraditionalChinese, Japanese, Korean, Persian, Thai, Indonesian. Information: Displays the monitor information. All Reset: Selects “Yes” to revert all settings to the factory default mode.ASUS LCD Monitor PA279 Series3-11
9.ShortcutSelecting this option allows you to set two shortcut keys. User canselect from Blue Light Filter, Brightness, Contrast, PIP/PBP Setting,Color Temp., Volume, sRGB Mode, Rec. 709 Mode, DICOM Mode,User Mode 1, User Mode 2 and set as shortcut key.ShortcutShortcut 1ASUS PA279CVStandard Mode DisplayPort 3840x2160@60HzBrightnessShortcut 23-12Chapter 3: General Instruction
3.2SpecificationsModelPA279CVPanel Size27”W (68.47cm)Max. Resolution3840x2160@60HzBrightness (Typ.)350cd/m2Intrinsic Contrast Ratio (Typ.)Viewing Angle (CR 10)Display Colors1000:1178 (V) /178 (H)1.07 BColor Saturation100% sRGBResponse Time5ms (Gray to Gray)Satellite Speaker2W x 2 stereoEarphone OutputYesSound from HDMIYesHDMI inputYesDisplayPort inputUSB PortPower ON Consumption(Max.)YesUpstream x1, Downstream x 4 32 W* Based on Energy Star 8.0 standardChassis ColorsBlackPower saving mode 0.5WPower off mode 0.5WTiltPhys. Dimension (WxHxD)Phys. Dimension without stand(WxHxD) (For VESA Wall Mount)Box Dimension (WxHxD)Net Weight (Esti.)Gross Weight (Esti.)Voltage RatingOperational temperatureASUS LCD Monitor PA279 Series-5 35 614 x 523.5 x 227.82 mm(highest)614 x 373.5 x 227.82 mm(lowest)614 x 369.9 x 59.5 mm680 x 161 x 516 mm8.6 kg(Net); 5.7 kg(without stand)11.2 kgAC 100 240V(Built-in)0 40 3-13
3.3Troubleshooting (FAQ)ProblemPower LED is not ONPossible Solution Press the button to check if the monitor is in theON mode. Check if the power cord is properly connected tothe monitor and the power outlet. Check Power Indicator function in main menu OSD.Select “ON” to turn on power LED.The power LED lights amber and Check if the monitor and the computer are in thethere is no screen imageON mode. Make sure the signal cable is properly connectedthe monitor and the computer. Inspect the signal cable and make sure none of thepins are bent. Connect the computer with another availablemonitor to check if the computer is properlyworking. Make sure Input Select setting is a validsignal. Enable Auto Source Detection to detect all inputport.Screen image is too light or dark Adjust the Contrast and Brightness settings viaOSD.Screen image bounces or a wave Make sure the signal cable is properly connected topattern is present in the imagethe monitor and the computer. Move electrical devices that may cause electricalinterference.3-14Screen image has color defects(white does not look white) Inspect the signal cable and make sure that none ofthe pins are bent. Perform Reset via OSD. Adjust the R/G/B color settings or select the ColorTemperature via OSD.No sound or sound is low Adjust the volume settings of both your monitor andcomputer. Make sure the computer sound card driver isproperly installed and activated.Chapter 3: General Instruction
3.4Supported Timing ListPC Timings List of HDMI / DP inputTiming ListDisplayPortHDMI1HDMI2640 x 480 @ 60HzVVV800 x 600 @ 56HzVVV800 x 600 @ 60HzVVV1024 x 768 @ 60HzVVV1280 x 720 @ 60HzVVV1280 x 960 @ 60HzVVV1280 x 1024 @ 60HzVVV1440 x 900 @ 60HzVVV1680 x 1050 @ 60HzVVV1920 x 1080 @ 60HzVVV1920 x 2160 @ 60HzVVV2560 x 1440 @ 60HzVVV3840 x 2160 @ 30HzVVV3840 x 2160 @ 60HzV (Default)V (Default)V (Default)Video timing
monitor surface with a lint-free, non-abrasive cloth. Stubborn stains may be removed with a cloth dampened with mild cleaner. Avoid using a cleaner containing alcohol or acetone. Use a cleaner intended for use with the LCD. Never spray cleaner directly on the screen, as it may drip inside the monitor and cause an electric shock.