Transcription
Dell Precision Rack 7910Owner's ManualRegulatory Model: E31SRegulatory Type: E31S001
Notes, cautions, and warningsNOTE: A NOTE indicates important information that helps you make better use of your computer.CAUTION: A CAUTION indicates either potential damage to hardware or loss of data and tells youhow to avoid the problem.WARNING: A WARNING indicates a potential for property damage, personal injury, or death.Copyright 2015 Dell Inc. All rights reserved. This product is protected by U.S. and international copyright andintellectual property laws. Dell and the Dell logo are trademarks of Dell Inc. in the United States and/or otherjurisdictions. All other marks and names mentioned herein may be trademarks of their respective companies.2015 - 09Rev. A03
Contents1 Working on Your Computer. 8Turning Off Your Computer.82 LCD panel features. 9Home screen. 10Setup menu. 10View menu.10Documentation matrix.113 Hard drive indicator codes.134 Installing and removing system components. 15Safety instructions. 15Before working inside your system.15After working inside your system.15Recommended tools.15System Overview. 16Front bezel (optional). 19Removing the front bezel.19Installing the front bezel. 20Removing the system cover. 20Installing the system cover.21Inside the system.22Cooling shroud. 24Removing the cooling shroud. 24Installing the cooling shroud. 24System memory. 25General memory module installation guidelines. 27Sample memory configurations. 27Removing memory modules.31Installing memory modules. 32Hard drives.35Removing a 2.5 inch hard-drive blank. 35Installing a 2.5 inch hard-drive blank. 36Removing Hard Drive.36Installing Hard Drive. 37Removing a hard drive from a hard-drive carrier. 38Installing a hard drive into a hard-drive carrier.383
Optical drive (optional). 39Removing the optical drive. 39Installing the optical drive.40Cooling fans. 40Removing a cooling fan.40Installing a cooling fan. 41Removing the cooling-fan assembly. 42Installing the cooling-fan assembly. 44Internal USB memory key (optional). 44Replacing the internal USB key.45PCIe card holder. 45Removing the PCIe card holder. 45Installing the PCIe card holder. 46Opening and closing the PCIe card holder latch.47Cable retention bracket. 48Removing the cable retention bracket.48Installing the cable retention bracket.49Expansion cards and expansion card risers. 50Expansion card installation guidelines. 50Removing an expansion card from expansion-card riser 2 or 3.50Installing an expansion card into the expansion-card riser 2 or 3. 52Removing an expansion card from the expansion-card riser 1. 53Installing an expansion card into the expansion-card riser 1.54Removing the riser 1 blank.55Installing the riser 1 blank.56Removing expansion-card risers. 56Installing expansion-card risers. 62GPU card installation guidelines.63Installing a GPU card.63Removing a GPU card.64SD vFlash media card (optional). 65Replacing an SD vFlash media card.65Internal dual SD module (optional). 66Removing an internal SD card. 66Installing an internal SD card. 67Removing the internal dual SD module . 67Installing the internal dual SD module . 69Integrated storage controller card. 70Removing the integrated storage controller card. 70Installing the integrated storage controller card. 71Network daughter card. 72Removing the network daughter card .724
Installing the network daughter card. 74Heat sink and processors.74Removing a processor. 74Installing a processor. 78Power supply units.80Hot spare feature. 80Removing the power supply unit blank.81Installing the power supply unit blank.81Removing an AC power supply unit. 81Installing an AC power supply unit.83System battery.84Replacing the system battery. 84Hard-drive backplane. 85Removing the hard-drive backplane .86Installing the hard-drive backplane . 87Control panel assembly.88Removing the control panel . 88Installing the control panel .90System board. 91Removing the system board. 91Installing the system board. 93Entering the system service tag by using System Setup. 94Restoring the Service Tag by using the Easy Restore feature. 94Updating the BIOS version.95Re-enabling the TPM for TXT users.955 Troubleshooting your system. 96Safety first—for you and your system. 96Troubleshooting system startup failure. 96Troubleshooting external connections.96Troubleshooting the video subsystem.96Troubleshooting a USB device. 96Troubleshooting iDRAC Direct (USB XML configuration).97Troubleshooting iDRAC Direct (laptop connection). 97Troubleshooting a serial I/O device. 98Troubleshooting a NIC. 98Troubleshooting a wet system. 98Troubleshooting a damaged system.99Troubleshooting the system battery. 99Troubleshooting power supply units. 100Power source problems. 100Power supply unit problems.1005
Troubleshooting cooling problems.101Troubleshooting cooling fans.101Troubleshooting system memory. 102Troubleshooting an internal USB key.103Troubleshooting an SD card.103Troubleshooting an optical drive. 104Troubleshooting a hard drive. 104Troubleshooting a storage controller. 105Troubleshooting expansion cards. 105Troubleshooting processors. 106Error Messages. 106Errors That Halt the System CompletelyErrors That Soft Halts the SystemError That donot Halt the system. 106System messages. 107Warning messages.107Diagnostic messages.107Alert messages.1076 Using system diagnostics.109Dell Embedded System Diagnostics. 109When to use the Embedded System Diagnostics.109Running the Embedded System Diagnostics from Boot Manager. 109Running the Embedded System Diagnostics from the Dell Lifecycle Controller. 109System diagnostics controls. 1107 Jumpers and connectors. 111System board jumper settings. 111System board connectors. 112Disabling a forgotten password. 1148 Specifications. 1159 System Setup. 121Boot Menu. 121Timing Key Sequences. 121Dell Diagnostics.122About system setup.122Entering System Setup. 122System Setup Main Menu.122System BIOS screen. 123System Information screen details. 123Memory Settings screen details.1246
Processor Settings screen details. 125SATA Settings screen details. 127Boot Settings screen details.129Integrated Devices screen details.130Serial Communication screen details. 132System Profile Settings screen details. 133System Security settings screen details.134Miscellaneous Settings screen details. 13610 NIC indicator codes. 13811 Power indicator codes. 13912 Contacting Dell. 141Contacting Dell.141Quick Resource Locator (QRL). 1417
Working on Your Computer1Turning Off Your ComputerCAUTION: To avoid losing data, save and close all open files and exit all open programs beforeyou turn off your computer.1.Shut down the operating system: In Windows 8:– Using a touch-enabled device:a.Swipe in from the right edge of the screen, opening the Charms menu and selectSettings.b.Select theand then select Shut down– Using a mouse: 8Point to upper-right corner of the screen and click Settings.b.Click theand select Shut down.In Windows 7:1.2.a.Click Start.2. Click Shut Down.Ensure that the computer and all attached devices are turned off. If your computer and attacheddevices did not automatically turn off when you shut down your operating system, press and holdthe power button for about 6 seconds to turn them off.
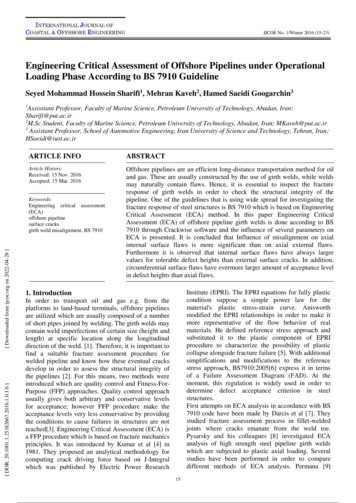
LCD panel features2NOTE: The LCD panel is present only on Precision Rack 7910The LCD panel of your system provides system information and status and error messages to indicate ifthe system is operating correctly or if the system needs attention. For more information on errormessages, see the Dell Event and Error Messages Reference Guide at dell.com/esmmanuals. The LCD backlight lights blue during normal operating conditions and lights amber to indicate anerror condition. The LCD backlight is off when the system is in standby mode and can be turned on by pressing eitherthe Select, Left, or Right button on the LCD panel. The LCD backlight remains off if LCD messaging is turned off through the iDRAC utility, the LCDpanel, or other tools.Figure 1. LCD panel featuresTable 1. LCD panel featuresItemButtonDescription1LeftMoves the cursor back in one-step increments.2SelectSelects the menu item highlighted by the cursor.3RightMoves the cursor forward in one-step increments.During message scrolling: Press and hold the button to increase scrolling speed. Release the button to stop.NOTE: The display will stop scrolling when the button isreleased. After 45 seconds of inactivity the display will startscrolling.9
Home screenThe Home screen displays user-configurable information about the system. This screen is displayedduring normal system operation when there are no status messages or errors. When the system is instandby mode, the LCD backlight turns off after five minutes of inactivity if there are no error messages.Press one of the three navigation buttons (Select, Left, or Right) to view the Home screen.To navigate to the Home screen from another menu, continue to select the up arrowiconuntil the Homeis displayed, and then select the Home icon.From the Home screen, press the Select button to enter the main menu.Setup menuNOTE: When you select an option in the Setup menu, you must confirm the option beforeproceeding to the next action.OptionDescriptioniDRACSelect DHCP or Static IP to configure the network mode. If Static IP is selected,the available fields are IP, Subnet (Sub), and Gateway (Gtw). Select Setup DNS toenable DNS and to view domain addresses. Two separate DNS entries are available.Set errorSelect SEL to view LCD error messages in a format that matches the IPMIdescription in the SEL. This is useful when trying to match an LCD message with anSEL entry.Select Simple to view LCD error messages in a simplified user-friendly description.For more information about error messages, see the Dell Event and Error MessagesReference Guide at Dell.com/openmanagemanuals OpenManage software.Set homeSelect the default information to be displayed on the Home screen. See View menufor the options and option items that can be set as the default on the Homescreen.View menuNOTE: When you select an option in the View menu, you must confirm the option beforeproceeding to the next action.OptionDescriptioniDRAC IPDisplays the IPv4 or IPv6 addresses for iDRAC8. Addresses include DNS (Primaryand Secondary), Gateway, IP, and Subnet (IPv6 does not have Subnet).MACDisplays the MAC addresses for iDRAC, iSCSI, or Network devices.NameDisplays the name of the Host, Model, or User String for the system.NumberDisplays the Asset tag or the Service tag for the system.10
OptionDescriptionPowerDisplays the power output of the system in BTU/hr or Watts. The display format canbe configured in the Set home submenu of the Setup menu.TemperatureDisplays the temperature of the system in Celsius or Fahrenheit. The display formatcan be configured in the Set home submenu of the Setup menu.OptionDescriptioniDRAC IPDisplays the IPv4 or IPv6 addresses for iDRAC8. Addresses include DNS(Primaryand Secondary), Gateway, IP, and Subnet (IPv6 does not have Subnet).MACDisplays the MAC addresses for iDRAC, iSCSI, or Network devices.NameDisplays the name of the Host, Model, or User String for the system.NumberDisplays the Asset tag or the Service tag for the system.PowerDisplays the power output of the system in BTU/hr or Watts. The display format canbe configured in the Set home submenu of the Setup menu.TemperatureDisplays the temperature of the system in Celsius or Fahrenheit. The display formatcan be configured in the Set home submenu of the Setup menu.Documentation matrixTable 2. Documentation matrixTo.Refer to.Install your system into a rackRack documentation included with your racksolutionSet up your system and know the system technicalspecificationsGetting Started With Your System that shipped withyour system or see dell.com/poweredgemanualsInstall the operating systemOperating system documentation at dell.com/operatingsystemmanualsGet an overview of the Dell Systems ManagementofferingsDell OpenManage Systems Management OverviewGuide at dell.com/openmanagemanualsConfigure and log in to iDRAC, set up managedand management system, know the iDRACfeatures and troubleshoot using iDRACIntegrated Dell Remote Access Controller User'sGuide at dell.com/esmmanualsKnow about the RACADM subcommands andsupported RACADM interfacesRACADM Command Line Reference Guide foriDRAC and CMC at dell.com/esmmanualsLaunch, enable and disable Lifecycle Controller,know the features, use and troubleshoot LifecycleControllerDell Lifecycle Controller User’s Guide at dell.com/esmmanualsUse Lifecycle Controller Remote ServicesDell Lifecycle Controller Remote Services QuickStart Guide at dell.com/esmmanuals11
To.Refer to.Set up, use, and troubleshoot OpenManage ServerAdministratorDell OpenManage Server Administrator User’sGuide at dell.com/openmanagemanualsInstall, use and troubleshoot OpenManageEssentialsDell OpenManage Essentials User’s Guide atdell.com/openmanagemanualsKnow the features of the storage controller cards,deploy the cards, and manage the storagesubsys
Contacting Dell . The LCD backlight remains off if LCD messaging is turned off through the iDRAC utility, the LCD panel, or other tools. Figure 1. LCD panel features Table 1. LCD panel features . Number Displays the Asset tag