Transcription
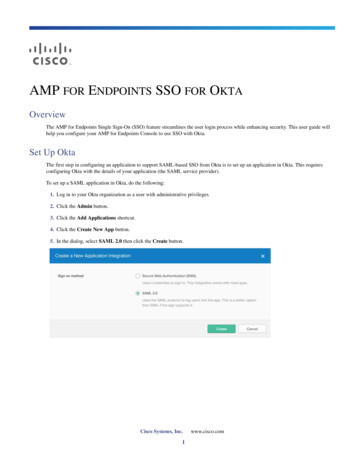
AMP FOR ENDPOINTS SSO FOR OKTAOverviewThe AMP for Endpoints Single Sign-On (SSO) feature streamlines the user login process while enhancing security. This user guide willhelp you configure your AMP for Endpoints Console to use SSO with Okta.Set Up OktaThe first step in configuring an application to support SAML-based SSO from Okta is to set up an application in Okta. This requiresconfiguring Okta with the details of your application (the SAML service provider).To set up a SAML application in Okta, do the following:1. Log in to your Okta organization as a user with administrative privileges.2. Click the Admin button.3. Click the Add Applications shortcut.4. Click the Create New App button.5. In the dialog, select SAML 2.0 then click the Create button.Cisco Systems, Inc.1www.cisco.com
AMP for Endpoints SSO for OktaSet Up Okta6. In General Settings under App name enter a name like “AMP for Endpoints” or whatever you want to assign as the name then clickNext.7. In Configure SAML, do the following:2
AMP for Endpoints SSO for OktaSet Up Oktaa. Paste the following URL into the Single sign on URL and Audience URI (SP Entity ID) rvice providerb. Click Next8. Under Feedback enter the appropriate information, then click Finish.9. You will now see the Sign On section of your newly created application. Click the Identity Provider metadata link to download themetadata file.You will need to upload this file to the AMP for Endpoints Console later3
AMP for Endpoints SSO for OktaConfigure SSO on the AMP for Endpoints Console10. Right-click on the People section of the application and select Open Link In New Tab (so you can come back to the Sign On sectionlater). In the new tab, click on Assign Application.11. A dialog named Assign Application will open. Type your username into the search box. Select the checkbox next to your username,then click Next. Please note the email address should be a valid email that has an AMP for Endpoints account or is mapped correctlyto an AMP for Endpoints account email address. Once users are assigned, save and click Done.You are now ready to configure SAML in your application. The information in the tab you opened in step #10 contains the information thatyou’ll need to configure SAML in your application. On AMP for Endpoints console, enter the SSO metadata URL or upload the metadatafile, save and then enable SAML Authentication.Configure SSO on the AMP for Endpoints ConsoleTo enable SSO for your business, do the following:1. Log in to your administrator account2. Go to Accounts Business3. Click Configure Single Sign-On4
AMP for Endpoints SSO for OktaConfigure SSO on the AMP for Endpoints Console4. Under Identity Provider Settings on the Single Sign-On page, upload the metadata file you previously downloaded from Okta.5. Click Save SAML Configuration6. Click Test to verify the connection to the service provider. If connection is successful, a confirmation message will appear on the SSOsetup page. If the test fails, verify that your settings are correct. If it continues to fail, contact Support.7. Click Enable SAML Authentication to complete setup. Once SSO is enabled, you can view the settings on the SSO page.5
5 AMP for Endpoints SSO for Okta Configure SSO on the AMP for Endpoints Console 4. Under Identity Provider Settings on the Single Sign-On page, upload the metadata file you previously downloaded from Okta. 5. Click Save SAML Configuration 6. Click Test to verify the connection to the service provider. If connectio n is successful, a confirmation message will appear on the SSO