Transcription
DEPLOYMENT GUIDESAML 2.0 SSO Deployment with OktaSimplify Network Authentication by Using Thunder ADCas an Authentication Proxy
Deployment Guide SAML 2.0 SSO Deployment with OktaTable of ContentsOverview.3The A10 Networks SAML 2.0 SSO Deployment with Okta Solution .3Accessing A10 Thunder ADC .4Configuring the Thunder ADC Device .4Logging into the CLI.4Logging onto the GUI .5Okta Initial Setup.5Okta Sign On Configuration .8A10 Thunder ADC AAM Configuration for Okta SAML 2.0.10Concept of Authentication and Authorization .12A10 SAML Commands .12A10 SAML Session Sample.13Summary .13About A10 Networks .14DisclaimerThis document does not create any express or implied warranty about A10 Networks or about its products or services, including but not limited tofitness for a particular use and noninfringement. A10 Networks has made reasonable efforts to verify that the information contained herein is accurate,but A10 Networks assumes no responsibility for its use. All information is provided “as-is.” The product specifications and features described in thispublication are based on the latest information available; however, specifications are subject to change without notice, and certain features may notbe available upon initial product release. Contact A10 Networks for current information regarding its products or services. A10 Networks’ products andservices are subject to A10 Networks’ standard terms and conditions.2
Deployment Guide SAML 2.0 SSO Deployment with OktaOverviewThe purpose of this deployment guide is to provide detailed instructions on how to deploy SAML 2.0Authentication using the A10 Networks Thunder ADC line of Application Delivery Controllers and ApplicationAccess Management (AAM) solution integrated with Okta cloud authentication. The Okta solution is a singlesign-on (SSO) solution that integrates with A10 and provides access to backend applications.Deployment PrerequisitesTo deploy the SAML solution with OKTA on A10 Thunder ADC, the following are required: ACOS 4.0.1 SP9 or higher Thunder ADC supported on hardware, virtual or cloud-based platforms (Azure or AWS) Okta SAML subscription (administration credential required)The A10 Networks SAML 2.0 SSO Deployment with Okta SolutionSecurity Assertion Markup Language (SAML) is an XML-based open standard data format for exchangingauthentication and authorization data between an Identity Provider (IdP) and a service provider. SAML is aproduct of the OASIS Security Services Technical Committee. With the introduction of SAML support in A10Networks Advanced Core Operating System (ACOS ) version 4.0, Thunder ADC can act as a service provider in asecurity topology and delegate authentication and authorization to IdPs such as Okta. In multi-domain servicesusing the same Identity Provider, SAML offers easy integration and seamless federation with an IdP, even withclients that originate from different service domains.Service Provider thenticateAssertion (Token)ClientIdentity Provider(IdP)Figure 1: A10 SAML topologyWith SAML in ACOS 4.0, the AAM feature plays an important role in protecting resources and distributingaccess requests. Before access is granted, clients need to provide authentication credentials and meet AAMauthorization policies. A security administrator configures an authentication template and an authorizationpolicy in order to perform authentication control. Figure 2 shows an SAML authentication process flow.3
Deployment Guide SAML 2.0 SSO Deployment with Okta12 HTTP Server Resp.1 HTTP Req.3 401 Challenge2 Check AAA Policy.Do authenticationbased on policy4 Username:Password11 Server Resp.8 Redirect User Cookie9 HTTP Req. User Cookie10 Original HTTP Req.7 AuthorizationCheck6 Auth Result5 Auth Req.Figure 2: A10 SAML authentication processAccessing A10 Thunder ADCConfiguring the Thunder ADC DeviceThe Thunder ADC device provides the following management interfaces: Command Line Interface (CLI) – a text-based interface in which commands are entered on a commandline. The CLI is directly accessible through the serial console or over the network using either of thefollowing protocols:- Secure protocol – Secure Shell (SSH) version 2- Unsecure protocol – Telnet (if enabled) Graphical User Interface (GUI) – web-based interface in which you click to access configuration ormanagement pages and type or select values to configure or manage the device. You can access the GUIusing Hypertext Transfer Protocol over Secure Socket Layer (HTTPS).Note: HTTP requests are redirected to HTTPS by default on the Thunder ADC device.By default, Telnet access is disabled on all interfaces, including the management interface. SSH, HTTP andHTTPS are enabled by default on the management interface only and disabled by default on all data interfaces.Logging into the CLIThunder ADC provides advanced features for securing management access to the SSH client device. Thissection assumes that only the basic security settings are in place.To log into the CLI using SSH: On a PC connected to a network that has access to a dedicated management interface, open an SSHconnection to the IP address of the management interface.Note: The default IP address is 172.31.31.31 Generally, if this is the first time the SSH client has accessed the Thunder ADC device, the SSH clientdisplays a security warning. Read the warning carefully, then acknowledge the warning to complete theconnection. Click on Enter. At the “login as:” prompt, enter the username “admin.”At the “Password:” prompt, enter the admin password. The default password is “a10.” If the admin usernameand password are valid, the command prompt for the User EXEC level of the CLI appears as ACOS . The User EXEC level allows you to enter a few basic commands, including some show commands as wellas ping and traceroute. To access the Privileged EXEC level of the CLI and allow access to all configuration levels, enter the“enable” command. At the “Password:” prompt, enter the enable password as blank; then press Enter.Note: This is not the same as the admin password, although it is possible to configure the same value for bothpasswords.4
Deployment Guide SAML 2.0 SSO Deployment with Okta If the enable password is correct, the command prompt for the Privileged EXEC level of the CLI appears as“Thunder#.” To access the global configuration level, enter the “config” command. The following command promptappears as “Thunder(config)#.”Note: See the Thunder Series Configuration Guide, or the Thunder Series System Configuration and AdministrationGuide and Application Delivery and Server Load Balancing Guide, for additional features and functions of the ThunderADC device.Logging onto the GUITo log onto the GUI: In your web browser, enter the HTTPS request with the management IP address of the Thunder ADCdevice (https://management-IP-address/). A logon dialog is displayed.Note: Dialog name and display image are different depending on the browser and browser version you are using. Inthis example, the Firefox browser is being used.Figure 3: ACOS GUI login dialogSince there is no root certificate for Thunder ADC’s internal Certificate Authority(CA), which issues web servercertificates for a management site on access PCs, warnings or alert messages are shown upon first accessingthe device. When the security exception process is done, the login prompt shown in Figure 3 will appear.Note: For the default admin credentials, the username is “admin” and the password is “a10.” Enter your admin username and password and click OK. The Summary page will appear showing at-a-glance information for your Thunder ADC device. Youcan access this page again at any time while using the GUI, by navigating to Monitor Overview Summary.Okta Initial SetupOne of the requirements for Okta SAML authentication is that the administrator must have access to the OktaManagement Console.Figure 4: Okta GUI login dialog5
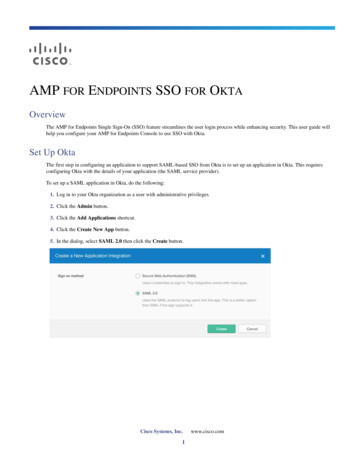
Deployment Guide SAML 2.0 SSO Deployment with OktaLogin with the proper credentials and navigate through the interface Okta under Applications AddApplication Create New App.Under the general settings, enter the following items:Application label: “A10 Networks”Force Authentication: “Unselected”Post back URL: http://192.168.2.100/api/SsoAuthLoginResponseNote: Post back URL will match the entity ID and the Assertion Consumer Services (ACS) URL of the A10 Thunder ADCdevice.Name ID Format: This option is selectable and the default is “email address”Recipient: Same as Post back URLAudience restriction: http://192.168.2.100 (equal to the entity ID)authnContectClassRef: Select “PasswordProtectedTransport”Response: Select “signed”Assertion: Select “signed”Request: Select “compressed”Figure 4: Okta new application settings6
Deployment Guide SAML 2.0 SSO Deployment with OktaFigure 5: Okta additional application settingsDestination: http://192.168.2.100/api/SsoAuthLoginResponseNote: Post back URL will match the entity ID and ACS URL of the Thunder ADC device.Default relay state: Can be any or blankNote: This is used in IdP initiated SSO post; if no value is set, Relay State is sent.Attribute statements, Group Name and Group Filter will be blank. Application visibility will be unselected. Saveconfiguration and the application will be added to the application list. Once this is configured, the applicationthat was just created should be “active.”VPN Notification: VPN Required Notification: DisabledFigure 6: Okta VPN notification optionApp Embed Link: No modification requiredFigure 7: App embed link7
Deployment Guide SAML 2.0 SSO Deployment with OktaOkta Sign On ConfigurationThis next step is to configure the Sign On section of Okta. To navigate to this section, go to Applications Select the Application Sign On.In the Sign On section, download the “Identity Provider metadata” file. Save this file for future configuration. Foradditional installation and deployment steps, view setup instructions.Figure 8: Okta sign on methods settingsNote: Once the metadata is downloaded, the metadata file has to be imported to the Thunder ADC device. Thisuploads the file.Figure 9: Okta user listNote: Users can be imported using a .csv file. Make sure you use the correct import template for users to be importedcorrectly in the Okta portal. The instructions on how to import users are available in the “import” tab of the Oktamanagement console.8
Deployment Guide SAML 2.0 SSO Deployment with OktaNavigate to the Sign On Policy and create a policy rule as follows:Rule name: SignonUnder Conditions, define as follows:People: User assigned this appLocation: AnywhereFigure 10: Okta app sign on ruleFor access policy, you can define either an Allowed or Denied access. In this case, we will select Allowed toallow users to access the A10 application.Note: “Prompt for re-authentication” is an option to request within a specific timeframe. This feature defaults to 60minutes.9
Deployment Guide SAML 2.0 SSO Deployment with OktaFigure 11: Okta access permissionsA10 Thunder ADC AAM Configuration for Okta SAML 2.0Note: The sample configuration included in this section is based on cloud-based solutions in AWS or Azuredeployments. Note that some settings will need to be modified depending on your environment. AAM Authentication SAML configuration (service provider)- Service provider name must be defined (i.e., Okta-sp).- Assertion-consuming-service location must be defined with this parameter “/api/SsoAuthLoginResponse” and you also need to create a unique index number.- Binding post- Entity-ID and Service-URL are identical and both configurations are required in ACOS. AAM Authentication SAML configuration (Identity Provider)- Identity Provider name must be defined (i.e., Okta-idp).- Metadata “Okta mdata” must be uploaded. Refer to section on how to download the metadatainformation. AAM Authentication template- Authentication template type must be defined as “SAML.”- SAML-SP name must be defined in this section (i.e., “okta-sp”).- SAML-IDP name must be defined in this section (i.e., “okta-idp”). AAM Authorization Policy- Create an SAML Authorization Policy- Define AAA policy with Allow or Deny- Add the authentication template AAA policy- Bind the AAA Policy in the VIP10
Deployment Guide SAML 2.0 SSO Deployment with Oktamulti-config enableABCDEF!web-service axapi-timeout-policy idle 60web-service port 8081web-service secure-port 8443!interface ethernet 1ip address dhcp!ip nat pool aws-nat1 192.58.100.100 192.58.100.100 netmask /24!health monitor aws-tcp-probemethod tcp port 80!aam authentication saml service-provider okta-spassertion-consuming-service index 0 location /api/SsoAuthLoginResponse binding postentity-id http://192.168.2.100service-url http://192.168.2.100!aam authentication saml identity-provider okta-idpmetadata okta mdata!slb server aws-www 192.0.2.10health-check aws-tcp-probeport 80 tcp!aam authentication template okta1type samlsaml-sp okta-spsaml-idp okta-idp!aam authorization policy saml test!aam aaa-policy okta-policyaaa-rule 1action allowauthentication-template okta1!slb service-group aws-www tcphealth-check aws-tcp-probemember aws-www 80!slb virtual-server aws-www use-if-ip ethernet 1port 80 httpname aws-www 80 tcpsource-nat pool aws-nat1service-group aws-wwwaaa-policy okta-policy!end!Current config commit point for partition 0 is 0 & config mode isclassical-modevThunder#Note: The Entity-ID and Service URL will have the same IP address as the VIP address. The sample configuration isbased on AWS EC2, so the Service URL and Entity-ID will be based on the AWS Dynamic Host Configuration Protocol(DHCP) address (e.g., 192.168.2.100).11
Deployment Guide SAML 2.0 SSO Deployment with OktaConcept of Authentication and AuthorizationThe A10 AAM solution supports authentication and authorization using SAML. With SAML authentication, SAMLauthorization is configured as part of the AAA policy that is bound within the vPort (in other words, server loadbalancing virtual server configuration).The first step is to create AAA rule/s that can provide a criteria for what can be accessed. Define “allow” or“deny” access, deploy an authentication template and provide an authorization policy. Finally, once the policyis configured, bind it within the vPort for the AAA policy to take effect. The sample configuration in Figure12shows this in more detail.vportAAA PolicyAAA ruleCriteria (URL access-list)AAA ruleAction (Allow Deny)AAA ruleAuthentication e CriteriaAND / ORAttribute CriteriaAND / ORAttribute CriteriaAND / ORFigure 12: A10 AAA policy configurationEach AAA policy will include the following: Criteria: User can configure access list, URI or domain name as criteria to associate client requests to thisrule. Action: Action to perform (allow or deny) after client request is associated to this rule. Authentication template: This applies if client request is allowed access via the AAA rule. Theauthentication template per forms authentication for the user of the request. Authorization policy: If client authentication is successful, ACOS can also perform authorization to checkwhether the authenticated user has permission to access the requested resource.A10 SAML CommandsHere’s a list of the most common commands specific to SAML configuration: show aam authentication saml idp- command: Shows the SAML Identity Provider settings show aam authentication saml sp- command: Shows the SAML service provider settings show aam authentication saml sp-session- command: Show the SAML service provider sessions show aam authentication statistic- command: Shows all AAM statistics including Kerberos, RADIUS, NTLMRelay, SAML and others. This command provides the detailed statistics of an SAML session.12
Deployment Guide SAML 2.0 SSO Deployment with OktaA10 SAML Session SampleFigure 13 shows sample CLI outputs for an SAML authentication session and a service provider session.Figure 13: A10 SAML authentication sessionFigure 14 shows a sample of AAM authentication statistics. Note that when you issue this command on theACOS CLI, other AAM statistics will come out, including Kerberos, NTLM relay, OCSP and others. The SAMLstatistic is just a portion of the CLI output.Figure 14: A10 authentication statisticsSummaryIn summary, the configuration steps described in this deployment guide show how to set up Thunder ADCAAM integration with the Okta cloud SAML solution. With the introduction of SAML support in ACOS version4.0, this integrated solution provides the following benefits: Minimizes the overwhelming nature of user interactions with traditional AAA servers Simplifies network authentication by using the A10 device as an authentication proxy Offloads web and authentication servers Enables Thunder ADC devices to handle the sending and initial processing of authentication challenges,forwarding credentials to SAML IdP and granting accessBy using A10 Thunder ADC, significant benefits are achieved for all authentication deployments.For more information about A10 Thunder ADC products, please refer to the following hunder-application delivery -delivery-controllers13
Deployment Guide SAML 2.0 SSO Deployment with OktaAbout A10 NetworksA10 Networks is a leader in application networking, providing a range of high-performance applicationnetworking solutions that help organizations ensure that their data center applications and networksremain highly available, accelerated and secure. Founded in 2004, A10 Networks is based in San Jose,California, and serves customers globally with offices worldwide. For more information, visit:www.a10networks.comCorporate HeadquartersA10 Networks, Inc3 West Plumeria Ave.San Jose, CA 95134 USATel: 1 408 325-8668Fax: 1 408 325-8666www.a10networks.comPart Number: A10-DG-16155-EN-01Dec 2015Worldwide OfficesNorth Americasales@a10networks.comEuropeemea sales@a10networks.comSouth Americalatam nachina sales@a10networks.comHong ks.comKoreakorea@a10networks.comSouth AsiaSouthAsia@a10networks.comAustralia/New Zealandanz sales@a10networks.com 2015 A10 Networks, Inc. All rights reserved. A10 Networks, the A10 Networks logo, ACOS, Thunder and SSL Insight are trademarks orregistered trademarks of A10 Networks, Inc. in the United States and other countries. All other trademarks are property of their respectiveowners. A10 Networks assumes no responsibility for any inaccuracies in this document. A10 Networks reserves the right to change, modify,transfer, or otherwise revise this publication without notice. For the full list of trademarks, visit: www.a10networks.com/a10-trademarks.To learn more about the A10 Thunder Application ServiceGateways and how it can enhance your business, contactA10 Networks at: www.a10networks.com/contact or callto talk to an A10 sales representative.14
Access Management (AAM) solution integrated with Okta cloud authentication. The Okta solution is a single sign-on (SSO) solution that integrates with A10 and provides access to backend applications. Deployment Prerequisites To deploy the SAML solution with OKTA on A10 Thunder ADC, the following are required: ACOS 4.0.1 SP9 or higher