Transcription
CHC LT500THandheld GNSS ReceiverUser ManualThis manual is for use with CHC LT500T receivers sold by iGageMapping Corporation.Receivers purchased from other sources (other dealers or thefactory) with similar model numbers/names may not matchdevices provisioned by iGage.18 September 2016LT500T UM RevD 010.docx
CopyrightCopyright 2016 iGage Mapping Corporation.All rights reserved.iGage and ‘iGage Mapping Corporation’ are Trademarks of iGageMapping Corporation of Salt Lake City Utah, USA.CHC is a Trademark of Shanghai Huace Satellite NavigationTechnology Limited of Shanghai, China.All product and brand names mentioned in this publication aretrademarks of their respective holders.GNSS Safety WarningThe LT500T GNSS receivers tracks and utilizes signals from manyspace based satellite navigation systems:The Global Positioning System (GPS) is operated by the USGovernment which is solely responsible for the accuracy andmaintenance of the GPS network. Accuracy can also be affectedby bad satellite geometry and obstructions including buildingsand tree canopy.The GLONASS (GLObal NAvigation Satellite System), is a satellitenavigation system operated by the Russian Aerospace DefenseForces.The Galileo System is the global navigation satellite system(GNSS) that is operated by the European Union (EU) andEuropean Space Agency (ESA)BeiDou Navigation Satellite System (BDS) (also known asCOMPASS or BeiDou-2) is a system operated by CNSA (ChinaNational Space Administration.)SBAS (Satellite Based Augmentation Services) including WAAS(USA), MSAS (Japan), EGNOS (Europe), QZSS (Asia), and GAGAN(India) may also be utilized by the X91 / X900 for carrier-phasecorrections, in addition to differential corrections.Neither iGage Mapping Corporation nor CHC are responsible fornor warrant the viability of the space segment portion of theGNSS system. The user is cautioned that they alone areresponsible for determining the suitability of the receivers totheir task at hand.2iGage LT500T User Manual
Any of the GNSS system components can fail at any time. Beprepared for down time and failures.FCC ComplianceFCC Notice: CHC LT500T receivers comply with the limits for aClass B digital device, pursuant to the Part 15 of the FCC ruleswhen it is used in the Portable Mode.Operation is subject to the following two conditions:1.2.This device may not cause harmful interferencethis device must accept any interference received,including interference that may cause undesiredoperationiGage LT500T User Manual3
Table of ContentsCHC LT500T Handheld GNSS Receiver User Manual . 1Copyright . 2GNSS Safety Warning . 2FCC Compliance. 3Table of Contents . 4Introduction. 5SurvCE Manual . 5The LT500T Device . 7LT500T Battery . 11Battery Warnings . 11Checking the Battery Status . 11Charging the Battery . 12Initial Settings . 14Memory ‘Spaces’ on the LT500T . 17Connecting the LT500T to Wi-Fi . 19Connecting the LT500T to your Computer with a USB Cable . 22Difficulty Starting Windows Mobile Device Center . 24Connecting to a Cellular Network . 25Connecting Software to the Internal GPS . 29Configuring SurvCE . 30Special Note on Reference Frames . 35Connecting to a Network Correction Source . 37Using the Internal Compass and Plummet Laser . 41Warranty . 42Exclusions . 43RMA . 444iGage LT500T User Manual
IntroductionThank you very much for choosing to purchase and use a LT500THandheld GNSS receiver!This guide is designed to help you familiarize yourself with yournew equipment and successfully use it in the field.If you have questions or suggestions, don’t hesitate to contact us:iGage Mapping Corporation1545 South 1100 East Suite 1Salt Lake City UT 84105 USA 1-801-412-0011email support@igage.comYour input is extremely valuable to us and we will listen to yoursuggestions to improve our products and support.Support is also available directly from the CHC Factory. You canreach factory support by email:support@chcnav.com.Software updates and news are available from:www.x9gps.comClick on ‘Tools’ then the ‘LT500T’ link for firmware, FAQs andother information.SurvCE ManualAn electronic copy of the manual for SurvCE can be found on theCarlson website:www.survce.comClick on ‘Software Download’, then choose the version number ofthe software loaded on your data collector, then click on ‘ShowFiles’. A link to the latest manual version will be shown:iGage LT500T User Manual5
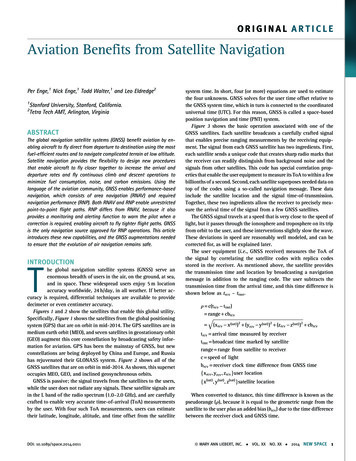
Figure 1 Downloading the latest SurvCE Manual as aPDF file.There are a variety of excellent SurvCE training videos available atthe Carlson Software website:www.carlsonsw.comClick on the ‘Videos’ link on the right side of the page.6iGage LT500T User Manual
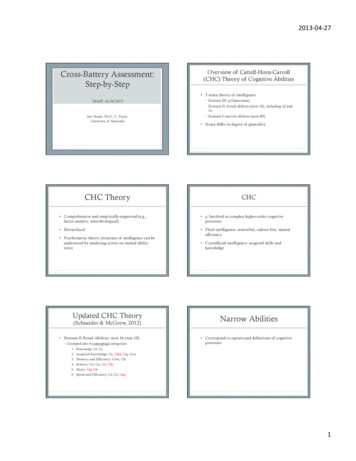
The LT500T DeviceFront ViewButtons and IndicatorsPower Button: ON: Press and hold the power button for 2seconds to turn ON the LT500T. The device will take at least 45seconds to fully boot, and the screen will go dark for a fewseconds during the process.STANDBY: When the device is ON, you can click (short press) thepower button to put the LT500T in a partial standby state. Whenin standby the screen is turned off and both the 3G and Wi-Fimodems are disconnected and powered off. When in standby thetouch screen is active and the GPS receiver continues to run. Toexit the standby mode, click the ON/OFF button.iGage LT500T User Manual7
OFF: To turn off the LT500T, push and hold the power button for4 seconds. The power select button will be displayed:Click on the center OFF button to fully power down the LT500T.We recommend that you remove the battery pack if the devicewill be left for more than a few days or when you are traveling. Ifthe device is placed in a padded case and transported in a‘bumpy’ environment, there is a chance that the power key willbe depressed and the unit will turn on and completely run downthe battery during transport.Windows Button: Click this button to display the ‘Windows’ menu(this is the same action as clicking the start button:In the lower left corner.Reset Key: Use the stylus or a pen to press this recessed buttonand force-reboot Windows. Existing closed files will not bedeleted, however open files will not be closed and there is a riskof data loss for active jobs.OK Key: The OK key is equivalent to ‘Enter’. In Carlson SurvCE, itwill store a shot when in the ‘Store’ menu.Left and Right Function Keys: activate the on screen function. Maybe overridden in the settings menu.Power Indicator (Red): Turns on when the device is ON.Satellite LED (Blue): Turns on when satellites are tracked. May notwork in all applications.Wi-Fi Indicator (Yellow): Turns on when the device is connectedto Wi-Fi.8iGage LT500T User Manual
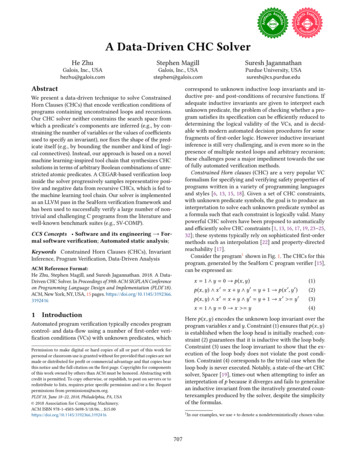
Back ViewiGage LT500T User Manual9
Bottom View10iGage LT500T User Manual
LT500T BatteryBattery WarningsThe battery is composed of Lithium-Ion type cells.WARNING - Do not damage the rechargeable Lithium-ion battery.A damaged battery can cause an explosion or fire, and can resultin personal injury and property damage.To prevent injury or damage: Do not use or charge the battery if it appears to bediscolored, warped, or leaking battery fluid.Do not expose the battery to fire, high temperature, ordirect sunlight.Do not immerse the battery in water.Do not store the battery inside a vehicle during hotweather.Do not drop or puncture the battery.Do not open the battery or short-circuit its contacts.Do not charge the batteries in aftermarket chargers,use only the supplied charger module.WARNING - Avoid contact with the rechargeableLithium-ion battery if it appears to be leaking. Thebattery fluid is extremely corrosive, and contact with itwill result in personal injury and/or property damage.If battery fluid gets into your eyes, immediately rinseyour eyes with clean water and seek medical attention.Do not rub your eyes!If battery fluid gets onto your skin or clothing,immediately use clean water to wash off the batteryfluid.Checking the Battery StatusBecause of transportation regulations, shipped batteries suppliedwith the TM500T will arrive at 30% charge or less.iGage LT500T User Manual11
You can check the battery status by removing the battery packand pressing on the status button:The relative charge of the battery will be shown by the four greenLEDs: 25% Charge1 Green LED 50% Charge2 Green LED 75% Charge3 Green LED 95% Charge4 Green LED100% Charge1 Green LED BLINKSBattery status can also be determined by the battery icon at thetop of the main menu screen:Charging the BatteryUse the supplied wall transformer to charge the battery byplugging it into the charging hole on the bottom of the cell pack:The Red or Green LED above the status button will light whenpower is applied (battery pack is plugged in.)12iGage LT500T User Manual
Red indicates chargingGreen indicates ‘fully charged’The battery when fully charged will provide up to 12-hours of use(depending on backlight settings.) It typically will charge to 90%of full charge in 4-hours if the battery is removed from thedevice.The cells can be charged when inserted into the LT500T device,with the device OFF. If you attempt to charge the battery whilethe device is ON, the device will be powered by the charger andthe battery will charge very slowly.iGage LT500T User Manual13
Initial SettingsWe recommend the following settings be made to the LT500T forinitial setup (for example, after a Factory Clear.)1. Configure the ‘HomeScreen’. From the mainmenu, click on the ‘Start’button (lower left):2. Click on ‘Settings’:3. Click on ‘Home’:4. Select the ‘Items’ tab:5. The “Home: Items” menu isshown:14Uncheck ‘Home timeout’,check ‘Date, Wireless,Carlson SurvCE (optionally ifyou have it) and LTSet’.6. Finally click on ‘OK’ to returnto ‘Settings’.7. Click on ‘Sounds andNotifications’:iGage LT500T User Manual
8. Then turn on all sounds:then click on ‘OK’.9. Click on ‘the ‘’System’button:and 5-minutes when onexternal power:10. From the ‘System’ menu,click on ‘Backlight’:11. Set the backlight to turn offafter 1 minute on Battery:cick on ‘OK’ to return to the‘System’ menu.12. Click on the ‘BL Light’button:iGage LT500T User Manual15
13. Set the backlight as brightas it can go:16Click on the ‘OK’ button toreturn to the ‘System’menu.iGage LT500T User Manual
Memory ‘Spaces’ on the LT500TThe LT500T has four possible memory agePrimary location forprograms and data‘My Device’‘/’402.11 Mbyte(512 Mbyteless system)ProgramRun-time memory,used by runningprograms-na-391.78 Mbyte(512 MBbyteless system)MMCCardSecondary locationfor programs andprogram data. Nonremovable flash‘MMC Card’15,180.56Mbyte(16 Gbytes)StorageCardRemovable uSDcard located underpower switchbehind rubber door‘StorageCard’Up to 32 GBOnly the ‘Storage Card’ can be physicallyaccessed/removed/changed by the user, it can be found underthe rubber door below the power switch.When you view the root directory in SurvCE or anotherapplication, it will appear as a listing:iGage LT500T User Manual17
Be sure to note the difference between ‘Storage Card’ (which isthe removable uSD card) and the internal ‘MMC Card’. If a uSDcard is not installed, then the ‘Storage Card’ will not be shown. Allof the other files and folders listed in the root (“/”) folder arestored in the ‘My Device’ memory space.18iGage LT500T User Manual
Connecting the LT500T to Wi-FiTo connect the LT500T to a Wi-Fi access point, from the mainmenu:1. Click on the ‘WirelessManager’ icon on the mainmenu:3. Click on the correct accesspoint:2. Click on ‘Menu’Then ‘Wi-Fi Settings’iGage LT500T User Manual19
4. The ‘Configure WirelessNetwork’ dialog is shown:Enter the wireless accesspoint’s Network Key(password.) Then click ‘Next’and finally click on ‘Finish’.After a few moments theLT500T will connect to youraccess point.6. From the Wi-Fi dialog, clickon ‘Menu’:7. A menu will be shown:5. Click on ‘Next’Then click on ‘Advanced’8. On the ‘Advanced Settings’dialogThe ‘Authentication’ and‘Data Encryptions’ settingsshould automatically be setfor the selected accesspoint.20iGage LT500T User Manual
network notification’, thenclick on OK.This setting will prevent thedata collector from askingyou to connect to every WiFi network that you pass byUncheck ‘Turn on availableiGage LT500T User Manual21
Connecting the LT500T to yourComputer with a USB Cable1. The first time you connect your LT500T to your computer youshould be logged in with full administrator rights and thecomputer should be connected to the internet so thatupdated components and drivers can automatically beapplied.2. Turn on your LT500T.3. Insert the USB cable small end into the LT500T:and the large end into an open USB port on your PC.4. If your computer operating system is Windows XP you mayneed to manually install ‘ActiveSync’. If your computer isWindows 7, 8 or 10 then ‘Windows Mobile Device Center’ isalready installed on your computer. If this is the first mobiledevice that you have connected to your computer, it may beinstalled, but not fully activated.5. The first time you connect the device, it may take 30 minutesfor your computer to install and activate all of the requiredcomponents. Remember that if your computer operatingsystem is Windows 7, 8 or 10 then all required componentsalready are loaded and available on your computer. Bepatient.22iGage LT500T User Manual
6. After some wait ‘Windows Mobile Device Center’ will beshown on your screen7. If you hover your mouse cursor over ‘File Management’, youcan click on ‘Browse the contents of your device’ as shownabove.8. When you click on ‘Browse’:The three storage areas will be shown (if you don’t have a uSDcard inserted ‘Storage Card’ will not be shown.) From thisexplorer window you can browse the contents of the entiredevice.iGage LT500T User Manual23
Difficulty Starting Windows Mobile DeviceCenterOn some PC’s the Mobile Device Center can have difficultyautomatically starting when the LT500T (and other WindowsMobile devices) is attached.Often manually starting the ‘Windows Mobile Device Center’before plugging in the LT500T will improve the connectionprocess.24iGage LT500T User Manual
Connecting to a CellularNetworkThe LT500T has an internal GSM cellular modem. The modem canbe used with a SIM card activated for data only or phone anddata.Activating the modem is not required for operation, however itcan be used for NTRIP corrections.1. To activate the modem, turnthe lower left corner:off the receiver and removethe battery. Insert your SIM 6. Click on the Settings gearcard (full sized) in the smallicon:slot at the top of the batteryhole. There is a small iconembossed on the case thatshows the correct7. Click on Connections:alignment:8. Click on Connections:2. Turn on the receiver, wait45-seconds for it to fullyboot.3. Click on the wireless icon onthe main menu:4. If the Phone bar is not blue,click on the bar to turn onthe cell phone modem:5. Click the ‘X’ to return to themain menu. Then click onthe ‘Start’ icon (the flag) in9. Under ‘My ISP’ click on‘Manage ExistingConnections’, if there are noexisting connections, clickon ‘Add a new modemconnection’:10. If there is one or moreexisting connections, clickand hold on them, then clickiGage LT500T User Manual25
on ‘Delete’:11. Click on ‘New’:12. On the ‘My ISP’ dialog:Alternatively enter‘broadband’.14. Click Next:enter a name and choose‘Cellular Line (GPRS)’. ClickNext.13. Typically you can leave the‘Access Point Name’ blank:Leave the ‘User Name’,‘Password’ and ‘Domain’blank. Click on Finish.26iGage LT500T User Manual
15. From the My ISP dialog:17. On the ‘Advanced’ tab:Click the ‘OK’ button in thelower right corner.16. On the Connections menu:Click on ‘Select Networks’.18. Set both drop down boxes:click on the ‘Advanced’ tabon the top.to ‘My ISP’. Then click ‘OK’to return to the ‘Advanced’tab. Then click ‘OK’ to returnto the main menu.19. Verify that your LT500T isconnected by turning off Wi-iGage LT500T User Manual27
Fi:20. After the connection ismade, the correct web pageshould be displayed:Then browse to a web siteusing Internet Explorer:Success! You are connectedto the internet via thecellular modem.28iGage LT500T User Manual
Connecting Software to theInternal GPSThe internal GPS receiver has two serial ports which connect tothe LT500T’s internal COM1 and COM6 ports. Both ports arealways active. Commands can be sent to either port, and NMEAstrings can be streamed from either/both ports.By default, the baud rate for each of the ports (COM1 and COM6)is set to 38,400. If you connect SurvCE to the internal receiverusing the ‘CHC’ ‘LT500T’ driver, SurvCE will set the baud rate to9600 baud. We strongly recommend that you don’t use theSurvCE internal driver and instead use the NMEA driver.You can control which NMEA sentences are sent to each portusing LTSet.iGage LT500T User Manual29
Configuring SurvCEAfter installing SurvCE and activating your SurvCE license:1. Make sure that NMEA datais being output on COM1.From the main menu, clickon the LTSet3.0 icon:3. Click on ‘Connection’:2. LTSet will run:Set COM: to ‘COM1’, setBaud to ’38,400’. Click onthe ‘Connect’ button, wait afew moments for theconnection status to changeto ‘Connected’.4. Click on the ‘Back’ button,then click on the ‘I/O’button:30iGage LT500T User Manual
Enable messages as requiredfor your application. Thesettings above work greatfor SurvCE and most otherapplications.5. Click on the ‘Set’ button,wait for the ‘Successmessage’:7.If you are connected to theGPS, then NMEA messagesshould be streamingthrough the top gray displaybox. NMEA strings areenabled on COM1 at 38,400baud.Click ‘Back’ then click ‘Exit’:6. Click on ‘ok’ to close the tip,then click on the ‘Command’tab on the top of the screen: 8. Click on ‘Yes’ to return tothe main menu.iGage LT500T User Manual31
9. From the main menu, clickon SurvCE:10. Click on ‘SelectNew/Existing Job’ and makean appropriate job, with anappropriate projection.If asked, click on ‘Continuewithout connecting’.12. On the ‘Equip’ tab, choose‘Manufacturer: NMEA GPSReceiver’ with Model ‘Generic’:11. Click the green check markto continue:32iGage LT500T User Manual
13. Click on the ‘Comms’ tab:Configure as shown above,COM1 – 38,400 baud.14. Click on the ‘Receiver’ tab:Choose a reasonableantenna height.15. Finally click on the ‘GreenCheckmark’ to configure therover and return to the mainmenu16. There are a few settings inCarlson that will make theLT500T work better with‘Real-Time’ data. First clickon the ‘Tolerances’ button:Set some reasonableiGage LT500T User Manual33
Tolerances (those shownabove are reasonable), thenclick on the ‘Green CheckMark’.17. Click on the ‘Configure’button:Typically you will want tochange the Method to‘North-South & East-West’for GPS work.19. Click on the ‘Green CheckMark’ to return to the main‘Equip’ menu.20. Click on the ‘Localization’button:Uncheck the ‘Store FixedOnly (GPS)’ checkbox.18. Click on ‘View’:If you are using WAAScorrections (not usingNetwork Corrections) thenyou will most likely want toclick the ‘Convert WGS84 toNAD83’ check box. This willperform a 14- parametertranslation from the WAASbroadcast IGS08 frame toFixed Tectonic Plate NAD832010.0.Click the ‘Green Check Mark’after checking this setting.34iGage LT500T User Manual
Special Note on Reference FramesIf your LT500T is receiving corrections from WAAS, then the rawmeasurements are ‘Current EPOCH, IGS08’ framed. If you arereceiving corrections from a NTRIP network (in the USA), then theraw measurements are probably ‘NAD83 2011 2010.0’ framed.In SurvCE you need to check or uncheck the box that controlsframe translation properly. The checkbox can be found under“Equip: Localization: System”:NTRIP NETWORK(NAD83)WAAS (SBAS)Broadcast Corrections(IGS08)Let’s work an example to show the transformation process.Occupy this location:40 44 10.21560000 -111 51 34.13960000With the ‘Convert WGS84 ’ box UNCHECKED this will translateinto a Utah Central NAD83 coordinate of:2,266,833.884 Meters N 469,633.929 Meters E 1306.381 UTC NAD83;
With the ‘Convert WGS84 ’ box CHECKED the translatedcoordinate is:2,266,833.210 Meters N 469,634.921 Meters E 1307.103 UTC NAD83;There is a 0.674 M Northing, 0.992 M Easting, 0.722 M Elev shiftin the resulting projected coordinates.36iGage LT500T User Manual
Connecting to a Network CorrectionSourceThe LT500T has good accuracy when used with WAAS correctionsin North America. It is also possible to connect the LT500T to anNTRIP network for even better performance.LTSet is used to connect to COM6 at 35,400 baud. LTSet makesan NTRIP connection via Wi-Fi or Cellular connection to theserver, sends the GGA position message from the internal GPSreceiver on the LT500T to the server which then sendscorrections back to the LT500T.Any Windows Mobile software (like SurvCE) can then connect toCOM1 and receive corrected NMEA strings.1. To begin, use the ‘InternetExplorer’ on the mobiledevice to make sure. Clickon ‘Start’ (the flag icon onthe lower left corner):connected to the internet:2. Then type the base name ofa website to browse to inthe address box:When the full site name isdisplayed, click on it(www.igage.com in the caseshown above.)3. If the correct website isshown, then the LT500T is4. Close the Internet Explorerby clicking on the . Button(lower right) then click onthe “X”iGage LT500T User Manual37
5. Start LTSet by clicking on the 7. Optional: You can make suremain menu icon:that you are connected tothe receiver by clicking on‘I/O’, then selecting the‘Command’ tab:6. Click on the ‘Connection’button:If NMEA sentences arestreaming, you areconnected and the GPSreceiver is working. Click on‘Back’ to close the ‘I/OConfig’ window.8. From the LTSet window:Configure as shown above,Click on the ‘Ntrip’ button.then click on ‘Connect’. Click 9. Enter a NTRIP source name,on ‘Back’ after the modeIP address and Port, thenchanges to ‘Connected’.click the ‘Get’ button:38iGage LT500T User Manual
The mount point list will beretrieved (via the internet)from the server and willpopulate the ‘Mountpoint’drop down list.10. Select the desiredMountpoint, then enter theUsername and Password.Press the ‘Save’ button, thenclick on ‘Login’:If the mount point is avirtual reference server,then the LT500T must betracking satellites. The GGAmessage must have a validLatitude and Longitude.If the ‘Receive Data’ counteris incrementing, then youhave successfully connectedto the network.iGage LT500T User Manual39
11. Click on ‘Back’:right-hand corner:13. The LTSet program will behidden and a small LTSeticon will appear on the taskbar:12. Minimize LTSet by clickingthe ‘-‘ button in the upper4014. You can now start SurvCEor any other program thataccepts NMEA strings,connect to COM1 and enjoydifferentially corrected, L1GNSS accuracy.iGage LT500T User Manual
Using the Internal Compass andPlummet Laser5. The Compass screen isshown:The LT500T has an internalcompass, level and a pointinglaser to indicate the GroundMark the device is sighted over.1. To use the ‘G Sensor’, clickon start:2. Then click on Settings:3. Then click on System:4. Then click on Gsensor:Clicking the ‘LaserAlignment’ ‘ON’ button willturn on the laser plummeton the bottom of thereceiver. If you level thehandheld so the red-cross isaligned with the white N-SE-W axis, then the internalGPS antenna will be directlyabove the red laser dot.iGage LT500T User Manual41
WarrantyBefore you get hung-up with hardware and software problems,please give us (iGage Mapping Corporation) a call. Our goal is totake great care of our customers and be reasonable witheveryone.Our response to issues may exceed your expectations and ourwritten warranty.IMC is “iGage Mapping Corporation” of Salt Lake City Utah USA.IMC warrants the LT500T receivers, which we sell, to be free ofdefects in material and workmanship and will conform to ourpublished specifications for these periods:GPS receivers: 2-yearsCables and accessories: 1-yearBatteries: 90-daysThis warranty applies only to the original purchaser of theproduct. This warranty applies only to the equipment that iGagesells, equipment sold by other dealers or channels is not covered.In addition, the CHC factory offers similar warranties andmaintains a repair depot in the United States. You can contactthe CHC factory at this email address: support@chcnav.com.Hardware: Purchaser's exclusive remedy under this warranty shallbe limited to the repair or replacement, at IMC's option, of anydefective part of the receiver or accessories which are covered bythis warranty. Repairs under this warranty shall only be made byIMC at an IMC service center. Any repairs by a service center notauthorized by IMC will void this warranty.In the event of a defect, IMC will at its option, repair or replacethe hardware product with no charge to the purchaser for partsor labor. The repaired or replaced product will be warranted for30-days from the date of return shipment, or for the balance ofthe original warranty, whichever is longer.Software: IMC warrants that software products included withhardware products will be free from media defects for a period of30-days from the date of shipment and will substantially conform42iGage LT500T User Manual
to the then-current user documentation provided with thesoftware. IMC's sole obligation shall be the correction orreplacement of the media so that it will substantially conform tothe then-current user documentation. IMC does not warrant thesoftware will meet purchaser's requirements or that its operationwill be uninterrupted, error-free or virus-free. Purchaser assumesthe entire risk of using the software.ExclusionsThe following are excluded from the warranty coverage:Periodic maintenance and repair or replacement of parts dueto normal wear and tear.Product Finishes.Batteries exposed to heat, cold; or batteries opened orphysically damaged.Installations or defects resulting from installation.Any damage caused by (i) shipping, misuse, abuse, negligence,tampering, or improper use; (ii) disasters such as fire, flood,wind, and lightning; (iii) unauthorized attachments ormodification.Service performed or attempted by anyone other than anauthorized CHC or IMC service center.That the receiver will be free from any claim for infringementof any patent, trademark, copyright or other proprietary right,including trade secrets.Any damage due to accident, resulting from inaccurate satellitetransmissions. Inaccurate transmissions can occur due tochanges in the position, health or geometry of a satellite ormodifications to the receiver that may be required due to anychange in the GPS. IMC GPS receivers use GPS satellites toobtain position, velocity and time information. GPS is operatedby the US government, which is solely responsible for theaccuracy and maintenance of the GPS system. OPUS and OPUSRS is a service of the NGS and IMC shall not be responsible forissues with NGS provided services.iGage LT500T User Manual43
SurvCE is not returnable and non-refundable. Please evaluateSurvCE prior to purchase and activation.Except as set forth in this limited warranty, all other expressed orimplied fitness for any particular purpose, merchantability ornon-infringement, are hereby disclaimed.IMC shall not be liable to the purchaser or any other person forany incidental or consequential damages whatsoever, includingbut not limited to lost profits, damages resulting from delay orloss of use, loss of or damages arising out of breach of thiswarranty or any implied warranty even though caused bynegligence or other fault of IMC or negligent usage of theproduct.In no event will IMC be responsible for such damages, even if IMChas been advised of the possibility of such damages.This written warranty is the complete, final and exclusiveagreement between IMC and the Purchaser.RMATo obtain warranty service from iGage Mapping Corporation thepurchaser must obtain a return materials authorization (RMA)number prior to shipping by calling 1-801-412-0011Or by email:info@igage.comTo obtain warranty service from CHC (the Factory) send email tosupport@chcnav.comPurchaser’s return address and the RMA number must be clearlyprinted on the outside of the package. IMC reserves the right torefuse to provide free-of-charge service if the date of sale cannotbe determined or if the serial number is altered or removed. IMCwill not be responsible for any losses or damage to the productincurred while the p
CHC LT500T Handheld GNSS Receiver User Manual This manual is for use with CHC LT500T receivers sold by iGage Mapping Corporation. Receivers purchased from other sources (other dealers or the factory) with similar model numbers/names may not match devices provisioned by iGage. 18 September 2016 LT500T_UM_RevD_010.docx