Transcription
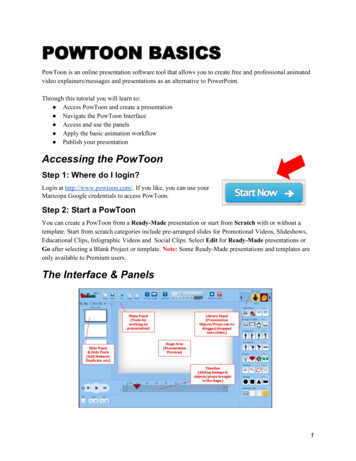
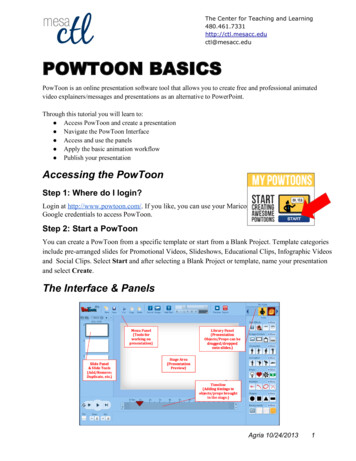
The Center for Teaching and acc.eduPOWTOON BASICSPowToon is an online presentation software tool that allows you to create free and professional animatedvideo explainers/messages and presentations as an alternative to PowerPoint.Through this tutorial you will learn to: Access PowToon and create a presentation Navigate the PowToon Interface Access and use the panels Apply the basic animation workflow Publish your presentationAccessing the PowToonStep 1: Where do I login?Login at http://www.powtoon.com/. If you like, you can use your MaricopaGoogle credentials to access PowToon.Step 2: Start a PowToonYou can create a PowToon from a specific template or start from a Blank Project. Template categoriesinclude pre- arranged slides for Promotional Videos, Slideshows, Educational Clips, Infographic Videosand Social Clips. Select Start and after selecting a Blank Project or template, name your presentationand select Create.The Interface & PanelsAgria 10/24/20131
The Center for Teaching and acc.eduThe Library PanelThe PowToon Library is made up of different categories of text,objects (shapes, markers), props and characters that can beadded to your presentation. You can even add your own imagesto the library by selecting an Image Holder (image frame) option.Using Items in the LibraryTo use the Library select a Style from the top of the panel. Toadd objects, props and characters simply drag/drop to the slide.NOTE: Some Items in the Library may be part of the premiumPowToon package.The TimelineThe PowToon Timeline is used to add animation timing to objectsin your presentation.1. Playhead: The playhead indicates at what second youare currently in your slide. You can slide the playhead throughout the timeline to preview theanimation for each slide.2. Total Slide Time: Each slide by default is assigned 10 seconds. This can be decreased orincreased to up to 20 seconds maximum.3. Object Duration Bar: Each object has a animation timing duration bar. To access this barselect the object on the stage and adjust the timing as desired.4. Object Thumbnails: All objects in the slide will appear below the timeline. Click on an objectto adjust the effect and duration of the object.5. Object Effects (Animation): Objects can be set to Enter or Exit the stage using a variety ofoptions including fades, directionality and even a hand function (where a human hand slides theobject onto the presentation). Each object can be animated using these effects. NOTE: Youcan also Flip an object’s orientation from this area.6. Playback Controls: Help you preview your presentation animation as you go. NOTE: thereare four playback options (1) play slides from start, (2) play current slide from start, (3) playfrom playhead then continue, and (4) play current slide.Agria 10/24/20132
The Center for Teaching and acc.eduThe Slide PanelThe Slide Panel contains your slides for yourpresentation.Slide Options: You can add/remove andduplicate slides (all objects and timing).NOTE: You can clone slides, whichduplicates the previous slide with the last frame(1 second) on it. This can help you make asmooth transition from slide to slide.Presentation/Movie Mode: Toggle betweenthe movie and presentation modes dependingon how you want to show or explain yourinformation. NOTE: Presentation modeallows you to create Hold Points for livepresentation narration.The Menu PanelThe Menu Panel contains features common to many presentation tools.1. Save: although PowToon will autosave every 5 minutes;; it is important to save regularly.2. New: to create a new PowToon.3. Cut, Copy, Paste: cut, copy and paste slides, objects in your presentation.4. Sound: add a sound file (either import, record or use a track from the PowToon).5. Image: Import image from computer or from the web.6. Text: add text to a slide and format text options.7. Preview (Share/Link, Embed): Select preview to review your PowToon and share via a URLlink, social media site or embed into a web site.8. Exporting (YouTube): directly share your PowToon to YouTube or export as a video file(paid option). NOTE: free accounts are limited to 30 exports to YouTube.Agria 10/24/20133
The Center for Teaching and acc.eduBasic WorkFlowStep 1: StoryboardIt is highly recommended that you plan your presentation using a storyboard that outlines your visual ideasand narration. It is the most effective approach for animation.Step 2: Add the Voiceover/MusicIt is much easier to add the voiceoverfirst then add the animations. Why? Itprovides you with the timings, making iteasier to add slides and animations.Adding SoundFrom the Menu Panel select SoundOR select the Audio Icon from theTimeline.1. Import or Record Voiceover2. Import or Add Music Track3. Adjust sound with controls4. Preview / Play5. ApplyNOTE: Some music requires a paidaccount.Step 3: Add SlidesUsing the Slide Panel add slides to your presentation based on your storyboard.Step 4: Add ObjectsDrag and drop objects from the PowToon LibraryPanel onto your slides (including characters, text,objects and props).Tip: You can layer objects on top of each otherand use the animation timings to introduce objectsstrategically to create a sense of dynamicmovement and cartoon interaction.Agria 10/24/20134
The Center for Teaching and acc.eduManaging ObjectsManaging objects in PowToon is similar to MS PowerPoint. Left- click on the item to select and either hold and move on the stage with the mouse or usethe arrow keys. Use the object handles to resize the object. Right- click for more object management options such as arrangement (back, front),orientation (flip), etc.Step 5: Animate ObjectsFrom the Timeline use the Duration Bar to animate each object on the slide.1. Select the object to animate.2. Choose an effect style for the object entry/exit.3. Use the sliders to adjust the duration of the object animation in the slide.4. Add/Remove overall slide timing as needed (slides can be up to 20 seconds in length).Agria 10/24/20135
The Center for Teaching and acc.eduStep 4: PreviewUse the Playback Controls OR select Preview from the Menu Panel to review your video. NOTE:Don’t forget to save throughout the process of creating your presentation. The save feature is located inthe Menu Panel.Step 5: PublishTo Publish your PowToon selectfrom the following:Share Via Link or Embed1. Select Preview from theMenu Panel2. Choose from one of thesharing options in thePreview dialog.Export to YouTube/Other1. Select Export from the Menu Panel2. In the dialog select an output option and Add a YouTube Account. NOTE: In the FREEPowToon account you can only export up to 30 videos at medium resolution with branding. Videoexports are also part of premium packages.Additional ResourcesVideo leBook & ://www.powtoon.com/blog/EditorialsAnimated Videos: http://www.powtoon.com/blog/russ- explains/Video Marketing: http://www.powtoon.com/blog/just- a- minute- explainers/Video Presentations: https://tinyurl.com/POWTOONPresAgria 10/24/20136
You can create a PowToon from a specific template or start from a Blank Project. Template categories include pre arranged slides for Promotional Videos, Slideshows, Educational Clips, Infographic Videos and Social Clips. Select Start and after selecting a Blank Project or template, name your presentation and select Create. The Interface & Panels