Transcription
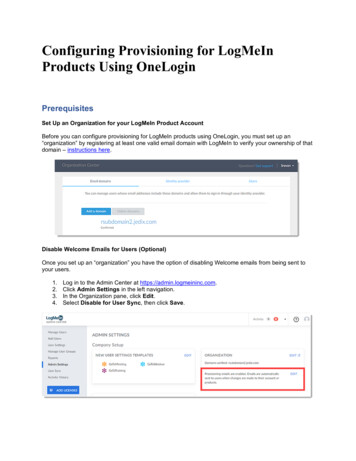
Configuring Provisioning for LogMeInProducts Using OneLoginPrerequisitesSet Up an Organization for your LogMeIn Product AccountBefore you can configure provisioning for LogMeIn products using OneLogin, you must set up an“organization” by registering at least one valid email domain with LogMeIn to verify your ownership of thatdomain – instructions here.Disable Welcome Emails for Users (Optional)Once you set up an “organization” you have the option of disabling Welcome emails from being sent toyour users.1.2.3.4.Log in to the Admin Center at https://admin.logmeininc.com.Click Admin Settings in the left navigation.In the Organization pane, click Edit.Select Disable for User Sync, then click Save.
ConfigurationAdding the LogMeIn app1.2.3.4.Log in to your OneLogin portal with your administrator credentials.In the top toolbar, go to Administration Apps Add Apps.Search for LogMeIn then click on the app to select it.For the “Visible in portal” setting, toggle the switch to Off. Please note that if this setting remainstoggled to On, then the LogMeIn app will appear in the user’s apps portal, and upon clicking on itthe user will be logged in to their My Account page (instead of being logged into their LogMeInproduct app). For this reason, it is recommended that you toggle the switch to Off to hide it.5. Click Save.Authorizing the LogMeIn App1. Click the Configuration tab, then click on Authenticate.2. When prompted, click on the LogMeIn parent app to authorize access.3. Once redirected to the LogMeIn authentication page, enter your LogMeIn account credentials andclick Sign In.4. When prompted, click Authorize to grant allowance to the connector. You will then be redirectedback to the LogMeIn parent app configuration in your OneLogin portal.5. Click on the Provisioning tab and enable automated provisioning with the following settings:a. Check the box for the Enable provisioning setting.b. If you want to require manual admin approval before certain actions are performed, checkthe box(es) for Create user, Delete user, and/or Update user as desired.
c. In the next two settings (for when users are deleted in OneLogin and when user accountsare suspended in OneLogin) use the drop-down menu and select Suspend.Creating Product Groups within LogMeIn1. To enable creation of groups and updates to group memberships, click the Rules tab, then clickthe New rule hyperlink and configure as follows:a. Under Name, enter a name for your mapping into the field (e.g., LMI Groups).b. Under Actions, do the following:i. Use the drop-down menu and select Set Groups in LogMeIn then select theradio button for Map from OneLogin.ii. After the “For each” instructional text, use the drop-down menu and select role.iii. After the “with value that matches” instructional text, enter a prefix (e.g., LMI)which will be used to distinguish the LMI role from other roles that are notintended to populate users in the Admin Center for LogMeIn products (so thatthis mapping rule will only apply to the LMI role).2. Click Save when finished.
3. To create a role for each of the LogMeIn product apps that will be provisioned (e.g.,GoToMeeting, GoToWebinar, etc.), click Users in the top toolbar, then select Roles.4. Click New Role in the upper-right navigation.5. Enter a name for the new role in the text field (e.g., LMIGoToMeeting), then click the Approveiconand click Save to create the new role.6. Repeat Steps #3 – 5 (in this section) to create a role for each of the LogMeIn product apps youwill be provisioning.7. Once your new roles have been added, you will need to assign at least one user (presumably theadmin, who will have access to all of the product apps) to each of the roles you created in Steps#3 – 5 (in this section):a. Click Users in the top toolbar, then select Roles.b. Click on the role you created.c. Click the Users tab.d. Use the Search bar to enter a user, then click Check.e. Click Save when finished.8. You will need to assign the same admin you assigned in Step #7 (in this section) to the LogMeInapp:a. Click Users in the top toolbar, then select All Users.b. Locate the admin from Step #7 (in this section), then click to select them.c. Click the Applications tab.d. Click the Add App icon, then use the drop-down menu to select the LogMeIn app.9. Once these actions are taken, the system will start processing the rule you created in Step #1 (inthis section) and begin populating the LogMeIn product groups in the LogMeIn Admin Center.10. If previously in Step #5, Sub-Step B (in the “Authorizing the LogMeIn App” section above) youenabled the Require admin approval before this action is performed setting for creating newusers, you will need to approve the pending transactions before they can be processed by theLogMeIn parent app.a. Click Users in the top toolbar, then select Provisioning.b. Click on your desired user, then click Approve for the pending transaction.11. Once approved, the system will start processing the rule you created in Step #1 (in this section)and begin populating the LogMeIn product groups in the LogMeIn Admin Center.Configuring Provisioning Rules for Product Groups in LogMeIn1. Next, you need to configure each newly populated group in the LogMeIn Admin Center with aproduct provisioning rule (i.e., User Sync rule). To do so, navigate to the LogMeIn Admin Centerat https://admin.logmeininc.com and log in with your LogMeIn admin credentials.2. To create and apply User Sync rules and manage rule priorities, please follow these instructions.
Creating & Configuring Quicklink Apps for Each LogMeIn Product1. Once your rules have been created and User Sync is enabled, you will need to return to theOneLogin portal to create Quicklink apps for each of the LogMeIn products for which you will beprovisioning.2. To configure single sign-on for each of your LogMeIn product apps, you will need to copy thesingle sign-on URL from the LogMeIn parent app to save for later use – as the single sign-onURL will be reused in each of your Quicklink (child) apps – which then links to the LogMeInparent app. To assist with this, open a text editor application.3. Next, navigate to the LogMeIn parent app by clicking Apps in the top toolbar, then selectCompany Apps.4. Click on the LogMeIn app, then click the SSO tab.5. Under SAML 2.0 Endpoint (HTTP), click the Copy to Clipboard iconto copy the contents withinthe field, then paste it into your text editor application. This same URL will be reused for everyLogMeIn product app you will need to provision.6. Next, add your first Quicklink app for a LogMeIn product app. Click Apps in the top toolbar, thenselect Company Apps.7. Click Add App.8. Use the Search bar to enter LogMeIn Quicklink, then select the LogMeIn Quicklink app andclick Save.9. On the Info tab under Display Name, enter your LogMeIn product name (e.g., GoToMeeting).10. If desired, you can also upload the LogMeIn product-specific logo for your Quicklink app on theInfo tab.11. Click the Configuration tab, then use the drop-down menu to select the LogMeIn product name(e.g., GoToMeeting).12. In the URL field, paste the SAML 2.0 Endpoint (HTTP) URL you copied from Step #5 (in thissection), then click Save.13. Repeat Steps #7 – 11 (in this section) for each of the LogMeIn product apps you will provision.
Automating User Assignment1. Next, you will need to assign each of the product-specific roles you created from Steps #3 – 5 (inthe “Creating Product Groups within LogMeIn” section above) to each of the Quicklink (LogMeInproduct) apps you created from Steps #7 – 11 (in the “Creating & Configuring Quicklink Apps forEach LogMeIn Product” section above). This means that the total number of LogMeIn roles (e.g.,LMIGoToMeeting) should be equal to the total number of Quicklink (LogMeIn product) apps.2. To assign the roles to the Quicklink apps, do the following:a. Click Apps in the top toolbar, then select Company Apps.b. Select a Quicklink app (e.g., GoToMeeting), then click the Access tab.c. Under Roles, click to select the product-specific LMI role (e.g., LMIGoToMeeting).d. Click Save.3. Repeat Sub-Steps a – d (directly above) for each of your Quicklink apps.4. Next, you will need to assign all product specific roles (e.g., LMIGoToMeeting, LMIGoToWebinar,LMIGoToTraining, etc.) to the LogMeIn app, as follows:a. Click Apps in the top toolbar, then select Company Apps.b. Select the LogMeIn app, then select the Access tab.c. Under Roles, click to select all product specific LMI roles for all LogMeIn products.d. Click Save.
Provisioning Users with LogMeIn Products1. Once the LogMeIn app is configured with all the LMI roles needed, you can assign the productspecific role to each of your users to provision the designated product (e.g., assign theLMIGoToMeeting role to each user to provision their account with GoToMeeting). To assignproduct role(s) to a user, do the following:a. Click Users in the top toolbar, then select Roles.b. Click on the Quicklink app (product app).c. Use the Search field to locate your desired user, then click to select them.d. Click the Check button.e. Click the Add to Role hyperlink.f. The user that you have added will now be provisioned with Quicklink app’s product (e.g.,the LMIGoToMeeting Quicklink app will assign GoToMeeting to the user).2. Repeat Step #1 (in this section) for each of your users to provision the LogMeIn product apps tothe appropriate users.
tab under Display Name, enter your LogMeIn product name (e.g., GoToMeeting). 10. If desired, you can also upload the LogMeIn product-specific logo for your Quicklink app on the Info tab. 11. Click the Configuration tab, then use the drop-down menu to select the LogMeIn product name (e.g., GoToMeeting). 12.