Transcription
How to remote into the "Backup System"*In order to allow for design and specification improvements, the information in this document is subject to change atany time, without noticeRevision 1.0How to remote into the "Backup System"Page 1
Table of ContentsQuick guide – Remote from Support laptop to Backup System . 3Remote from the customer support laptop – Step by Step. 5Test and create a Remote Desktop Connection . 5Backup system – Default configuration . 6Troubleshooting . 6How to remote into the "Backup System"Page 2
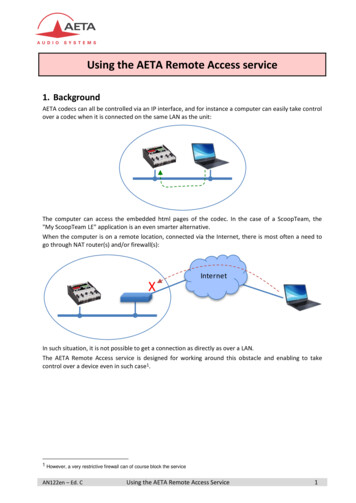
Quick guide – Remote from Support laptop to Backup System1. Connect LAN cable, from the Backup PC to the Netbook/Laptop built-in LANa2. Add a secondary, static IP address, on the Netbook/Laptop:a. Open Network and Sharing Center (right click LAN or Wi-Fi icon)b. Click the "Change adapter Settings" linkc. Right click the LAN adapterd. Click the "Properties" buttone. Select the "Internet Protocol Version 4 (TCP/IPv4)"bf. Click the rightmost "Properties" buttong. Click the "Advanced" buttonh. Click the "Add " buttoni. Type "169.254.77.254"j. Done.cdegfihHow to remote into the "Backup System"Page 3
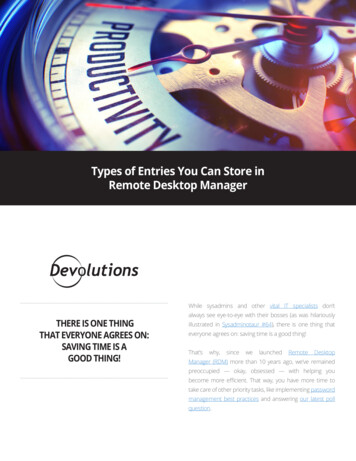
3. Test and create the Remote Desktop connection:In the Laptop/Netbook please do the followinga. Open CMD / Command Prompt, type: ping MIDAS The Backup System computer will replyab. Press the "Windows" key, type “remote desktop” Or, run C:\Windows\System32\mstsc.exebc. In the Remote Desktop Connection dialog: Computer: MIDAS User name: \Administrator Check "Allow me to save credentials"d. Click "Save As "e. Click "Connect"f. Windows Security: Password (in uppercase): MIDASg. Check "Remember my credentials”, then click the Ok buttonh. Remote Desktop Connection: Warning: Check "Don’t ask me again”, then “Yes”cbdebfgHow to remote into the "Backup System"Page 4
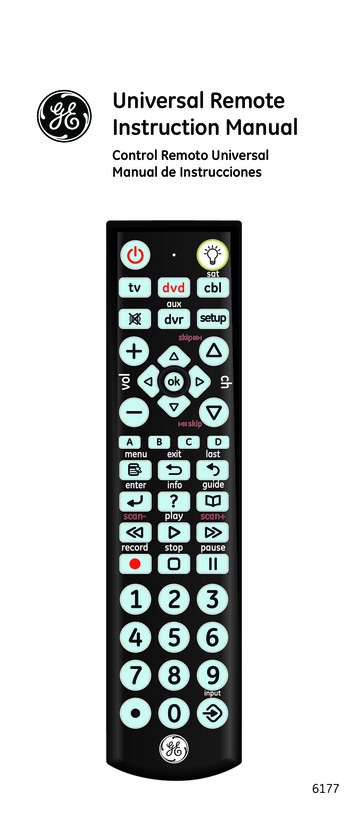
Remote from the customer support laptop – Step by StepThe Support Laptop has a static IP Address to connect to the MIDAS.How to add a secondary static IP address:1. Open Network and Sharing Centera. Right click on the Wi-Fi or LAN icon at the bottom right, or,b. Control Panel, View by Large Icons4. Click the link (top left) "Change adapter Settings"5. Local Area Connection Properties: Right click the LAN adaptera. Click the "Properties" button, Click next "Properties" buttonb. Select the "Internet Protocol Version 4 (TCP/IPv4)"c. Click the rightmost "Properties" buttond. Internet Protocol Version 4 : Click the "Advanced" buttone. TCP/IP Address: Click the "Add " buttonf. Type "169.254.77.254"g. Done.Test and create a Remote Desktop Connection1. Test: Open a CMD prompt, type: ping MIDAS, the backup system should reply2. Run Remote Desktop: Press the "Windows" key, type “remote desktop”, or, Run C:\Windows\System32\mstsc.exe3. In the Remote Desktop connection window: Computer: MIDAS User name: \Administrator Check "Allow me to save credentials"6. Click "Save As ", save it to the Desktop7. Click "Connect"a. Password (in uppercase): MIDASb. Check "Remember my credentials”, then “Ok”c. Please ignore the “identity” warning messageHow to remote into the "Backup System"Page 5
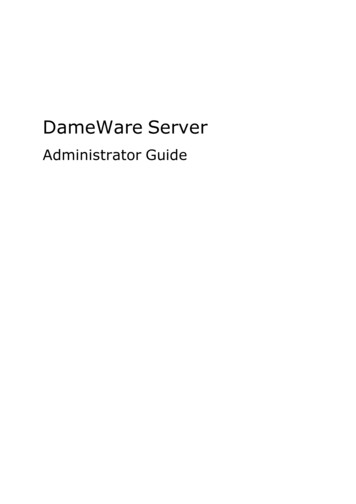
Backup system – Default configurationUsername and Password o-login:Yes (to modify auto-login, run "control userpasswords2")Network informationWorkgroup:Computer Name:LAN IP Address:WORKGROUPMIDASDHCP, provided by Windows: 169.254.xx.xxTroubleshooting1. Cannot connect.a. Open CMD, type "ping MIDAS". If Backup PC does not reply:i. Please verify the Backup Station computer name (MIDAS):ii. Please verify that the Backup Station IP address starts with 169.254.77b. Was the Backup System powered on more than 1 minute ago?i. Remote desktop will not connect while the OS bootsii. If the OS is having trouble recognizing any SSD, boot will be significantly delayedc. Is the LAN cable plugged to the Laptop/netbook? (not the USB to LAN adapter)d. Is the secondary IP address set to 169.254.77.xxx?e. Is it a different laptop?i. Older laptops might require a crossover LAN cable or a hub/switchf.Try setting up a static IP in the Backup System:i. Follow the instructions to set-up the Customer Service PC, except:1. Use the main IP Address: 192.168.0.56 (or any other below 200)2. Password not valida. Lock the Backup System; verify if the password "MIDAS" unlocks it.b. Create a new user accounti. Control Panel, User Accounts, Manage other account, Add a new user, ii. Change remote desktop connection user1. (always start with a backslash \, for example, \new user)How to remote into the "Backup System"Page 6
How to remote into the "Backup System" Page 3 Quick guide - Remote from Support laptop to Backup System 1. Connect LAN cable, from the Backup PC to the Netbook/Laptop built-in LAN a 2. Add a secondary, static IP address, on the Netbook/Laptop: a. Open Network and Sharing Center (right click LAN or Wi-Fi icon) b.