Transcription
How to Query, View & Print Documents in BDMBanner Document ManagementBanner Document Management(BDM)How to Query, View & Print Documents in BDM1
How to Query, View & Print Documents in BDMBanner Document ManagementTable of Contents1. Overview32. Creating & Saving Queries2.1 Creating Queries within an Application2.2 Creating a Cross Application Query453. Querying Documents3.1 Querying From Banner3.2 Querying Within an Application3.3 Querying Using a Saved Query3.4 Querying Using a Cross Application Query789104. Viewing Documents125. Correcting Page Orientation146. Printing Documents5.1 Emailing15152
How to Query, View & Print Documents in BDMBanner Document Management1. OverviewAll documents in BDM are stored in electronic form within what is called a BDM Application. TheseBDM Applications are business specific storage areas that allow us to keep documents organized andstored in areas that pertain to their purpose. You can think of these BDM Applications as specificdrawers in a filing cabinet, and the filing cabinet being BDM.Accessing documents in BDM is primarily done via Banner. While working on Banner forms you canaccess BDM at any time to view documents that may be related to the Banner ID you are workingwith.BDM is the general name that applies to the entire tool set and underlying processes & architecturefor document management in Banner. The specific web based tool that we use for user interactionwith documents is called WebXtender.The WebXtender interface contains a menu bar containing the typical File, Edit, View and Help menuitems as well as a toolbar containing various icon buttons. The toolbar changes from one view toanother in WebXtender. Depending on which screen you are working in you will have varyingtoolbars (i.e. buttons) available to you.Each button in the toolbar will display a tool tip when you mouse over the button. The tool tip isuseful in telling you what each button does. You should take some time when first usingWebXtender to examine all the buttons, tool tips and menu items to see what is available to you.When opening WebXtender from Banner there is integration in place that tells WebXtender whichApplication(s) to open and search in for documents. This integration is designed in such a way thateach time you launch WebXtender from Banner, BDM is queried for documents using the integrationrules that are in place for the specific form you are working on. These rules can vary from form toform but in all cases where the Banner form is used for working with students the Banner ID is partof the integration rule by default. Refer to Appendix A for more detail on this integration.Note:1. Because WebXtender is a web based product that runs through a browser and establishes a websession with the BDM server, timing out of sessions has to be realized. Inactivity in WebXtenderbeyond a certain period of time will cause your session and connection to drop and you will berequired to log in again.3
How to Query, View & Print Documents in BDMBanner Document Management2. Creating & Saving Queries2.1 Creating Queries within an ApplicationWebXtender allows users to create queries that they run repeatedly and save them within theBDM application in which they are searching for documents. It should be noted that savingqueries for reuse is only of value when the query is based on 3 or more query criteria that neverchange. If you are querying based on 1 or 2 criteria then it is best to simply create a new queryeach time you need to do the search.Step 1 - open a New Query page for the application in which you wish to search Double click on the application in the Application List page Click the “New Query” button in the toolbar In the menu bar click EDIT - New QueryStep 2 – enter the criteria in the available fields you wish to search withStep 3 – at the bottom the New Query page locate the “Save Options” section. Provide aquery name in the available field. If you wish other users to be able to use your queryselect the “Available to All Users” check box. If you want the query to be private to onlyyou then do not select the checkbox.Step 4 – press the SAVE button at the bottom of the New Query page.The query will now be listed underneath the BDM application when you expand the node in theApplication List page4
How to Query, View & Print Documents in BDMBanner Document Management2.2 Creating a Cross Application QueryNote – creating cross application queries is only practical when you have access to two or moreBDM applications and you need to view documents from more than one application in a singleview. These queries can only be created using applications that you have access to.Step 1 – navigate to the Application List pageStep 2 – right click on one of the BDM Applications that you need to search withinStep 3 – from the pop-up menu select “New Cross App Query”Step 4 – the Cross Application Query Configuration window will open. From the left hand listselect the BDM Applications that you wish to include in the cross app query and add them to theright hand list by clicking the button with the “ ” icon. Each application will display in expandedfashion in the right hand list.5
How to Query, View & Print Documents in BDMBanner Document ManagementStep 5 – Select the fields that you wish to make searchable and act as query criteria fields. To dothis, double click the field twice. The first double click will place a tick mark next to the field.The second double click will place a question mark “?” next to the field to indicate that it issearchable.NOTE – you must select fields that are common to all applications in the query in this step.Step 6 – Select the other fields that you wish to display in the query results. The fields from step6 will be included in this set of fields by default. To select others simply double click them in thelist. A field that is marked for display will have a “tick” mark in front of it. You can select fieldsthat do not exist in all applications in this step.Step 7 – check if you want the query to be private or public to all users. By default Cross AppQueries are public. To make the query private to only you uncheck the “Available to All Users”Step 8 – press the APPLY button. You will be prompted to name the query. Once named, youcan close the configuration window. The Application List page will refresh and your Cross AppQuery will be listed under each of the BDM Applications contained in the query.Notes: When you build a cross app query you do not specify any search criteria. They are bydefault designed to do searches for all documents from the BDM Applications in thequery. When the results page opens each document returned will display the fields youselected for display when building the query. In addition, the application that thedocument is coming from will be displayed and the number of pages in the document Any field that you marked for display that does not belong to all applications will onlydisplay data when the document listed comes from that particular application. If yourequested to display a field called “Field 1” from Application A but that same field doesnot exist in Application B then you will only see data in that field on the results pagewhen the document comes from Application A. Documents from Application B will havethis blank.6
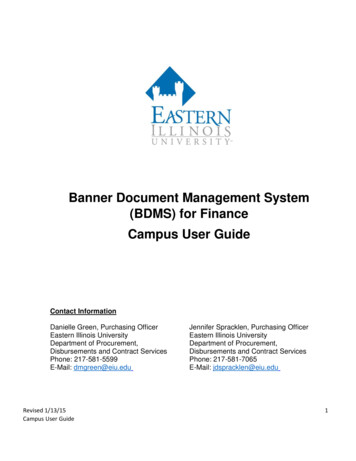
How to Query, View & Print Documents in BDMBanner Document Management3. Querying DocumentsQuerying, or searching, for documents can be done within a single BDM Application or withinseveral BDM Applications through a query that joins the applications. These queries are referredto as Cross Application Queries and are saved within one of the Applications that make up thequery.In addition, a BDM Application can contain one or more saved queries that when run collectdocuments from the application based on some predetermined search criteria. These savedqueries are useful for users that find they are searching for the same thing repeatedly.3.1 Querying From BannerBanner forms can be integrated to BDM applications or queries to provide quick query accessdirectly from Banner to documents in BDM. Integration criteria are setup in Banner for a formand saved making it static and consistent for that form. Currently the integration setup inBanner is fundamentally based on Banner ID, thus ensuring that all queries from Banner to BDMare intended to locate documents for the personWhen a user is working on a form and wishes to view documents that are related to the personor student they are working with they simply click the “BDMS – Display Documents” button inthe Banner toolbar:7
How to Query, View & Print Documents in BDMBanner Document ManagementUpon clicking this button the integration rules in Banner will launch WebXtender and carry outthe query to locate all the documents that match the criteria that integrates the form to BDM.This Banner inegration means users do not always have to open WebXtender and constructtheir own searches when working with Banner data and processes.3.2 Querying within a BDM ApplicationStep 1 – launch WebXtender through a browser or through BannerStep 2 – open the New Query page ensuring that you are opening it for the specific application inwhich you wish to search. The header text on the New Query page will read “Query Criteria forApplication application name ”. Where application name should be the correct name of theapplication you wish to search within.Step 3 – on the New Query page enter the criteria you wish to search with in the list of elementsprovided under the “Query Criteria ” header text. The list of elements provided are the onlyitems you can use to search for documents.Criteria Notes:- Each item will be represented by a free text entry field or a pick list.- You are limited to searching on only one item at a time from the pick lists. Thepage will not allow you to select more than one item from the list for your query.- By default the pick list will contain the wildcard, an asterisk (*). The wildcardacts as an “all” type value.- For each free text field you have the option of entering individual values, lists ofvalues, a range of values or use wildcards. At the far right of each item are two8
How to Query, View & Print Documents in BDMBanner Document Managementbuttons that provide the means to create a list or a range to search on. If theitem is a date field a button to make use of a calendar will be available.Example:-Ranges can be based on a number of conditions. They can use the “between”,“greater than”, “less than” conditions as examples.Step 4 – press the SUBMIT button at the bottom of the New Query page. The query will run andyou will be presented with the list of documents on the Query Results page or you will receive a“No Documents Found” message.3.3 Querying Using a Saved QueryStep 1 – launch WebXtender through a browser or through BannerStep 2 – navigate to the Application List pageStep 3 – locate the application that contains the saved query and click on the “ ” icon to the leftof the application to expand it9
How to Query, View & Print Documents in BDMBanner Document ManagementStep 4 – locate the saved query you wish to run and double click it in the list. You will NOT bepresented with the New Query page. WebXtender will run the query using the criteria that yousaved when building the query.Note: You can change the query criteria or add new criteria by right clicking the query in thelist and choosing “Edit” from the pop-up menu. The New Query page will open with thesaved criteria displayed. Several options are now available to you:a. Add more criteria to the queryb. Change existing criteriac. Re-save the changes thus updating the query for future usage3.4 Querying Using a Cross App QueryStep 1 – launch WebXtender through a browser or through BannerStep 2 – navigate to the Application List page10
How to Query, View & Print Documents in BDMBanner Document ManagementStep 3 – locate the application that contains the cross app query and click on the “ ” icon to theleft of the application to expand itStep 4 – locate the cross app query you wish to run. There are two options available:a. Double click the query and run it in its default configuration. This will return thecomplete document set from all applications that are in the query.b. Right click the query name in the list and select “Edit” from the pop-up menu. Thiswill open the Query page allowing you to enter criteria to search on. The onlycriteria available will be the fields that you marked as searchable when building thequery.This is the more practical use.Step 5 – enter values for the criteria fields and then press the SUBMIT button at the bottom ofthe query page.11
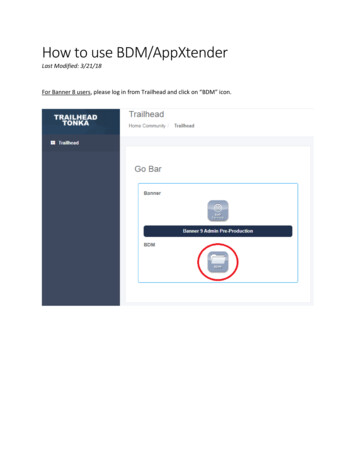
How to Query, View & Print Documents in BDMBanner Document Management4. Viewing DocumentsViewing documents can only be done after a query has been run and a collection of documentsreturned from that query.Step 1 – run a query to collect a document or a set of documents.Step 2 – in the Query Results page locate the document you wish to viewStep 3 – open the document using one of the following two methods:a. Double click the document in the listb. Check the check box next to the document and in the WebXtender toolbar click the“Open Selected Documents” buttonDepending on the browser being used the document open in the Document Viewer. If usingInternet Explorer the document will open in the Interactive Client Viewer offering moretoolbars and features:12
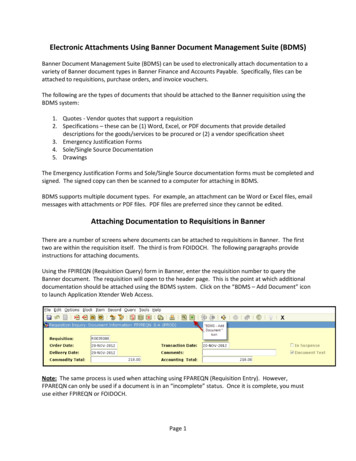
How to Query, View & Print Documents in BDMBanner Document ManagementIf using a non-Internet Explorer browser the docucment will open in a Thin ClientViewer offering limited features and functionality:13
How to Query, View & Print Documents in BDMBanner Document Management5. Correcting Page OrientationOn occasion a page in a document may get scanned incorrectly with respect to its orientation.The page may be upside down or sideways. The document gets indexed and the mistake in pageorientation does not get recognized until a user attempts to view the document.Here are the simple steps to follow to fix that one page without having to rescan the entiredocument or rescanning that page:1. Open the document in WebXtender for viewing.2. Scroll to the page that needs to be re-oriented.3. In the Interactive Viewer (IRC) Toolbar locate the rotate buttons and use one of them torotate the page until it is in the proper orientation.4. Once the page is in its proper orientation click on the Page Menu button in the IRC Toolbar.5. In the options that are presented to you select New Version - Current ViewNote – you have now created a new version of that page. You now need to delete any oldversions6. Go back to the Page Menu button in the IRC Toolbar and select Purge Versions7. A pop-up will ask you to confirm the deletion of previous versions. Answer YES.Note – it is very important that you purge the previous versions. When the new version iscreated it creates a new physical file for that version on the network storage drive for BDM.We do not want to leave old versions sitting in storage and the purge will remove them.14
How to Query, View & Print Documents in BDMBanner Document Management6. Printing DocumentsOccasionally in WebXtender there may arise the need to print a document of set of documents.The following provides details on how to send documents to print from BDM.a. Open the document in WebXtender so you are viewing its contents in the interactiveviewerb. In the interactive viewer toolbar you have two options:i. Print a single pageii. Print the entire documentIn the toolbar locate the buttons for printing.c. If you wish to print just the page you are viewing use the left print button. If you wish toprint all pages of the document use the print button in the right.Note – there are various other methods of printing documents out of WebXtender.5.1 EmailingIn addition to printing, documents can also be exported and emailed from WebXtender.Exporting is similar to saving the document to your PC.To Email a DocumentWhile viewing the document in the Interactive Viewer do the following:a. In the WebXtender menu click Document - Mail Documentb. In the “From” line enter your email address.Note:o The first time you use your email address BDM will email you a confirmationemail with a code. You will need to paste that code into the appropriate field toregister your email addressc. Enter the “To” address and any “Cc” addresses15
How to Query, View & Print Documents in BDMd.e.f.g.Banner Document ManagementEnter the email subjectChoose the message formatChoose if you want to attach the entire document or a page rangeBy default emails are sent with the document being a hyperlink link. This works OK ifthe person you are emailing has access to WebXtender and the document you wantthem to see. If you uncheck this option the document will be attached in normalattachment fashion.Emailing Notes:o Multipage documents will be emailed as one attachment per pageo As an option you can export the document and email it as an attachment usingMS Outlook.16
How to Query, View & Print Documents in BDM Banner Document Management 4 2. Creating & Saving Queries 2.1 Creating Queries within an Application WebXtender allows users to create queries that they run repeatedly and save them within the BDM application in which they are searching for documents. It should be noted that savingFile Size: 1MB