Transcription
NORTOC H AMEA ERNIA ICAPORCELAIN PAVERS INSTALLATION GUIDE
IND X2INTRODUCTIONA complete system of floorings and special pieces for public and residential outdoor spaces that providesa wide range of sizes, colors and finishes and different modes of application.7INSTALLATION OPTIONSThis manual was conceived from the desire to provide our customers valuable tips for laying the material;a simple and exhaustive tool, in order to obtain the best result in terms of appearance and quality.7SAND SET OVER COMPACTED ROAD BASEINSTALLATION (PEDESTRIAN FOOT TRAFFIC)8SAND SET OVER CONCRETE OVERLAYINSTALLATION (PEDESTRIAN FOOT TRAFFIC)9CEMENTITIOUS ADHESIVE OVERLAY, CONCRETE BASEINSTALLATION (LIGHT VEHICLE TRAFFIC)10PERMEABLE OVER OPEN GRADED AGGREGATEINSTALLATION (PEDESTRIAN FOOT TRAFFIC)11STEPPING STONE SAND SET ON COMPACTED ROADBASE INSTALLATION (PEDESTRIAN FOOT TRAFFIC)1220 MM (¾") FIXED PEDESTAL INSTALLATION ONCONCRETE FLOOR (PEDESTRIAN FOOT TRAFFIC)Dear Customer,Thank you for choosing Evo 2/E , the first porcelain stoneware to have a thickness of 20mm (¾”),produced and marketed by Mirage as a complete project for outdoors and gardening.The information contained in this guide is the result of the experience acquired from Mirage and the dailyinteraction with professionals of the sector.Mirage nevertheless invites you to comply with the local laws and regulations of each individual countryto produce flooring in accordance with the best working standards. We also recommend you carefullyassess the characteristics of the substructure before doing any type of machining or installing.1
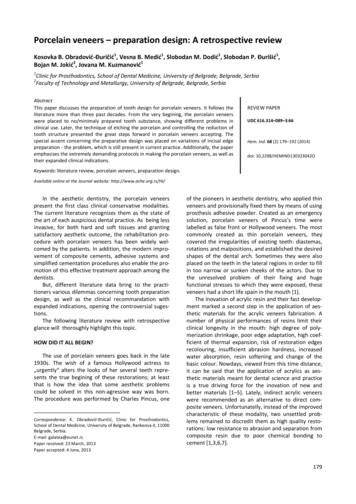
PORCELAIN PAVERS INSTALLATION INFORMATIONPORCELAIN PAVERS ADVANTAGESINTRODUCTION:Freeze thaw resistantColor durabilityMirage EVO 2/E porcelain pavers are formed by pressing, followed by vitrification: thisprocess involves the total fusion into a single material made from natural rawmaterials (sand, quartz, feldspars, kaolin, clays and inorganic pigments) which,fired at temperatures above 1230 C (2240 F), are transformed into a productwith exceptional hardness, ultra-low absorption rate and unmatchablemechanical characteristics.They are 100% frost-free and theirpropertiesremainunalteredattemperatures ranging from -50 C to 60 C (-60 F to 140 F).Aggregate is not seen if chipped/scratcheddue to color throughout unit.Easy installationLow absorption ratePerfect fit and for fast installs.Spills, salt and other materials will notseep into pours.Mirage EVO 2/E porcelain pavers are eco-compatible and ecolabel-certified.Each unit is 20 mm (0.7874”) standard thickness or ¾” nominal thickness and isdurable enough to withstand use in exterior applications. 1000kgEasy to cleanStylishHousehold cleaners can be used to wipe downspills and dirt; pressure washing can even bedone in select installation applications*.Matches what homeowners are currentlydoing inside the home.DurableResistantHigh breakage loads of up to 1000 kg(2200 lbs) allows for breakage reduction.High compressive strength and ultra-lowabsorption rate creates a dense surface thatresists mold, moss, dirt and other staining.Skid-resistantModular DesignStructured paver top textures createnon-slip surfaces for safety; perfect foraround pools/spas or in wet climates.Superior accuracy in dimensional sizingand linear sides, the slabs allow forperfectly executed installations with tightand accurate lines.Light weightAvailable in colors that have an SRI thatqualifies for a LEED certification.The SRI on some units ranges between60-80%. To receive LEED credit, the SRImust be at least 29%.17 kg (37 lbs) for the 60x60 cm (24”x24”)paver permit for easy installation, removaland serviceability and even reusability(Excluding adhered installations).ImpermeableDeicing salt and other deicing materialscan be used without concern of damage.* It is important that all pressure washing of your porcelain pavers be done with a low pressure washer with a maximum of 1600 psi andnothing more powerful. When pressure washing your installation, care should be taken to prevent damage to the grout (adhesive andgrout installations) and some re-sanding will be necessary when power washing an installation with sand or polymeric sand joints.23
PORCELAIN PAVERS INSTALLATION INFORMATIONSPECIALTY TOOLS FOR PORCELAIN PAVER CONSTRUCTIONINSTALLATION INFORMATION THAT MUST BE FOLLOWED Wet cut tile saw equipped with a diamond blademanufactured for wet cutting porcelain. The saw should bedesigned to safely cut a 60 cm (24") length porcelain paver. NEVER compact porcelain pavers with a plate compactor. A paver clamp for easy handling, which can be used toboth install and remove pavers. The use of gloves is highly recommended while handlingand installing porcelain slabs. Appropriate notched trowels and grout float tools forcementitious adhesive and grout Installation.The appropriate tool selection would be based on theadhesive and grout manufacturer’s recommendations. ALWAYS pre-compact and strike off your sand leveling course before installing your porcelain paversin sand set installations. Porcelain pavers should only be wet cut with a tile saw equipped with a wet cut porcelain blade. NEVER install porcelain pavers without the required 4 mm (3/16”) spacing between them. The porcelainpavers should never be installed with a porcelain to porcelain contact. Plastic 4 mm (3/16”) spacers(SPACE G shown in photos below) should be used on sand set and permeable installations. The photoon the left illustrates the spacer installed in a perspective to support and space 4 paver corners and thephoto on the right illustrates the installed spacer snapped apart (as designed) to form a T-perspectivethat support 2 paver corners. This versatility will permit your porcelain pavers to be installed in a stackbond pattern, a running bond patterns as well as a flush installation against another structure.SPACE G Mirage HANDLING Porcelain paver pallets are packaged with a very strongplastic covering and the individual units are packaged inprotective cardboard boxes. The packaged pavers shouldnot be removed from the protective boxes until they areready for installation.CAUTION: Removing pavers from their protectivepackaging and handling multiple loose stones togethercreates the possibility for chipping. Once the plastic shipping cover has been removed fromthe pallet, the un-used boxed pavers should be protectedfrom the elements to insure the integrity of the protectivecardboard boxes.JOINT INFILLING INFORMATIONINSTALLATION INFORMATIONWhen porcelain pavers are installed as sand set installations, you may fill the 4 mm (3/16”) paver joints with:Each of the following option details will include specific information relative to the selected installation.Base thicknesses vary between different geographical and climatic locations and the contractor will beinstalling typical base thicknesses for paving installations in their location.Traditional sandDry traditional sand is swept into the open joints until they are completely filled. Excess sand should be swept off of thepavement. Keep in mind that sand joint may in time have to be re-sanded as wind and rain can cause some erosion.IMPORTANT: Installing porcelain pavers requires the bedding course sand to be pre-compacted and thenstruck off with a screed to the required thickness as shown in the detail drawings. The porcelain paversare not compacted and therefore the sand layer beneath them requires pre-compaction. Do not compactdry sand, but insure the sand has a 5 to 6% moisture content so that it will compact cohesively and allowfor a smooth strike off finish.Cement blended sandDry cement blended sand (typical 3 parts sand to 1 part cement) is swept into the open joints until theyare completely filled. Excess cement blended sand is swept off of the pavement. It is extremely importantthat all of the excess sand and dust be swept from the surface (blowers can be used for final dustremoval), as any residual dust or sand can stain the surface. After joints are full and the surface is cleanthe pavement is misted with water to activate the cement and the curing of the mixture.Polymeric sandPolymeric sand is a manufactured sand that is blended with polymers which hardens when subjected tomoisture. The sand is swept into the open joints until they are completely filled. Like cement blended sand, itis extremely important that all excess sand and dust be swept from the surface (blowers can be used for finaldust removal), as any residual dust or sand can stain the surface. After joints are full and the surface is clean,the pavement is misted with water to activate the polymer and curing of the mixture.IMPORTANT NOTE: LEGAL DISCLAIMERThe nominal measurements include 4mm for product spacers which are sold separately. Although extreme care has been taken to ensurethe accuracy of all measurements set forth herein, Manufacturer assumes no liability relating thereto.4IMPORTANT NOTES:1. When selecting sand for a traditional sand or cement blended sand infill, insure the gradation of the sand is fine enough to pass throughand fill the 4 mm (3/16”) joints.2. When using Polymeric Sand it is important to follow the manufacturer’s instructions to insure there is no surface staining.3. Cement blended sand and polymeric sand can both contribute to a reduction in joint plant growth and insect infiltration within thejoint infill material.5
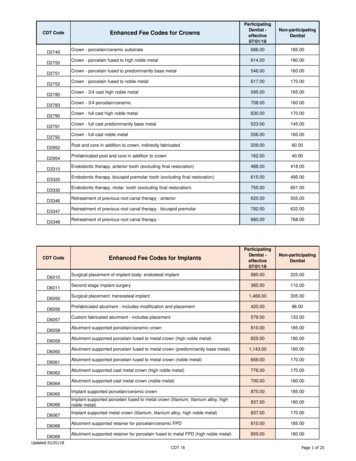
PORCELAIN PAVERS INSTALLATION INFORMATIONINSTALLATION OPTIONSINSTALLATION OPTIONS1. SAND SET OVER COMPACTED ROAD BASE INSTALLATION(PEDESTRIAN FOOT TRAFFIC)1. Sand Set over Compacted Road Base Installation.(Pedestrian Traffic)2. Sand Set over Concrete Overlay Installation.(Pedestrian Traffic)3. Cementitious Adhesive Overlay, Concrete Base Installation.(Light Vehicular Traffic)4. Permeable Over Open Graded Aggregate Installation.(Pedestrian Traffic)5. Stepping Stone Sand Set on Compacted Road Base Installation.(Pedestrian Traffic)6. 20 mm (¾”) Fixed Pedestal Installation on Concrete Floor.(Pedestrian Traffic)Roof Top and Commercial Raised Pedestal Installations require engineered design. For Engineeredsupport and other additional technical information on the installation of porcelain pavers, pleasecontact Mirage at info@mirage.it.INSTALLATION NOTES:Follow the detail drawing below. Base material is to be over based 15 to 20 cm (6" to 8") beyond the edge of the pavement. The required edge restraint system is a low profile edge restraint with a vertical height of 4 cm (1½")as shown in the drawing. Insure that pavement is constructed with a 1,5 to 2 degree slope that it is pitched away from any building. Insure the plastic 4 mm (3/16”) spacers are installed at all corners of the installed pavers.17236451. Mirage Porcelain 20 mm (¾" nominal) pavers.2. Minimum 4 mm ( /16”) spacing between pavers.7. Peripheral Restraint System Spikedinto 15 to 20 cm (6" to 8") overbase area.3. Sand bedding course (2,5 cm - 1" Pre-compacted thickness)20 mm (¾”) Mirage Porcelain Paver4. Compacted road base4 cm (1½") tall peripheral restraintsystem spiked into 15 to 20 cm (6" to8") over base area3NOTE: Pre-compact the sand bedding course and screed to a 2,5 cm (1")thickness with smooth surface.2,5 cm (1") Pre-compacted torpedo sand2 cm (¾") minus road base material. Base thickness is determined bysoil and climatic conditions.5. Subgrade6. SoilIMPORTANT:For a professional and chip free cut, Mirage Porcelain Pavers should only be cut with a tile saw equipped with a wet cut porcelain blade.CAUTION:Never compact Mirage Porcelain Pavers with a plate compactor.Never install Mirage Porcelain Pavers without the required 4 mm (3/16”) spacers between all units.67
INSTALLATION OPTIONS2. SAND SET OVER CONCRETE OVERLAY INSTALLATION(PEDESTRIAN FOOT TRAFFIC)3. CEMENTITIOUS ADHESIVE OVERLAY, CONCRETE BASE INSTALLATION(LIGHT VEHICLE TRAFFIC)INSTALLATION NOTES:INSTALLATION NOTES:Follow the detail drawing below.Follow the detail drawing below. The required edge restraint system is a low profile edge restraint with a vertical height of 4 cm (1½")as shown in the drawing. Insure that pavement is constructed with a 2 degree pitch and that it is pitched away from any building. Mechanically anchor edge restraint into the concrete base. Insure geotextile is installed directly on top of the concrete to contain the bedding sand. Insure that pavement is constructed with a 1,5 to 2 degree slope and that it is pitched away from any building. Insure the plastic 4 mm (3/16”) spacers are installed at all corners of the installed pavers. Referenced approved cementitious adhesive.www.mapei.com/public/US/products/Kerabond T-Keralastic EN lr.pdfwww.mapei.com/public/US/products/Ultraflex LFT EN lr.pdf Referenced approved joint grout orplus tds s ea.pdfFor cementitious adhesive and grout installation, refer to the manufacturer’s technical instructions andspecifically as they relate to outdoor installations. For concrete foundation slabs that are not large enough to require contraction / control joints, a minimum 4 mm(1/8” to 3/16“) grout joint is acceptable, but for larger concrete foundation slabs that do require contraction /control joints, the joint width should be a 1 cm (3/8”). It is absolutely imperative that all contraction / controljoints be located in the joint line of installed porcelain pavers and not beneath a paver.CAUTION: If a Porcelain Paver is installed over a control joint, the paver will reflectively crack along thecontraction / control joint beneath it.91924852565734865135571. Mirage Porcelain 20 mm (¾" nominal) pavers.9. Peripheral Restraint System Mechanicalfastened into concrete base.1. Mirage Porcelain 20 mm (¾" nominal) pavers3. Sand bedding course (2,5 cm - 1" Pre-compacted thickness)20 mm (¾”) Mirage Porcelain Paver3. Sand bedding course (2,5 cm - 1" Pre-compacted thickness)20 mm (¾”) Mirage Porcelain Paver4. Geotextile fabric4 cm (1½") tall peripheral restraintsystem anchored into concrete base.4. Geotextile fabric4 cm (1½") tall peripheral restraintsystem anchored into concrete base.2. Minimum 4 mm ( /16”) spacing between pavers.3NOTE: Pre-compact the sand bedding course and screed to a 2,5 cm(1") thickness with smooth surface.2,5 cm (1") Pre-compacted torpedo sandInstalled on top of concrete and folden up the front of the Edging.This is required to prevent the unwanted migration of the sandbedding course material.5. 12,5 mm (½") drainage holes drilled 60 cm (24") on center.9. Peripheral Restraint System Mechanicalfastened into concrete base.2. Minimum 4 mm (3/16”) spacing between pavers.NOTE: Pre-compact the sand bedding course and screed to a 2,5 cm(1") thickness with smooth surface.2,5 cm (1") Pre-compacted torpedo sandInstalled on top of concrete and folden up the front of the Edging.This is required to prevent the unwanted migration of the sandbedding course material.5. 12,5 mm (½") drainage holes drilled 60 cm (24") on center.IMPORTANT:For a professional and chip free cut, Mirage Porcelain Pavers shouldonly be cut with a tile saw equipped with a wet cut porcelain blade.6. Concrete baseNOTE: A concrete base with a sound surface and small cracks can beutilized as a base for paving slab construction, but a concrete basewith differential settlement or movement is not acceptable.CAUTION:Never compact Mirage Porcelain Pavers with a plate compactor.7. SubgradeNever install Mirage Porcelain Pavers without the required 4 mm(3/16”) spacers between all units.8. Soil8IMPORTANT:For a professional and chip free cut, Mirage Porcelain Pavers shouldonly be cut with a tile saw equipped with a wet cut porcelain blade.6. Concrete baseNOTE: A concrete base with a sound surface and small cracks can beutilized as a base for paving slab construction, but a concrete basewith differential settlement or movement is not acceptable.CAUTION:Never compact Mirage Porcelain Pavers with a plate compactor.7. SubgradeNever install Mirage Porcelain Pavers without the required 4 mm(3/16”) spacers between all units.8. Soil9
INSTALLATION OPTIONS4. PERMEABLE OVER OPEN GRADED AGGREGATE INSTALLATION(PEDESTRIAN FOOT TRAFFIC)5. STEPPING STONE SAND SET ON COMPACTED ROAD BASE INSTALLATION(PEDESTRIAN FOOT TRAFFIC)INSTALLATION NOTES:Follow the detail drawing below. The required edge restraint system for this installation has a vertical height of 6 cm (2½") as shown inthe drawing. Follow the edge restraint manufacturer’s recommendations for the use of their productin permeable applications regarding geogrid usage and placement to maintain the performance ofthere edging. Insure that pavement is constructed with a 2 degree pitch and that it is pitched away from any building. Insure the 4 mm (3/16”) spacers are installed between all pavers.FULL INFILTRATION - PERMEABLE SUBGRADE218213613734445561. Mirage Porcelain 20 mm (¾" nominal) pavers.1. Mirage Porcelain 20 mm (¾" nominal) pavers.2. Minimum 4 mm (3/16”) spacing between pavers.8. Peripheral Restraint System Spikedinto 15 to 20 cm (6" to 8") overbase area.3. 5 cm (2 ") bedding course of 1 cm ( /8”) open graded aggregate.20 mm (¾”) Mirage Porcelain Paver3. Sand Bedding Course (2,5 cm - 1" Pre-compacted thickness).3 NOTE: Pre-compact the sand bedding course and screed to a 2,5 cm(1") thickness with smooth surface.5 cm (2") Pre-compacted 1 cm (3/8”)open graded aggregate4. Compacted base course of 20 mm (¾") open graded aggregate.Geogrid to stabilize the restraint systemFinal Base Course thickness and exfiltration design is determinedby soil, climatic and hydraulic considerations.6 cm (2½") tall peripheral restraintsystem spiked into 15 to 20 cm (6" to 8")over base area5. Geotextile6. Subgrade2. Grass cutout areas provide peripheral paver containment.NOTE: Pre-compact the sand bedding course and screed to a 2,5 cm(1") thickness with smooth surface.4. Compacted road base.Compacted Road Base, 2 cm (¾") minus road base material.Base thickness is determied by soil and climatic conditions.5. Subgrade6. Soil7. SoilIMPORTANT:For a professional and chip free cut, Mirage Porcelain Pavers should only be cut with a tile saw equipped with a wet cut porcelain blade.IMPORTANT:For a professional and chip free cut, Mirage Porcelain Pavers should only be cut with a tile saw equipped with a wet cut porcelain blade.CAUTION:Never compact Mirage Porcelain Pavers with a plate compactor.CAUTION:Never compact Mirage Porcelain Pavers with a plate compactor.Never install Mirage Porcelain Pavers without the required 4 mm (3/16”) spacers between all units.Never install Mirage Porcelain Pavers without the required 4 mm (3/16”) spacers between all units.1011
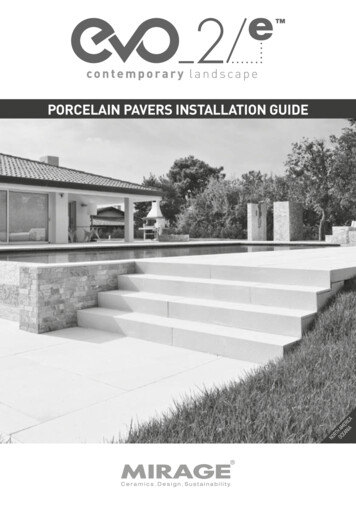
INSTALLATION OPTIONS6. 20 MM (¾”) FIXED PEDESTAL INSTALLATION ON CONCRETE FLOOR(PEDESTRIAN FOOT TRAFFIC)INSTALLATION NOTES:Follow the detail drawing below. Insure that concrete slab is smooth, even across the surface and is constructed with a 2 degree pitchand that it is pitched away from any building. Insure the plastic 20 mm (¾”) pedestal support are installed at all corners of the installed pavers.312645CONTEMPORARY LANDSCAPE1. Mirage Porcelain 20 mm (¾" nominal) pavers.2. 20 mm (¾") Pedestal for raised installation (sectionable). Pedestal musthave a rubber coverage on top, in order to prevent any breakage slab.In 2010 Mirage made its mark as the first international company to develop a complete rangeof 20 mm (¾”) porcelain stoneware for outdoor flooring and furnishing. A system that bringsinnovation to the Contemporary Landscape Design world. Today EVO 2/E is still the mostadvanced range on the market, thanks to the know-how acquired in years of research and the widerange of colours, sizes, special pieces and complements.WARNING OUTDOOR PAVINGS INSTALLED UNGLUED ABOVE THE GROUND LEVEL ARE SUBJECT TO THE ACTION OF THE WIND, WITH THE RISK,IN SOME CASES, OF BECOMING AIRBORNE. THE MANUFACTURER RECOMMENDS TO REQUIRE THE ASSISTANCE OF A QUALIFIEDPROFESSIONAL IN ORDER TO CHECK THE SUITABILITY OF THE INSTALLATION SYSTEM ABOVE THE GROUND ADOPTED, IN ACCORDANCEWITH THE LOCAL LAWS AND REGULATIONS AND THE CONDITIONS OF USE. FAILURE TO DO SO COULD RESULT IN SERIOUS INJURY ORPROPERTY DAMAGE.3. Sectioned pedestal anchored or adhesively bonded to concrete base.4. Concrete base.Thickness and reinforcement requirements are based on traffic loading andare to be designed and constructed according to the proper local standards.5. Subgrade A CERAMIC SLAB INSTALLED ON A RAISED PEDESTAL SYSTEM MAY FRACTURE ON IMPACT IF A HEAVY OBJECT IS DROPPED ONTO IT FROMA HEIGHT, WITH A RISK OF INJURY TO ANYONE STANDING OR WALKING ON SUCH SLAB. FAILURE TO ADHERE TO THE MANUFACTURER’SINSTRUCTIONS FOR INSTALLATION OF SLABS ON RAISED PEDESTAL SYSTEMS MAY RESULT IN SERIOUS INJURY.FOR FURTHER INFORMATION AND RECOMMENDATIONS CONCERNING THE INSTALLATION SYSTEMS PLEASE REFER TO WWW.MIRAGE.ITOR TO THE EVO 2/E 20 MM. CATALOGUE.NOTE6. SoilIF THE APPLICATION OF THE 20 MM (¾") SLABS FORESEES THE CERAMIC PRODUCT USED IN STRUCTURAL INSTALLATIONS, THEPROJECT ENGINEER AND/OR CUSTOMER MUST CAREFULLY ASSESS THE PROJECT REQUIREMENTS WITH REGARD TOTHE TECHNICALSPECIFICATIONS OF THE SLABS.TO PREVENT THE RISK OF DAMAGE OR INJURY, THE MANUFACTURER RECOMMENDS:IMPORTANT:For a professional and chip free cut, Mirage Porcelain Pavers should only be cut with a tile saw equipped with a wet cut porcelain blade.CAUTION:Never compact Mirage Porcelain Pavers with a plate compactor.Never install Mirage Porcelain Pavers without the required 4 mm (3/16”) spacers between all units.For installation above 2 cm (3/4”) please contact Mirage . WITH REGARD TO A RAISED FLOOR INSTALLATION A CERAMIC SLAB MAY FRACTURE ON IMPACT IF A HEAVY OBJECT FALLS ON IT FROMANY SIGNIFICANT HEIGHT. THEREFORE THE MANUFACTURER RECOMMENDS TO CHECK THE SPECIFIC INTENDED USE BEFORE STARTINGTHE INSTALLATION AND TO FOLLOW TABLE FOR RAISED INSTALLATION PROVIDED BELOW. IN CERTAIN CONDITIONS, REINFORCING MUSTBE APPLIED ON THE BACK OF THE SLABS (MESH PLUS OR GALVANIZED STEEL SHEET) SUPPLIED AND APPLIED BY THE MANUFACTURER; WITH REFERENCE TO ANY DRY INSTALLATION SYSTEM OF FLOORING ABOVE THE GROUND LEVEL, THE MANUFACTURER RECOMMENDSTO COMPLY WITH LOCAL REGULATIONS AND CONDITIONS OF USE WITH REGARD TO WIND-LOAD, LOADBEARING, SEISMIC EVENTS, ETC.FAILURE TO COMPLY WITH THESE RECOMMENDATIONS MAY LEAD TO IMPROPER USE OF THE PRODUCT AND COULD CAUSESERIOUS DAMAGE OR INJURY.12
Settembre 2015Cod. R945Mirage Granito Ceramico SpA - Settembre 2015È vietata la riproduzione, anche parziale, dell’opera in tutte le sue forme.Reproduction of this printed catalogue, even partially, is prohibited.MIRAGE USA100 Crescent CourtSuite 700Dallas, TX 75201Ph. 214 459 2760Ph. 214 459 276241026 PAVULLO (MO) ITALYVia Giardini nord, 225Tel. 39 0536 29.611Telefax 39 0536 21.065info@mirage.itTAX ID: 75 Mirage.it
Dear Customer, Thank you for choosing Evo_2/E , the first porcelain stoneware to have a thickness of 20mm (¾"), produced and marketed by Mirage as a complete project for outdoors and gardening. A complete system of floorings and special pieces for public and residential outdoor spaces that provides a wide range of sizes, colors and finishes and different modes of application.