Transcription
QuickBooks SMALL BUSINESS ACCOUNTINGPayroll User Guide
CopyrightCopyright 2012 Intuit Inc.All rights reserved.STATEMENTS IN THIS DOCUMENT REGARDING THIRD-PARTY STANDARDS OR SOFTWARE AREBASED ON INFORMATION MADE AVAILABLE BY THIRD PARTIES. INTUIT AND ITS AFFILIATESARE NOT THE SOURCE OF SUCH INFORMATION AND HAVE NOT INDEPENDENTLY VERIFIEDSUCH INFORMATION. THE INFORMATION IN THIS DOCUMENT IS SUBJECT TO CHANGEWITHOUT NOTICE.Trademarks and PatentsIntuit, the Intuit logo, QuickBooks, QuickBase, Quicken, TurboTax, among others, are registeredtrademarks and/or registered service marks of Intuit Inc. in Canada and other countries. Otherparties’ trademarks or service marks are the property of their respective owners and should betreated as such. Various QuickBooks products and services may be protected by one or more U.S.patents.ImportantTerms, conditions, features, service offerings, prices, and hours referenced in this documentare subject to change without notice. We at Intuit are committed to bringing you great onlineservices through QuickBooks. Occasionally, we may decide to update our selection and changeour service offerings, so please check www.quickbooks.ca for the latest information, includingpricing and availability, on our products and services. Discontinuation policy available atwww.quickbooks.ca/discontinuation-policyService KeySubscription NumberThank you for choosing Intuit QuickBooks Payroll.Intuit QuickBooks Payroll gives you the tools you need to efficiently manage your payroll.Your subscription provides you with up-to-date tax tables and gives you the flexibility toprocess payroll and run customized reports whenever you want. Because you do it fromwithin QuickBooks, QuickBooks Payroll is easy to set up and use.It’s important to us that you are completely satisfied with QuickBooks accounting software.This Payroll Getting Started Guide will help familiarize you with our payroll solution andhelp ensure a hassle-free experience. Please keep this guide within easy reach. It can helpyou through the payroll start-up process and provide answers to many common questions.
Intuit QuickBooks PayrollAbout this guideThe illustrations and procedures in this guide are for customers using QuickBooks 2013.ContentsGetting Started: Activate and Set UpHow Intuit QuickBooks Payroll worksActivating your payroll subscriptionThe QuickBooks Payroll Centre overviewSetting up payrollPayroll SetupAdding Payroll ItemsSetting up EmployeesSet up Year-to-Date AmountsKeeping your tax tables up to date2234699101213Payroll ProcessPayroll overviewPaying employeesPrinting pay cheques and paystubsEditing and voiding pay chequesManaging employeesManaging payroll items14141620212223Tax Forms and FilingsPaying taxes and other liabilitiesCreating T4 slipsEmailing & Printing T4 slipsEFILE T4 slips to the CRAAmending T4 slipsCancelling T4 slips24242525262727Employer ResourcesInformation for new employers2828If you have any questions during the payroll start-upprocess, call us. You benefit from a FREE support phonesession (up to 60 minutes) with a QuickBooks expert within60 days of purchasing your software.*1-877-772-9158(Monday to Friday, 8 a.m. to 8 p.m. EST).* Product registration & the free 60-minute technical support call must be completed within 60 days of purchase. Length of call cannot beredeemed in increments. Canada only. Intuit Canada ULC reserves the right to limit the length of the telephone call.1
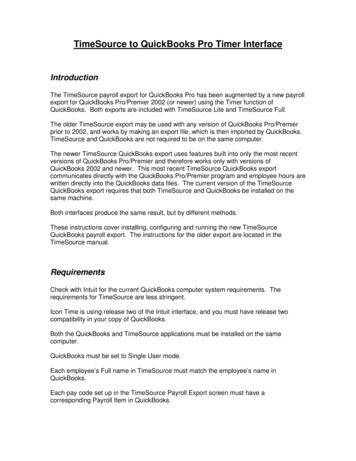
Getting Started: Activate and Set UpHow Intuit QuickBooks Payroll worksIntuit QuickBooks Payroll is a subscription service that works inside your QuickBooksaccounting software.Setting up and running payroll involves five main steps:➊ Activate and Set Up—Activating unlocks the payroll features in your QuickBookssoftware. Once you’ve activated your subscription, you can set up and pay employees.➋ Automatically Download Tax Tables—QuickBooks connects to the Internet todownload the latest tax tables.➌ Process Payroll—You can easily enter the time for your hourly and salaried employeesdirectly into QuickBooks. QuickBooks Payroll calculates earnings, payroll taxes, anddeductions.➍ Print Pay Cheques—Once you’ve reviewed your pay cheques, you can print them fromyour computer. Or you can use the convenient Direct Deposit feature (additional feesand setup required. See telpay.ca for more details).➎ Pay and File Your Taxes and Liabilities—QuickBooks Payroll tracks your payroll taxesand other liabilities as you go. When you have a Payroll subscription, you can generatetax reports and submit your payroll taxes to the CRA. Requires Internet access,download of current tax tables & transmitter number from CRA &/or MRQ. For details,visit www.cra-arc.gc.ca/esrvc-srvce or www.revenu/gouv.qc.caPD7A1. Activate and set upIntuit QuickBooksPayroll.22. Download the latesttax tables.3. Enter employee datain QuickBooks.4. Print pay cheques oruse convenient DirectDeposit (setup required.See telpay.ca for moredetails).5. Pay and file your taxes.
Getting StartedActivating your payroll subscriptionIf you're already using QuickBooks accounting software: Call Intuit at 1-888-333-8580 to speak with a customer service agent. The customer service agent will require some company information to complete yourQuickBooks Payroll Subscription.Note: Your payroll service key is specific to you and your business. This number is required to use thepayroll service features to which you subscribed. Payroll activation is a one-time process.Entering your Payroll Service Key in QuickBooks➊ Within QuickBooks, select the Employees drop-down menu, go to My Payroll Service, andselect Manage Service Key.➋ In the Service Key field, enter your Payroll Service Key and then click Next.➌ Click Finish. QuickBooks Payroll is now activated.3
The QuickBooks Payroll Centre overviewTo open the Payroll Centre: From the Home page, click the Payroll Centre icon or go to the Employees menu andclick Payroll Centre.Click the Employees tabto add new employees,modify employee records,and view employeerelated transactions, suchas liability adjustmentsand pay cheques.Click the Transactions tabto view past transactions,such as pay cheques,liability adjustments, andhistorical data.View and updatesubscription information.4
Getting StartedAccess the PayrollLearning Centreand other usefullinks.Access in-productHelp.Pay your employees quicklyand easily. Enter hours,review pay cheques, andprint or use convenientDirect Deposit (additionalsetup and fees required).5
Setting up payrollAfter you have activated your QuickBooks payroll you can begin to set up payroll items andemployees in the Payroll Centre. Follow the workflows in the Payroll Centre to set up andrun your payroll in QuickBooks. Company Setup: Enter compensation and benefits. Employee Setup: Add your employees and set up their personal and pay information(pay rate, benefits, and so on). Taxes: QuickBooks sets up all of the necessary payroll tax items like Federal Tax, CanadaPension Plan and Employment Insurance. Year-to-Date Amounts: Enter all year-to-date payroll information (payroll summaries,tax and non-tax payments you’ve already made, and so on). For more information aboutentering year-to-date information, see the Help topic, Summarize Payroll Amounts for thisYear-to-Date.6
Getting StartedSetting up payroll preferences:There are several preferences that let you use payroll moreeffectively in QuickBooks. To edit payroll preferences:➊ Go to the Edit menu and click Preferences.➋ Click Payroll & Employees and then click the CompanyPreferences tab.Did You Know?QuickBooks defines anemployee as someoneyou give a T4 form toat the end of the year.You pay them with paycheques and withholdtaxes for them. Set up allthose who fall into thiscategory as employees.Do not set upindependent contractorsand owners asemployees. QuickBooksdefines an independentcontractor as someoneyou might give a T4Aor T5018 to. Set upcontractors as vendors.Pay owners and partnersby cheques that draw onthe company’s equity.Setting up payrollQuickBooks sets upimportant payroll taxitems for you such asFederal Tax, CPP, and EI.You will need to add youremployees and otherdetails to complete thepayroll setup.It’s a good idea to havean accountant or payrollprofessional review yoursetup. Mistakes in settingup payroll can causeproblems later.7
Payroll Setup Checklist:You’ll need the following information to set up Intuit QuickBooks Payroll. You can get theinformation from your own records, from your accountant, or from federal and provincial agencies.ItemExamplesCompanyInformation Pay period frequency or frequencies (for example, weekly, biweekly,semimonthly, monthly) Date you started or will start using payroll in QuickBooksCompensation,Benefits, andMiscellaneousAdditions andDeductions Compensation you give employees and officers: hourly wages, salaries,commissions, and so on Insurance benefits offered, such as health, dental, vision Retirement benefits offered, such as RSP information Additional deductions from net pay that you withhold, such as union dues,repayments of employee advances or loans, and life insurance Additions you add to a pay cheque, such as bonuses, travelreimbursements, employee advances or loans, and tipsTax Information Federal and provincial TD1 forms completed by each employee (for moreinformation, see cra.gc.ca) and your 9 Digit CRA Business Number Payroll bank accounts Tax rates for any local or other taxesEmployees Employee names, addresses, and Social Insurance numbers from youremployees’ Social Insurance cards or TD1 forms Employee withholdings, which can also be found on the TD1 form Current employee wages/salaries, additions, deductions, and companycontributions Sick and vacation time policies and hours accruedDirect DepositInformation For each employee you want to pay using Direct Deposit, you need bankaccount routing and transit numbersNote: This is an optional feature that requires additional fees Pay period summaries of employee payroll amounts from the beginning ofthis calendar year to the beginning of the current on8Note: You need to enter year-to-date payroll ONLY if you start using QuickBooksPayroll after January 1 of the calendar year AND if you’ve already run payroll atleast once since January 1 (if you start using QuickBooks Payroll after January1 but have not run a payroll yet this calendar year, you have no year-to-dateinformation to enter) Monthly and pay period summaries of payroll liability payments from thebeginning of this year to your start date Copies of payroll liability cheques from the first day of the current quarteruntil today Payment and filing methods
Intuit QuickBooksGetting StartedPayrollPayroll SetupWhen setting up payroll for the first time, you must: Create items that can be added to an employee’s pay cheque. Set up employees in the Employee Centre. Set up YTD (Year-to-Date) amounts for your employees. These are totals paid so far thiscalendar year to each employee before starting QuickBooks Payroll, including benefitsand taxes withheld. (Optional) Configure Payroll Schedules to save time generating pay cheques in thefuture.Adding Payroll ItemsAdd payroll items to pay cheques the same way you add items to invoices. Payroll items trackamounts such as wages you pay and taxes you deduct from pay cheques. There are payrollitems for compensation, taxes, other additions and deductions, and employer-paid expenses.By default, QuickBooks creates common payroll items for you. However, you may need toadd other payroll items for your own company, such as additional health benefits that yourcompany provides. You’ll need payroll items for hourly wages, salaries, commission, andbonuses; government taxes and deductions; employee deductions of any kind (such as RRSPcontributions); additions (such as an automobile allowance); and company-paid expenses (suchas company-paid health insurance).9
To create a payroll item:➊ Open the Payroll Centre (go to the Employees menu and click Payroll Centre).➋ In the Payroll Setup section, click Payroll Items.➌ In the Payroll Item List, click the Payroll Item menu button and then click New.➍ Choose the type of payroll item you want to create:Use thispayroll itemTo trackWageMoney you pay to employees for salaries, hourly wages, commissions,bonuses, and overtime.AdditionMoney you pay to an employee that is not a direct result of their work,such as a car allowance.DeductionMoney you deduct from your employee other than taxes, such as uniondues or employee purchases.CompanyContributionCompany-paid benefits for your employees, such as pension plans ordental benefits.Other TaxMiscellaneous taxes (company or employee paid) based on an employee’swages, such as Provincial Health Tax.➎ Click Next and answer the questions on each screen.Setting up EmployeesTo process pay cheques and prepare tax documents for your employees, you must enter severaldetails about your employees.To add an employee:➊ Open the Employee Centre (go to the Employees menu and click Employee Centre).➋ Click New Employee. The New Employee window opens.➌ Enter information about the employee as listed below.To set up an employee’s personal information:➊ In the Personal tab of the New Employee window, enter the employee’s personaldetails, including their name, Social Insurance Number (SIN), and date of birth.➋ In the Address and Contact tab, enter the employee’s address and contact information.➌ In the Additional Info tab, define custom fields to store other information you want totrack, such as the name of the employee’s spouse.➍ In the Employment Info tab enter the employee’s hire date and occupational title.10
Intuit QuickBooksGetting StartedPayrollTo set up an employee’s payroll information:➊ In the New Employee window, select the Payroll Info tab.➋ In the Earnings section, set up the employee’s wage information: Under Item Name, select a salary or hourly payroll item, then under Hourly/AnnualRate enter the amount you pay annually or hourly.➌ In Pay Frequency, select how often you pay this employee.➍ If you use QuickBooks to track your employee’s time, and you pay employees based onthis time, click Use time data to create pay cheques.➎ In the Additions, Deductions, and Company Contributions section, set up anyemployee benefits and other deductions (except for taxes) that you take from paycheques.➏ Click the Taxes button to enter information from the employee’s TD1 forms, and reviewthe Income Tax, Canada Pension Plan/Quebec Pension Plan, Employment Insurance andother payroll taxes he or she might have to pay.➐ Click the Accrual Hours button to set up how much time an employee accrues, includinghow much he or she has accrued this year.➑ Click the Vacation Pay button to set up how much vacation pay the employee hasavailable and how much he or she earns. Select the earning items you want vacation toaccrue on.➒ Click the Direct Deposit button to set up direct deposit information.Note: This is a third-party service and fees do apply.11
Set up Year-to-Date AmountsIn order for QuickBooks to calculate tax and other amounts during a payroll run, QuickBooksneeds to know the amounts you already paid to employees before you started using QuickBooksPayroll, for this calendar year-to-date.In order to enter YTD amounts, you’ll need: The amount each employee earned (including former employees paid this year) How much was deducted from each employee’s earnings, and for what purpose (incometax, EI, CPP, and so on). You must also include how much tax your company paid as aresult of the employee’s earnings (such as the employer’s portion of EI) Vacation pay accrued by each employee (in total, not just this year) Amounts you have remitted so far this year for payroll liabilitiesTo enter YTD amounts: Open the Payroll Centre (go to the Employees menu and click Payroll Centre) In the Payroll Setup section, click Set Up YTD Amounts Follow the instructions in the wizard12
Getting StartedKeeping your tax tables up to dateBy default, QuickBooks Payroll has Automatic Updates enabled.This lets QuickBooks Payroll check for payroll updates eachtime you start it so you never miss an updated tax rate.Did You Know?Payroll UpdatesPayroll updatesbecome availablethroughout the year.Updates might includeenhancements ornew tax tables. Werecommend that youupdate to make surethat you have the mostcurrent tax tables.If you don’t have Automatic Updates turned on, you canstill keep your QuickBooks Payroll up to date:➊ From the Help menu, click Update QuickBooks.➋ Select the Options tab to change update preferences.➌ Click the Get Updates button, located in the‘Update Now’ tab. When the download completes,QuickBooks displays a message confirming that the updatewas downloaded successfully.➍ Close QuickBooks and re-launch it to allow the update toinstall.To review the tax table changes, click Employees, then MyPayroll Service, then Tax Table Information.13
Payroll ProcessPayroll overviewYou can set up payroll schedules or run payroll without a schedule. A payroll run that is setup to occur at a regular frequency is scheduled, while payroll that you might run only forspecial circumstances or outside your regular payroll run is unscheduled payroll.Payroll Centre without payroll schedulesPayroll Centre with payroll schedulesFrom the Payroll Centre, you can start paying your employees: If you click the Start Scheduled Payroll button, you’ll be prompted to set up payrollschedules. Once you set up payroll schedules, click to select the schedule you want to runand then click Start Scheduled Payroll.14
Payroll ProcessSetting up payroll schedules➊ Go to the Payroll Centre.Key Terms➋ Click the Add/Edit Payroll Schedules icon.Payroll SchedulesAlthough you canpay employees usingunscheduled payroll,we recommend usingschedules for yourregular pay run.➌ From the Payroll Schedule List window, click PayrollSchedule, and then click New.➍ Enter information in the fields.When you use payrollschedules, QuickBooksautomaticallydetermines the payrollprocessing dates foreach pay period. Youset up your payrollschedule once andassign employees toit. The dates reset tothe next pay periodafter you create paycheques.You can use payrollschedules to grouptogether employees inwhichever way makesthe most sense for youto effectively run yourpayroll and business.Assigning employees to payroll schedulesNote: You can only group employees in the same payroll scheduleif they have the same pay frequency (for example, weekly, biweekly,semimonthly, and so on).➊ From the Employees tab in the Payroll Centre, doubleclick the name of the employee you want to assign to theschedule.➋ Click the Payroll Info tab.➌ Click the Payroll Schedule drop-down arrow and thenselect the pay schedule. The Pay Frequency field updatesaccordingly.Unscheduled PayrollTo pay an employeeoutside a regularpayroll run, useUnscheduled Payroll.Termination PayrollTo terminate anemployee, go tothe Payroll Centre,click Related PayrollActivities, then clickCreate TerminationCheque.➍ Click OK.15
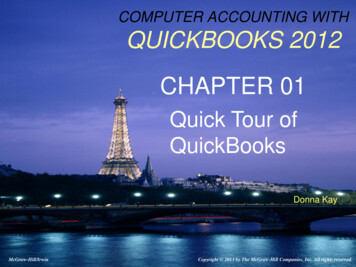
Paying employeesEnter payroll information and select employees to pay➊➋➌➍➎Review and create pay cheques➏➐➑16
Payroll ProcessTo pay employees:Open the Enter Payroll Information window, by clickingUnscheduled Payroll or Start Scheduled Payroll. In theEnter Payroll Information window:➊ Specify the Pay Period Ends and Cheque Date(unless you’re running a payroll schedule).➋ Select the bank account from which the pay chequesare drawn.➌ Click to select employees to pay. If you’re running apayroll schedule, only the employees who are assignedto the payroll schedule appear and are checked bydefault.➍ Review the information and enter hours worked,commissions, and so on (if you selected Use time tocreate pay cheques, hours are automatically entered).Click the employee’s name to make changes in theReview or Change Pay Cheque window.➎ Click Continue.➏ Specify whether pay cheques should be printed fromQuickBooks or written by hand.➐ Review the payroll summary information.➑ Click Create Pay Cheques.The Confirmation and Next Steps window appears fromwhere you can print pay cheques or paystubs or sendpaystubs by email, as shown on page 20.Key TermsCheque Date and PayPeriod Ends dateThe pay cheque dateis the date whenemployees know theyare getting paid. It‘sthe date you want thepay cheque to affectyour bank account.For example, your payperiod end date couldbe Friday, April 16, butyour pay cheque dateis 5 business days lateron the following Friday,April 23.The CRA bases yourtax liability and thatof your employees onthe pay cheque date.For example, if youpay an employee inJanuary 2012 for timeworked in December2011, the earningsare reported on theemployee’s 2012 T4form. QuickBooks usesthe pay cheque datewhen it runs reports.A pay period is theduration of time forwhich you are payingyour employee wages.The pay period endsdate is the last dateof the pay period thatyou want a pay chequeto cover.QuickBooks uses thisdate to calculatehow many weeks anemployee has workedin a year and the timeinformation to includein the pay cheque.17
Finish Later:QuickBooks Payroll allows you to save draft pay cheques and return later to finish yourpayroll run without losing your data. This is particularly useful for the times you areinterrupted and need to switch off the payroll workflow but don’t want to lose the work youhave done.➊18
Intuit QuickBooksPayroll ProcessPayroll➊ If you click Finish Later or close the window with another method you receive a messagesimilar to this:Notice the following changes in the Payroll Centre after you save draft pay cheques: W hen you have draft pay cheques for employees included in a schedule, that scheduleappears in italics.To continue processing the scheduled payroll, click the Start Scheduled Payroll button.19
Printing pay cheques and paystubsAfter you finish creating pay cheques, the Confirmation and Next Steps window appears,from where you can print pay cheques.➊ Click Print Pay Cheques or Print /Email Paystubs from the Confirmation and Next Stepswindow. If you choose not to print at this time, click Close. To print at a later time, go tothe Employee Centre, click the Print drop-down arrow, and then click Print Pay Chequesor Print/Send Paystubs.➊➋ Depending on your selection, the Select Pay Cheques to Print or Select Paystubs to Print/Email window appears. Pay cheques and Paystubs to be printed appear selected by default.Click to clear, if necessary, and then click OK or Print.➋Note: Click Email to send paystubs via email.20
Payroll ProcessEditing and voiding pay cheques➊ Go to the Employees menu and click Edit/Void PayCheques.➋➌Did You Know?How does voiding affectyear-to-date amounts?If you delete the mostrecent pay cheque,QuickBooks updatesthe year-to-date figuresto reflect the change.If you void or deletean earlier pay cheque,the year-to-date figureson subsequent alreadyrecorded pay chequeswill be correct on thepaystubs, but not inthe Review Pay Chequewindow.➋ Select a date range in the Show pay cheques from/through fields.➌ Select the pay cheque you want to edit or void and do oneof the following: Review the warning message, and click Void if you stillwant to void the pay cheque. Click Edit if you’re changing the pay cheque.➍ Do one of the following: If you’re voiding a pay cheque, click Yes or No in thewarning message. If you’re editing a pay cheque, make your changes in thePay Cheque window. To make other changes, click PayCheque Detail. The Review Pay Cheque window opens.Note: You can’t change the payee. You can change the amount,cheque number, cheque date, bank account, or employee’s address.➎ When your pay cheque edits are complete: Click Save & Close to close the Pay Cheque window. Click Yes or No to close the message window.➏ Click Done in the Edit/Void Pay Cheques window.21
Managing employeesYou can add new employees or edit existing records by going to the Employees tab on thePayroll centre. You can edit a single employee’s information, or make global changes toemployee default settings.Adding or editing an employee➊ Click the Employees icon on the icon bar.➋ Click the New Employee button or double-click the name of an existing employee.➊➋➌ Complete the fields in the Personal, Address & Contact, Additional Info, andEmployment Info tabs.➍ Use the Payroll Info tab to enter earnings or other additions and deductions for theemployee.➎ Click Taxes and TD1, Accrual Hours, and Vacation Pay to enter information specific tothe employee. Click OK when you’re done.➌➍➎Setting up employee defaults➊ Click the Employees icon on the icon bar.➋ Click the Manage Employee Information button andthen click Change New Employee Default Settings.➌ Enter information in the fields and then click OK.22
Payroll ProcessManaging payroll itemsAfter enabling QuickBooks payroll you need to create newpayroll items for new taxes, employee benefits, or itemssuch as garnishments on an employee’s wage, or edititems.Adding or editing a payroll item➊ Go to the Employees menu and then click PayrollSetup.➋ Click Add or Edit Payroll Items.➌ To create a new payroll item, click Payroll Item, andthen click New.➍ Click Next to keep advancing through the wizard.Click Finish on the last screen to save your changes.Key TermPayroll ItemsAny componentof a pay cheque,including salary,taxes, and benefits,is called a payrollitem. QuickBooksuses these items tocreate pay cheques,liability payments,and adjustments.When you activatethe payroll feature,QuickBooks creates apayroll items list withsome standard payrollitems, such as hourlypay rates, sick timeaccrual, and otheritems. You can add oredit payroll items.QuickBooks usespayroll items to trackindividual amountson pay cheques andaccumulated yearto-date wage andliability amountsfor each employee.Set up payroll itemsfor compensation,taxes, other additionsand deductions, andother employer-paidcontributions.23
Tax Forms and FilingsRemitting payroll taxes and other liabilitiesQuickBooks lets you track all of the withholdings for Taxes, CPP, and EI. You can pay theseliabilities using your choice of payment methods.➋➌➍➎24
Tax Forms and FilingsTo pay your payroll taxes and liabilities:➊ Open the Payroll Centre.➋ Click Pay Liabilities.➌ Select the appropriate date range for your payroll liabilities.➍ Select the payroll liabilities to be paid, and then enter the other payment information.➎ Based on your preference selection, click Review or Create to complete the liabilitypayment.Note: QuickBooks Payroll lets you create, print, email, and EFILE both T4 and Relevé 1 (RL-1) slips. In thefollowing section we focus on the T4 process, but a similar process is available for Relevé 1 slips for thosewho live in Québec.Creating T4 slips T4 (Statement of Remuneration Paid) slips are end-of-year payroll forms that show anemployee’s wages and payroll deductions for the past year. In January or February, youneed to create these slips for your employees and the CRA. You must file your T4 slips bythe last day of February following the calendar year to which the T4 slips apply. Before creating T4 slips, make sure the Social Insurance Number (SIN) and name you seeon the T4 slip for each employee are the same as on his or her SIN card. QuickBooks doesall the other required checks for you.Emailing & Printing T4 slips QuickBooks provides you with the option of emailing your employees’ T4s to them. Theemail attachments are password protected to ensure that only you and your individualemployees have access. The password used will be the first three characters of theemployee’s last name (all lower case; no dashes, apostrophes, etc.) and the last threedigits of the employee’s SIN. The following are examples:Deb D’Spain with SIN 222-222-226 would be dsp226Jimmy Wu with SIN 333-333-334 would be wu334If you prefer to provide printed T4s, QuickBooks can print slips on blank paper.➊ In the Process End of Year Forms window, make sure that the correct employees areselected and the correct payroll year shown.➋ If you have not already done so, you must review the T4 slips before you can print them.➌ Click Print.➍ Select your printer.➎ Select who you are printing it for.➏ Click Print.25
EFILE T4 slips to the CRAThe CRA encourages businesses to file T4s through the secure Internet file transfer (XML)service. You’ll receive electronic confirmation of receipt, have faster processing, and save onmailing costs. QuickBooks Payroll makes it easy to do this.To EFILE your T4 slips you’ll need the following information: Your Business Number. You’ll enter this in the Company Information window. A Web Access Code. If you do not have one, visit http://www.cra-arc.gc.ca A transmitter number or Magnetic Media (MM) number. If this is your first time usingEFILE to submit your T4s, you can use the following number: 555 555Note: Once you’ve successfully sent your T4s electronically, the CRA will send you a unique transmitternumber you can then use to EFILE in the future.Once you have the above information, proceed as follows:➊ Select all employees whose slips you want to EFILE.➋ In the Process End of Year Forms window, make sure that the correct form and year aredisplayed. If not already done so, you must review the T4 slips before you can EFILEthem.➌ Click EFILE.➍ Fill in all the fields marked as required: Enter your Transmitter Number (also called a Magnetic Media number) in theTransmitter Number field. If your company is a sole proprietorship or partnership, enter your and your partner’sSocial Insurance Numbers in the SIN fields.➎ Click Send. QuickBooks compiles an XML file called “ T4Slips.xml” that contains your T4 data.By default, this file is stored in your My Documents directory; when you closeQuickBooks, the file is deleted.➏ QuickBooks opens the CRA Web site for you. You will need to enter the path to theT4Sl
Intuit QuickBooks Payroll. 1. About this guide. The illustrations and procedures in this guide are for customers using QuickBooks 2013. Contents. Getting Started: Activate and Set Up 2 How Intuit QuickBooks Payroll works 2 Activating your payroll subscription 3 The QuickBooks Payroll Centre overview 4 Setting up payroll 6 Payroll Setup 9