Transcription
LearnQuest Partner Portal User GuideLearnQuestPartner Operations GuideUsing the Partner PortalUsing the Student PortalCountry Code ListPage 1Version: 2015-06-19
LearnQuest Partner Portal User GuideThe Partner Portal1. Download Course Outlines from LearnQuest.2. Download Upcoming Class Schedules fromLearnQuest.3. Redirect visitors on your site to LearnQuest whenthey want to enroll in courses.4. Add your own classes (with their locations andinstructors) to the LearnQuest web site.5. Add your students to LearnQuest classes.6. View schedules for your upcoming classes thatare in the LearnQuest system as well as schedulesfor LearnQuest classes being taught by yourinstructors.7. View instructor evaluations for both your classesand for LearnQuest classes taught by yourinstructors.Page 2Version: 2015-06-19
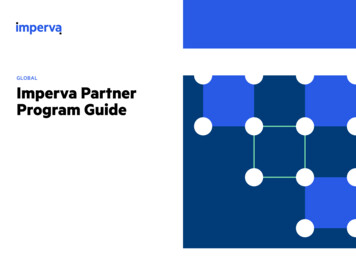
LearnQuest Partner Portal User GuideLogging into the Partner Portal1.Open a browser window and go to https://www.learnquest.comIn the upper right corner, click the Login link.2.On the Login page, enter your username and password.The username is NOT case sensitive. The password is case sensitive.Page 3Version: 2015-06-19
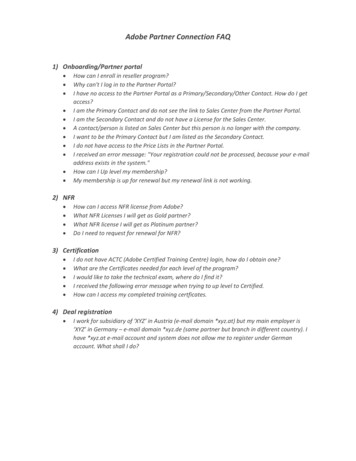
LearnQuest Partner Portal User GuideThe Partner Portal1.Once you are logged in successfully, you will be viewing the Partner HomePage2.The actual home page will contain links to documents that you will need as aLearnQuest Training Partner. The Partner Portal Guide, which you are reading at this moment, is oftenupdated with new information. The Education Partner Operations Guide describes the businessrequirements Sample Spreadsheets are used to upload data to LearnQuest The Tiering Report shows IBM courses that can be advertised andscheduled along with their scheduling "tier". The LQ IBM Remote Lab Cost Catalog shows the cost of reserving an IRLPlab when conducting classes.Page 4Version: 2015-06-19
LearnQuest Partner Portal User Guide3.The menu area contains links to pages you will need to use as a LearnQuestpartner.4.You will see only the menu items that are needed for your Partner role. In otherwords, you may or may not see all the menu items shown above.Page 5Version: 2015-06-19
LearnQuest Partner Portal User GuideMenu Option Overview1.Course Catalog permits downloading Course Outlines from the LearnQuestweb site so that you can then upload the course outlines to your system anddisplay them on your web site.Two formats are available, CSV and Excel. You can choose the option thatmost suits your processing needs.2.Class Schedules permits downloading the LearnQuest upcoming classschedule so that you can then upload the schedule to your system and displaythe schedules on your web site.Again, two formats are available, CSV and Excel. You can choose the optionthat most suits your processing needs.3.Load Data gives you the ability to load your class information into theLearnQuest system, some of which will be displayed on the LearnQuest andIBM web sites. All of the loads are accomplished using data in ExcelWorkbooks. Classroom Locations Instructors and Instructor Skills Classes that you are deliveringAdditionally, the Load Data function is used to Add your students to the rosters of any public class. Purchase IBM Self Paced Virtual Classes (SPVCs). Publish your course prices (restrictions apply).Page 6Version: 2015-06-19
LearnQuest Partner Portal User Guide4.Classes in Session displays your classes that are running today.Two types of classes will display on this page: LearnQuest classes which one of your instructors is delivering Your own classes that you have uploaded to LearnQuest5.Upcoming Classes displays a list of your classes in a given date range.From the displayed list of classes, you can download courseware, reserveIRLP labs and request instructor prep materials and workstations.6.Training Schedule displays a list of your classes in a given date range.This display is organized by week to make planning easier and can be used forthe same functions available under Upcoming classes.7.Reports allows you to request lists of Students you have enrolled inLearnQuest public classes, Students that LearnQuest has enrolled in yourclasses, and SPVC transactions that you have initiated.8.Evaluation History displays a list of your classes in a given date range alongwith the students' evaluations of the Instructor, Course and Workshops on ascale from 1(lowest) to 5(highest).9.Marketing Center contains logos and other marketing related materials.Page 7Version: 2015-06-19
LearnQuest Partner Portal User GuideCourse Catalog1.Catalog: LearnQuest: downloads our courses only IBM: downloads IBM courses only All: downloads both IBM and LearnQuest courses2.Testing Limit: All: displays all courses that meet the selection criteria. 5,50,100: stops the display at the indicated number of courses. This ishandy for testing purposes.Page 8Version: 2015-06-19
LearnQuest Partner Portal User Guide3.Modality:ILT: Instructor led courses (both on-site and virtual)Self-Paced: IBM SPVC and WBT coursesAll: Both types of delivery4.Download Format: Screen: catalog is displayed on your monitor. Excel: the catalog is downloaded as an Excel spreadsheet CSV: the catalog is downloaded as tab separated text file. All CRLF's arechanged to "\n" to ease programming tasks.5.Scheduled Only: Yes: Download only those courses on the upcoming class schedule.6.Show Outline: Yes: Includes this course information: Description, Objectives, Audience,PreRequisites, Duration and Topics No: Does not include the above information.7.Inactive Courses: Yes: Download all courses even those no longer available. This adds acolumn to the output titled "Inactive". No: Download only courses that are available8.Show Category Information: Yes: Displays the category and subcategory in which a course belongs. No: Does not display the category and subcategory information.Page 9Version: 2015-06-19
LearnQuest Partner Portal User Guide9.Course Keywords are used to filter the download by words in the course title. For example, entering "cognos report studio" would display all courses withall three words in the title.10.Categories are used to filter based on the category in which a course belongs.11.Specific Courses: One or more course numbers can be entered on each line, separate fromone another by commas to download only the indicated courses.12.Country: Download only those courses that have outlines for the selected country.Page 10Version: 2015-06-19
LearnQuest Partner Portal User GuideCourse Catalog Output1.Course Number2.Inactive **3.Course Name4.Price (Public per student)5.Please note: this is the regular public price for the course before anyLearnQuest promotional rates have been applied.6.Private Price (Private per Class)7.Currency8.Country9.Description ation*14.Topics** Not shown when Show Outline is No.** Not shown when Inactive Courses is No.Page 11Version: 2015-06-19
LearnQuest Partner Portal User GuideCourse Catalog Sample Output1.When Screen is the Download Format, you will see this page:2.When Excel is the Download Format, you will see this page (when usingInternet Explorer).The Excel file name is timestamped so you can keep multiple versions.Click Open to view the course catalog information.Click Save or Save As (shown when down arrow is clicked) .3.When CSV is the Download Format, you will see the same page as above(when using Internet Explorer).When the file is opened, the data will be displayed as tab separated text.Page 12Version: 2015-06-19
LearnQuest Partner Portal User GuideAutomated Course Catalog Download1.The Course Catalog can be downloaded without accessing the partner portalusing a URL like this: (obviously, it must be on one g.asp?ovid 12&autostart OK&auto yes&typeoflogin V&process y2.In order to generate the URL, select the proper options on the DownloadCourse Catalog page and click the link that reads "Click here to displayautomated download instructions".3.Every time this link is clicked, the current options are read and thecorresponding URL is built and displayed.Page 13Version: 2015-06-19
LearnQuest Partner Portal User GuideClass Schedule1.End Date After: Limits download to classes with an ending date equal to orlater than this date. Defaults to today's date.2.End Date Before: Limits download to classes with an ending date equal to orless than this date. Defaults to the End Date After plus 6 months.3.Testing Limit: All: displays all classes that meet the selection criteria. 5,50,100: stops the display at the indicated number of classes. This ishandy for testing purposes.Page 14Version: 2015-06-19
LearnQuest Partner Portal User Guide4.Status: All: displays available and cancelled classes. Available: does not display cancelled classes.5.Catalog: LearnQuest: downloads our classes only IBM: downloads IBM classes only All: downloads both IBM and LearnQuest classes6.Download Format: Screen: class schedule is displayed on your monitor. Excel: the class schedule is downloaded as an Excel spreadsheet CSV: the class schedule is downloaded as tab separated text file. AllCRLF's are changed to "\n" to ease programming tasks.7.Show Category Information: Yes: Displays the category and subcategory in which a course belongs. No: Does not display the category and subcategory information.8.Show Street Address Yes: Displays the full address for On site classes. No: Does not display the full address.Page 15Version: 2015-06-19
LearnQuest Partner Portal User Guide9.Keywords are used to filter the download by words in the course title. For example, entering "cognos report studio" would display all classes forcourses with all three words in the title.10.Categories are used to filter based on the category in which a course belongs.11.Country: Download only those classes schedule for the selected country.Page 16Version: 2015-06-19
LearnQuest Partner Portal User GuideClass Schedule OutputClassIdThe LearnQuest unique identifier for eachscheduled classGTRy indicates the class is guaranteed to runStart DateEnd DateStart TimeEnd TimePriceCurrencyLQ StatusCourse NumberCourse NameEnrolledLocation NameLocation CityLocationCountryPage 17Version: 2015-06-19
LearnQuest Partner Portal User GuideClass Schedule Sample Output1.When Screen is the Download Format, you will see this page:2.When Excel is the Download Format, you will see this page (when usingInternet Explorer).The Excel file name is timestamped so you can keep multiple versions.Click Open to view the scheduled class information.Click Save or Save As (shown when down arrow is clicked) .3.When CSV is the Download Format, you will see the same page as above(when using Internet Explorer).4.When the file is opened, the data will be displayed as tab separated text. AllCRLF's are changed to "\n" to ease programming tasks.Page 18Version: 2015-06-19
LearnQuest Partner Portal User GuideAutomated Class Schedule Download1.The class schedule can be downloaded without accessing these pages usingthis type of URL (obviously, it must be on one e.asp?ovid 123456&autostart OK&auto yes&typeoflogin V&process y2.In order to generate the URL, select the proper options on the Download ClassSchedule page and click the link that reads "Click here to display automateddownload instructions".3.Every time this link is clicked, the current options are read and thecorresponding URL is built and displayed.Page 19Version: 2015-06-19
LearnQuest Partner Portal User GuideRegistering for a Scheduled ClassYou most likely will download a class schedule and course catalog to display thisinformation on your own web site.When a visitor to YOUR site wants to enroll in a scheduled class, you will have threechoices:1.Collect the student information on your web site.When this method is used, you have 2 alternative ways to let LearnQuest knowthe student has enrolled.a. Load the student information to the LearnQuest system which isdescribed in the Loading Roster information section of this manual.Using this method means you will be billed for this student when theclass is run.b. Login into the Partner Portal, find the LearnQuest registration page forthe class and enter the student's information.Using this method means you must pay LearnQuest the tuition less yourcommission at the time of registration.2.Link your class schedule to the class registration page on the LearnQuest website.When this method is used, the student will click a link on your site which willopen the Class Registration page on the LearnQuest site.Page 20Version: 2015-06-19
LearnQuest Partner Portal User GuideLinking to the LearnQuest web site1.Use this URL to open the class registration page on the LearnQuest web aspx?ovid20130805 584&classid 682522.ovid20130805 Your Partner/Vendor Idclassid The classid value from the class scheduledownloadThis is the page your visitor will see on the LearnQuest site.Your company logo will be displayed on the right side of every page yourvisitor views.When the registration form is fully completed, the student's enrollment in theclass will indicate the registration originated from YOUR web site.Page 21Version: 2015-06-19
LearnQuest Partner Portal User Guide3.You can link a visitor from your web site to any page on the LearnQuest website and, be credited with any enrollments and/or e-Learning purchases.4.Identify the page and include ovid20130805 your Partner Number (asdescribed above).For example, this link takes a visitor to the LearnQuest class schedule page,filtered by Cognos classes in the United spx?ovid20130805 584&build-schedule y&country united%20states&coursekeywords cognosIf a visitor follows this link and enrolls in a class, you will be credited with theregistration.If you need assistance creating this type of customized link, please notify yourLearnQuest representative and they will work with you to make it happen.Page 22Version: 2015-06-19
LearnQuest Partner Portal User GuideLoad Data1.This menu item is used to upload scheduled classes, instructors, students,training locations, SPVC sales and Public pricing information to LearnQuest.2.All information is submitted on Excel spreadsheets as described on thefollowing pages.The spreadsheets must contain the correct column names and tab names.To make your life easier, you can download sample Excel workbooks from theVendor Home page.3.Click the Browse button below, locate the spreadsheet, click Open and thenclick Continue.4.After the file is processed, an Excel file will be returned showing errors orshowing that updating was completed.Updating will not take place if one error is found on any line in the spreadsheet.5.A description of each load function is on the following pages.6.Please note, in order to add students to our rosters and also to purchasean SPVC, the student's email address must be supplied.If you do not want your students to receive emails from LearnQuest orIBM, your account executive can redirect all emails being sent to yourstudents to an email address of your choosing.Page 23Version: 2015-06-19
LearnQuest Partner Portal User GuideLoad Class Schedules1.This option is used to add, update or cancel your classes that are stored onLearnQuest.Public classes will be displayed on the LearnQuest and IBM web sites.Private classes will not be displayed on the LearnQuest and IBM web sites.2.To process a scheduled class, there must be a ClassSchedule tab in the Excelfile.3.The columns in the spreadsheet contain the following information.CountryLocationStart DateEnd DateDurationStart TimeEnd TimeCourseInstructorVendor ClassIdPublic PrivateStatusLanguageStay OpenGTRPage 24Version: 2015-06-19Country where the class is being heldName of the training facility. (described later)The first day of classThe last day of classThe number of daysCourse number being scheduledInstructor's Email addressYour unique identifier for this class.Public to show on the LearnQuest and IBM web sitesPrivate to not showBlank for availableCancelled to cancel the classLanguage in which the class is conductedy means this class will not be cancelled automatically14 days before the start date when there are noenrollmentsy means this class will display with the Guaranteed toRun indicator
LearnQuest Partner Portal User Guide4.The location must be one of your training facilities.Public classes must use one of your "Protected" training locations.Private classes can use any of your training locations.5.The start and end dates must be valid dates.6.The course must be a valid course in the LearnQuest catalog and, it must beavailable in the specified Country.7.The instructor is optional. If supplied, it must be the email address of one ofyour instructors that was supplied on the Load Instructor spreadsheet(described a bit later in this document).8.Status is optional. The only valid value is "Cancelled".9.If all of your input passes all of the validity checks, then all the updates will takeplace.If any of your input fails any of the validity checks, then NONE of the updateswill take place.Page 25Version: 2015-06-19
LearnQuest Partner Portal User Guide10.An Excel file will be returned at the end of processing.If the updates took place, the file will look as follows.If an error was detected, the file will look as follows. Correct the error andprocess the entire file again.PLEASE NOTE: A MAXIMUM OF 500 CLASSES CAN BE UPLOADED ON ONESPREADSHEET.Page 26Version: 2015-06-19
LearnQuest Partner Portal User GuideLoad Rosters1.This option is used to add, update or cancel student enrollments on theLearnQuest system.This option is only needed when you process student class registrationsinstead of sending students to the LearnQuest web site to register.2.To upload roster information, there must be a Roster tab in the Excel file.3.The columns in the spreadsheet contain the following information.LQ ClassIdVendor ClassIdCourseStart DateLast Name, First nameEmail AddressStatusCountryPage 27Version: 2015-06-19If this class is not one of yours, this number isfrom the Class Schedule download.If this class is one of yours, this is your uniqueclass identifier that was supplied when the classwas scheduledThis is the Course number in which the studentis enrolling.This is the first day of the class in which thestudent is enrolling. The course and start dateare used to ensure there are no errors.Student's email (this is the key to our system).Cancelled or blankThis is the STUDENT's country of residence.This is NOT THE COUNTRY WHERE THECOURSE IS BEING HELD. See Appendix for alist of valid Country codes.
LearnQuest Partner Portal User GuideDiscount Information:Ed Pack NumberMembership NumberMembership LevelUser GroupPromo CodeIBM Educational Package Account NumberIBM membership numberIBM membership level (Advanced, Premium etc)IBM user groupSpecial discount promo code4.The LQ ClassId or Vendor ClassId, Course and Start Date combination mustbe valid.5.The Last Name and First Name are required.6.The Email Address is required. If the email address matches an existing student's email address, then thefirst and last names on the spreadsheet must match the existing student'sfirst and last names. If you do not want LearnQuest and IBM to send emails to your students,please tell your LearnQuest account representative so all student emailscan be redirected to an email address of your choosing.7.Status is optional. The only valid value is "Cancelled".8.Country is required and must be one of the country codes listed at the end ofthis document.9.Discount information is optional.10.If all of your input passes all of the validity checks, then all the updates will takeplace.If any of your input fails any of the validity checks, then NONE of the updateswill take place.Page 28Version: 2015-06-19
LearnQuest Partner Portal User Guide11.An Excel file will be returned at the end of processing.If the updates took place, the file will look as follows.If an error was detected, the file will look as follows. Correct the error andprocess the entire file again.Page 29Version: 2015-06-19
LearnQuest Partner Portal User GuideLoad Instructors1.This option is used to add, update or inactivate your instructors on theLearnQuest system.2.To upload instructor information, there must be an Instructor tab in the Excelfile.3.The columns in the spreadsheet contain the following information.First NameLast NameAddressStateZipcodeCityCountryEmail AddressHome PhoneWork PhoneCell PhoneStatusLanguageThis is the key to the LearnQuest instructorinformation.Blank or "Inactive"the language(s) the instructor can teach in4.First Name, Last name and Email Address are required.5.Status is optional and must be blank or "Inactive"6.All other fields are optional and free form.Page 30Version: 2015-06-19
LearnQuest Partner Portal User Guide7.If all of your input passes all of the validity checks, then all the updates will takeplace.If any of your input fails any of the validity checks, then NONE of the updateswill take place.8.An Excel file will be returned at the end of processing.If the updates took place, the file will look as follows.If an error was detected, the file will look as follows. Correct the error andprocess the entire file again.Page 31Version: 2015-06-19
LearnQuest Partner Portal User GuideLoad Locations1.This option is used to add, update or inactivate your training locations on theLearnQuest system.2.To upload location information, there must be a Location tab in the Excel file.3.The columns in the spreadsheet contain the following information.Location NameThis is the name of your training location. It will beused when loading class tryPhone NumberFax NumberStatusblank or InactiveNumber of RoomsLanguageLanguage in which classes at this facility areconductedCancellation Days The number of days before the start date of classeswhen 0 enrollment classes are automaticallycancelled. (If not specified, defaults to 21)4.Location name is required and must be unique for your locations.5.Address1, City, Zip (Postal code) and Country are required.Page 32Version: 2015-06-19
LearnQuest Partner Portal User Guide6.Status is optional and can be blank or "Inactive".7.All other fields are optional and free form.8.If all of your input passes all of the validity checks, then all the updates will takeplace.If any of your input fails any of the validity checks, then NONE of the updateswill take place.9.An Excel file will be returned at the end of processing.If the updates took place, the file will look as follows.If an error was detected, the file will look as follows. Correct the error andprocess the entire file again.10.There is one more back office step that takes place for locations if you have"exclusive" territories with LearnQuest.When a new location is added, and the Country where the facility is locatedhas exclusive territories at the city level, your LearnQuest Account Managerwill determine if this location is in your exclusive territory.If the location is indeed in your exclusive territory, then LearnQuest personnelmust update the LearnQuest system before you can schedule public classes inthis location. Once that update is completed, no other entity will be permitted toschedule, on the LearnQuest web site, public classes in the samegeographical region.Page 33Version: 2015-06-19
LearnQuest Partner Portal User GuideLoad Instructor Skills1.This option is used to update the Skill Level of your instructors in theLearnQuest system.2.To upload skill information, there must be an InstructorSkills tab in the Excelfile.3.This process works differently from the others. The first column is pre-filled inthe sample with a list of LearnQuest skills.You may not ADD to the skill list nor may you change the spelling of any skills.You can remove the skills that are not appropriate for your organization if sodesired.4.The first line in column 2 thru n contains an instructor's email address.The instructor's email address must be one of your instructors previouslyadded to the LearnQuest system with the load instructor process.5.The intersecting cells contain the number of years the instructor has beenteaching the particular skill.This must be blank or a number.Page 34Version: 2015-06-19
LearnQuest Partner Portal User Guide6.If all of your input passes all of the validity checks, then all the updates will takeplace.If any of your input fails any of the validity checks, then NONE of the updateswill take place.7.An Excel file will be returned at the end of processing.If the updates took place, the file will look as follows.If an error was detected, the file will look as follows. Correct the error andprocess the entire file again.Page 35Version: 2015-06-19
LearnQuest Partner Portal User GuideSPVC Sales1.This option is used to purchase IBM Self Paced Virtual Classes and IBM WebBased Training through LearnQuest.2.To purchase a self paced offering, there must be a SPVC tab in the Excel file.3.The columns in the spreadsheet contain the following information.CourseQuantityPurchaser Last NameThis is the Course number being purchased.The number of users.This is the name of the purchaser. Whenordering self study courses, the students areNOT identified.Purchaser First NamePurchaser Email Address Purchaser's email. Again, this is not the student.CountryThis is the Purchaser's country of residence.This is NOT THE COUNTRY THAT SHOWSTHE COURSE. See Appendix for a list of validCountry codes.Discount Information:Ed Pack NumberMembership NumberMembership LevelUser GroupPromo CodePage 36Version: 2015-06-19IBM Educational Package Account NumberIBM membership numberIBM membership level (Advanced, Premium etc)IBM user groupSpecial discount promo code
LearnQuest Partner Portal User Guide4.The Course must be a valid IBM self study course code.5.The Purchaser Last Name, Purchaser First Name andPurchaser Email Address are required. Unlike adding students to a roster, the purchaser email address is notchecked to see if it matches an existing student's email address. This email address is only used by IBM to send out the "OrderConfirmation" which is described below.6.Country is required.7.Discount information is optional.8.If all of your input passes all of the validity checks, then all the updates will takeplace.If any of your input fails any of the validity checks, then NONE of the updateswill take place.9.An Excel file will be returned at the end of processing.If the updates took place, the file will look as follows.If an error was detected, the file will look as follows. Correct the error andprocess the entire file again.Page 37Version: 2015-06-19
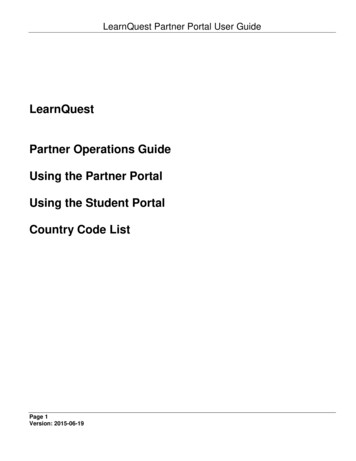
LearnQuest Partner Portal User GuideAfter you purchase the SPVC/WBT for your client, the following steps take place.1.LearnQuest sends IBM your order request.2.IBM sends an "Order Confirmation" to your client's email address or to anemail address of your choosing as described earlier. (A sample OrderConfirmation is shown on the next page.)3.The purchaser sends the "Order Confirmation" to the student(s).4.The student(s) follows the directions in the "Order Confirmation" to enter theIBM SPVC environment. Note: One access code is used by as many students as indicated in thequantity ordered. Each student must enter their Access code within 12 months of the OrderConfirmation date. Each student MUST COMPLETE THEIR SPVC/WBT WITHIN 30 DAYSOF ENTERING THEIR Access Code for the first time.5.The student works on the SPVC/WBT.6.The student completes a Course Evaluation in the IBM SPVC environment. Atthis time, the student can obtain a Certificate of Completion.7.Please be aware: using any of the discount programs will slow the processingof the order while LearnQuest determines if the discount information is valid.Page 38Version: 2015-06-19
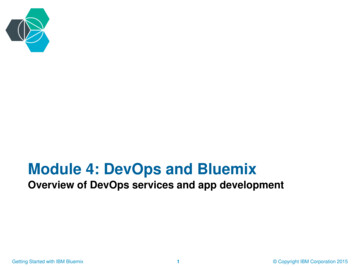
LearnQuest Partner Portal User GuideSample IBM Order ConfirmationIBM On-Line TrainingTo:Purchaser Email AddressFrom:DLServicesDate:Fri Aug 09 08:50:41 CDT 2013Name: Purchaser First and Last NameCompany Name:Customer Number:Subject: Order Confirmation Letter for the IBM On-Line Training Course - J2252Authorized Number of Students: 1 (non-transferable)Dear Purchaser,Thank you for your order. You have been granted access for the indicated number of students, for theonline learning listed above.This training is delivered via the IBM Learner Portal and access is granted via use of an IBM LearnerPortal Access Code.If You Are New to the IBM Learner PortalPlease follow these steps to self-register, and then log into the IBM Learner Portal:1. Use your web browser to access this URL:http://eb90.elearn.ihost.com/wps/portal/ibm2. On the Learner Portal Sign In page, click the Self-Register With An Access Code hotlink andwhen prompted, enter the following Access Code: CognosJ225220130809learnquest.com(theAccess Code is case-sensitive) and then follow the instructions to create your Learner Portalaccount.3. Return to the IBM Learner Portal Sign In page and sign in - using your new Userid (your e-mailaddress) and your new Password.If You Already Have an IBM Learner Portal Userid and PasswordIf you are already registered with the IBM Learner Portal, enter the following URL into your browserhttp://eb90.elearn.ihost.com/wps/portal/ibm Sign in using your Userid (e-mail address) and password,and then follow these steps to add the new privileges, associated with the Access Code, to your account:1. Click the Preferences tab (left-hand side of the interface)2. Click Apply Access Code3. Enter the access code: CognosJ225220130809learnquest.com and then click Apply4. Click the Refresh hotlink in either the My Available Courses portlet or the My EnrolledCourses portlet to access any new courses that were added to your
LearnQuest: downloads our classes only IBM: downloads IBM classes only All: downloads both IBM and LearnQuest classes 6. Download Format: Screen: class schedule is displayed on your monitor. Excel: the class schedule is downloaded as an Excel spreadsheet CSV: the class schedule is downloaded as tab separated text file.