Transcription
Mobile Application User GuideActivate your account by callingSaleManager at 800.918.4890 orcontact us at sales@salemanager.comSwipeSimple iOS version 3.01
Contents3 Part 1: Getting Started19 Part 5: Items3 Downloading the app19 Sorting your inventory4 Signing in20 Edit item5 Familiarizing yourself with the interface20 Create a new item6 Part 2: Sale21 Part 6: Settings6 Types of payment21 Familiarizing yourself7 Taking a credit card payment22 Turning signatures on/off7 Setting up the purchase22 Sales tax8 Prompt for tips23 Tips9 Taking a credit card payment23 Offline mode10 Taking a chip card payment24 Support10 Taking a magnetic stripe card24 Reset passwordpayment24 About11 Taking a manually enteredpayment12 Capture signature12 Email receipt13 Taking a cash payment14 Part 3: Account14 Viewing your account statistics15 Part 4: History15 View transaction history17 Voids17 Refunds18 Resend receipt2
Part 1: Getting StartedDownloading the appTo use the SwipeSimple mobile app, you have to first download it from the AppleApp Store.1. Open the App Store and search for “SwipeSimple”.2. Download and install the SwipeSimple mobile app on your device.3. Open the SwipeSimple mobile app.You are ready to go!3
Signing inSigning inThe email and password you use to sign inwill be provided by your payments provider.1. Sign in to the app by typing in your emailaddress and password in the allocated fields.2. Press the “Sign In” button to complete theprocess.Demo modeIf you want to explore SwipeSimple’sfunctionality without signing in, you can doso by selecting “Demo mode”.Demo mode allows you to test out variousfunctions, but limits you from processingactual transactions.Changing your password on the first sign-inUpon signing in for the first time, you will beprompted to change your password. Typeyour new password in the allocated fields.Stay logged inMerchants can enable this on the log inscreen, and will stay logged in until theyexplicitly log out. There is no time limit.Forgot passwordIf you’ve forgotten your password, you canreset it by selecting “Reset Password”. We’llsend you an email with instructions shortly.4
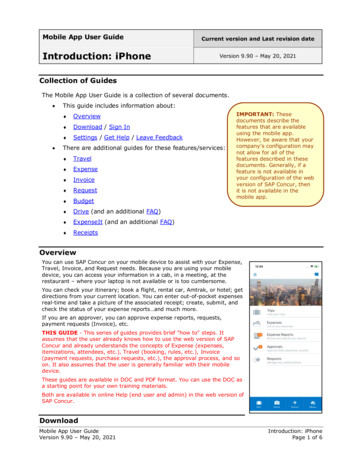
Familiarizing yourself with the interfaceThis information confirms which MerchantAccount you are currently on.Sign out of youraccount fromhere. This will leadyou back to theSign In screen.This is your Menu bar, from which you can access allof SwipeSimple’s functions. These are categorized intoAccount, History, Sale, Items and Settings. You arecurrently on the Sale screen.5
Part 2: SaleYou make transactions in the Sale section. Access the Sale section by selecting theblue Sale tab on your navigation bar.Types of paymentUsing SwipeSimple, you can accept payments through both credit cards and cash.The next two sections illustrate the steps to take payments through each of thesepayment methods.6
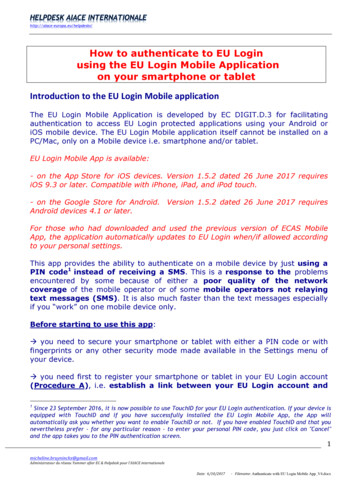
Taking a credit card paymentStep 1: Setting up the purchaseAt this step, you can either manually enteran amount you want to charge, and/or selectitems from your inventory to add to thecustomer’s shopping cart.Add item to shopping cart1. Select “Items (0)”.2. Select the item(s) you want to add.3. A dropdown menu will appear, with theoptions to increase or decrease thequantity of the selected item. Reach yourdesired quantity by tapping on the plus orminus signs.Manually enter an amountUse the keypad to key in the amount youwant to charge, and tap “ ” to add it to thetotal, or “c” to delete the amount.4. When you’re done, select either “CashSale” or “Credit Card” to move to the nextstep, or tap the keyboard icon to addanother manual amount to the total.7
Reset active transactionTo reset the transaction, tap on “c”twice. Tapping on “c” once will clearthe manually entered amount, andtapping on it twice will clear the entiretransaction. Select “Reset” to clear thetransaction.Step 2: Prompt for tipsIf you have tips enabled, your customerscan select how much they want to tip, eitherfrom 3 adjustable tip values, or by manuallyinputting their tip value.Default tipsYour customers can select from one of 3default tip values, which are adjustablein the Settings menu.Custom tipsYour customers can input their own tipamount by selecting “Other” and keyingin the value on the keypad.After you select “Continue”, you’ll head tothe payment screen to choose the modeof payment.8
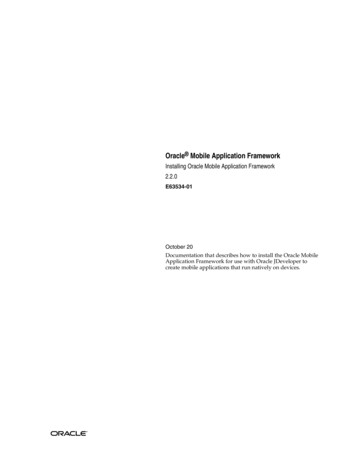
Step 3: Taking a credit cardpaymentAt this step, you can dip or swipe a creditcard on your card reader, or manually enterthe credit card information in the fields.Credit Card Transactions1. Check if your card reader is ready toprocess a dip or swipe transaction.The image on the bottom half of thescreen indicates the status of the reader.More details below.2. Dip card into the chip slot or swipecard on reader.3. When the “Dip/Swipe Successful”image shows, select the “Processpayment” button on the screen toadvance to the next step.Insert Card ReaderYour reader is notdetected. Eitherinsert the reader ordial up the volume(for readers whichplug into headphonejacks.)Reader ConnectedYour reader isdetected. Wait amoment to dip/swipethe credit card.9
Step 3a: Taking a chip card paymentDip CardIf your customer uses a chip card, you canattempt to dip the credit card now. Dip thecard into the slot at the back of the reader,with the chip facing the front.Dip SuccessfulThe chip card has been recognized by the reader. You canprocess the payment now. Please ensure that the card remainsinserted throughout the entire transaction, and is only removedwhen prompted by SwipeSimple. Removing the card prematurelywill cancel the transaction.Step 3b: Taking a magnetic stripe card paymentSwipe CardIf your customeruses a magneticstripe card, youcan attempt toswipe the creditcard now. Swipethe card throughthe slot at the frontof the reader, withthe magnetic stripefacing the back.Swipe SuccessfulThe credit card swipeis successful. You canprocess the paymentnow.10
Step 3c: Taking a manually entered paymentManually enter detailsUse the keypad to key in card number,expiration date and CVV number on theback of the card.Process paymentTap on “Process payment” after enteringall respective fields. For chip cardtransactions, please ensure that the cardremains inserted throughout the entiretransaction.Cancel paymentTap on “Cancel payment” to reset thetransaction.11
Step 4: Capture signatureIf you have signatures enabled, thecustomer can sign by tracing out theirsignature on your device’s screen.Enter signatureLet your customers trace out theirsignatures within the signature box,using their fingers or a stylus.Clear signatureSelect “Clear Signature” at the bottom ofthe screen, to reset the signature box.Step 5: Email receiptAt this step, you can view the e-receipt onyour device, and you can choose to send thee-receipt to the customer’s email address.Send receiptSelect “Send Receipt” to email or text areceipt to your customer.Enter your customer’s email address orphone number into the next screen.To not send a receipt, select “No Receipt”.12
Taking a cash paymentThe steps involved in taking a cash paymentare very similar to that of a credit cardpayment, and simpler.Follow the steps listed in Taking a creditcard payment, with slight changes as notedbelow:1. On Step 1, select “Cash Sale”.2. Determine the amount gratuity to becharged in Step 2.2. You will automatically skip Step 3 and Step4.3. Select “Process Payment” to confirm thecash sale.4. Complete the payment the same way asStep 5.13
Part 3: AccountIn the Account section, you can view statistics of your transactions for multipleuser accounts. Access the Account section by selecting the leftmost tab on yournavigation bar.Viewing your account statisticsChanging AccountIf you have multiple merchant accounts tiedto your SwipeSimple account, you can selectthis item to choose a different merchantaccount from the list.Changing Time PeriodsView your account summary basedon statistics from the last 24 hours,last 7 days or last 30 days. Toggleeach mode by selecting its respectivebutton.View Account SummaryTotal Charges: The total amount charged tocustomers over the time period specified.Number of Successful Charges: The totalnumber of charges approved over the timeperiod specified.Average Charge: Total Charges divided byNumber of Successful Charges.Tax Collected/Tip Collected: Total amountof taxes/tips collected over the time period.14
Part 4: HistoryIn the History section, you can view detailed transaction data, void and refundtransactions, and resend receipts. Access the History section by selecting theHistory tab from your navigation bar, second from the left.View transaction historyView the transaction history of anotheraccountSelect this and changing to the desired one.Understanding your transaction historyTransactional information is organized byseparate transactions, descending in timefrom the most recent. This includes:Status of the transaction:: Approved: Voided: Refunded: DeclinedCustomer Name:E.g. “1384529483”Time and Date of Transaction:E.g. “5:49 PM”, and “October 29, 2015”.Card Details:Card issuer (VISA, MasterCard, AMEX, orothers), and the last 4 digits of the cardnumber.Transaction Value:Shows the amount transferred. “ 15.00”.15
Access detailed purchase information, voidsand refundsPress anywhere in the space of eachtransaction. It will lead you to theTransaction screen below.On the Transaction screen, you can viewwhich items and their amounts involved inthe specific transaction. If the customer gavea signature, you can view it here.From here, you can perform Voids andRefunds, and also Resend Receipt.16
VoidsTo void the selected transaction, select Voidat the bottom-left corner of the transactionscreen.On the confirmation window that appears,select “Void” to confirm.Voids are only available for a short timeafter a transaction. If the Void option is notdisplayed, you may only do a Refund instead.RefundsTo make a refund, select Refund at thebottom-right corner of the transactionscreen.On the window that appears, enter theamount you wish to refund, and select“Refund” to confirm.Partial refundsYou can refund part of a transaction, and thepartial refund will show up as a new record.To refund the rest of the transaction, returnto the original transaction and perform therefund.The total amount you refund cannot exceedthe total of the transaction.17
Resend ReceiptTo resend a receipt, select Resend Receipt atthe bottom of the transaction screen.On the window that appears, type in thecustomer’s email address and select “EmailReceipt” to confirm.18
Part 5: ItemsIn the Items section, you can create new items and edit existing items in yourinventory. You can view the quantity in stock for each item and also sort youritems by name or price. Access the Items section by selecting the Items tab onyour navigation bar, second from the right.Sort your inventorySort your items by Name or PriceToggle your desired sorting method byselecting either one of these buttons.19
Edit itemEdit itemSelect the desired item on the Items list toenter the Edit item screen.Here, you can edit the name, SKU, price,whether the item is taxable, whether youwant inventory tracking for the item, and thestock quantity of the item.Select “Update Item” at the bottom toconfirm your changes, or select “ Items” toreturn to the previous screen.Create a new itemCreate itemSelect “Create Item” at the top right of theItems screen.Here, you can create a new item by enteringthe item’s name, SKU, price, whether theitem is taxable, whether you want inventorytracking for the item, and the stock quantityof the item.Select “Create Item” at the bottom toadd your new item to the inventory, or select“Cancel” to return to the previous screen.20
Part 6: SettingsIn the Settings section, you can set preferences for whether to requiresignatures, add sales tax, and prompt for tips. You can also access supportcontact details and information about SwipeSimple.Familiarizing yourselfHere, you can see the currentselection for each adjustablesetting.E.g. Sales Tax is currently setto “Yes”, which means that youare charging sales tax to yourcustomers.Change SettingsPress any part of the areaoccupied by the setting you desireto change, to enter the respectivesettings screens for Signature,Sales Tax, Tip and Offline Mode.21
Turning signatures on/offTurn signatures on/offSelect from either of these 3 options:Never: The app never prompts for asignatureAlways: The app always prompts for asignatureAbove 25: The app prompts only ontransactions above 25Sales taxTurn sales tax on/offToggle this button on if you want to collectsales tax from your customers. Sales tax iscurrently on. When off, it shows like this:Modify sales taxSelect this box to input the percentage salestax you want to collect from your customers.Only applicable when sales tax is toggled on.22
TipsTurn tips on/offToggle this button on if you want to promptyour customers for tips.Modify default tip valuesThis section allows you to modify the 3default tip selections presented to yourcustomers.Hold and drag each white button alongit horizontal axis to edit each of the 3 tipvalues.Offline modeOffline mode enables you to continue takingpayments without an internet connection.However, offline mode is not compatiblewith chip card transactions. You will not beable to process chip card transactions if youare offline.Turn offline mode on/offToggle this button on if you want to enablethe ability to take payments offline.Set maximum amount for offlinetransactionsSet an upper limit for offline transactionsthat can be saved, by keying in the desiredamount here.23
SupportThe Support screen contains contact information for obtaining support for yourmerchant account and SwipeSimple.Reset PasswordReset passwordEnter your new password in the “NewPassword” and “Confirm Password” spaces,and select “Change Password” to confirm.AboutThe About screen contains information of the version of SwipeSimple you arecurrently using. Providing this info can be useful for handling any complexsupport issues.24
Check if your card reader is ready to process a dip or swipe transaction. The image on the bottom half of the screen indicates the status of the reader. More details below. 2. Dip card into the chip slot or swipe card on reader. 3. When the "Dip/Swipe Successful" image shows, select the "Process payment" button on the screen to advance .