Transcription
P.O. Box 726Ames, Iowa50010515-239-9900Enhanced Microsoft Access Calendar Scheduling DatabaseTemplateUser ManualThis easy to use and intuitive calendar can help with the efficiency and productivity ofyour business, but implementing an elegant calendar in your Microsoft Access databasecan be a challenge. The Enhanced Microsoft Access Calendar Scheduling Database isa full featured calendar system built completely in Microsoft Access tables, forms,reports and VBA (Visual Basic for Applications) code.Based upon some of the concepts of the Microsoft Outlook Calendar modules, thisdatabase template has the advantage of being 100% Microsoft Access based. Thisallows for smooth and easy integration into your existing Access database. TheEnhanced Microsoft Access Calendar Scheduling Database offers a daily, weekly, biweekly, and monthly view of scheduled appointments/meetings/task. This database hasa form for setting up and maintaining appointments/meetings/tasks as well. Pre-builtdaily, weekly, bi-weekly, and monthly reports are also included with the EnhancedMicrosoft Access Calendar Scheduling Database.
Table of ContentsMain Menu . 4Search Button . 5Search Parameters . 5Search Example . 6Record View . 6Calendar Form Option View . 7Appointment Form Option View . 7Calendar View . 8Day View . 8Day View – Standard View . 8Day View – Expanded View . 9Week View . 9Full Week View . 9Short Work Week View . 10Week View Person Option . 10Bi-Weekly View . 10Month View . 10Full Week View . 10Short Work Week View . 10Month View Person Option . 11Month and Day View . 11Custom View . 12Calendar Options . 12Export Option . 13Import Option . 13Maintenance Option . 14Search Option . 14Setup Option . 14Print Option . 14Page One Printout. 14Next Page . 15Page Two Printout. 15Toolbar Options. 152 Page
Maintenance Lookup Button. 16Appointment Types . 16Contacts . 17Location. 18People . 19User Logins . 20System Setup Button. 21Calendar Options Tab . 21Calendar Colors Tab . 22Add a Calendar Item . 23Add a Calendar Item from Standard View . 24Calendar Details. 24Invite Attendees . 25Custom Color . 26Add a Calendar Item from Expanded View . 27Change Existing Calendar Item . 28Change Existing Calendar Item in Appointment Setup Box . 28Import Button . 29Export Button . 303 Page
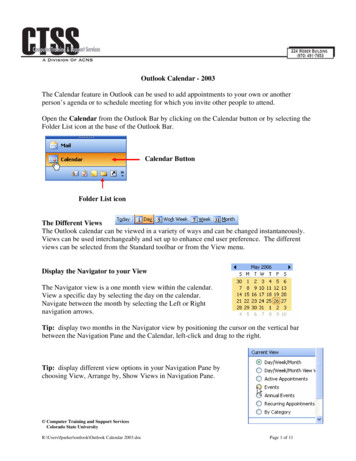
Main MenuUpon opening the Enhanced Microsoft Access Calendar Database, the Main Menupage is displayed. By selecting each button, the following actions occur: Search button - allows the user to search calendar items Calendar View button – add and view calendar items Import – import calendar items from Outlook Maintenance Lookups – allows the setup of specific fields System Setup – allows for the customization of the calendar day and time format,colors, etc. Export – export database calendar to desktop Outlook for designated personsRest of page intentionally blank4 Page
Search ButtonSelecting the Search button allows for the search of items in the calendar. This can besearched by: Subject Location Start Date End Date PersonSearch ParametersWhen the parameters have been set for the search options, select the Run Searchbutton to generate the results.Figure 1 – Search ParametersRest of page intentionally blank5 Page
Search ExampleFor this example, the search parameter is set by location (Location 1) and date(04/06/2020). The date format can be changed by making the adjustment under theSystem Maintenance button. See System Maintenance button.Figure 2 – Search ExampleRecord ViewThe Double Click Records Below To box provides two options to display the recordwhen it is selected. See examples on the next page.To access the record, double click anywhere on the record. This will open the record ineither the calendar or appointment form view. Changes can be made to the record andsaved.Figure 3 – Record ViewRest of page intentionally blank6 Page
Calendar Form Option ViewWhen the record is selected, the user is directed to the calendar view for this record.Example – Calendar Form Option ViewAppointment Form Option ViewWhen the record is selected, the user is directed to a text box view for this record.Example – Appointment Form Option View7 Page
Calendar ViewWhen the Calendar View button is selected, the calendar is displayed. The calendarview can be changed by selecting: Weekly Bi-Weekly Month Month/Day CustomDay ViewThe view of the day calendar can be changed by selecting the Standard View orExpanded View radio button.Day View – Standard ViewThe standard view shows all the appointments for everyone.Figure 4 – Day View: Standard View8 Page
Day View – Expanded ViewThe expanded day view identified the calendar status for assigned to the calendar.While in the expanded view, a maximum of seven (7) people will be displayed.Changing or adding people to the calendar is made under the Maintenance Lookupbutton. See Maintenance Lookup button.Figure 5 – Day View: Expanded ViewWeek ViewThe week view has two different view options: Full week Short work weekFull Week ViewThe full work week displays Monday through Sunday.Figure 6 – Week View: Full WeekRest of page intentionally blank9 Page
Short Work Week ViewThe short work week displays Monday through Friday.Figure 7 – Week View: Short WeekWeek View Person OptionIn the week view, the calendar can display all persons on the calendar or by persononly.Figure 8 – Week View: PersonBi-Weekly ViewThe bi-week view has two different view options: Full week Short work weekThe same features available in the weekly view is also available in the bi-weekly view,the calendar can display all persons in the calendar or just one specific person.Month ViewThe month view has the same features as the weekly calendar view. Items on thecalendar can be viewed in full or short week, as well as by person.Full Week ViewThe full work week displays Monday through Sunday.Short Work Week ViewThe short work week displays Monday through Friday.10 P a g e
Month View Person OptionIn the month view, the calendar can display all persons on the calendar or by persononly.Figure 9 – Month ViewMonth and Day ViewThe month and day view displays both the calendar and then the day, which is locatedon the right side of the calendar.This calendar option allows items on the calendar can be viewed in full or short week,as well as by person.Figure 10 – Month and Day View11 P a g e
Custom ViewThe custom view allows for a specific date range to be searched.Like the weekly and monthly calendar options, the custom view allows for items on thecalendar to be viewed in full or short week, as well as by person.Figure 11 – Custom ViewCalendar OptionsAll the calendar options include: Export Import Maintain Search Setup PrintFigure 12 – Calendar OptionsRest of page intentionally blank12 P a g e
Export OptionWhen the Export button is selected, a text box appears. This allows the user to exportdata to Outlook. This function is the same as the Export button on the Main MenuPage.Items can be exported as a calendar item or task. This information can also be exportedbased on a specific person or all persons with items scheduled in the calendar.Figure 13 – Export OptionImport OptionWhen the Import button is selected, a text box appears. This allows the user to importdata to Outlook. This function is the same as the Import button on the Main Menu Page.Items can be imported as a calendar item or task. This information can also be importedbased on a specific person or all persons with items scheduled in the calendar.Figure 14 – Import Option13 P a g e
Maintenance OptionWhen the Maintenance button is selected, the user will navigate to the LookupMaintenance page. Functionality and usage of the Lookup Maintenance features arecovered under the Lookup Maintenance button.Search OptionWhen the Search button is selected, the user will navigate to the Search button page.Functionality and usage of the Search button features are covered under the Searchbutton.Setup OptionWhen the Setup button is selected, the user will navigate to the System Setup page,where the General Setup functions can be adjusted. Functionality and usage of theSystem Setup is covered under the System Setup button.Print OptionWhen the Print button is selected, the database will generate the printable calendar,based on the selection of the view (day, week, bi-weekly, month, month/day custom).Unless specified, the calendar will print on standard 8 ½ X 11 paper.Page One PrintoutFigure 14 – Import OptionRest of page intentionally blank14 P a g e
Next PageTo view and print the next page, select the forward arrow to navigate to the page.Figure 15 – Next PagePage Two PrintoutThe page two printout of the calendar lists the appointments, giving more details, alongwith the calendar view of the appointments.Figure 16 – Page Two PrintoutToolbar OptionsLike all Microsoft products, the toolbar can be utilized to adjust the paper size, margins,and printer setup. This document can be converted to an Excel, text file, PDF. or XPS,and also emailed.Figure 17 – Toolbar Options15 P a g e
Maintenance Lookup ButtonSelecting the Maintenance Lookup button allows the user to change: Appointment Types Contacts Locations People User LoginsAppointment TypesWhen Appointment Types is selected, the type of appointment can be created orchanged. The template example contains appointment types titled “type 1” and “type 2”but adding and changing titles can be accomplished by placing the cursor in the recordyou want to change. Once the cursor is in the record to change or add, type the title ofthe new appointment type and select the Enter key to move to the next record, savingthe record change.Figure 18 – Appointment TypesRest of page intentionally blank16 P a g e
ContactsWhen Contacts is selected, this persons can be added to the database. This option isimportant due to the fact that when creating a calendar item, attendees can be invited.Those set up under contacts will be available to select from a dropdown when invitingattendees to your events.The example below shows the first name and last name as only a single letter,depending on how you set up the names in this area, will determine how their name isreflected in the dropdown option.Figure 19 - ContactsOnce the cursor is in the record to change or add, type the new contacts informationand select the Enter key to move to the next record, saving the record change.Rest of page intentionally blank17 P a g e
LocationSelecting Location allows the user to identify locations in the calendar dropdown boxwhen setting up an appointment. When creating a calendar item, the location is not arequired block to complete but selecting a location from the dropdown box will displaythe location title in the calendar item.Figure 20 – LocationOnce the cursor is in the record to change or add, type the new location and select theEnter key to move to the next record, saving the record change.Rest of page intentionally blank18 P a g e
PeopleSelecting People allows for the addition or change the names of people who appear inthe Person dropdown box when creating a calendar item.When creating a calendar item, the name in the Person column will appear in thePerson dropdown box. This is not a required field to complete when creating a calendaritem, but if the person is not added here, it cannot be manually added to the Person boxin the calendar.The way the person is identified in the Display code column is the way their name willbe displayed in the calendar event. Example: When setting up a calendar event for Dr.Sasha, their name will appear in the calendar as SM.When in the expanded day view, the calendar will display up to 7 people. To selectthose to show up in the expanded day view, check the box to the far right of their name.Figure 21 – PeopleOnce the cursor is in the record to change or add, type the new information and selectthe Enter key to move to the next record, saving the record change.Rest of page intentionally blank19 P a g e
User LoginsSelecting User Logins allows for the addition or change of users. Information requiredfor user login is: First Name Last Nate User Name PasswordBy selecting the check box in the far-right column, the user can assign administrativerights. This database allows for multiple users to have administrative rights.Figure 21 – User LoginsOnce the cursor is in the record to change or add, type the new information and selectthe Enter key to move to the next record, saving the record change.Rest of page intentionally blank20 P a g e
System Setup ButtonSelecting the System Setup button allows the user to change: Calendar Options Calendar ColorsCalendar Options TabChange the first day of theweek by selecting any day,Monday through SundayLandscape or portraitoptionChange the calendar default toFull Week (7 days) or WorkWeek (5 days)Changes the calendar viewwhen in Day mode.When selected, the location ofthe appointment appears on thecalendarTime can be displayed canbe 12- or 24-hour modeChange the calendardefault viewSelect checkbox toactivate User Login21 P a g eCalendar can be displayed by 15min., 30 min., or hour incrementsTime can be viewed by minute,5, 10, 15, 30, and hour on thecalendarDisplay time as: mm/dd/yyyy ordd/mm/yyyySelect to apply color option tocalendar items
Calendar Colors TabSelecting any of the colorpalette icons will change thecolorExample of color palette changes as they will appear on the calendar view.22 P a g e
Add a Calendar ItemTo add a calendar item, select the Calendar View button on the Main Menu page. Oncethe Calendar View button is selected, the calendar will appear in the day view formatwith the Standard View radio button selected.With the calendar in the Standard View, double clicking on the date and time, will openthe calendar in the Appointment View format, allowing the user to add a calendar item.Figure 22 – Add Calendar Item from Standard ViewRest of page intentionally blank23 P a g e
Add a Calendar Item from Standard ViewWith the Appointment Setup box open, the user can create the calendar item byselecting the items from the Person, Location, and Type dropdown options. Manual textentry is used for the Subject field.To add information in the Appointment Details tab, select the start and stop time for themeeting. Like other calendar setups, a large text section is available to add notes.The information in the dropdown options are set up under the Maintenance Lookupsbutton on the Main Menu. See Maintenance Lookup button.Calendar DetailsFigure 23 – Appointment Setup - DetailsRest of page intentionally blank24 P a g e
Invite AttendeesUnder the Invite Attendees tab, select the name from the Existing Contact dropdownoption to add an attendee.The information in the Existing Contact dropdown option is set up under theMaintenance Lookups button on the Main Menu. See Maintenance Lookup button.Figure 24 – Appointment Setup – Invite Attendees TabRest of page intentionally blank25 P a g e
Custom ColorBy selecting the Select Custom Color button on the lower left side of the AppointmentView box, a color can be added to the calendar item. The color selected is shown on thecalendar, along with the calendar item information.When the Select Custom Color button is selected, the Color box appears. In this box,colors can be selected by either the preset colors in the Basic Colors box or by selectingthe Define Custom Colors button.Selecting the Define Custom Colors button allows the user to create a custom color byselecting a color from the additions box with the gradient colors. When the custom coloris selected, select the Add to Custom Colors button.After the color has been determined and selected, select the OK button to save thischange.Figure 25 – Appointment Setup – Custom Color26 P a g e
Add a Calendar Item from Expanded ViewWhen the calendar opens in the Expanded View, the calendar item is added by thepersons identified in the People field of the Maintenance Lookup button.By double clicking a time under a specific person’s name, the calendar item can beadded.Figure 26 – Add Calendar Item from Expanded ViewThe Appointment Setup box appears so the calendar item can be added. Since thecalendar selection was for a specific person, their name is automatically added in thePerson field. The calendar and invitation for attendees is completed in the same manneras in the Standard View. See Calendar Details for instructions on completing theDetails, Appointment Details, and the Invite Attendees sections of the calendar items.Figure 27 – Appointment Setup – Expanded View27 P a g e
Change Existing Calendar ItemTo change a calendar item currently in the calendar, double click the item.Figure 28 – Change Calendar Item from Standard ViewChange Existing Calendar Item in Appointment Setup BoxWhen the calendar item is double clicked, the Appointment Setup box will open, Thisallows the user to make changes to an existing calendar item.The calendar and invitation for attendees is completed in the same manner as adding anew calendar item. See Calendar Details for instructions on completing the Details,Appointment Details, and the Invite Attendees sections of the calendar items.Figure 29 – Change Existing Calendar Item from Standard View28 P a g e
Import ButtonWhen the Import button is selected, a text box appears. This allows the user to importdata to Outlook. This function is the same as the Import button in the calendar.Items can be imported as a calendar item or task. This information can also be importedbased on a specific person or all persons with items scheduled in the calendar.Rest of page intentionally blank29 P a g e
Export ButtonWhen the Export button is selected, a text box appears. This allows the user to exportdata to Outlook. This function is the same as the Export button in the calendar.Items can be exported as a calendar item or task. This information can also be exportedbased on a specific person or all persons with items scheduled in the calendar.Rest of page intentionally blank30 P a g e
can be a challenge. The Enhanced Microsoft Access Calendar Scheduling Database is a full featured calendar system built completely in Microsoft Access tables, forms, reports and VBA (Visual Basic for Applications) code. Based upon some of the concepts of the Microsoft Outlook Calendar modules, this database template has the advantage of being .