Transcription
User ManualMilli-Q IQ 7003/7005/7010/7015
Table of contentsINTRODUCTION 1System overview 2QUICK START 5Exit screensaver 5Dispense ultrapure water (Q-POD) 5Dispense pure water (E-POD) 6Dispense report 8View & manage Alerts and Alarms 9Navigate the screen interface 10CONSUMABLE MENU 12INFORMATION MENU 14System 14History 14Flow schematic 15Troubleshooting 15Contacts 16SETTINGS MENU 17Manager access & password 19System configuration20Production configuration21POD configuration21Accessories 22Alarm configuration23Connectivity 24Date Time & Language 24Units 25MAINTENANCE MENU 26Consumable installation wizards 27Cleaning & Sanitization 31Depressurization 3233ech2o UV lamps - mercury freeSELF HELP GUIDE 34Depressurize system 34Turn system off34Inaccurate volumetric dispensing 34High TOC values 34Low flowrate35Tank is not re-filled of pure water35Icons 36REQUIREMENTS AND SPECIFICATIONS 37Water specifications37System specifications41Dimensions and weights 43Ordering Information 47LEGAL INFORMATION & WARRANTY 49
INTRODUCTIONCongratulations!Thank you for buying a Milli-Q water purification system.Milli-Q IQ 7003/7005/7010/7015 produces ultrapure water from a tap water source. Installationof this product should be performed by a qualified service representative with access to qualifiedinstallation documentation.This user manual is a guide for use during the normal operation and maintenance of a Milli-QIQ 7003/7005/7010/7015 water purification system. It is highly recommended to fully read thismanual and comprehend its contents before handling the water purification system.System identificationSystemCatalogue numberVoltageFrequencyMilli-Q IQ 7003ZIQ7003T0100-240 V50-60 HzMilli-Q IQ 7005ZIQ7005T0100-240 V50-60 HzMilli-Q IQ 7010ZIQ7010T0100-240 V50-60 HzMilli-Q IQ 7015ZIQ7015T0100-240 V50-60 HzManufacturing site:Millipore SAS, 67120 Molsheim, FranceFor more information on your Milli-Q system, please call your local representative or visit ourwebsite www.emdmillipore.com (North America) or www.merckmillipore.com (Rest of the World).Intended useThe Milli-Q IQ 7003/7005/7010/7015 is intended to produce pure (type 2) and ultrapure(type 1) water from a tap water source primarily for use in research and quality control in avariety of laboratories worldwide.The product is designed to produce ultrapure water with specific characteristics (refer to therequirements and specifications section) when it leaves the water purification system, provided thatit is fed with water quality within specifications and properly maintained as required by the supplier.Merck KGaA does not warrant the product for any specific application. It is up to the user todetermine if the quality of the water produced by the product matches their expectations, fitswith norms/legal requirements and to bear responsibility resulting from the usage of the water.The product is not intended to produce: water for injection, water for dialysis, sterile water forirrigation or injection, bacteriostatic water for injection, sterile purified water in containers, andsterile water for injection in container or ingestion. The product is not intended to be used inexplosive environments according to ATEX Directive – equipment & protective systems intendedfor use in potentially explosive atmospheres. In addition the product is not intended as a MedicalDevice, including In-Vitro Devices.1
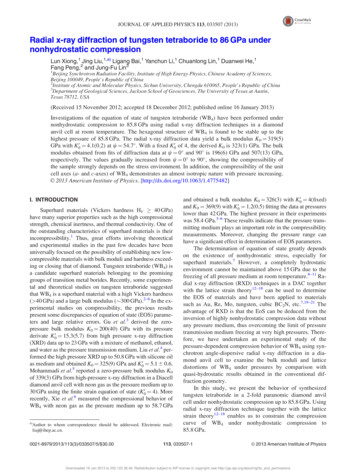
System overviewMilli-Q IQ 7003/7005/7010/7015 consists of different units:5421637891POD (Point of Dispense) with screeninterface6Electrical connections2POD dispenser7Hydraulic connections3POD base8Storage tank4Dispensing wheel9Milli-Q IQ Element (optional)5Water purification unitIntroduction2
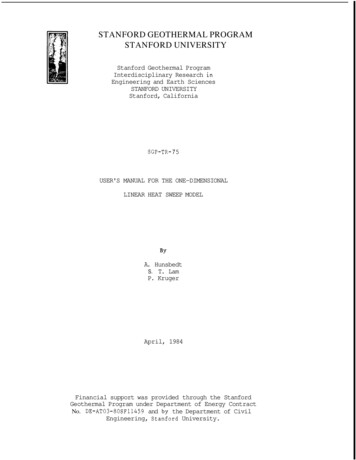
Description of the systemThe Milli-Q IQ 7003/7005/7010/7015 manages the production and the distribution of pure(Type 2) and ultrapure (Type 1) water from a tap water source. It is composed of threedifferent sections: Water purification unit manages the production of pure and ultrapure water. Point of dispense (POD) integrates the screen interface and manages the dispensing of pure(E-POD ) and ultrapure (Q-POD /Milli-Q IQ Element) water. At least one Q-POD is necessaryand up to 4 PODs can be installed, 1 E-POD 3 Q-POD or 4 Q-POD . Storage tank stores and maintains the pure water quality.System flow-schematicsThe system is fed with tap water and the distribution loop is fed by a storage tank.Production ion flowschematic241526272519283031203233212334291Tap Feed Water18 Pure water Resistivity Cell2Inlet Solenoid Valve19 Pure water 3 Ways Valve3System Feed Pressure Sensor420 ech2o bactericidal lampIPAK GARD 21 Storage Tank5Pressure Regulator22 Vent Filter6Reverse Osmosis (RO) Reject Capillary723 ech2o ASM lampRO Pump Feed Pressure Sensor24 Distribution Inlet Solenoid Valve8Flow Controller25 Motorized Valve9RO Flush Solenoid Valve26 TOC Monitor10 RO Pump (bypass 180psi)27 Distribution Pump11 RO Pressure Sensor28 Pressure Sensor12 Feed Conductivity Cell29 Ultrapure Resistivity Cell13 Thermistor30 IPAK QUANTA 14 RO membrane (1 or 2 depends on syst type)31 ech2o oxidation lamp15 Permeate Conductivity Cell32 E-POD 16 Permeate 3 Ways Valve33 Milli-Q IQ Element (optional)17 Elix EDI Module34 Q-POD Introduction3
This system uses potable tap water as feed and produces pure (Type 2) and ultrapure water(Type 1) delivered by independent POD dispensers.The system is divided into three sections. These are the production, the storage and thedistribution.Production: Tap water is first purified by the IPAK Gard pretreatment rticles,colloidsandfree chlorine are efficiently removed before the reverse osmosis purification.The intelligent reverse osmosis (RO) purification that follows controls water consumption,ensures a constant product flow rate and optimal water quality. Majority of contaminants areremoved at this stage such as the ions, particles, bacteria and large organics. The purified ROwater then enters the patented Elix electrodeionization module, where ion-exchange resins arecontinuously regenerated by a small electrical field. The pure water then passes through themercury-free ech2o bactericidal lamp where bacteria is further eliminated resulting in pure waterthat is stored in the storage tank.Distribution: Pure water is stored in high-quality polyethylene tank, which is equipped with thevent filter and the mercury-free ech2o ASM lamp. The vent filter maintains the consistent purityof stored water and provides effective protection against airborne contaminants. The ech2o ASMlamp further protects the integrity of the stored water with regular exposure to bactericidal UVlight. Purified water then flows to the mercury-free ech2o oxidation lamp. Organic moleculesare partially oxidized, resulting in ions. These are then captured in the next stage when thepurified water enters the IPAK Quanta polishing cartridge, composed of ion-exchange resins andsynthetic activated carbon.Throughout the purification steps, quality parameters are monitored with resistivity sensors andthe A10 TOC (total oxidizable carbon) monitor. The A10 TOC Monitor uses a small UV lampduring its TOC analysis mode. This is called the ech2o A10 TOC Lamp.The E-POD and Q-POD are the main interfaces with the user. They are configured with 2 or 5meter connectors to the main production unit depending on the laboratory setting. The armholding the dispenser on the mast can be moved up and down to adapt to laboratory glassware.Its dispensing ‘wheel’ delivers water from precise drop-by-drop up to fast 2 L/min flowrate. ThePOD’s large 5” touchscreen offers a wide range of applications for users. It also has an USB portto easily export data. At the outlet of the dispenser, the final purification is performed by theapplication-specific POD-Pak.When not in active use, the water within the units will recirculate for three minutes every hour.This is to maintain water quality, a clean environment and to avoid contamination. The systemshould not be turned off as this will stop the periodic recirculation taking place.Introduction4
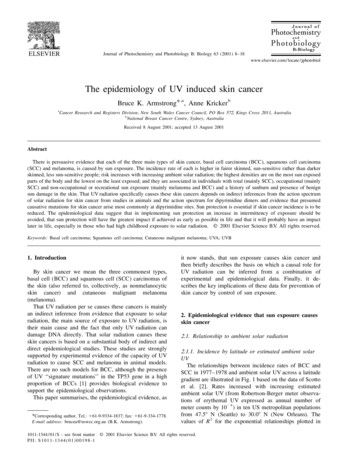
QUICK STARTExit screensaverIf the setting is active and there has been a certain time of user inactivity, the screensaver willbe displayed on the POD touch-screen.ScreensaverTap anywhere on the screen or initiate a manual dispense by pressing the dispenser wheel toexit the screensaver.Home screenStatus barHomeMenuDispense ultrapure water (Q-POD)It is a good practice to always recirculate water before dispensing.To do this, press on the recirculation icon, this also refreshes the water qualityparameters: Product resistivity TOC TemperatureRecirculateThere are several options to dispense ultrapure water:Manual DispensingTo start dispensing in drop-by-drop, turn thedispense wheel one notch counter-clockwise.To start dispensing at full flow, press down onthe wheel. Adjust flow rateStopTo increase the flow rate keep turning thewheel counter-clockwise until full flow isreached. To decrease the flow rate, turn thewheel clockwise.To stop any ongoing dispensing, press downon the wheel or rotate the wheel clockwiseuntil no more water flows from the dispenser.Full flowDrop-by-drop 5
Dispense pure water (E-POD)It is a good practice to always recirculate water before dispensing.To do this, press on the recirculation icon, this also refreshes the water quality parameters: Elix resistivity TemperatureThere are several options to dispense pure water:Manual DispensingTo start dispensing at low flow, turn thedispense wheel one notch counter-clockwise.To start dispensing at full flow, press down onthe wheel. Adjust flow rateStopTo increase the flow rate keep turning thewheel counter-clockwise until full flow isreached. To decrease the flow rate, turn thewheel clockwise.To stop any ongoing dispensing, press downon the wheel or rotate the wheel clockwiseuntil no more water flows from the dispenser.Low flow High flowQuick start6
Volumetric Dispensing (20mL to 100L)Enables a user to auto dispense a pre-selected volume.Note: When connected to a storage tank, always make sure there is enough water presentbefore dispensing. This information is always displayed on the main screen.1- Select unit and input volume todispense, press ok to validate.2- Press the start icon on the screen or thedispenser wheel to initiate the dispense.The system will automatically stop once the input volume is reached.Note: The system keeps in memory the last volume dispensed. To repeat a volumetricdispense, click on the start icon or the dispenser wheel.Assisted Dispensing (50mL to 5L) (Q-POD only)Like volumetric dispensing, a pre-selected volume is auto-dispensed and the last millilitresare distributed drop-by-drop for the user to manually stop the flow when the calibration markis reached. The assisted dispensing function brings more precision, avoiding the use of anintermediary container and possible source of contamination.1- Select unit and input volume to dispense, press OK to validate.2- Press the start icon on the screen or the dispenser wheel to initiate the dispense.The system dispenses in high-flow 96% of the required volume and automatically switchesto drop-by-drop to enable a user to manually and precisely reach the calibration mark of avolumetric flask.3- User must manually stop the drop-bydrop dispensing.Important! The dispensing must be stopped by the user by either pressing on the dispenserwheel or the stop dispense icon on the touch-screen.Quick start7
Dispense reportA dispense report is automatically produced after each dispensing operation. A dispensingoperation is considered to be all dispenses with less than 10 second intervals between them. Thiscan be interrupted at any time by pressing on the dispense report icon that becomes availableon the home screen as soon as a dispense is initiated.1. VisualizeClick on the dispense report icon:Dispensereport2. Personalize (assign a name or experiment number)In the user ID field, enter the content of your choice (max 15 characters)3. Export- Scan the QR code from a mobile device to instantly retrieve the report.- Click on the export button to save the report on a USB key.4. Automatic archivingThe dispense report icon on the home screen will automatically disappear after 5 minutes ofinactivity. Each dispense report, whether consulted or not, is automatically archived and can beretrieved anytime by going in the history report section available in the information menu. Go topage 14 Information History for further information.Quick start8
View & manage Alerts and AlarmsAlerts give you advanced warning when maintenance is required and Alarms notify you whenthe system has encountered a technical issue.1or the alarmiconPress on the alertpresent in the bottom bar to display the alert(s)or/and alarm(s) which are active.Note: The notification number indicates how many active alarms are present. When there areno active alerts or alarms, the icon disappears.Select a specific alert or alarm to get furtherinformation and better understand the root cause.Advice is provided in the information section tohelp the user troubleshoot.If the issue is not resolved, select the Contacttab to find the technical support hotline numberfor further assistance.To protect the system and user applications,alarms of a serious nature will automatically stopthe system from dispensing water.Note: These are displayed on the screensaver toalert the user when the system is not in activeuse.Alerts provide advanced warning of anymaintenance actions that will be required. Thesecan be “closed” to be reminded again in 24h orcan be “cleared” permanently.An Order tab will be present containing orderinginformation when applicable.Quick start9
Navigate the screen interfaceEach POD has a 5” touch-screen that allows a user to control and monitor the water system.All sub-menus and applications can easily be reached in a few clicks or swipes, as on a smartphone.HOME SCREENHome- Water qualityinformation- Dispensing functions- Alerts & Alarms(when applicable)- Dispense report(when applicable)MAIN MENUSMenu-Go toConsumablesMenuGo toInformationMenuGo toSettingsMenuGo toMaintenanceMenuQuick nGo toManager access10
AppsWhen thereare multiplelines, ascroll bar ispresent toswipe up &downIndicates how many screens are present and where you are. Swipe left & right anywhere on screen to switch between screens.Pops-upWhen you click in a zone of text, thekeypad will automatically appear.To remove the keypad click onon any zone outside the keypad.orNote: When in a menu or app level screen, 1 minute of inactivity generates a time-out backto the home screen.When in a pop-up level screen, there is no time-out, therefore the user remains on thisscreen until the pop-up is manually closed.Important! If multiple Q-PODs are installed and a pop-up in the settings or maintenancemenus is not closed, dispensing will remain unavailable on all Q-PODs until the pop-up ismanually closed.Quick start11
CONSUMABLE MENUViewing Consumables StatusColour icons allow to instantly view the status of all installed consumables.Green: no action requiredYellow: notice for a maintenance actionRed: maintenance required!Press on the icon to get theconsumable ID, ordering information and adescription of the purification technology.Note: Certificates of quality are now available online www.mymilliqconsumables.comAll cartridges have been designed to be easily replaced by a user. A short-cut is available to thereplacement wizard by clicking on the “replace pack” button in the pop-up.Important! ech2o UV lamps should not be replaced by users. Contact the technical supporthotline to organize a replacement visit.ech2o cartridge collection and recycling programFor United States users onlyGo to page 46 recycling section.Consumable Menu12
Consumable identification with card readingSome of the consumables come with a card for scanning and identification by the system. For system consumables, the card must be scanned on the end of the dispenser (e-Sure tag reader).Consumable Menu13
INFORMATION MENUThis menu contains useful system information and provides a system status. Dispensing isavailable while in this menu.Available apps:SystemHistoryContactsFlow schematicTroubleshootingSystemFind system detailsSelect System ID to find the information on thewater system model and installation details.Download user manualThe user manual is available in 9 languagesand it can be downloaded through an USB keyor if connected to a network, to any computerdevice.History2 user reports exist: Daily quality measures reportEach row represents a day (24h) and is dated. It contains daily averages for productresistivity, temperature and TOC. Also included is the total volume dispensed during the day. Dispensing events reportEach row is a dispense operation. It is an archive of all the dispense reports.To export data or preview a graph:1. Select a time period of interest with a start andend date.2. A graph pre-view of the last 30 records isavailable on the Q-POD screen.3. Export the report in .ods (open documentsource) format to visualize the full data andintegrate them into a data management system.Note: A complete history report with all system activity is available. By default it is onlyavailable when logged-in as the system manager. This can be modified by de-activating thesystem manager profile in the settings menu, go to page 19 Settings Manager access.14
Flow schematicThis is a graphic representation of the hydraulic components of the water purification system.Components change colour depending on the state and system status.Grey - inactive Blue - activeYellow - maintenance alert Red - technical issue alarmProduction flow schematicDistribution flow schematicTroubleshootingAccess a diagnostic summary.This app contains all the necessary information in one location for effective troubleshootingwhen in contact with the technical support hotline. System information & last service visitWater quality & consumables (installed dates)Active alerts, alarms & auto-test resultsDiagnosticsInformation15
ContactsTo edit contact information, login as the system manager, go to page 19 Settings Manageraccess. The user parameters are used on various reports generated by the system and canquickly help users identify the right contact for any questions or issues.Technical support hotlineApplication specialistField service engineerSystem managerMaintenance operatorIn case of troubleshootingApplication enquiries or quote requirementsOnly in selected countries, contact technical supportResponsible for system configuration & quality settingsResponsible for maintaining the systemInformation16
SETTINGS MENUDifferent settings are available to customize the water purification system operation.Depending on the user profile (end-user operator / system manager) some of the settings willhave either read-only or read & write urationTank configurationDistributionconfigurationProduction alarmconfigurationEnd-userSystemManagerScreen saverRead onlyWater sensorRead onlyAlarm relayRead onlyPeriodic EDI rinsing check timeRead onlyPeriodic EDI rinsing durationRead onlyRead onlyPeriodic EDI rinsing periodRead onlyRead onlyTank capacityRead onlyRead onlyTank refill setpointRead onlyech2o ASM lamp cycle start hourRead onlyLab closeRecirculation DurationRead onlySafety flow stopRead onlyDispensing ModeRead onlyEDI resistivityRead onlyPermeate conductivityRead onlyRO ionic rejectionRead onlyRO feed conductivity RO highRead onlyRO feed conductivity tap highRead onlyInlet strainer cleanRead onlyCl2 cleanRead onlyRead onlyIPAK Gard lifetimeIPAK Gard volumeTank alarmconfigurationVent FilterTank emptyRead only17
SettingsDistribution alarmconfigurationEnd-userSystemManagerProduct resistivityProduct TOCIPAK QuantaMillipakMillipak GoldLC-PakVOC-PakEDS-PakLC-Pak 0.1µm0.1µm-PakConnectivityDate, Time & LanguagePasswordUnitsLocal networkRead onlyTime zone - Date - TimeRead onlySelect languageRead onlySystem managerResistivity / ConductivityRead onlyTemperatureRead onlyStorage tankRead onlyTemperature compensation modeRead onlyPressureRead only18
Available gurationConnectivityDate, Time &Language C/ FPasswordUnitsNote: Dispensing while in this menu is not available.Manager access & passwordLogin as a Manager1. Press on the menu buttonfrom the Home page.2. Press on Login.3. Enter system manager password.To display & see the password while typing, check the Show code boxis displayed in the top left corner.Once logged-in, the manager iconIf a manual logout is not performed, the system manager profile will be automatically loggedoff after 1 hour.Note: By default this parameter is activated. The default password is PASSIf the system manager password is forgotten, contact the technical support hotline.Log off as a Manager1. Press on the menu button2. Press on “Logout”.Modify system manager settingsThis can only be done when logged-in as amanager.In the Password app:1. Deactivate/re-activate the manager passwordthrough the password activation slider button.2. If required, change the password.Important! Deactivating the system manager profile will enable all settings to be modifiableby any user.Settings19
System configurationLab closeWhen leaving the lab for long periods of inactivity, this mode can be activated to save energyand reduce wear of system components. Recirculation is reduced to once a day. 24h prior toresuming lab activity, the system automatically resumes a recirculation every hour, ensuring itis ready for use.1. Activate Lab close via the slider button.2. Enter a Start and End date (minimum of 3 days). Lab close mode will be initiated at 00:01on the selected date.Safety flow stopA precautionary measure that stops a POD dispensing after having continuously deliveredwater for a certain duration.Adjust to the preferred time by using the arrows or click on the box to access the keypad.This setting will not impact volumetric dispensing functions.ScreensaverThis is the maximum duration of inactivity on a POD before the screensaver starts.1. Activate / deactivate via the slider button.2. Adjust to the preferred time by using the arrows or click on the box to access the keypad.This setting applies to all connected PODs. By default the screensaver is active and the timeris set to 5 minutes.Settings20
Production configurationThe system includes a periodic EDI rinsing feature to ensure a good system performance andwater quality is always maintained.The rinsing will take place at the time of the day set in Periodic EDI rinsing check time, thatcan be chosen by the system manager to better adapt to the work time schedule.The system will rinse the EDI for the Periodic EDI rinsing duration (1h by default) wheneverthe system did not produce Elix water for at least 1 hour during the time period set in thePeriodic EDI rinsing period (24h by default).POD configurationThis app allows a user to configure all parameters specific to PODs. These are unique to thePOD that is being used to input the values.To duplicate POD parameters, the action(s) should be repeated on all other PODs.POD NameThis can be personalized. Click on the text box and input up to a maximum of 8 characters.Screen brightnessAdjust to the preferred brightness from 1 to 7 using the arrows or click on the box to accessthe keypad and type-in the value.Sound volumeEach POD can emit a sound when alerts/alarms are triggered. This can be activated or deactivatedusing the slider button. The sound can be adjusted to the desired volume by using the arrows orclick on the box to access the keypad and type-in the value. By default, the sound is deactivated.Flowmeter offsetThe flowmeter has been calibrated in order to achieve volume precision of /- 2% for Q-POD and /- 5% for E-POD. Laboratory glassware accuracy can vary a lot. This setting provides a userwith the ability to adapt the flowmeter to their current glassware accuracy by using an offsetfunction.Adjust the offset by using the arrows or click on the box to access the keypad and type in thevalue. To gain back the original calibration settings, set the value back to 0.Settings21
AccessoriesWater sensorA water sensor can be connected to the system unitto stop the system from producing water in case ofwater spillage. Up to 3 sensors can be connected inseries to cover a wider surface area.Foot pedalThe pedal is connected to the base of the Q-POD.In the Q-POD configuration app, activate the footpedal via the slider button.Dispense using the foot pedal1. Press once and release to dispense in full flow.2. Press and hold to start dispensing in drop-bydrop, keep pressing to increase the flow rate upuntil full flow is reached. Release at the chosen flowrate.3. Press once to stop the flow dispensing.Washer Distribution kitThis accessory will allow distributing water from astorage tank to washing machines.Note : specific tank vent filter HF used for highflowrate application.Alarm relayThis accessory will allow to relay all, or a selectionof alarms to a remote device.Select the alarm(s) that will activate the relay.Sanitary Sampling valve for storage tankThe unique design of the sanitary sampling valveallows the user to sample mid-stream and preventsaccumulation of bacteria or particles inside thesampling probe.It can also be sanitized effectively and easily inplace.Settings22
Alarm configurationAdjust the alarm set points by either clicking on the arrows or alternatively, click in the box toaccess the keypad and directly type-in the value.Water quality Product resistivity/conductivity Product TOCInlet strainer cleanIt is recommended to clean the inlet strainer once a year to avoid it becoming clogged. Depending on the feed water and its particle concentration, the inlet strainer clean frequency can beadapted.Cartridge lifetimesCartridges should be changed when the system alerts the user.Saturated pack content will start to let ion and organic contaminants through. This is calledbreakthrough and often starts with traces that cannot be detected by on-board monitoring.Some technologies will clog, creating a back pressure which can result in flowrate issues or pressure alarms in the system.In validated settings, to adjust lifetimes according to existing SOPs, click on the applicablefilters and adjust accordingly.Settings23
ConnectivityThe system offers the possibility to be connected to a laptop with a fixed IP addressor to your local network (DHCP protocol/fixed IP address) via an Ethernet port. The DHCP(Dynamic Host Configuration Protocol) is an “automatic configuration” of a device anytimeit connects to an IP Network. This “automatic configuration” is called allocation. Thesystem is automatically recognized and configured so that the networks resources canbe used. Check with your local IT resources which type of connection is best suited to you.Change network connection settings1. For a direct connection, change the network settings if necessary(default IP address: 192.168.1.69).2. For network connection, activate DHCP via the DHCP activation button.Duplicate user interface in a browserOnce connected:1. Go to your browser. For best browsing performance, Chrome is recommended.2. Enter the IP address of your system which can be found in the connectivity pop-up screen.Note: The view from a laptop enables a user to view the Q-POD display remotely. Dispensingoperations cannot be conducted remotely for safety reasons.Date Time & LanguageThe norm ISO 8601 has been used as a reference for a standardized way of presenting datesand times.DateCalendar date representations are shown in the form “2018-11-06” [YYYY-MM-DD]. [YYYY]indicates a four-digit year. [MM] indicates a two-digit month of the year, 01 through 12. [DD]indicates a two-digit day of that month, 01 through 31.Start by setting the year:1. Click on the month & year title, this displays months and only the year as a title. Click againon the year title to display years.2. Select the year, this then displays months.3. Select the month, this then displays the days.4. Finally select the day to confirm the date setting.Time ZONE1. Select the continental or oceanic zone you are in on the left. This updates the right-handside with all the major cities within this time zone.2. Select the appropriate city. If you have not found a city, make sure you are in the right timezone.The Milli-Q system is now configured to display current local time and automatically updateswhen daylight saving time applies.TimeThe time is set and displayed in a 24h clock format. A time of day is written in the 24-hournotation in the form hh:mm (for example 14:23), where hh (00 to 23) is the number of full hoursthat have passed since midnight, mm (00 to 59) is the number of full minutes that have passedsince the last full hour.LanguageThere are 9 languages available: Chinese / English / French / German / Italian / Spanish /Portuguese / Japanese / RussianSettings24
UnitsUnits can be formatted to local needs:Resistivity / ConductivityTemperatureMΩ.cmµS/cm C FL%Storage tank levelPressureBar / kPa / psiSelect and press on the unit of interest. The selected unit will appear in blue. Press “OK” toconfirm selection and exit the pop-up.Temperature compensation modeIt is possible to show non-temperature compensated resistivity or non-temperature compensatedconductivity. Temperature compensation is a way of standardizing resistivity or conductivity tomeasurements that would be seen if the water tempera
the A10 TOC (total oxidizable carbon) monitor. The A10 TOC Monitor uses a small UV lamp during its TOC analysis mode. This is called the ech 2 o A10 TOC Lamp. The E-POD and Q-POD are the main interfaces with the user. They are configured with 2 or 5 meter connectors to the main production unit depending on the laboratory setting. The arm