Transcription
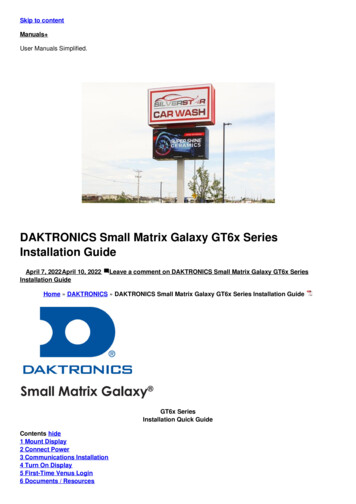
Skip to contentManuals User Manuals Simplified.DAKTRONICS Small Matrix Galaxy GT6x SeriesInstallation GuideApril 7, 2022April 10, 2022Installation GuideLeave a comment on DAKTRONICS Small Matrix Galaxy GT6x SeriesHome » DAKTRONICS » DAKTRONICS Small Matrix Galaxy GT6x Series Installation GuideGT6x SeriesInstallation Quick GuideContents hide1 Mount Display2 Connect Power3 Communications Installation4 Turn On Display5 First-Time Venus Login6 Documents / Resources
6.1 References6.2 Related Manuals / ResourcesMount Display1. Lift the display into position on the support structure.2. Weld or use 1/2 ” hardened bolts to secure all clip angles to support structure.3. Remove crane support from the display.4. Remove all eyebolts if desired. Seal all of the remaining holes with silicone approved for use on aluminum.5. Make sure the display structure or shrouding does not block display ventilation.Connect PowerRefer to the label on the back of the display or to the display riser drawing for power requirements.Displays require either 120 VAC (2 wire ground) or 120/240 (3 wire ground).
1. Wire Line 1, Line 2, neutral, and ground wires according to the shop drawing.2. Connect grounding electrode to the ground lug on each display face.3. Test the display ground to ensure it meets the provisions of all applicable local and national codes.Communications Installation1. Connect the signal cables to the proper QuickConnect Jacks on the back of the display.Note: Remove the protective cap from the cables.2. If this display is a two-sided primary/mirror display, quick-connect cables are provided to connect the signalbetween the two faces. Refer to options 1 and 2 below for yourspecific application.Option 1: Connect a cable from theSignal Out jack on the primary face to the Signal In jack on the mirror face. Connect a second cable from theSignal Out jack on the mirror face to the Signal In jack on the primary face.Option 2: Inst all the fiber quick-connect cables between the Primary and Mirror display faces when applicable.3. Secure the excess cable to the support structure to prevent damage from weather or vandalism.
Turn On Display1. Turn on power to the display.2. Observe the boot sequence shown on the display to get the IP Address or DHCP name. The boot time lastsabout three minutes.3. Displays are set to DHCP from the factory. If a static IP address is required, contact theDaktronics Help Desk at 800-325-8766.First-Time Venus LoginLog In – Daktronics Web-Hosted Server1. Navigate to https://venus.daktronics.com using a web browser such as Internet Explorer version 11 or lateror Chrome.2. Enter the user name and password into the Email and Password text boxes.3. Change the password in the Update Password text boxes.4. Update the account information in the User Information and Additional Information sections.Log In – Customer-Local Hosted ServerNavigate to https://ComputerName:44300 (entering the actual computer name forComputerName).Venus AssistanceFor further assistance, contact DaktronicsCustomer Service.United States & Canada:1-800-DAK-TRON (325-8766)Outside the U.S. & Canada: 1-605-275-1040Online: http://www.daktronics.com
DD4541531Rev 0121 April 2021201 Daktronics DriveBrookings, SD cuments / ResourcesDAKTRONICS Small Matrix Galaxy GT6x Series [pdf] Installation GuideSmall Matrix Galaxy, GT6x Series, Small Matrix Galaxy GT6x Series, DD4541531ReferencesVenus Log InDaktronics :: Scoreboards, LED Video Displays, Message Signs, BillboardsRelated Manuals / ResourcesGARMIN STRIKER 4 Series Installation GuideSTRIKER 4 Series 30 cm (11.8 in.) Compass Safe DistanceOctober 2020 Kodak E1000 Series Scanners Installation GuideE1000 Series Scanners Installation Guide A-61940 5K9219www.alarisworld.com/go/E1025install pport www.alarisworld.com/go/contactusAll trademarks and trade names used MSR Access Series Installation GuideMSR Access Series Installation Guide PACKAGE INCLUDES: Frameassembly tent body rainfly stakes PREPARE FOR SETUP Stake out DAKTRONICS DXB Series Digital Billboard Installation GuideDXB Series Digital Billboard Installation Quick Guide Time-Saving TipsLocate installation parts and tools in the box shipped Leave a commentYour email address will not be published.
CommentNameEmailWebsiteSave my name, email, and website in this browser for the next time I comment.Post CommentManuals ,homeprivacy
Daktronics Help Desk at 800-325-8766. First-Time Venus Login Log In - Daktronics Web-Hosted Server 1. Navigate to https://venus.daktronics.com using a web browser such as Internet Explorer version 11 or later or Chrome. 2. Enter the user name and password into the Email and Password text boxes. 3. Change the password in the Update Password .