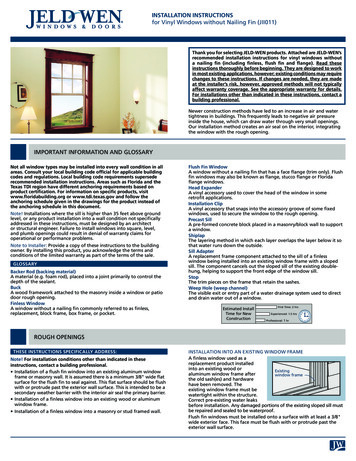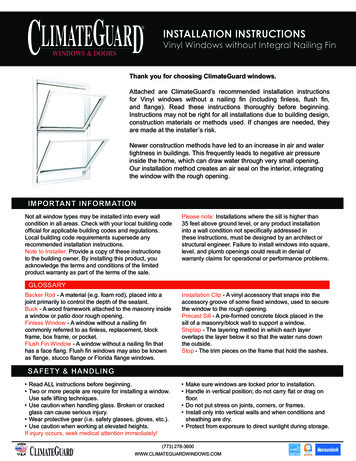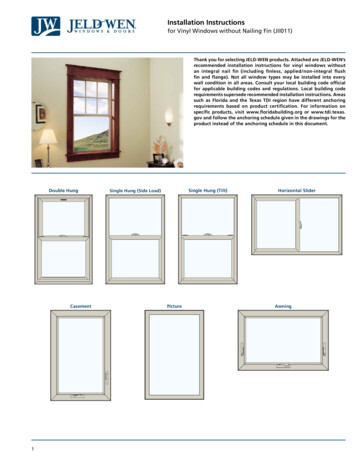
Transcription
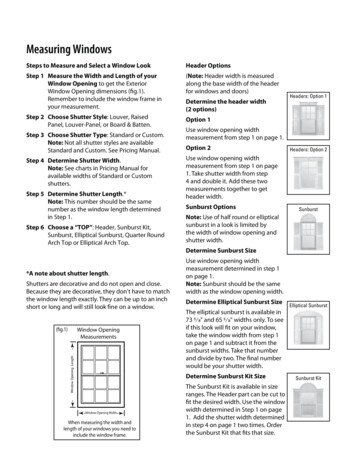
Measuring WindowsSteps to Measure and Select a Window LookHeader OptionsStep 1 Measure the Width and Length of yourWindow Opening to get the ExteriorWindow Opening dimensions (fig.1).Remember to include the window frame inyour measurement.(Note: Header width is measuredalong the base width of the headerfor windows and doors)Step 2 Choose Shutter Style: Louver, RaisedPanel, Louver-Panel, or Board & Batten.Option 1Step 3 Choose Shutter Type: Standard or Custom.Note: Not all shutter styles are availableStandard and Custom. See Pricing Manual.Step 4 Determine Shutter Width.Note: See charts in Pricing Manual foravailable widths of Standard or Customshutters.Step 5 Determine Shutter Length.*Note: This number should be the samenumber as the window length determinedin Step 1.Step 6 Choose a “TOP”: Header, Sunburst Kit,Sunburst, Elliptical Sunburst, Quarter RoundArch Top or Elliptical Arch Top.Headers: Option 1Determine the header width(2 options)Use window opening widthmeasurement from step 1 on page 1.Option 2Headers: Option 2Use window opening widthmeasurement from step 1 on page1. Take shutter width from step4 and double it. Add these twomeasurements together to getheader width.Sunburst OptionsSunburstNote: Use of half round or ellipticalsunburst in a look is limited bythe width of window opening andshutter width.Determine Sunburst Size*A note about shutter length.Shutters are decorative and do not open and close.Because they are decorative, they don't have to matchthe window length exactly. They can be up to an inchshort or long and will still look fine on a window.(fig.1)Window OpeningMeasurements Window Opening LengthUse window opening widthmeasurement determined in step 1on page 1.Note: Sunburst should be the samewidth as the window opening width.Determine Elliptical Sunburst SizeDetermine Sunburst Kit Size Window Opening Width When measuring the width andlength of your windows you need toinclude the window frame.Elliptical SunburstThe elliptical sunburst is available in73 " and 65 " widths only. To seeif this look will fit on your window,take the window width from step 1on page 1 and subtract it from thesunburst widths. Take that numberand divide by two. The final numberwould be your shutter width.The Sunburst Kit is available in sizeranges. The Header part can be cut tofit the desired width. Use the windowwidth determined in Step 1 on page1. Add the shutter width determinedin step 4 on page 1 two times. Orderthe Sunburst Kit that fits that size.Sunburst Kit
Louver/Panel Installation with Screws or Shutter-Loks FOR USE ON A VARIETY OF SURFACES INCLUDING:Wood, aluminum, vinyl, stucco, hardboard, brick or masonry.REQUIRED FOR INSTALLATION:Electric drill, 1/4" drill bit (Shutter-Loks), 11/64" drill bit (screws), hammer, Shutter-Loks and/or screws.NOTE: Shutters need room to expand/contract, be sure not to over tighten fasteners. To prevent shuttersfrom warping, proper installation must be followed. Wall anchors will be required for shutters installedon any type of masonry.STEP 1Place the shutter next to the windowand mark desired location against thewall or window. See Figure 1.Figure 1top of shutterNote: Up to 43", use four Shutter-Loksor screws. 44" and greater, use sixShutter-Loks/screws per shutter.windowSTEP 2To help ensure proper alignment, mark andpre-drill holes into the shutter before attachingit to the wall. Shutter-Loks require 1/4" hole.Screws require 11/64" hole and 1/4" hole ifover 44". See Figures 2A and 2B.Figure 2AFigure 2BFour Shutter-Lok Application1/4" holesSix Screws Application1/4" holesWhen installing shutters shorter than 44",drill four (4) 1/4" holes in the locations shownin Figure 2A. If the shutter is 44" or greater,drill six (6) 1/4" holes for Lok application orfour (4) 1/4" holes and two (2) 11/64" holesfor screws. See Figure 2B.STEP 311/64" holesPosition the shutter in location against thewall, and drill through the shutter into the wallsurface to a depth of 3-1/4".STEP 4Tap the Shutter-Lok gently with a hammer ordrive in the screw so as not to over driveor over tighten.1/4" holes1/4" holesNOTE:To remove shutters, do not attempt to pull out the Shutter-Loks. Instead, simplyslide a pair of snips behind the shutter to cut the Shutter-Lok off at the shank.
Board-N-Batten FOR USE ON A VARIETY OF SURFACES INCLUDING:Wood, aluminum, vinyl, stucco, hardboard, brick or masonry.REQUIRED FOR INSTALLATION:Electric drill, 1/4" drill bit, 11/64" drill bit, screwdriver and screws.NOTE: Shutters need room to expand/contract, be sure not to over tighten fasteners. To prevent shuttersfrom warping, proper installation must be followed. Wall anchors will be required for shutters installedon any type of masonry.Figure 1STEP 1Place the shutter next to the window and markdesired location against the wall or window asshown in Figure 1.Note: Up to 43", use four screws. 44" andgreater, use six screws per shutter.STEP 2To help ensure proper alignment, mark or predrill holes into the shutter before attaching it tothe wall. When installing shutters shorter than43" drill (4) 1/4" holes in the locations shown in“Four Screw Application”as shown in Figure 2A.If shutters are 44" or greater, drill (6) 1/4" holesand (2) 11/64" holes in the locations show in“Six Screw Application” as shown in Figure 2B.Figure 2AFigure 2B1/4" holes1/4" holesSTEP 3Use enclosed screws to secure the shutter to thewall surface. Do not over tighten. Shutters musthave room to expand and contract with changingweather. Position the shutter in location againstthe wall, and drill through the shutter into the wallsurface to a depth of 3-1/4”. These instructions usethree-board shutters as the example. The sametechniques are used for shutters with four and fiveboards.11/64" holes1/4" holesFour ScrewApplicationFor less than 55"1/4" holesSix ScrewApplicationFor 55" or greater
Shutter TopREQUIRED FOR INSTALLATION:Electric drill, 1/4" drill bit (Shutter-Loks ), 11/64" drill bit (screws), screwdriver, screws or Shutter-Loks.NOTE: Note that Louver and Elliptical tops, do not require transom clips.Top1/4"Figure 1holeClipSTEP 1Attach the top to the shutter using theclips provided. Align shutter and top ona flat surface. Join pieces together bypushing each clip on as far as it will go.Use two clips per top. See Figure 1.Proceed to Step 1A for Raised Panel,Solid and Transom top installation withtransom clips.ClipClipShutterTransom ClipSupport rib willneed to be removedSTEP 1AA transom clip will also need to beinstalled in addition to the two (2)clips. Start by pushing one end ofthe transom clip onto the shutter,clamping the shutter to the top. Workthe transom clip down until the entireclip is fastened to the shutter. Be surethe transom clip is pushed on as faras it will go. See Figure 1.(back of assembly)Figure 21/4" holeFigure 31/4" holeSTEP 2Drill one (1) 1/4" hole as shown inFigure 2. For Transom tops, drill two(2) holes as shown in Figure3.ClipClipSTEP 3Fasten shutter to wall using instructionssupplied with shutter. To prevent shutterTransom Clipfrom dimpling, do not over tighten.Support rib willneed to be removed(front of assembly)
Shutter HardwareREQUIRED FOR INSTALLATION:Electric drill, Phillips screwdriver, 1/8" drill bitKit contains (4) hinges, (2) S-hooks, (10) screwsFigure 1S-HookHingeSTEP 1Determine where hinges and S hook will beinstalled. Hinges are typically installed near endsof shutters. S-hooks are installed on the bottomouter corner. See Figure 1. NOTE: that if placinghinges over fasteners, be sure pilot holes don’tinterfere with the fasteners.STEP 2Using the marks on front of hinges as guides, drillpilot holes through the hinge and shutter, using a1/8" drill bit. The back of the S-hook has a fin, thescrew will be placed here. After the position of theS hook is determined, drill through the fin and intothe bottom of the shutter using a 1/8" drill bit.STEP 3Securely attach hardware using screwsprovided.NOTE:If screw head coating is scratched duringinstallation, touch-up with satin black paint.
FerruleFOR USE ON ANY SURFACE INCLUDING:Wood, aluminum, vinyl, hardboard, brick, masonry and stone.REQUIRED FOR INSTALLATION:Electric drill, 1/4" drill bit, 11/64" drill bit, hammer, Shutter-Loks or screws and ferrule.STEP 1Place shutter next to window, mark desiredlocation against the wall or window.STEP 2With shutter in location against the wall,drill through shutter into the wall to depthof 3-1/4". In brick, the hole diametershould be no greater than 1/4", and drilledinto mortar joints. Do not attach shutter atthis time. See Figure 1.STEP 3Place Ferrule behind shutter and line upwith the holes drilled for the Shutter-Loksor screws. Trim ferrule to properly fit gapbetween back of shutter and wall to which it isbeing attached. Ferrules may not all be samelength. Shutter-Loks used in masonry mustpenetrate into the wall to a depth of at least7/8". Note that if using screws, drill a hole11/64". Follow shutter installation instructionsbased on height.STEP 4Ensure ferrule is trimmed to desired lengthand shutter is parallel to wall. InsertShutter-Lok or screw into the hole in theshutter and through ferrule into the wall.Tap Shutter-Lok gently with a hammer ordrive in a screw to secure the shutter to thecladding. To prevent shutter from dimpling,do not over tighten.Figure 1
Shutter ClipREQUIRED FOR INSTALLATION:Screwdriver, electric drill, level and pencil. (4) shutter clips for shutters up to 43" and (6) shutter clipsfor shutters 44" or greater. Also needed are (9) No. 10 or equivalent (M5 metric) screws. Other fastenersmay be needed for specific surfaces (not included).Figure 1STEP 1Push a shutter clip onto the ribs at each cornerof the shutter. The mounting tab should extendbeyond the shutter. See Figure 2. Shutter clipswill be removed later, so DO NOT fasten shutterclips completely onto the shutter at this time.CorrectPlacement forShutter ClipsFigure 2Do not completelyfasten Shutter Clipsto shutter at this time
Shutter Clip, ContinuedSTEP 2STEP 3Hold the shutter where you want it to be attachedon the mounting surface. Mark the center hole ofeach shutter clip in each clip. Draw lines verticallybetween top and bottom marks. After completingthis step, remove shutter clips from shutter. SeeFigure 3.Figure 3Place the front of the shutter against the mountingsurface and align it next to where it will be installed.On the vertical lines drawn in Step 2, sketch markscorresponding to the mounting areas of the shutter.See Figure 3.pencil markswindow trimtop of shutterwindowFigure 4STEP 4Read complete instructions for Step 4 and examineFigure 4 before installing shutter clips to mountingsurface. Fasten shutter clips centered on thevertical line and between the sketch marks drawnin Step 3. Use one screw next to the window, andtwo screws in the shutter clips away from window.See Figure 4. shutter clips should be free to movewith changes in temperature. Mounting bracket onshutter clip should be placed in upright position.Special mounting procedures or techniques may berequired on different mounting surfaces.STEP 5Once the shutter clips are positioned and secured tothe mounting surface, attach shutter by placing shutterover shutter clips and pressing the shutter ribs on toeach shutter clip. Press shutter firmly against mountingsurface, making sure all six (6) clips are engaged.Next to windowFasten with bracket upAway from windowOptional
TECHNICAL BULLETINFramed Shutter InstallationApplies to Louver, Panel, Board-N-Batten Shutters.Maintain a minimum clearance of 1/4" along both sides and 3/8"at the top and bottom of the shutter to allow for movement.d bottom3/8" Top an1/4" Sides
Notes:26
Wood, aluminum, vinyl, stucco, hardboard, brick or masonry. REQUIRED FOR INSTALLATION: Electric drill, 1/4" drill bit, 11/64" drill bit, screwdriver and screws. NOTE: Shutters need room to expand/contract, be sure not to over tighten fasteners. To prevent shutters from warping, proper installation must be followed. Wall anchors will be required .