Transcription
INSTALLATION INSTRUCTIONSVinyl Windows without Integral Nailing FinThank you for choosing ClimateGuard windows.Attached are ClimateGuard’s recommended installation instructionsfor Vinyl windows without a nailing fin (including finless, flush fin,and flange). Read these instructions thoroughly before beginning.Instructions may not be right for all installations due to building design,construction materials or methods used. If changes are needed, theyare made at the installer’s risk.Newer construction methods have led to an increase in air and watertightness in buildings. This frequently leads to negative air pressureinside the home, which can draw water through very small opening.Our installation method creates an air seal on the interior, integratingthe window with the rough opening.IMPORTANT INFORMATIONNot all window types may be installed into every wallcondition in all areas. Check with your local building codeofficial for applicable building codes and regulations.Local building code requirements supersede anyrecommended installation instructions.Note to Installer: Provide a copy of these instructionsto the building owner. By installing this product, youacknowledge the terms and conditions of the limitedproduct warranty as part of the terms of the sale.Please note: Installations where the sill is higher than35 feet above ground level, or any product installationinto a wall condition not specifically addressed inthese instructions, must be designed by an architect orstructural engineer. Failure to install windows into square,level, and plumb openings could result in denial ofwarranty claims for operational or performance problems.GLOSSARYBacker Rod - A material (e.g. foam rod), placed into ajoint primarily to control the depth of the sealant.Buck - A wood framework attached to the masonry insidea window or patio door rough opening.Finless Window - A window without a nailing fincommonly referred to as finless, replacement, blockframe, box frame, or pocket.Flush Fin Window - A window without a nailing fin thathas a face flang. Flush fin windows may also be knownas flange, stucco flange or Florida flange windows.Installation Clip - A vinyl accessory that snaps into theaccessory groove of some fixed windows, used to securethe window to the rough opening.Precast Sill - A pre-formed concrete block placed in thesill of a masonry/block wall to support a window.Shiplap - The layering method in which each layeroverlaps the layer below it so that the water runs downthe outside.Stop - The trim pieces on the frame that hold the sashes.SAFETY & HANDLING Read ALL instructions before beginning. Two or more people are require for installing a window.Use safe lifting techniques. Use caution when handling glass. Broken or crackedglass can cause serious injury. Wear protective gear (i.e. safety glasses, gloves, etc.). Use caution when working at elevated heights.If injury occurs, seek medical attention immediately! Make sure windows are locked prior to installation. Handle in vertical position; do not carry flat or drag onfloor. Do not put stress on joints, corners, or frames. Install only into vertical walls and when conditions andsheathing are dry. Protect from exporsure to direct sunlight during storage.(773) 278-3600WWW.CLIMATEGUARDWINDOWS.COM
INSTALLATION INSTRUCTIONSVinyl Windows with Integral Nailing FinROUGH OPENINGSThis installation guide will specifically address flush finwindows into an existing aluminum window frame ormasonry wall, finless windows into an existing wood oraluminum frame, and installation of a finless window intoa masonry or stud framed wall.INSTALLATION INTO AN EXISTING WINDOW FRAMEA finless window used to replace a previous window inan existing wood or aluminum window frame after the oldwindow has been removed. The existing frame should bewatertight within the structure. Correct any pre-existingwater leaks before installation. Any damaged portions ofthe existing sloped sill must be repaired and sealed tobe waterproof. Flus fin windows must be installedontoa surface with at least a 3/8” wide exterior face. Thisface must be flush with or protrude past the exterior wallsurface.MASONRY WALL CONSTRUCTIONThis installation assumesthat a framework of studs(often called a buck) hasalready been properlyfastened and sealed to theconcrete/masonry wall bya building professional.FULLY SHEATHED WALL CONSTRUCTIONThe wall is covered by sheathing. Windows will bemounted inside of the rough opening. This installationassumes building wrap is properly installed prior toinstallation.OPEN STUD WALL CONSTRUCTIONThe window will be mounted inside of the rough opening.This installation assumes building wrap is properlyinstalled prior to installation.MATERIALS & TOOLSINCLUDED MATERIALSTOOLS Double Hung windows have two jamb adjuster screws. Dust plugs to cover installation screws. Jamb installation clips only provided for Fixed,Stationary Awning/Casement windows.NEEDED MATERIALSPlease note: Follow all material instructions for properuse and compatibility. #8 x 1 1/4” corrosion-resistant pan head screws.Screws must penetrate at least 1” into framing (or asrequired by local code). For securing the sill in masonry applications, 3/16” c 11/4” minimum self-tapping concrete screws (gasketedhead optional)(or as required by local code). Sealant: For sill fasteners and if left exposed use 100%silicone. If painted we recommend OSI QUAD MaxSealant or equivalent. Backer rod 1/8” larger than the widest portion of thegap (used in conjunction with sealant bead). Non-compressible or non-water degradable shims. Polyurethane low expansion Window and Door foam. 4”, 6”, or 9” (as required by local code and windowconfiguration) wide self-adhesive flashing. J-roller Level (4’ minimumrecommended) Tape measure Utility Knife Hammer ScrewdriverHacksawPutty knifeCaulking gunDrill with bitsADDITIONAL MATERIALSIf installing into an existing window frame: Composite or solid wood (cedar or redwoodrecommended) or exterior grade plywood forcontinuous support. If installing into an aluminum window, dimensionsshould be 1/2” shorter than the length of the sill trackand 1/4” taller than the depth of the track. If installating into a wood window, dimensions shouldbe 1/4” thick, length of the existing frame sill minus 1”and the width of the new vinyl window side jamb minus1/4”If installing into a masonry wall: Liquid applied flashing Composite or solid wood (cedar or redwoodrecommended) or exterior grade plywood forcontinuous support.(773) 278-3600WWW.CLIMATEGUARDWINDOWS.COM2
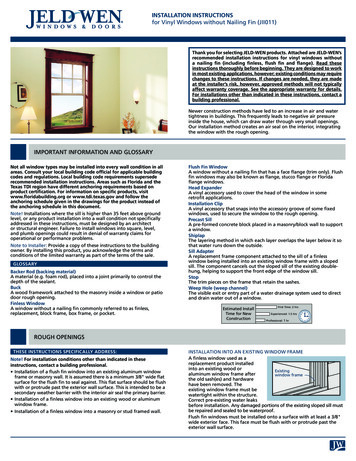
INSTALLATION INSTRUCTIONSVinyl Windows with Integral Nailing Fin1REMOVE PACKAGING & INSPECT WINDOWRemove all shipping materials, such as corner covers,shipping blocks or pads. If there is a protective film on theglass, do not remove it until installation and constructionare complete.INSPECT WINDOWCheck your new vinyl window for any of the following: Cosmetic damage Product squareness (diagonal measurements not morethan 1/4” different)2 Correct product (size, color, grid pattern, handing,glazing, energy-efficiency requirements, etc.) Cracked frame weldsDo not install your window if any of the conditions listedhere represent a concern. Contact ClimateGuard forfurther recommendations.INSPECT ROUGH OPENING1. Measure all four sides of the opening to make sureit is 1/2” larger than the window in both width andheight. On larger openings measure the width andheight in several places to ensure the header orstuds are not bowed.2. Confirm the opening is plumb and level. Themaximum allowable deviation is 1/8”.3. The sill must not be crowned or sagged, but eitherlevel or sloped to the exterior.4. Verify the exterior face of the rough opening is asingle plan with last than 1/8” twist form corner tocorner.5. Correct any deviations before installing the window.3PREPARE WINDOW OPENINGPREPARE EXISTING WINDOW FRAME1. Remove the sashesand/or glass in theexisting window.2. Remove allhardware andwindow componentsnot a part of theframe (meeting stile,jamb liners, lockingmechanisms orother hardware etc.).IF INSTALLING INTO ANALUMINUM WINDOW FRAME1. Seal all four corners of thewindow frame as shown.2. Notch grooves across the bottom of the continuoussupport (see materials list) to allow for waterdrainage through the weep holes. Set the continuoussupport into the exterior sill track, creating a levelsurface at the sill.End of Aluminum Frame Instructions, SKIP to section4, “INSTALL WINDOW”IF INSTALLING INTO A WOOD WINDOW FRAMEInstallation from the interior: Remove any trim onthe inside face of the wood frame. Do not remove theexterior stops.Installation from the exterior: Remove any trim onthe outside face of the wood frame. Do not remove theinterior stops.Please note: The steps below are not applicable ifinstalling into an existing double-hung with sloped sill.1. Apply enough sealantto the bottom of thecontinuous support tocover the entire surface.2. Center the continuoussupport (see materials list)on the sill of the existingframe, flush to the exterioredge and leaving a 1/2”gap at the ends. Securewith nails.END of Existing Window Frame Instructions, SKIP tosection 4, “INSTALL WINDOW”(773) 278-3600WWW.CLIMATEGUARDWINDOWS.COM3
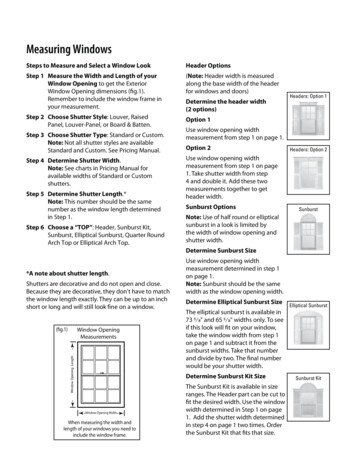
INSTALLATION INSTRUCTIONSVinyl Windows with Integral Nailing Fin3PREPARE WINDOW OPENING - CONTINUEDPREPARE MASONRY OPENING WITH BUCK1. Seal any joint largerthan 1/16” in the buckand between the buckand the concrete/masonry with sealant.2. Cover the buck and thesurrounding concrete/masonry at the headand jambs with liquidapplied flashing asshown.3. If installing into a four-sided buck, seal the sill in asimilar manner.Please note: Shims must be 1/4” shorter than thedepth of the window sill, should level the roughopening sill and be no more than 1/4” thick.4. Center the continuous support on the sill of theopening, flush to the exterior edge and leaving a 1/2”gap at the ends. Secure in place.SKIP to section 4, “Install Window”.PREPARE STUD-FRAMED WALLPlease note: Verify with thebuilding wrap manufacturerto verify the following stepswill not void their productwarranty.Trim building wrap flush withthe rough opening.PREPARE SILL1. Cut 2 pieces of flashingtape 12” longer than theopening width.2. Apply the first sill flashingtape at the bottom of theopening, extending 1” tothe exterior and 6” upeach jamb.3. Cut 1” wide tabs at eachcorner by tearing the foil1/2” each way from corner.4. Apply the second sillflashing tape in the samefashion, overlaping thefirst flashing tape by 1”minimum. Press all tapedown firmly.5. Install and level sill shims:Place 1” wide x 1/4” to3/8” thick shims 1/2” from interior face of window.place additional shims under each mullion andsliding window interlocker. Add shims so maximumspacing is 18”6. Attach shims to prevent movement after they arelevel.(773) 278-3600WWW.CLIMATEGUARDWINDOWS.COM4
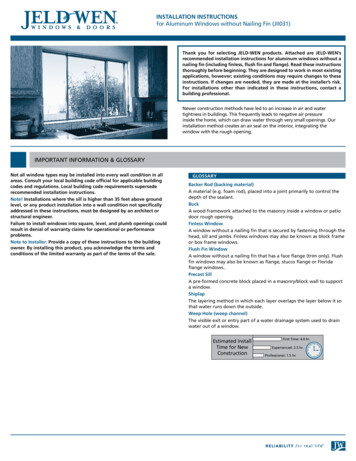
INSTALLATION INSTRUCTIONSVinyl Windows with Integral Nailing Fin4INSTALL WINDOWFRAME PREPARATIONDRILL CLEARANCE HOLES If the window has opentracks (most sliding andhung windows), remove trackfillers if present. If installinga sliding window, remove theoperating sash and the trackfor access to the sill pocket.Mark fastener locationswithin the frame track usingthe spacing given below in“Fastener Locations“, or asrequired by local code. If the window does nothave open tracks (awning,casement and fixed withoutopen tracks), these windowscan be fastened one of threeways:1. Use installation clips(excludes windows withpre-applied extension jamb).Snap a clip into the interioraccessory groove accordingto the spacing given below in“Fastener Locations”.2. Through the frame (screws can be covered with dustplugs) using the pattern in “Fastener Locations”.3. Stopped in place (excludes windows with pre-appliedextension jamb) with trim or drywall (excludesimpact). No fasteners are required through the frame.FASTENER LOCATIONSProducts are fastened according to performance rating(some holes may be pre-drilled). Performance rating islocated on the purchase paperwork or gold AAMA labelfixed somewhere on the frame, generally in the headjamb. Look for something like this example: R-PG20122X76 (48X30)-HS. If this label is missing, use thePG50 and above fastener pattern.PG20 -- 3” – 6” from the corners and every 24” on center.PG35 -- 3” – 6” from each corner and every 18” oncenter.PG50 and above -- 3” – 6” from each corner and every12” on center.Mull JointsThe first 8” beyond mull joints,on both sides, must be fastenedthrough each nail fin hole.Continuous Headand Sill abovePG35The first 4” from center, on bothsides, must be fastened every 2”At each fastenerlocation, drill a 3/8”clearance hole throughONLY the first wall ofthe frame to allow thescrew head to passthrough. Do not drillthrough the outer wallof the window frame.IF INSTALLING A FLUSH WINDOW1. If using an applied fin,apply a continuousbead of sealant onthe interior around thewindow where the finmeets the frame.2. Apply a 3/8” bead ofsealant to the exteriorface of the opening ,leaving gaps at anyweep holes if installinginto an existing frame.3. Place window in the opening, make sure the windowrests on the shimming support and makes positivecontact with the sealant.Continue with “All Installations”.IF INSTALLING A FINLESS WINDOWIf installing into an Existing Frame with a Sloped Sill:1. If a detached sill adapter is used, cut to length, andsnap into accessory groove at the sill.2. Cut notches in the lower edge of the sill adapterto allow for water drainage; notches should be aminimum of 1/8” square and positioned under eachweep hole of the window.3. If the sill adaptercovers weep holes,notch for properdrainage.(773) 278-3600WWW.CLIMATEGUARDWINDOWS.COM5
INSTALLATION INSTRUCTIONSVinyl Windows with Integral Nailing Fin4INSTALL WINDOW - CONTINUED4. Center the headexpander (optional)over the head of thewindow as shown.5. From the interior, applysealant to the insideedge of the outsidestop. Set window with asill adapter fully againstthe outside stop.Continue with “AllInstallations”.Window Frame and AccessoriesShown from the SideIf installing into an ExistingFrame or Rough Openingwith a Flat Sill:Center the head expander(optional) over the headof the window. Set newwindow into the existingwindow frame or roughopening.Continue with “AllInstallations”.ALL INSTALLATIONS1. Shim the sidejambs betweenthe rough openingor existing frameand the newwindow at eachfastener location.Shims must beset 1/4” back fromthe interior of thewindow frame.Secure shims withsealant.2. Secure one uppercorner as follows(skip to step 3 ifusing the stop inmethod):a. If installing awindow withSealant gapinstallation clips,drive a screwthrough the clipuntil the screw head contacts the clip. Do not bendthe clip toward the rough opening (applying a shimbetween clip and rough opening can be helpful toprevent bending the clip).b.If installing awindow withfasteners throughthe jambs, securewith a #8 screw untilfully seated (withoutdeforming vinyl).3. If installing awindow using thestop in method, thisinstallation assumesinstallation from theinterior with exteriorstops applied beforewindow installation.All stops must overhang the windowframe by a minimumof 1/8”.a. Mill and install exterior stops in the desiredlocation if necessary for the side and headjambs.b. Apply sealant to the interior side of the side andhead jamb exterior stops and verify it is properlyshimmed until square, level, and plumb.c. Apply backer rod and sealant or low expansionfoam on the interior between the window frameand rough opening on all four sides.d. Install interior stops on all four sides.4. Inspect window for square, level and plumb (adjustshims or remove and reinstall if necessary).5. Fasten window in a similar manner through theremaining corners, and then through the rest of thefastener locations. If installing fasteners in the sill,apply silicone sealant to the screw threads and thehead of the screw in the window frame (use moresealant as necessary to completely seal the screwhead to the frame), or use a gasketed head screw.6. Insert plugs into fastener holes not located in anyoperating track. Seal plugs in the sill with silicone.Replace track fillers if applicable.7. On some doublehung operating unitsonly, jamb adjusterhardware is mountedin the middleinstallation holes toallow for some jambadjustment. Installjamb adjuster screws until captured (first ‘click’), thescrew may then be screwed in or out to adjust thejamb as needed. Replace lower sash.(773) 278-3600WWW.CLIMATEGUARDWINDOWS.COM6
INSTALLATION INSTRUCTIONSVinyl Windows with Integral Nailing Fin5COMPLETE INSTALLATIONCreate a continuousair seal on the interiorby integrating therough opening andthe window framewith low expansionpolyurethane foamor backer rod andsealant.FINISH INSTALLATION1. If installing a headexpander, sealbetween the headexpander and thewindow frame.2. On the exterior,apply backer rod andsealant between thewindow frame andthe rough opening.3. If installing a sloped sill adapter, seal the jointbetween the existing sloped sill and sill adapter,leaving gaps at the weep holes.AFTER INSTALLATION Install exterior wall surface per manufactures’guidelines.Leave an expansion/contraction gap of approximately3/8” between window frame and final exterior wallsurface (siding, stucco, etc.). For a finished look andadditional protection, seal this gap on the sides withbacker rod and sealant. If sealant is applied abovethe drip cap ensure the sealant bead is discontinuousto allow for drainage.Ensure weep holes/channels are clear of debrisfor proper water drainage; do not seal weep holes/channels if present.If applicable, apply desired exterior vinyl trim.Protect recently installed units from damage fromplaster, paint, etc. by covering the unit with plastic.Thank you for choosing ClimateGuard Windows!Contact us for more information:773-278-3600(773) 278-3600WWW.CLIMATEGUARDWINDOWS.COM7
Finless Window - A window without a nailing fin commonly referred to as finless, replacement, block frame, box frame, or pocket. Flush Fin Window - A window without a nailing fin that has a face flang. Flush fin windows may also be known as flange, stucco flange or Florida flange windows. Installat