Transcription
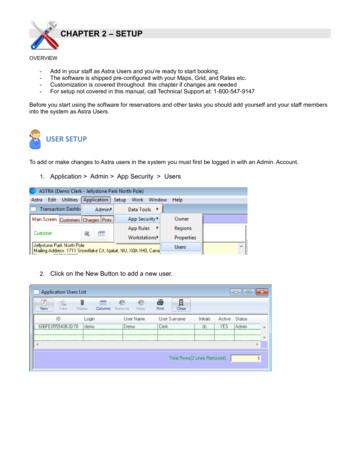
CHAPTER 2 – SETUPOVERVIEW-Add in your staff as Astra Users and you’re ready to start booking.The software is shipped pre-configured with your Maps, Grid, and Rates etc.Customization is covered throughout this chapter if changes are neededFor setup not covered in this manual, call Technical Support at: 1-800-547-9147Before you start using the software for reservations and other tasks you should add yourself and your staff membersinto the system as Astra Users.USER SETUPTo add or make changes to Astra users in the system you must first be logged in with an Admin. Account.1. Application Admin App Security Users2. Click on the New Button to add a new user.
Chapter 2 - Setup
Chapter 2 - SetupUser Profiles3. Fill in the following when setting up users: Login Password(Temporary password, gets changed upon first log in) First Name(User’s First Name) Last Name(User’s Last Name)(User name they log in with)Access Levels4. Set an Access Level to control how much access the user has in the program.Adminsoftware and property setup.Application Userfor users allowed to make changes to thefor non-administrative users and general users of the program.5. Select a Role Name that best describes this user’s role in your organization from the drop down menu.6. Key in Contact information for the user: Home Address, Phone, Email, etc.7. Key in Initials for the user that you’ll see stamped on their transactions8. Click on the Update button to save your work. Commissions are optional depending on whether you are tracking sales agencies or not. After clicking on the Update button, you should see the user you added, in the user list window.
Chapter 2 - SetupUser Roles-Roles describe what the user’s responsibility level is in your company.A role must be assigned to a user before they can access a propertyChoose a role that best suits this user’s position in your company.To assign a role to a user:1. Open the User Profile is you don’t already have it open2. Select an appropriate Role Name for this person from the drop down menu.3. Click on the Update button.Role Permissions Role Permissions are additional security measures used to control access in the system.1. Make the following main menu picks to set or change permissions on a user’s role, as an Admin user,Application Admin Workstations Payment Servers
Chapter 2 - SetupPayment Server ScreenClick on the Machine tab to access the local computer.Right click on your computer name, then left click on the Permissions option.User Role Permissions Screen You can set role permissions such as View and Delete.for Manager, Assistant, Clerk, and Novice Roles here.
Chapter 2 - SetupUser Property AssignmentProperty Screen1. A user must be assigned to a property in order for them to access it.This is done via the Property Screen in Astra using the following menu selections:1. Application Admin App Security Properties2. Double click on the Property Name and open the :Property List
Chapter 2 - Setup
Chapter 2 - Setup3.4.5.6.7.8.Click on the Other tab, thenClick on the Users tab.Select the userClick on the button to add a user or the button to remove one.Click on the Save button to save your settings.Click on the Update button to update the property information,
Chapter 2 - Setup
Chapter 2 - SetupCLERK TRACKINGTo turn on Clerk Tracking and force users to key in their password when they make changes1. Make the following Menu picks:Application Admin App Security Properties
Chapter 2 - SetupClerk ID’s Clerk ID’s are used to track clerk activities in the system. Campground Manager Astra can be set to prompt a user for their clerk ID whenever they make a reservation,take a payment or completes a POS sale or do a total out Clerk ID’s for Admin users can be manually assigned whereas clerk ID’s for non-administrative users aregenerated by the system and can be changed to a new system generated number using the Renew button.1. Log in as the Clerk you wish to view or renew a Clerk ID for.2. Log in a second time using the following menu selections:Astra User The ID shown is the user’s clerk ID. To generate a new ID click on the Renew button, then the Update button.
Chapter 3 - Basic Training1. Make the following menu selections to customize the Astra Screen and Text Colors:Astra ApplicationApplication Preferences2. Click on the Application Preference drop down menu and choose a screen item you wish to change the colourfor.3. Click on the Save button to save your changes and update the colors.Screen ColorsScreen colors can be customized by selecting1.2.3.4.5.6.7.Background ColorButton Text ColorCheckbox Text ColorLabel ColorList Background ColorList Text ColorTab Pane Text Color
Chapter 3 - Basic TrainingUser Preferences ScreenThe User Preferences screen is where you manage user profiles and attributes from such as: User ID, Initials (Clerk ID), Login Name, Password, First Name, Last Name etc A Default Property for the user to log on to can be assigned here as well.The User Preferences Screen opens after logging in a second time as that user during their session usingthe Astra User menu selections from the main menu at the top of the Transaction Dashboard4. Key in and select (where necessary) the desired User Preferences.5. Click on the Update button to save your changes. The Initials assigned to the user will get stamped on transactions and payments Only an Admin account can set their own ID Standard User Accounts get assigned system generated clerk ID’s that can be renewed if they don’t like thenumber. Assigned, but these types of users can not set their own ID. They are system generated.Transaction Dashboard DefaultTo set your Campground Manager Astra software to open the Transaction Dashboard automatically after logging in,
Chapter 3 - Basic Trainingmake the following main menu selections:Application Admin Workstations Payment Servers1. Click on the Machine tab of the Payment Server Setup Screen and inside the Open Transaction Dashboardupon Login checkbox so it’s checked, as shown below.2. Click on the Save button.
Chapter 3 - Basic TrainingPrinter and Cash Drawer Setup and approvedCampground Manager Astra is compatible with various types of pre-testedreport and point of sale printers and devices that have been tested byour support team. Please contact Technical Support at: 1-800-547-9147or by email to support@campgroundmanager.com prior to the purchase of any hardware youplan on using with your Campground Manager Astra software as some brands and models arenot supported unfortunately due to compatibility issues with the software.Printer and Cash Drawer Setup are accessed via the Payment Servers ScreenMake the following menu selections to set up printers and cash drawers.Application Workstations Payment ServersClick on the Machine tab, then double click on the device or computer name you want to set up printing on,Or select it with a single left click, then click on the View button.
Chapter 3 - Basic Training
Chapter 3 - Basic TrainingReceipts - Setting Default Number to Print Number of Receipts are set on the Point Of Sale Tab on the Property Setup screen.Be sure to click on the Update button if you make changes you want to save.Print without prompt for destination8. Checkmark this option to bypass the print destination prompt and send the job immediately to the printer.1. Make the following menu selections :Application Admin Workstations Payment ServersClick on the Machine tab, then, double click on your machine name or MAC Address to get to this screen.Site Details
Chapter 3 - Basic TrainingSite Details are used to describe the site’s attributes.Inventory List1. Open your Inventory List to access your sites.Work Inventory Inventory List2. Click on the Search button to display all inventory items in the system by code which is the default.3. Double Click on Inventory Code that matches the site type you want to editeg) W/E/S for Water Electric Sewer sites.Accommodation ScreenYou can access the site rates and details from here via the inventory list.4.5.On the Accommodation Screen, click on the Site Tab to access your sites.Double click on a site number to edit.
Chapter 3 - Basic TrainingSite Attributes9. Site attributes describe the characteristics and features the site has.Double click on an attribute to change it, make your changes, then click on the Save button.Double click on an attribute to edit it. In this example, length was selected so we can change the length here.
Chapter 3 - Basic Training1. Change the length or any other desired attribute.2. Click on the Save button to save your changes
Chapter 3 - Basic TrainingSite AttributesThe following site attributes can be changed from the Accommodation Site Screen.Item Desc. Description of the itemCodeSkew NoVendorVendor Prod No.GroupCategoryTaxes – Taxes ChargedDiscounts – Site DiscountCommissionsSales A/C#Deposits – Deposit Rules DropdownClassPayment ScheduleSite TypeSite No.S/N SegmentItem DescLength – Site Length
Email SetupAstra must have an Email Server configured in to successfully send outbound emails.Inbound mail is not a feature and is not supported.To configure Astra to send emails, make the following main menu picks.Setup Email Mail ServerMail Server SettingsFill in valid SMTP email server settings, then click on the Update button to save your changes.ServerName or IP Address of a functional outbound SMTP email serverPortPort Number traffic is being allowed through for emailSSLSecure Socket Layers on-off setting.TimeoutLength of time before sending times out.UserEmail address for sending emailsPasswordEmail address account passwordAuthentication TypeAuthentication on-off setting. O Off 1 OnWait IntervalLength of time waited between email sends.
METERING Setting up meters in Astra for tracking and billing requires a one-time set up, unless changes are needed later. This section covers Meter set up only. Meter Invoicing is covered in Chapter 3The items that need to be created or carried out for Astra Meter Setup are:1.2.3.4.5.Utility CategoryUtility Inventory ItemUtility Price ScheduleSite Type Meter LinkingAssign Meters, Dates and Readings to sites.Utilities Utilities such as Electricity and Gas must have categories set up in Astra to function correctly.Category Setup1. Open the category setup screen from the Setup menu.Setup Inventory Category Setup2. Click on the New button to create a new category.
3. Key in the name Utility then select appropriate values for the other attributes from the drop down menus.4. Click on the Save button to save a new Category5. Click on the Close button to close the Category window.Utility Inventory Item1. Open your Inventory List with the following menu picks:Work Inventory Inventory List2. Click on the New button to create a new inventory item for your utility.3. Click on the Proceed button
Utility Inventory Item Setup4. Key in or select the following attributes for your inventory item.Item Description - Inventory Item DescriptionCode - Inventory Item CodeSkew No. - Inventory Item Skew No. (automatically generated)Supplier - Inventory Item SupplierVendor Product No. - Vendor Product Number if the supplier uses one.Track Qty ? - Apply a check mark to track the quantity as this is a trackable itemSale Unit - The unit of measure for the item. kWh for Killowatt hoursInv Cost - Your cost for this itemSug. Price - Suggested price (not applicable for this kind of item)Margin Calc. - Calculate the margin on the saleTrack Meters - Track meters for this item. Check mark this item for utilities.Group - Inventory group this item belongs toCategory - Inventory Category this item belongs toTaxes - Taxes assigned to the priceDiscounts – Discounts that can be used with the priceCommissions – Commissions that can be allocatedSales A/C # - Accounting General Ledger number and description for this itemDeposits – Deposits expected for this itemClass – Classification for this itemPayment Schedule – Payment Schedules this item can be assigned5. Click on the Save button when you’re done filling in details.
Utility Price Schedule10. You need to create a price schedule for your utility in order to do your billing.1. Click on the Price Schedule tab of your Utility inventory item2. Click on the New button to create a new price schedule The Price Schedule Setup Wizard screen will open3. Select Rack from the Rate Plan drop down menu4. Select Store Items from the Rate Scheme drop down menu5. Select a Rate Span from the Rate Span drop down menu to set the effective dates for your utility rate.In this example 2105 Full Season is selected to make the rate go the full 2015 season.6. Select No Breaks from the Quantity Template to set a single line item in the rate7. Select kWh for Kilowatt Hours as the Qty Unit.8. Select a Tax to assign a tax to the rate9. Select a Discount if desired10. Select a Sales A/C # to assign a General Ledger description and number to track the sales in your accounting.11. Key in a Variable Rate equal to the per kilowatt hour electricity usage rate you want to bill.12. Click on the Save button to save your utility price schedule.13.
14.15.16. After clicking on the Save button, you should see an active Price Schedule assigned to your utility.17.18.19.20.21.22. Double clicking on the Price Schedule will let you view and change pricing details.23.24.25.
26.27.a.i.1.Price Schedule Meter Assignment28. In order for your meters to inherit your price schedule, you must assign your meters to your utility29.1. Click on the New button to add a meter to your utility.30.31.32.33.2. Key in a site number you wish to add a meter for to your utility.34.35.36.3. Click on the Save button to add the meter to the utility inventory item.
37.a.i.1.38.1.2.3.4.39.Site Meter SetupOpen your Inventory ListOpen the Accommodation Screen for the site type you want to assign a meter to.Click on the Site Tab to access your sitesDouble click on a site number to edit it’s details.
40.5. Click on the Meters Tab and select a site number for Electric, Water and Gas meters from the drop down.6. Click on the Save button to save your changes.7. Click on the Close button to close the window when you’re done with it.41.
a.i. Adding a Meter8.9. On a Utility Category Inventory Item screen:10.1. Click on the Meter tab.2. Click on the New button11.12.13.14.a.i.1.15.16.17.18.19.20.Adding a Meter to a Utility Rate
21.a.i.1.Rolling Down Changes22.23.24.25.26.27.28.29.a.i. Linking a Utility Rate to a Site Type30.1. Locate the site type by Code name in the inventory list2. Double click on it to open it.31.
32.33.34.35.
a.i. Meter Assignment36. Before you can begin Meter Assignment the Utilities Setup steps outlined previously must already becompleted.37.38.1. Use the following menu selections to assign meters to the sites and setup the last read dates and readingvalues.39.40. Setup Park Meter Assignment41.42.43.44.2. Select a site type from the Accommodation drop down menu.45.46.47.3. Select a meter for each site that needs one using the Meter No. drop down menu4. Key in the last read date into the Last Read field5. Key in the last reading into the Last Reading field.6. Close the Meter Assignment window and your meter should be ready to use.
48.a.i. DISCOUNTS49.50.51.1.2.3.4.5.6.Discounts can be set up and assigned to sites and point of sales items in a logical order by:Creating discount codes.Creating discount schedulesAssigning the codes to a scheduleCreating discount programsLinking the schedules to programsLinking discount programs to site types or point of sales items that you will allow the discount to be usedon.7. Linking the Discount Program to desired Price Schedule Items (rate items)52.a.i.1.Discount Codes53.54. Discount Codes are created as place-holders to identify which discount you are applying.55. The first step is to add discount codes into the system to discount prices for sites and Point Of SaleItems.56.57.1. To Setup a discount in the system you start by creating a Discount Code using the following menu eating a New Discount Code70.2. Click on the New button on the Discount Setup Screen.71.
72.73.74.
75.a.i.1.Discount Code Setup76.77. When the Discount Code Screen opens key in or select the following:a.i.1.a.Name78. The name should describe the purpose of the discounta.i.1.a.Expenses79. This field is where your General Ledger account description could be selected from a pre-definedaccount tablea.i.1.a.Multiplier80. The Multiplier is a decimal equivalent number for the percentage, eg) 0.2 would create a 20percent.discount.a.i.1.a.Amount81. A flat amount is specified here eg) 10 for ten dollars.a.i.1.a.Min Amt82. The minimum amount that must be spent to qualify for the discounta.i.1.a.Max Amt83. The maximum amount that can have a discount applied to it.a.i.1.a.Use Sales Account84. Checked: Deduct the discounted value from the site revenue in the accounting reports85. Unchecked: Break the discount out as a separate line item with an account number or desin theaccounting reports86.a.i.1.Transaction Types87.1. Choose a transaction type to apply the discount to.88.a.i.1.a.i.Sales89. Apply the discount to site Accommodation Sales such as RV Sites, Rental Units, etc.90.a.i.1.a.i.sesa.i.1.a.ii.the discount to Point Of Sale Purchases.91.92.93. 10 percent Seniors Discount using a system multiplier of 0.1 as shown here:94.PurchaApply
95.2. Set valid dates.3. Click on the Save button to save your work and add the discount code into the system.96.
97.98.a.i. Discount Schedules99.100.Discount Schedules are used to connect discount codes to discount programs and control howDiscount Codes are applied. A discount must belong to a schedule. Multiple discount codes can beadded to a schedule.101.1. Click on the New button from the discount tab of the discount setup screen to create a new discountschedule.102.103.104.105.2. Key in a Name that best describes the general usage of the schedule.The Discount schedule name given should be generic in nature to allow other types of discounts to beused with it. For example, the name Camping Discounts has been used with this particular schedule toallow for various types of camping discounts to be used with this schedule.106. 3. Select a Transaction Type to apply this schedule to4. Click on the Save button.107.108.109.110.111.112.113.114.
115.116.117.a.i.1.Linking Discount Codes to Discount Schedules118.119.Once discount codes and schedule are created they need to be linked to one another.120.1. Open the Discount Schedules List2. Double click on a discount code to link it to the schedule and add it to the right side.121.122.123.124.3. Click on the Save button to link the discount code to the discount schedule.125.126.127.128.129.130.131.3. Click on the Save button once you see your desired code on the right side of the Discount Schedulestable.4. Click on the Close button to close the window when you’re done132.
133.134.a.i. Discount Programs135. Discount Programs are used as menu selections on the site type screen when making a reservation.136. Discount schedules are linked to the desired discount program so they can be triggered automaticallywhen a date range is specified during a reservation or booking.137.1.2. Click on the Discount Programs Tab.3. Click on the New button to create a new discount program.138.139.140.141.142.143.4. Fill in the Name, Transaction Dates and Comments.144.5. Click on the Save button.145.146.147.
148.a.i.1.149.150.151.152.Discount Program ListOnce saved, your discount program will appear in the list.153.154.a.i.1.Linking Discount Codes to Discount Programs155.156.You link Discount Codes to Desired Programs to achieve the desired amount of discount,especially if you have more than one discount code that needs to be part of a particular discountprogram157.1. Click on the Discount Programs tab to open the discount programs screen.2. Double click on the discount code name you wish to link to the desired discount .161.161.161.161.161.161.161.161.161.161.162.
5.176.177.178.179.3. Click on the Save button to link the discount code to the discount program.
180.181.a.i.1.Linking Discount Programs to a Property182.183.Discount Programs need to be linked to the property you want to apply them to.184.1. Open the Property Screen using the following menu picks:185.186.187.Application Admin App Security Property188.189.190.191.2. Double click on the Discount Program to add it to the right side and link it to the property.192.193.194.195.3. Click on the Save button to save your changes.4.Click on the Update button to updatethe program.
196.197.198.a.i.1.Linking the Discount Program to a Site Type199.200.Lastly, you must link the Discount Program to a Site type.201.This is done by opening the Accommodation Screen for the desired site type.202.1. Open the Accommodation Screen by opening the Inventory list using the following menu picks203.204.Work Inventory Inventory List205.206.207.208.209.When the Inventory List opens:210.2. Click on the Search button to display a list of Accommodation Types to link the desired discount program to.211.3. Double click on a code that matches the Item Description or site type you wish to add the discount program .224.225.226.227.228.229.230.231.
a.i.1.Linking a Discount Program to an Accommodation232.1. Click on the Discount Programs Tab2. Double click on a discount program name on the right to add it into the left side233.234.235.236.3. Select the Discount from the Discounts Drop Down menu on the right.237.238.239.240.4. Click on the Save button on discount program list.241.5. Click on the Save button at the top of the Accommodation screen and your discount should be ready to use.242.
243.6. To roll down changes to any items currently linked click Yes,244.or No to not roll down your changes to linked 256.257.258.259.a.i.1.Linking the Discount Program to Price Schedule Itemsa.i.2.Accommodation Price Schedule260.261.Lastly, to complete the desired discount set up, you must apply the discount to select rates by openingthe Accommodation Price Schedule Screen and selecting the discount on the rates you wish to discount (daily,weekly, monthly rack items.)262.7. Open the Price Schedule Screen to add the discount to the desired Price Schedule(s) by clicking on the PriceSchedule Tab on the Accommodation Screen.263.8. Open Price Schedule Items that span the dates you want to apply a discount to.by double clicking on them.264.265.266.267.268.269.
270.a.i.1.Applying a Discount to a Price Schedule Rack Item271.9. Select your desired discount once you open your desired Price Schedule (rate item)10. Click on the Save button to save your changes and add the discount to the desired price schedule.11. Repeat the process for any additional price schedules you wish to apply your discount to12.272.Discounted AccommodationIn your reservation, you should see your Discount in the Discounts Program drop down menu on the Site TypeScreen when you make a reservation if it was set up correctly and the reservation price should be adjusted forthe discount automatically when you select it.
Customer ClassesCustomer Classes drive the rates in the system, so depending on which Customer Class you assign to a customerduring a stay, their accommodation price can vary.Creating a Customer Class1. Make the following menu picks to create a Customer Class:2. Click on the Customer Class tab on the Application Classes Setup screen.3. Click on the New button.4. Key in a name for your class that best describes the type of customer you have.5. Select a Rate Plan from the drop down. The Rack rate is the default rate structure already in the system.6. Check or leave Unchecked the Use for online booking box7. Key in a Display Order number. This is usually sequential based on the first one in the system.8. Click on the Save button. You are returned to a list of your classes after clicking on the Save button on the classes set up screen.
The items that need to be created or carried out for Astra Meter Setup are: 1. Utility Category 2. Utility Inventory Item 3. Utility Price Schedule 4. Site Type Meter Linking 5. Assign Meters, Dates and Readings to sites. Utilities Utilities such as Electricity and Gas must have categories set up in Astra to function correctly. Category Setup 1.