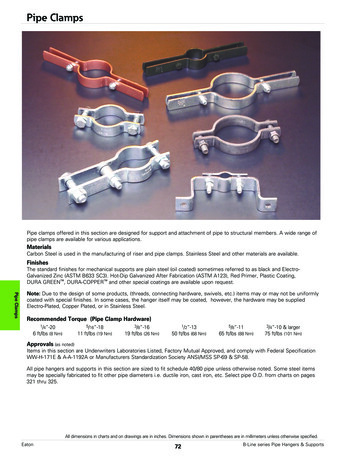
Transcription
GUARD1/plusPIPE UtilityUser's ManualVersion 2.030700 Bainbridge Road Solon, Ohio 44139Phone 216-595-0890 Fax 216-595-0991support@guard1.com www.guard1.com 2010 TimeKeeping Systems, Inc. GUARD1 PLUS and THE PIPE are registered trademarks of TimeKeeping Systems, Inc.
PIPE UtilityUser’s ManualTable of ContentsPIPE Utility Overview . 1How to tell which PIPE model you have . 1Installing PIPE Utility . 2Using PIPE Utility . 3Opening PIPE Utility . 3Viewing the PIPE’s status. 4Viewing PIPE II History Data . 5Setting PIPE II Reminders . 7PIPE II Beeper Settings . 8Troubleshooting PIPE II . 9How to Contact Technical Support . 9PIPE Utility User’s Manuali
PIPE Utility OverviewPIPE Utility allows you to view information about THE PIPE and PIPE II. It supports thefollowing PIPE features:FeatureDisplay PIPE Serial NumberDisplay PIPE Manufacturing Date (UTC)Display PIPE Battery StatusDisplay PIPE Time (Local)View PIPE II History DataSave PIPE II History Data to a fileEnable/Disable BeeperEnable/Disable Tour Reminder BeepTHE PIPEPIPE II How to tell which PIPE model you have The PIPE serial number, a 6-character code engraved on the PIPE’s readtip, will confirm the PIPE model:oIf the serial number begins with a number (such as 4, 5, 6 or 7) it’s aPIPE. For example: 56A357oIf the serial number begins with the letter “A”, it’s a PIPE II. Forexample: A15378In some cases, usually on older PIPEs, the serial number is not visible due towear and tear. In this case, follow the steps in How to view the PIPE’sstatus below to determine the serial number.oNote: if the PIPE is non-functional, PIPE Utility may not be able todisplay any status information. In this case the messageCommunication with the PIPE failed will be displayed in the PIPEInformation section. If this occurs contact Technical Support to requesta Return Merchandise Authorization (RMA) for the PIPE.PIPE Utility User’s Manual1
Installing PIPE UtilityThe workstation must meet the following minimum requirements: Supported Operating Systems:oWindows XP SP3 or later (32-bit only)oWindows Vista SP1 or later (32- or 64-bit)oWindows Server 2003 SP2 or later (32-bit only)oWindows 7 (32- or 64-bit)oWindows Server 2008 SP2 or later (32- or 64-bit)oWindows Server 2008 R2Required GUARD1 PLUS Program:oGUARD1 PLUS version 2.60 or lateroAttendant SE version 4.20 or later 1024 x 768 or higher screen resolution A connected Direct Downloader or USB DownloaderTo install PIPE Utility:1. Place the PIPE Utility CD in the drive - the installer should begin automatically. If the installer does not begin automatically, open My Computerand browse to the CD drive. Double-click the setup.exe file tostart the installer.2. The installer checks to see whether Microsoft .NET Framework 3.5 SP1 isinstalled on your system. If it is not installed, a Prerequisite window willappear. Click Install to install .NET Framework 3.5, then follow the prompts.3. Click Next at the Welcome screen.4. Click Yes at the License Agreement.5. To start copying the files, click Next.6. After the installation is complete you must restart the computer before youcan use PIPE Utility.7. Select Yes to restart the computer now or No to restart the computer later.8. Click Finish.PIPE Utility User’s Manual2
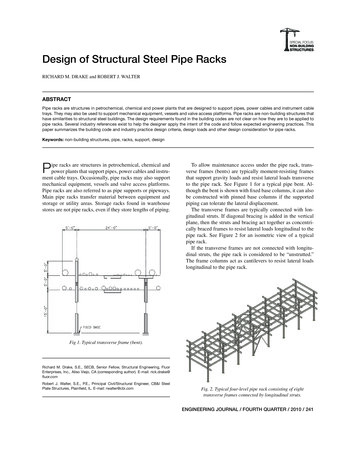
Using PIPE UtilityOpening PIPE Utility1.Confirm that a Direct Downloader or USB Downloader is connected to thecomputer running PIPE Utility.2.If any of these programs are running on this workstation, close them: Attendant Attendant SE3.Double-click the PIPE Utility shortcut on the Desktop. If the shortcut is notpresent, click Start Programs (or All Programs) TimeKeepingSystems PIPE Utility.4.PIPE Utility will automatically detectand connect to the Downloader. Asuccessful connection is indicated by:oThe Active Port field displays theDownloader typeoThe Close Port button is enabledoIf no PIPE is inserted in theDownloader, the PIPE Informationsection’s message field displaysPlease insert a PIPE into theDownloader. If a PIPE is presentin the Downloader, the PIPE’sinformation will be displayed. If the Attendant is running, theActive Port field will display Attendant is running. Close theAttendant then click Detect Downloader to search again. If the port is still not opened, use the Select COM Port drop-down toselect the COM Port the Downloader is using then click Open Port.PIPE Utility User’s ManualoIf successful, the Active Port field displays the Downloadertype, the Close Port button is enabled, and the PIPEInformation section’s message field displays Please inserta PIPE into the Downloader (if no PIPE is present) OR thePIPE Information is displayed (if a PIPE is present).oIf the port still does not open please contact TechnicalSupport.3
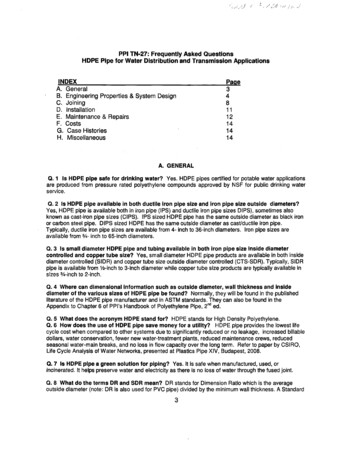
Viewing the PIPE’s status1.Place a PIPE or PIPE II in the Downloader.2.The Utility displays the PIPE’s information: For THE PIPE: For PIPE II:For PIPE II: if the battery status is red, request a Return MerchandiseAuthorization (RMA) for the PIPE on the Web at www.guard1.com or contactTechnical Support via email or phone.PIPE Utility User’s Manual4
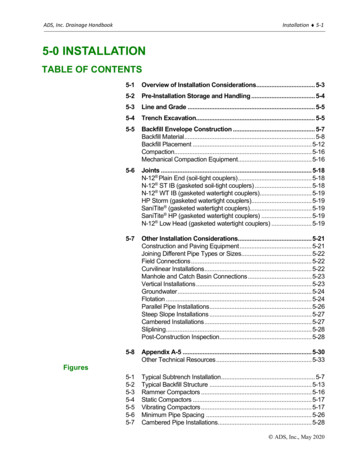
Viewing PIPE II History DataPIPE II features an onboard Event Log that can be viewed with PIPE Utility.To view PIPE II History Data:1.On the Menu Bar, click Get History Data.2.The History Data is displayed in the right-hand window panes: The upper pane displays the 24 most critical events that haveoccurred since the PIPE was last initialized. The lower pane displays the most recent 4096 events inchronological order with the most recent at the top.PIPE Utility User’s Manual5
Saving the PIPE II’s History Data to a text fileYou can save the PIPE II’s History Data to a text file for your records or for use byTechnical Support.To save the Critical Events shown in the upper History pane to a text file:1.On the Menu Bar, click Get History Data.2.Under the File Information section, click Save beside the label “Save criticaldata to file”.3.The Save As dialog appears.4.Select the folder where you want to save the file.5.Change the default file name if desired.6.Click Save.7.The file is saved in the folder you selected in Step 3.To save all History Events shown in the lower History pane (this includes the top 24Critical Events) to a text file:1.On the Menu Bar, click Get History Data.2.Under the File Information section, click Save beside the label “Save all datato file”.3.The Save As dialog appears.4.Select the folder where you want to save the file.5.Change the default file name if desired.6.Click Save.7.The file is saved in the folder you selected in Step 3.PIPE Utility User’s Manual6
Setting PIPE II RemindersYou can set a Reminder that will cause the PIPE II to double-beep to remind theuser to make a tour. Reminders are based on the PIPE clock time – NOT theelapsed time since the last button scan – and start at 12:00AM (00:00). Forexample:o15 Minute Reminder: the reminder beep will occur every 15 minutesstarting at 12:00AM.o1 Hour Reminder: the reminder beep will occur every hour starting at12:00AM.o4 Hour Reminder: the reminder beep will occur every four hours starting at12:00AM.When triggered, the Reminder beep will occur every minute until a button isscanned or the Reminder is turned off using PIPE Utility.NOTE: If the PIPE II is set to Silent Mode (see next page), the Reminderssection will be disabled. Setting the PIPE II to Silent Mode also disables theReminder beep. The PIPE’s Reminder setting will be restored when you returnit to Beep Mode.To set the Reminder: In the Reminder section,select the desired interval (inthis example, 30 Min.) thenclick Save.NOTE: if any Reminder options are disabled, it means the PIPE’s firmwareversion does not support them. This will also be noted in the PIPE Informationsection’s message field.To disable the Reminder: In the Reminder section, selectNone then click Save.PIPE Utility User’s Manual7
PIPE II Beeper SettingsThe PIPE II’s Beeper can be turned off. This is useful for late-night tours or othersituations where the beeper’s noise may be disruptive or undesirable.To view the current PIPE II Beeper Settings:Insert the PIPE II. In the Beeper Settings section, the current beeper setting isindicated by the disabled button.Beep ON:Beep OFF:To turn the PIPE II Beeper off: In the Beeper Settingssection, click SilentMode.NOTE: If the PIPE II has a Reminder set, setting the PIPE II to Silent Mode willdisable the Reminder beep. The PIPE’s Reminder setting will be restoredwhen you return it to Beep Mode.To turn the PIPE II Beeper on: In the Beeper SettingsSection, click BeepMode.PIPE Utility User’s Manual8
Troubleshooting PIPE IIThe History and Critical Event Logs tell you how the PIPE II has been handled. For anexplanation of some of the various Event types and their causes, refer to the tablebelow. All of these Events indicate handling outside the normal usage conditions ofPIPE II.Event TypeTip ble Causes Placing a metal object across the tip Submerging the PIPE II in water Connecting the PIPE II to an external powersource (negative terminal) Connecting the PIPE II to an external powersource (positive terminal) Dropping the PIPE II deliberately with an undueamount of forceVoltsEquivalent Drop toConcrete1.2V – 1.4V8 foot drop1.4V – 1.8V16 foot drop1.8V – 2.1V24 foot dropHow to Contact Technical Support Visit our Knowledge Base at www.guard1.com/support Via email at support@guard1.com (or eurosupport@guard1.com in Europe) Via phone at 216-595-0695 (or 32 3 285 95 70 in Europe) 2010 TimeKeeping Systems, Inc. GUARD1 PLUS and THE PIPE are registered trademarks of TimeKeeping Systems, Inc.ED-99-0044-02PIPE Utility User’s Manual9
PIPE Utility User's Manual 2 Installing PIPE Utility The workstation must meet the following minimum requirements: Supported Operating Systems: o Windows XP SP3 or later (32-bit only) o Windows Vista SP1 or later (32- or 64-bit) o Windows Server 2003 SP2 or later (32-bit only) o Windows 7 (32- or 64-bit)