Transcription
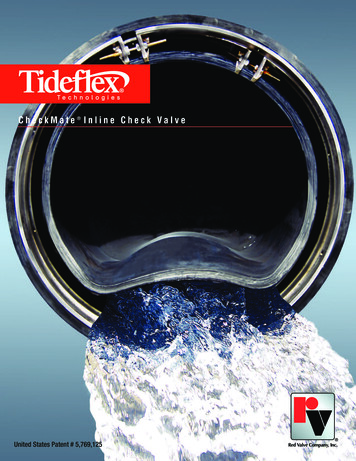
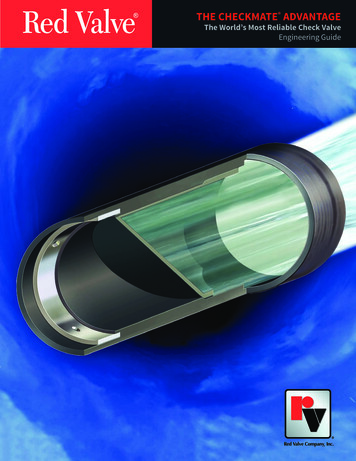
TidTechnologiesDivision of Red Valve, Inc.CHECKMATEINLINE CHECK VALVESAlthonINSTALLATION, OPERATION, AND MAINTENANCE MANUALThe revolutionary design of the CheckMate lnline CheckValve provides superior backflow prevention and odormitigation. In outfalls, stormwater, CSO and SSO appli cations, the CheckMate's custom-engineered, all-rubberunibody design eliminates costly backflow from oceans,rivers and interceptors. The valve's unique elastomer fab ric-reinforced design provides a proven record of main tenance-free performance, cost savings and results thatno other inline check valve can match. The CheckMate isbuilt to suit all your site-specific and flow needs.The CheckMate has a 100% fabric and elastomer con struction that eliminates corrosion problems. Becausethe CheckMate is made with a unibody construction,there are no mechanical components to catch debris,corrode or fail.The CheckMate Valve's inherit flexibility virtually elimi nates seating problems. The CheckMate remains in theclosed position until flow in the forward direction opens it.The fabric-reinforced elastomer CheckMate Valve sealstighly aroun dsilt and small debris, preventing unwantedbackflow.The major advantage of the CheckMate Valve is itsextremely low headloss. The CheckMate can open toa near full pipe diameter. This maximizes flow capacityof the outfall, which is particularly beneficial in low-lyingareas where limited driving head is available.IMPORTANTPlease take a moment to review this manual. Before performing any maintenance on the pres sure sensors be sure the pipeline has been depressurized. The improper installation or use ofthis product may result in personal injury, product failure, or reduced product life. Tideflex Technolo gies can accept NO liability resulting from the improper use or installation of this product. If youhave any questions or problems, please call the customer service department at (412) 279-0044.We appreciate your comments. Thank you for choosing Tideflex Technologies.www.althon.co.uk
, 241(3www.measurit.com -/ / "1. Inspection of ValveCheck inside diameter of pipe section for roughor damaged areas. Surface should be uniformand relatively smooth. Long gouges or cracks mayallow water to pass and should be filled prior toinstallation. The exterior of the CheckMate shouldhave a rough texture resembling a cloth pattern.This will help the valve grip the walls of the pipe.2. Valve OrientationThe sealing area of the CheckMate must be installed horizontally. Valves 4" - 18" (nominal) aresupplied with a single clamp. The clamp turnbuckleshould be oriented at top dead center.Valves 20" - 60" (nominal) are supplied with twoclamps. The turnbuckles should be oriented 180 apart.3. Pipe DimensionsEvery CheckMate Valve is designed and built to fitinto a specific pipe inside diameter. Different pipematerials such as concrete, HDPE, steel, andPVC have different. I.D. dimensions for the samenominal pipe size. Do not attempt to install aCheckMate into a pipeline for which it was notintended.4. PreparationThe CheckMate uses expanding clamp(s) to exertpressure outwards on the walls of the valve to"wedge" it in place within the pipe. The walls ofNEVER.Install the valve atan angleNEVER.Use Sharp Tools on Rubberthe pipe should be clean and free of debris prior toinstallation.5. SecuringThe valve should be inserted fully into the pipe sothat no part of the cuff or bill extends outside thepipe. Ensure that the valve is not "slanted" at anangle, with the sealing area pointing upwards ordownwards. The valve centerline should be parallel to the pipe centerline.Tideflex Technologies recommends pinningthe CheckMate on all installations. See below.Pre-drilled holes are provided in each expansionclamp. At least one clamp should be pinned. Onexposed pipe, holes can be drilled through thevalve and pipe, and a bolt run through securedwith a nut. For buried pipe, silicon or similar sealant should be used to seal bolts.6. The outside of the CheckMate Valve is markedwith the word "top." The "top" marking is to bepositioned in the 12:00 position.7. The CheckMate Valve is provided with a flowdirection marking. The valve must be installed inthe correct direction to allow the valve to operateproperly. Valves installed backwards will not function, may invert and void the warranty, even if thevalve position is later reversed.NEVER.Exceed Design BackPressureNEVER.Install the ValveBackwardsÕvv «I "7-i }Ê Ài IÊ «ÃÊ ÀiÊ ÃÌ i Ê ÊÌ iÊÕ«ÃÌÀi Ê ÀÊ Ü ÃÌÀi ÊVÕvv]Ê i «i }ÊÕ« ÊÌ iÊ «« V Ì www.althon.co.uk
, 241(3www.measurit.com -/ / " Ê "/ -Ê ",Ê /A. It is important that the CheckMate is installed level within the pipe. The CheckMatemay "gap open" it installed improperly.B. The sealing area of the CheckMate musthave room to expand outwards, while bottomof the sealing area rises. The area around thesealing area must be kept free of debris to allow the bill to close in order for the valve to sealproperly.C. The CheckMate effectively reduces the inside diameter of the pipe in which it is installed,creating a restriction. It may also create a"ledge" inside the pipe, causing standing water.D. Back pressure in excess of the maximumline pressure may invert the sleeve and causevalve failure.E. Should the conditions that the CheckMatewas designed for change, (line pressure, backpressure, chemical compatibility) the performance of the valve may suffer.F. CheckMate Valves must be installed in trueround pipe which is concentric across the entirelength. Out of round pipe will cause the sealingarea of the valve to distort and gap, which willcause the valve to leak."ÛiÀ Ê i }Ì II Ê* «iÊ- âiÊ I V iÃÊÊÊÊÊÊÊÊÊÊÊÊÊÊÊÊ{ÊÈÊnÊ äÊ ÓÊ {Ê ÈÊ nÊÓäÊÓ{ÊÎäÊÎÈÊ{ÓÊ{nÊx{ÊÈäÊ iÌiÀà ääÊ �äÊÈääÊÇxäÊ ääÊ äxäÊ ÓääÊ ÎxäÊ xääÊI À}iÀÊà âiÃÊ Û L iÊÕ« ÊÀiµÕiÃÌ Ê V ià iÌiÀÃÕ LiÀÊ vÊ «Ã ÎÊ Î xÊ È ÇÊ nÊÓÎÊÎä ÓÊÎÎ ÎÊÎÈ xÊ{Ç ÇÊx{ÊÈÎ xÊÇÎÊnÓ xÊ ÓÊ ä xÊ ÊÓÎÈÊÎ{ÎÊ{Ó{ÊxäÎÊxn{ÊÇÈÇÊn{ÈÊ ÓÇÊ Ó ÓÊ ÎÇÓÊ È ÎÊ nx{ÊÓä ÈÊÓÎÎÇÊÓxÇnÊÎäÓÎÊ Ê Ê Ê Ê Ê Ê Ê ÊÓÊÓÊÓÊÓÊÓÊÓÊÓÊÓÊÊII- ÀÌiÀÊ i }Ì ÃÊ Û L i www.althon.co.ukÕvvÊ i«Ì V ià xÊÓÊÓÊÓÊÓÊ{Ê{Ê{ÊnÊnÊnÊnÊnÊnÊnÊ ÓÊ V «ÀiÃÃÕÀiÊ, Ì } iÌiÀÃÎnÊx Êx Êx Êx Ê äÓÊ äÓÊ ÎÊÓäÎÊÎäxÊ �ÊÓäÊÓäÊÓäÊ äÊ äÊ äÊ äÊiÌiÀà ÓÊ ÓÊ ÓÊ ÓÊ ÊÎÊÊÎÊÊÎÊÊ
Tideflex}AlthonTechnologiesTechnical DataCheckMate TM lnline Check Valve Install With TapeTo install a CheckMatern In line Check VrJve into a pipe in which the valve O.D. is smaller than the pipe I. D., follow the instruc tions below. 1/8" thick vulcanized rubber tape is used to build up the 0.D. of a CheckMate TM Inline Check Valve until it fits intothe I.D. or the pipe. Please note, the 1/8" thick rubber vulcanized tape can only be used on CheckMaten1 Inline Check V,Jves size3"-18". The example pictured below builds up the O.D. of a 9.5" CheckMateni lnline Check Valve to Ht into a pipe with a 10" I.D.'While valves 20" and larger are custom built, 4"-18" CheckMateTM InLine Check Valves are built to standard speciHcations anddimensions as charted below. In sizes 4"-18": The cuff encl is interchangeable, allowing the valve to be inserted into the pipeline from either encl. All CheckMate rn Valves have a standard back pressure rating. All CheckMaten1 Check Valves are built to a common O.D.CHECKMATE INLINE CHECK VALVE--LENGTHVALVE SIZEinchesinches-CUFF DEPTH- - - -millimetersinchesCUFF/CLAMPMINIMUMBACK PRESSURE RATING- --STANDARD VALVE 1836.59274120617.5Step 1: Clean the outside surface onthe clamped end of the CheckMaternValve. Hemove all surface clirt so the1/8" vulcanized rubber tape will stickto the valve.Step 2: Place the CheckMateTM Valveon a solid surface with the clampedend hanging sligl1tly over the edge ofthe surface.www.althon.co.ukStep 3: Unroll a small amount or the1/8" thick vulcanized rubber tape.Hemove plastic from both sides of theunrolled tape. Leave length of tapeattached to roll.
Step 4: Place the rubber tape, adhesiveside down, against the outer edge of thedamped encl of the CheckMate rnValve. Make sure the edge of the tape isflush with the edge of the valve. Pressflrmly into place.Step 5: Slowly rotate the CheckMate·1 MValve, as you continue to press the rub ber tape into place around the circum ference of the valve. As you apply moreof the tape, press it firmly into place andline the edge of the tape up with theedge of the valve.Step 6: Unroll more of the tape.Remove plastic: from tape. Continue toapply tape to the outside circumferenceof the v;Jve to build up the O.D. to thedesired size. In this example, 3-4 layersof continuously wrapped tape was used.Step 7:When the O.D. reaches thedesired size, cut the rubber tape fromthe roll using sharp scissors. Press theend of the tape firmly into place on theCheckMaten1 Valve.Step 8: The CheckMate 1 1 Valve is nowready to be installed into a pipe. Gentlyslide the valve into the end of the pipewith the clamped end facing out. Makesure the ,u-ea marked top on the valve isat the 12:00 position. The edge of theCheckMate rn Valve should rest flushwith the edge of the pipe opening.Step 9: Once the CheckMate rM \l,Jvehas been eased into position, check tl1eO.D. of tl1e valve, making sure it fitssnugly into the I.D. of the pipe. If the fitis loose, slide the CheckMate TM Valveout of the pipe and apply another layerof rubber tape to obtain tl1e appropriateO.D.Step 10: If you have removed theCheckivlatern Valve to apply anotherlayer of rubber tape, gently place theCheckMateTM Valve back into the pipe.There should be no rolling or moving ofthe rubber tape as you slide the valveinto place. The valve should fit snuglyinto the pipe with the area of the valvemarked top at the 12:00 position.Step 11: Once in place, tighten the ringclamp inside of the CheckMateTM Valveto secure it against the pipe. Using awrench, tighten the bolts on the clampuntil the valve is locked into place. Thetightening of the clamp will compressthe tape, making it waterproof. 'vVhenproperly clone, water will not bypass theseal. 1f the v,Jve to pipe area leaks,remove the valve and repeat steps 9-10.Step 12: Once the bolts are tightenedand the rubber tape is compressed, theCheckMateTM Valve is installed andready for operation.www.althon.co.ukThe number or layers required is a[unction of the pipe I.D. dimension.
/,"1 - ""/ Ê 1 / 1. InspectionValves should occasionally be inspected for damage, wear, and buildup of debris. The frequency ofthe inspections should be determined by the severity of the service and the environment in whichit operates.SLEEVE INVERTED Excessive back pressure, water surge, or waterhammer.The clamp should be checked for proper tension,and be sure that the inside of the valve is free ofdebris. Soft marine growth is normal on valves insubmerged applications. Because hard marinegrowth such as barnacles will not bond wellto the CheckMate, they can be easily removed.Also insert pins to ensure they are tight.BACKFLOW Debris lodged inside bill Debris built up beneath billLEAKING AROUND PERIMETER OF VALVE Tighten Clamp Check for cracks and holes in surface of pipe-/", If your CheckMate is to be stored for a period oftime prior to installation, the following storageguidelines will help to preserve the valve and assure a trouble-free installation.1. Store in a clean, cool, dry location. Avoid exposure to light, electric motors, dirt, or chemicals.2. Store valve vertically on floor or pallet.3. Store valve to prevent other items fromcontacting check sleeve to prevent possibledamage.4. Store this manual with the valve, so thatis readily available at time of installation.Á/ 8Ê/ " " -Ê7 ,, /9WARRANTIES - REMEDIES - DISCLAIMERS - LIMITATION OF LIABILITYUnless otherwise agreed to in writing signed by Tideflex Technologies, all Products supplied by Tideflex Technologies will be described in the specificationsset forth on the face hereof.THE WARRANTIES SET FORTH IN THIS PROVISION ARE EXCLUSIVE AND IN LIEU OF ALL OTHER WARRANTIES WHETHER STATUTORY, EXPRESSOR IMPLIED (INCLUDING ALL WARRANTIES OF MERCHANTABILITY AND FITNESS FOR A PARTICULAR PURPOSE AND ALL WARRANTIES ARISINGFROM COURSE OF DEALING OR USAGE OR TRADE).Tideflex Technologies Products are guaranteed for a period of one year from date of shipment, against defective workmanship and material only, when properlyinstalled, operated and serviced in accordance with Tideflex Technologies' recommendations. Replacement for items of Tideflex Technologies manufacture willbe made free of charge if proved to be defective within such year; but not claim for transportation, labor or consequential damages shall be allowed. We shallhave the option of requiring the return of the defective product to our factory, with transportation charges prepaid, to establish the claim and our liability shallbe limited to the repair or replacement of the defective product, F.O.B. our factory. Tideflex Technologies will not assume costs incurred to remove or installdefective products nor shall we incur back charges or liquidated damages as a result of warranty work. Tideflex Technologies does not guarantee resistanceto corrosion erosion, abrasion or other sources of failure, nor does Tideflex Technologies guarantee a minimum length of service, or that the product shall befit for any particular service. Failure of purchaser to give prompt written notice of any alleged defect under this guarantee forthwith upon its discovery, or use,and possession thereof after an attempt has been made and completed to remedy defects therein, or failure to return product or part for replacement as hereinprovided, or failure to install and operate said products and parts according to instructions furnished by Tideflex Technologies, or failure to pay entire contractprice when due, shall be a waiver by purchaser of all rights under these representations. All orders accepted shall be deemed accepted subject to this warrantywhich shall be exclusive of any other or previous warranty, and shall be the only effective guarantee or warranty binding on Tideflex Technologies, anythingon the contrary contained in purchaser’s order, or represented by any agent or employee of Tideflex Technologies in writing or otherwise, not withstandingimplied warranties. TIDEFLEX TECHNOLOGIES MAKES NO WARRANTY THAT THE PRODUCTS, AUXILIARIES AND PARTS ARE MERCHANTABLE ORFIT FOR ANY PARTICULAR PURPOSE.Althonwww.althon.co.uk
Tideflex} Technologies Technical Data CheckMate TM lnline Check Valve Install With Tape To install a CheckMatern In line Check VrJve into a pipe in which the valve O.D. is smaller than the pipe I. D., follow the instruc tions below. 1/8" thick vulcanized rubber tape is used to build up the 0.D. of a CheckMateTM Inline Check Valve until it fits into