Transcription
ProData DBU/ServerUser Manualv2.6.0 - January 2016
Table of ContentsWelcomeInstallationIBM iSystem RequirementsDownload & InstallExecutablePTFStarting DBU/ServerMicrosoft WindowsAccessing DBU/ServerRDi PluginWeb BrowserExploring the InterfaceThe InterfaceHeaderToolbarRecord DataMeta TabsFieldsFormatsMembersDatabase RelationsThe ToolbarRecord NavigationChange Record ModesSearch, Export, PrintLayout/User Preferences, System ConnectionQuick Launch, Help, Log Out, SubmitHelpful Tips & ShortcutsNavigate Records & FieldsDisplay/Delete ModeEdit/Add ModePage Between RecordsSingle Record FormatMultiple Record Format"DUP" Data ShortcutDUP FieldDUP RecordSingle Record FormatMultiple Record FormatDialog Boxes
Functional ReferenceToggle Access ModeKeyed Access ModeNon-Keyed (RRN) Access ModeRRN Input FieldPosition To RecordDisplay ModeEdit ModeNavigating Input FieldsAdd ModeDelete ModeToggle Multiple Record FormatToggle RDR ModeReactivating Deleted RecordsDefine Search & ReplaceSearch Method ToggleClassic SearchSQL SearchAdd/Edit Search EntryField NameFrom/ToOperationValueReplace Entry TableSearch SettingsFormatMatch caseInclude deleted recordsCreate subset of recordsOccurrences to processNextReplacing DataAll - Use With Caution!PreviousRecords to searchActionsExport DataPrintPrint PreviewPC PrinterSystem iLayout PreferencesSettingsPosition to FieldField LabelsFormatTable Layout
ColumnsActionsCreate FieldRemove FieldSort By KeyUser PreferencesRecord FormatRecord ModeRecords to DisplayPrint Audit LogJ.D. Edwards FormatEnable Continuous ScrollEnable Intro TutorialSystem ConnectionMembers Meta TabDatabase Relations Meta Tab
WelcomeThank you for choosing DBU/Server! This manual is intended to guide you through the installation,setup, and use of DBU/Server. While we do our best to provide a comprehensive and up-to-dateresource in this guide, you may encounter a situation that requires additional assistance. If so, pleasedon't hesitate to contact ProData Customer Support - we're happy to help.ProData Customer SupportOnline:http://dodbu.com/support.shtmlToll erver can be installed and run on either an IBM i or Microsoft Windows system. Werecommend the IBM i installation for most users.IBM iFollow the steps below to install and run DBU/Server on an IBM i system.System Requirements IBM i V5R4 or later 60MB free disk space Java 5, 6, or 7. To determine your Java version: From the command line, run: QSH From the Q-shell prompt, run: ls /QOPenSys/QIBM/ProdData/JavaVMSample Output Ensure one of the following exists: jdk50, jdk60, jdk70 Access to TCP port 8205 If port 8205 is unavailable, a custom port can be configured. Download the DBUServer/Plugin Port Customization Guide for details.Download & InstallDBU/Server comes packaged with all DBU installations as of 3/22/2016. However, even ifyou have downloaded or updated DBU since that date, it's a good idea to perform thefollowing to ensure the latest version of DBU/Server is available. Two download optionsexist: Executable and PTF.IMPORTANT! All users must be logged out of DBU prior to installing DBU/Server.Executable1. Download the latest DBU11 executable2. Unpackage and install on the desired machine
PTF1. From the command line on the desired machine, run: DBUPTFa. This will update DBU and bring in the required DBU/Server program files2. Once the DBUPTF is complete, run: DBUSVRPTFa. This will bring in files required to run DBU/ServerStarting DBU/ServerOnce installation is complete, simply run the command: DBUSVRRSTNote: By default, the DBU/Server job will run under the subsystem of your default jobqueue for the workstation on which the DBUSVRRST command was executed. If youwould like to specify a different subsystem, perform the following:1. Run the command DBUDTA DBUSVRSBS - this will open a data area in DBU2. In the Control field, type CHG and press Enter3. In the DATA field, type the name of the job queue under which you wantDBU/Server to run, then press Enter4. Once saved, restart DBU/Server: DBUSVRRSTMicrosoft WindowsPlease contact ProData Tech Support for Microsoft Windows installation details.Accessing DBU/ServerRDi Plugin (DBU RDi)Download the DBU/Server - RDi Quick Start Guide to learn about accessing DBU/Server fromwithin the IBM RDi environment.Web Browser (DBU Web)Download the DBU/Server - Web Quick Start Guide to learn about accessing DBU/Server fromwithin your favorite web browser.
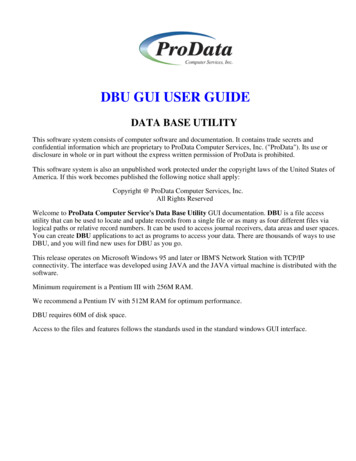
Exploring the InterfaceThe InterfaceThe main DBU/Server interface consists of four main sections (Figure 1).Figure 1 - Interface OverviewHeaderThis section is mainly used for informational purposes, such as referencing the location ofthe current file and the date/time it was last refreshed. System messages are also displayed inthis section.Given its informational nature, almost no user interaction will take place in the header. Theone exception is when system messages are displayed. For non-critical messages, clickingwithin the message banner area (green box in Figure 2) will hide the message. Otherwise,these messages will hide automatically after a few seconds.Figure 2 - DBU/Server Header with system messagingToolbarThe DBU/Server toolbar is where most user interactions will take place: navigating betweenrecords, changing modes, searching, exporting data, printing, and more (Figure 3).Figure 3 - DBU/Server Toolbar
The toolbar consists of up to 24 buttons and a text input field (depending on object type anduser permissions). Simply point and click to activate a button's functionality. While thefunction of each button should be fairly intuitive, just hold your mouse cursor over a buttonto see a brief description of what it does. More details about each button's functionality arecovered in later sections of this manual.Record DataThis section displays the data contained within each record. Data can be displayed in avariety of ways by changing a record's format and mode combinations. Records can bedisplayed in Single/Multiple Record Format, and Display, Edit, Add, Delete, or Hexadecimalmode. More details about each record mode are covered in future sections of this manual.Meta TabsThe Meta Tabs section provides access to lower-level file data. Each tab is described in moredetail below.FieldsDisplays the field name and attributes for the currently selected file (Figure 4).Figure 4 - Fields View TabFormatsDisplays the record format information for the currently selected file (Figure 5).Figure 5 - Formats View TabMembersDisplays the member information for the current file. For files with multiple members,you may switch members on-the-fly by double-clicking on the desired member (Figure6).Figure 6 - Members View TabDatabase RelationsDisplays database relations and associated information for the selected file. All of theaccess paths built over the physical file are listed. For files with multiple relations, youmay switch files on-the-fly by double-clicking on the desired file name (highlighted inyellow) (Figure 7).
Figure 7 - Database Relations View TabThe ToolbarBelow is a brief description of the various toolbar sections and related functions.Record NavigationUse this section of the toolbar to navigate between records (Figure 8).Figure 8 - Record NavigationToggle Access ModeToggle the record access mode. This will enable/disable RRN Input, Position ToRecord, and Toggle RDR buttons. See the Functional Reference for details.RRN InputJump to a specific record by RRN (Relative Record Number). Enter the desirednumber in this field and press the Enter key (disabled while in Keyed access mode).Position To RecordJump to a specific record by key (available for keyed files only)First Record/PageJump to the first record or page.Previous Record/PageLoad the previous record or page.Reload Record/PageReload the current record or page.Next Record/PageLoad the next record or page.Last Record/PageJump to the last record or page.Change Record ModesUse this section of the toolbar to change record modes (Figure 9).Figure 9 - Change Record ModesDisplay ModeLoad the current file in Display Mode. No data manipulation is available (i.e. readonly).
Edit ModeLoad the current file in Edit Mode. This mode allows the user to edit record data.Add ModeLoad the current file in Add Mode. This mode allows the user to create a single newrecord.Delete ModeLoad the current file in Delete Mode. This mode allows the user to delete individualrecords.Toggle Multiple Record FormatLoad the current file in Single or Multiple Record Format. Single Record Formatdisplays one record at-a-time. Multiple Record Format displays up to 50 records atonce, depending on the user's preferences.Toggle Hex ModeLoad the current file in Hex or Non-Hex mode. Record data will converted to or fromthe hexadecimal equivalent.Toggle RDR ModeLoad the current file with RDR (Reactivate Deleted Records) on or off. This modeallows the user to reactivate deleted records (RDR may not be available with allinstallations).Note: Single/Multiple Record, Hex, and RDR modes can be used in combination withDisplay, Edit, Add, and Delete modes (with some exceptions). For example, youcan edit data (Edit Mode) in Single/Multiple Record Format, and display data(Display Mode) in Hex or Non-Hex Mode.Search, Export, PrintUse this section of the toolbar to search, export, and print (Figure 10).Figure 10 - Search, Export, PrintDefine Search/ReplaceDefine search parameters and option replace values for a search within the currentfile.Next Search ResultLoad the next result(s) for the current search.Export DataExport data from the current view in HTML, CSV, or XML format.PrintPrint a single record or multiple records, depending on current mode.Layout Preferences, User Preferences, System ConnectionUse this section of the toolbar to view/change layout preferences, user preferences, andsystem connection settings (Figure 11).
Figure 11 - Layout Preferences, User Preferences, System ConnectionLayout PreferencesAlter the way data is presented in the main layout.User PreferencesAlter preferences for the current user such as default record quantity and mode.System ConnectionAlter the current system connection name, password, and program library.Quick Launch, Help, Log Out, Submit ActionUse this section of the toolbar to open a new Quick Launch tab, get help, log out, or submitan action (Figure 12).Figure 12 - Quick Launch, Help, Log Out, Submit ActionQuick LaunchOpens a Quick Launch dialog box.HelpOpen this user manual.Log OutLog out of the current system.Submit Action (Update/Add/Delete/Reactivate)This button will be in one of 5 possible states (Figure 13), depending on the actioncurrently being performed.Figure 13 - Submit action button statesHelpful Tips & ShortcutsMost toolbar button have an associated keyboard shortcut - simply hover over a toolbar button toview its shortcut. A note for RDi users: some keyboard shortcuts may already be associatedwith RDi functionality and, therefore, may not work as intended.Navigate Records & FieldsBelow are some alternatives to using a mouse when navigating between records and fields:Display/Delete ModeClick to select a row, then in:Single Record FormatUse the up/down arrow keys to move between fields.Multiple Record Format
Use the up/down arrow keys to move between records. Use the left/right arrowkeys to move between fields.Edit/Add ModeClick on an input field, then in:Single Record FormatUse the up/down arrow keys to move between fields.Multiple Record Format- Press Tab to move the to the next field.- Hold Shift, then press Tab to move to the previous field.- Use the up/down arrow keys to move between records (not available withinlarger textareas).Page Between RecordsSingle Record FormatPress the PgUp or PgDn key to load the previous or next record, respectively. Hold theShift key while pressing PgUp or PgDn to load the first or last record, respectively.Multiple Record FormatPress the PgUp or PgDn key to load the previous or next page of records, respectively.Hold the Shift key while pressing PgUp or PgDn to load the first or last page of records,respectively."DUP" Data ShortcutUse Shift Insert to "DUP" (duplicate) individual fields or entire single records.DUP FieldIn Add or Edit mode, place the cursor within the field you wish to "DUP", then holdShift and press the Insert key. This action will cause the current data to be replaced withdata from the same field in the previously viewed record.DUP RecordYou must be in Display mode to "DUP" an entire record. The Shift Insert action willautomatically switch to Add mode, with all fields pre-populated from the duped data.Single Record FormatSimply hold Shift and press the Insert key when on the record you wish to "DUP".Multiple Record FormatFirst, click to select the record you wish to "DUP", then hold Shift and press theInsert key. If no record is selected, the first/top record will be duped.Dialog BoxesDialog boxes are the small pop-up style windows that open over the top of the main layoutand other dialog boxes (Figure 14). Clicking the following buttons will launch dialog boxes:Position To Record, Define Search, Export Data, Print, Layout Preferences, and UserPreferences.
Figure 14 - Sample dialog boxMost dialog boxes offer the following features:DraggableClick and hold on the dialog box title, drag to the desired location, and release.Minimize/Maximize/CloseClick on the yellow (minimize), orange (maximize), or red (close) icon in the upperright corner to trigger the associated action.
Functional ReferenceIn this section we'll dive deeper into the individual tools and functionalities of DBU/Server. Eachsubsection below details a specific piece for the DBU/Server application, though some elements areexcluded due to their self-explanatory nature (i.e. First Record, Next Record, etc.). While reading allthe way through this section is recommended, it's likely to be most useful as an ad-hoc reference.Toggle Access ModeAvailable for keyed files only. Keyed files will display in Keyed Access Mode by default.Click either side of the Access Mode toggle to switch access modes. Key will switch the recordto keyed access mode. RRN will switch to non-keyed access mode.Keyed Access ModeIn keyed access mode, records are ordered according to the value of predefined keys. Notethat in this mode the RRN Input Field is disabled, the Position To Record button isenabled, and the Toggle RDRbutton is no longer available. This occurs because, in thisaccess mode, you are able to position to records by key only, not by RRN, and RDR is notallowed.Non-Keyed (RRN) Access ModeIn non-keyed access mode, records are ordered by RRN (Relative Record Number). Note thatin this mode the RRN Input Field is enabled, the Position To Record button is disabled,and the Toggle RDRbutton is available. This occurs because, in this access mode, you areable to position to records by RRN only, not by key, and RDR is allowed.RRN Input FieldAvailable for non-keyed files, or keyed files in non-keyed access mode only.Key in the desired RRN in the input field and press Enter. The record with the specified RRN (iffound) will be positioned to the top.Position To RecordAvailable for keyed files in keyed access mode only.Click to launch the Position To Record dialog box (Figure 15). Update the desired fields andclick Go. If a matching record is found, the file will be re-positioned to that record.Figure 15 - Position To Record dialog
Display ModeAs the name suggests, Display Mode is useful for browsing records when no data manipulationis required.Edit ModeIn Edit Mode, the Record Data area is updated to display input fields (Figures 19-20) in place ofstatic record data, enabling the user to alter data and submit changes. To submit altered data,press the Enter key on your keyboard, or click the Update button.Navigating Input FieldsNavigating between fields is very simple. Several methods are available for ease-of-use:Point-and-Click - use your mouse to click within the field you'd like to edit.Tab - press the Tab key to target the next available input field.Shift Tab - hold Shift, then press the Tab key to target the previous input field.Up Arrow - press the up arrow to target the input in the previous row/record, samecolumn/field.Down Arrow - press the down arrow to target the input in the next row/record, samecolumn/field.Figure 16 - Single Record Edit ModeFigure 17 - Multiple Record Edit ModeAdd ModeNew records are added in Single Record Format (i.e. one at-a-time)
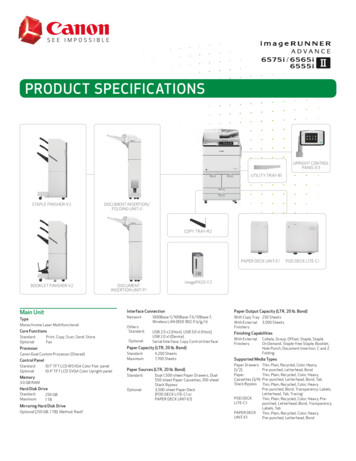
Add Mode is very similar to Edit Mode in Single Record Format (Figure 16), except the inputsare usually empty. To add a new record, simply provide data for the desired inputs and press theEnter key on your keyboard or click the Add button.Delete ModeIn Single Record Format, navigate to the record you wish to delete, and click the Delete button.In Multiple Record Format, select a record to delete by clicking within the record's row, thenpress the Delete key on your keyboard, or click the Delete button.Toggle Multiple Record FormatClick to enable/disable Multiple Record Format. Multiple Record Format is enabled when thebutton is in a depressed state and multiple records are displayed in the Record Data area (Figure17).Toggle RDR ModeClick to enable/disable RDR (Reactivate Deleted Records). RDR is enabled when the button is ina depressed state, at which time any available deleted records for the current view will behighlighted in red (Figure 18).Note: Some deleted records may be empty, depending on the method with which the file wasoriginally created.Figure 18 - RDR enabled with deleted records presentReactivating Deleted RecordsTo reactivate a deleted record:1. Ensure RDR is enabled.2. Navigate to, or click on, the record you wish to reactivate.3. Click the "Reactivate" button.If successful, the selected record will no longer be highlighted in red.Define Search & ReplaceClick to launch the Search & Replace dialog box (Figure 19) and define search & replaceparameters and execute a search/replace on the current file.
Figure 19 - Define Search & Replace dialogSearch Method ToggleClick either side of the Search Method Toggle to change the search method.Classic SearchAdd search entries (parameters) one at-a-time; the query will be built dynamically whenthe search is submitted.SQL SearchBuild your own custom SQL statement (Figure 20).Figure 20 - SQL Search methodAdd/Edit Search EntryClick the Add or Edit button below the Search entry table to launch the Add/Edit SearchEntry dialog box (Figure 21). Complete the desired fields and click Save - the entry will beadded to, or modified in, the entry in the Search entry table.
Figure 21 - Add/Edit Search Entry dialogFollowing is a brief overview of the available fields:Field NameThe name of the field in which to search. Aside from the actual record field names,available values include:*RCD - Search the entire file for Decimal Data Errors*RRN - Search based on a specified RRN (Relative Record Number)*STRPOS - Used to search for a value within the specified start position range(From/To)From/ToThe beginning/ending start position within which to search for a given value.Available when Field Name is set to *STRPOS onlyOperationThe desired operation with which to compare values. In each case, the "specified value"referenced below is the value selected or defined in the Value field. In most cases, thisvalue is compared to the value of the field corresponding to the selected Field Name.Available operations are:Contains - Find records that contain the specified value.Equal To - Find records equal to the specified value.Greater Than - Find records greater than the specified value.Greater Than or Equal To - Find records greater than or equal to the specified value.Less Than - Find records less than the specified value.Less Than or Equal To - Find records less than or equal to the specified value.Does Not Contain - Find records that do not contain the specified value.Not Equal To - Find records not equal to the specified value.Not Greater Than - Find records not greater than the specified value.Not Less Than - Find records not less than the specified value.
ValueThe value on which to execute a search. Aside from a custom user-defined value andrecord field names, available values include:NULL - Search for fields with NULL valuesDecimal Data Error - Search for fields with decimal data errorsReplace Entry TableClick the Add or Edit button below the Replace entry table to launch the Add/Edit ReplaceEntry dialog box (Figure 22). Once the desired fields are completed, click the "Save" buttonto add/modify the entry in the Search entry table.See descriptions for the Search Entry Table fields above - they are very similar to theReplace Entry Table fields.Figure 22 - Add/Edit Replace EntrySearch SettingsFollowing are the available search settings:FormatSelect the format, if multiple available, for the current record (logical files only).Match caseIf selected, a case-sensitive search is performed. Otherwise, searches are case-insensitiveby default.Include deleted recordsIf selected, RDR is enabled when the search is executed. Any available deleted recordswill be included in the search results.Create subset of recordsIf selected, the currently displayed data will be replaced by a subset of records containingonly those records that match the provided search criteria. This can be undone by clickingthe blue Reset button in the main search dialog box.Occurrences to processDictates how the search is executed. Available values are:Next
Search progresses forward from current record up to the number of recordsspecified in the Records to search field or the end of the file (whichever is less).The next record to satisfy the search criteria is displayed.Replacing DataIf a Replace entry is defined, a confirmation dialog box (Figure 23) willappear for each matching result. In the dialog, click Replace to replace data inthe target field with the specified replacement value; click Skip to continue tothe next matching record; or click Cancel to cancel the search/replace process.Figure 23 - Replace Confirmation dialogAll - Use With Caution!Search progresses forward from the current record to the end of the file. If used inconjunction with the replace function, all records which satisfy the search criteriawill have the replace function performed without additional prompts orconfirmation.PreviousSimilar to "Next", except the search moves backward through the file to previousrecords.Records to searchSpecifies the quantity of records to search when Occurrences to process is "Next" or"Previous".ActionsAside from the standard Submit and Cancel actions, you are able to reset or clear a search.ResetReset the search/replace parameters and settings and clear any existing search results,including a created subset. This basically allows you to revert the file to its pre-searchstate.Export DataClick to launch a the Export Data dialog box (Figure 24) and export the displayed record(s) inHTML, CSV, or XML format.After selecting the desired format, click Export. At this point you'll be prompted to select adestination to save the file. Follow the system prompts to complete the export.
Figure 24 - Export Data dialogPrintClick to launch the Print Preview dialog and view/print the displayed record(s). In Single Recordformat, the displayed record will be printed (Figure 25). In Multiple Record format, a singlerecord can be printed by clicking to select the desired record; otherwise, all displayed recordswill be printed (Figure 26).Keyboard shortcut: Ctrl PPrint PreviewIn addition to previewing the data set to be printed, you can specify the printing destination:PC PrinterLaunches the default print dialog on your local machine.System iCreates a spool file on the IBM i, containing the number of records specified in the Qtyof records field (Figure 26).Figure 25 - Single Record print preview
Figure 26 - Multiple Record print previewLayout PreferencesClick to launch the Layout Preferences dialog box (Figure 27). Changes made in this dialog willaffect the display of fields in the Record Data area.Figure 27 - Layout Preferences dialog
SettingsPosition to FieldJump to (highlight) the first or last field/row in the Table Layout.Field LabelsDetermines the source for field labels (column/row headers) when records are displayedin the main Record Data area.Field Text - Use the field text (i.e. "Query Name").Field Name - Use the field name (i.e. "SQNAME").Column Headings - Use the column headings (i.e. "Query Name")Alias - Use a user-defined alias.FormatSelect the format, if multiple available, for the current file (logical files only).Table LayoutColumnsField Text - Text defined for the field in DDS. Click and drag on this column within anyrow to change its position.Field Name - Name of the field as described in DDS.Key Sequence - Denotes the order of any keys that may exist in the file.Select - Determines whether to select/show or omit/hide a field.If this column is blank for all fields then all fields are shown by default.If this column hasin one or more fields, only those selected fields are shown.If this column hasin one or more fields, those fields are omitted (hidden) andall others are shown.If this column has bothandfor different fields, only the omitselectionwill go through and anyselections will be reverted to blank cells.Read-Only - If checked, field will be read-only (non-editable).Auto Dup - If checked, field will be automatically "Duped" when adding a new record.Upper Case - If checked, field input is forced to upper-case.Type - Displays the field type (numeric, alpha, etc).Length - Displays the field length.Dec - Displays the decimal position for numeric fields.Loc - Displays the position of a field's starting character within the file.Column Headings - Displays the field's column headings.Alias - Displays the field's alias, if defined.
ActionsCreate FieldClick to create a new custom field - a dialog window will appear (Figure 28). Thisfunctionality is typically used to break fields non-packed fields up into smaller fields, orto merge smaller contiguous fields into larger fields.When the form is complete, click Create and the new field will be added to the top of theTable Layout table.Figure 28 - Layout Preferences Create Field dialogFollowing is a brief overview of the available fields:Field Text - Text for the new field.Field Name - Name of the new field (must be unique).Type - The new field's data typeDec - Number of decimal places for numeric data types (i.e. Zoned or Float)Loc - Position within the file where the new field should begin.Length - Desired length of the new field.Select - If checked, awill appear in the Select/Omit column for the new field.Remove FieldOnly available when a custom user-created field is highlighted.Click to remove the selected user-created field (created using the Create Field button).Sort By KeyOnly available for keyed files.Click to sort the fields in ascending key order.User PreferencesClick to launch the User Preferences dialog (Figure 29) and customize user preferences such asdefault record modes and quantity of records per page.
Figure 29 - User Preferences dialogFollowing is a brief overview of the available fields:Record FormatSingle - Opens records in Single Record FormatMultiple - Opens records in Multiple Record FormatRecord Mode*DBUAUT - Opens records in the mode set within DBUAUT on the IBM i.Add - Opens records in Add Mode.Edit - Opens files in Edit Mode.Display - Opens files in Display Mode.Records to DisplayQuantity of records to display when in Multiple Record Format.Print Audit Log*DBAUT - Use the setting from DBUAUT on the IBM i.Off - Turn off the print log.J.D. Edwards Format*NONE - Do not apply J.D. Edwards format.*PRV - Apply the previous J.D. Edwards format.World - Use the J.D. Edwards World format.OneWorld - Use the J.D. Edwards OneWorld format.Enable Continuous ScrollWhen checked, the next available page of records will automatically be loaded in whenscrolling the bottom record in Multiple Record Format.
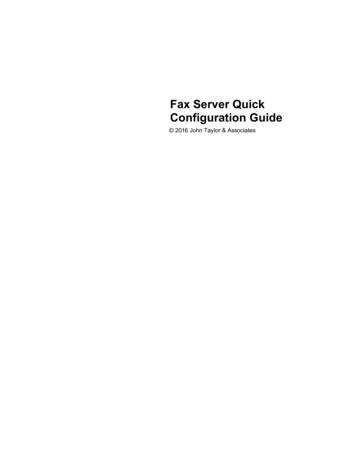
Enable Intro TutorialWhen checked, the DBU/Server Intro tutorial will launch the next time a file is opened. Sincethe file is reloaded by default when User Preferences are submitted, the tutorial will launchby default.System ConnectionClick to launch the System Connection dialog (Figure 30) and alter system connectionparameters.Figure 30 - System Connection dialogFollowing is an overview of the available fields:Connection Name - Opens records in Single Record FormatIP Address - (Not editable)Username/Password - The username and password for the system connection.Program Library - The library where DBU is installed.Members Meta TabClick the Members tab to view and access file members (Figure 31). From this view you can seedetails about a file's members, with the currently displayed member highlighted in blue.If multiple members exist, you can switch to another member by double-clicking on the desiredmember's row. This will load the record data for that member in the Record Data area.Note: Switching members will replace the currently displayed record data with the selectedmember's record data.Figure 31 - Members View tab
Database Relations Meta TabClick the Database Relations tab to view and access a file's database relations (Figure 32). Fromthis view you can see details about a file's relations, with the currently displayed file highlightedin blue.If multiple relations exist, you can switch to another relation by double-clicking on the desiredrelation's row. This will load the record data for that relation in the Record Data area.Note: Switching relations will replace the currently displayed Record Data with the selectedrelation's record data.Figure 32 - Database Relations View tab
Download the DBU Server/Plugin Port Customization Guide for details. Download & Install DBU/Server comes packaged with all DBU installations as of 3/22/2016. However, even if you have downloaded or updated DBU since that date, it's a good idea to perform the following to ensure the latest version of DBU/Server is available. Two download options