Transcription
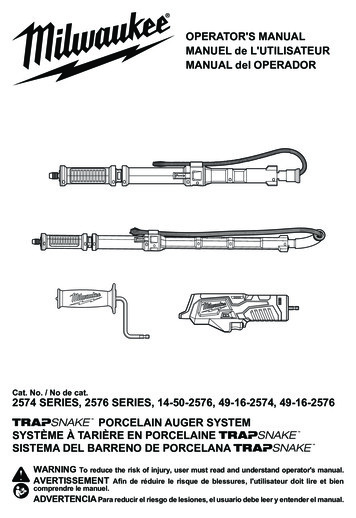
Drain-Rooter PH Operating InstructionsFor 1-1/4” through 3” lines(30mm—75mm)Your Drain-Rooter PH is designed togive you years of trouble-free, profitableservice. However, no machine is betterthan its operator.Read, understand and follow all safetywarnings and instructions provided withthe product. Failure to follow the warningsand instructions may result in electricshock and/or serious injury. Save all warnings and instructions for future reference.SAVE THESE INSTRUCTIONS!Pour français voir la page 9Para ver el español vea la paginá 17
Drain-Rooter PH To reduce the risk of injury,user must read instructionmanual. Failure to follow operating instructions could resultin death or serious injury.Electric shock resulting indeath can occur if you plugthis machine into an improperly wired outlet. If the groundwire is electrified, you can beelectrocuted by just touchingthe machine, even when thepower switch is off. A groundfault circuit interrupter will not protect you in this situation. Use aUL listed tester to determine if theoutlet is safe.WARNING Read all safety warnings and allinstructions. Failure to follow the warningsand instructions may result in electric shock,fire and/or serious injury. Save all warningsand instructions for future reference.Replacement manuals are available upon request at no charge, or may be downloadedfrom our website, www.drainbrain.com. Instructional videos are available for downloadon our website, and may be ordered. If youhave any questions or problems, please callGeneral’s customer service department at412-771-6300.Do not operate power tools inexplosive atmospheres, suchas in the presence of flammable liquids, gases, or dust.Power tools create sparks whichmay ignite the dust or fumes.Save all warnings and instructionsfor future reference.Only wear leather gloves.Never use any other type ofglove, such as cloth, rubber, orcoated gloves. Never grasp arotating cable with a rag.These items could becomewrapped around the cable andcause serious injury.These instructions are intended tofamiliarize all personnel with the safeoperation and maintenanceprocedures for the Drain-Rooter PH.SAFETY SYMBOLSThis is the safety alert symbol. It isused to alert you to potential personalinjury hazards. Obey all safety messages that follow this symbol to avoidpossible injury or death.Always wear safety glassesand rubber soled, non-slipshoes. Use of this safety equipment may prevent serious injury.DANGER indicates a hazard with a high level of riskwhich, if not avoided, will result in death or serious injury.Do not overstress cables.Overstressing cables may causetwisting, kinking, or breaking ofthe cable and may result in serious injury.WARNING indicates a hazard with a medium level of riskwhich, if not avoided, could result in death or serious injury.CAUTION indicates a hazard with a low level of risk which,if not avoided, will result in minor or moderate injury.2
Drain-Rooter PH GENERAL POWER TOOL SAFETY WARNINGS2.Use personal protective equipment. Always wear eye protection. Protective equipment such as dust mask, non-skid safetyshoes, hard hat, or hearing protection used for appropriate conditions will reduce personal injuries.3.Prevent unintentional starting. Ensure the switch is in the off-position before connecting to power source and/or batterypack, picking up or carrying the tool. Carrying power toolswith your finger on the switch or energizing power tools that havethe switch on invites accidents.4.Remove any adjusting key or wrench before turning thepower tool on. A wrench or key that is left attached to a rotatingpart of the power tool may result in personal injury.5.Do not overreach. Keep proper footing and balance at alltimes. This enables better control of the power tool in unexpected situations.6.Dress properly. Do not wear loose clothing or jewelry. Keepyour hair, clothing, and gloves away from moving parts.Loose clothes, jewelry, or long hair can be caught in movingparts.7.If devices are provided for the connection of dust extractionand collection facilities, ensure these are connected andproperly used. Use of dust collection can reduce dust-relatedhazards.WARNINGRead all safety warnings and all instructions. Failure to follow allinstructions listed below may result in electric shock, fire, and/or serious injury.SAVE ALL WARNINGS AND INSTRUCTIONSFOR FUTURE USE!The term “power tool” in the warnings refers to your mainsoperated (corded) power tool or battery-operated (cordless)power tool.Work Area Safety1.Keep work area clean and well lit. Cluttered or dark areas invite accidents.2.Do not operate power tools in explosive atmospheres, suchas in the presence of flammable liquids, gases, or dust.Power tools create sparks which may ignite the dust or fumes.3.Keep children and bystanders away while operating a powertool. Distractions can cause you to lose control.Electrical Safety1.Power tool plugs must match the outlet. Never modify theplug in any way. Do not use any adapter plugs with earthed(grounded) power tools. Unmodified plugs and matching outlets will reduce risk of electric shock.Power Tool Use and Care1.Avoid body contact with earthed or grounded surfaces suchas pipes, radiators, ranges and refrigerators. There is anincreased risk of electric shock if your body is earthed orgrounded.Do not force the power tool. Use the correct power tool foryour application. The correct tool will do the job better and saferat the rate for which it is designed.2.Do not use the power tool if the switch does not turn it onand off. Any power tool that cannot be controlled with the switchis dangerous and must be repaired.3.Do not expose power tools to rain or wet conditions. Waterentering a power tool will increase the risk of electric shock.3.4.Do not abuse the cord. Never use the cord carrying, pullingor unplugging the power tool. Keep cord away from heat, oil,sharp edges or moving parts. Damaged cords increase the riskof electric shock.Disconnect the plug from the power source and/or batterypack from the power tool before making any adjustments,changing accessories, or storing power tools. Such preventive safety measures reduce the risk of starting the power toolaccidentally.4.Store idle power tools out of reach of children and do notallow persons unfamiliar with the power tool or these instructions to operate the power tool. Power tools are dangerous in the hands of untrained users.5.Maintain power tools. Check for misalignment or binding ofmoving parts, breakage of parts and any other condition thatmay affect the power tool’s operation. If damaged, have thepower tool repaired before use. Many accidents are caused bypoorly maintained power tools.6.Keep cutting tools sharp and clean. Properly maintained cutting tools with sharp cutting edges are less likely to bind and areeasier to control.7.Use the power tool, accessories and tool bits, etc. in accordance with these instructions, taking into account the working conditions and the work to be performed. Use of thepower tool for operations different from those intended couldresult in a hazardous situation.2.5.When operating a power tool outdoors, use an extensioncord suitable for outdoor use. Use of a cord suitable for outdoor use reduces the risk of electric shock.6.If operating a power tool in a damp location is unavoidable,use a ground fault circuit interrupter (GFCI) protected supply. Use of an GFCI reduces the risk of electric shock.Double insulated tools are equipped with a polarized plug(one blade is wider than the other). This plug will fit a polarized outlet only one way. If the plug does not fit fully in theoutlet, reverse the plug. If it still does not fit, contact a qualified electrician to install a polarized outlet. Do not changethe plug in any way. Double insulation eliminates the need forthe three wire grounded power cord and grounded power supplysystem.7.Personal Safety1.Stay alert, watch what you are doing and use common sensewhen operating a power tool. Do not use a power tool whileyou are tired or under the influence of drugs, alcohol, ormedication. A moment of inattention while operating power toolsmay result in serious personal injury.3
Drain-Rooter PH FEATURES - Closed Drum Drain-Rooter PHService1.Have your power tool serviced by a qualified repair personusing only identical replacement parts. This will ensure thatthe safety of the power tool is maintained.HandleFeed PressureKnobFeed ControlLeverSPECIFIC SAFETY RULESThis is the safety alert symbol. It is used to alertyou to potential personal injury hazards. Obey allsafety messages that follow this symbol to avoidpossible injury or death.Guide Hose(Cable Inside)Electric shock resulting in death can occur if youplug this machine into an improperly wired outlet. Ifthe ground wire is electrified, you can be electrocutedby just touching the machine, even when the powerswitch is off. A ground fault circuit interrupter will notprotect you in this situation. Use a UL listed tester todetermine if the outlet is safe.CutterMotorDrum Container Drum ContainerBackFrontFront PostKnobNOTE: Do not operate machine if warning labels on the containerfront and power cord are missing or illegible.Do not overstress cables. Overstressing cables maycause twisting, kinking, or breaking of the cable and mayresult in serious injury.1.2.3.4.5.6.7.8.FEATURES - Open Drum Drain-Rooter PHOnly wear leather gloves. Never use any other type of glove,such as cloth, rubber, or coated gloves. Never grasp a rotatingcable with a rag. These items could become wrapped around thecable and cause serious injury.HandleDo not overstress cables. Overstressing cables because of anobstruction may cause twisting, kinking, or breaking of the cableand may result in serious injury.Place the machine at a distance not greater than six inches(15cm) from drain opening. Greater distances can result incable twisting or kinking.Machine is designed for ONE-PERSON operation. Operatormust control trigger switch and cable.Never take hold of a rotating cable. Pull the cable out, orpush it back into the container by hand only when the motoris stopped. When the motor is turning, always have onehand controlling the trigger switch and the other handaround the grip shield. Operator’s hand may be caught in themoving parts resulting in serious injury.Feed PressureKnobGuide Hose(Cable Inside)CutterMotorBe careful when cleaning drains where cleaning chemicalshave been used. Avoid direct contact with corrosive drain cleaners. Drain cleaning chemicals can cause serious burns, as wellas damage the cable.Do not operate machine if operator or machine is standingin water. Will increase risk of electrical shock.Wear safety glasses and rubber soled, non-slip shoes. Useof this safety equipment may prevent serious injury.Feed ControlLeverOpen DrumFront PostKnobNOTE: Do not operate machine if warning labels are missing or illegible.VARIABLE SPEED SWITCHA variable speed control is built into the trigger mechanism. You cancontrol and increase the machine's speed by applying more triggerpressure until you get the speed that you want.You can also control the machine's direction of rotation by switchingthe forward and reverse lever, which is located just above the triggerswitch. Move the lever toward the Forward arrow for forward rotationand toward the Back arrow for reverse rotation. Switch to OFF position when the tool is not in use.4
Drain-Rooter PH OPERATIONCable Application Chart (Table 1)Cable SizePipe SizeTypical Applications1/4”1-1/4" to 2"Small lines, tubs, and shower drains.5/16"1-1/2" to 2"Sinks, basins, and small drains.3/8"2" to 3"1.Plug machine into a properly grounded outlet.2.Make sure the Forward/Off/Reverse switch is in the FORWARDposition.3.Tighten the knob on top of the variable speed power cable feedso that the feed roller presses against the cable. Be sure not toover tighten since this could cause excessive cable wear.4.The feed lever controls the feeding rate and direction of the cable. Move the feed lever down to feed the cable out of the drum.The farther the lever is moved downward, the faster the cable willfeed out. Move the lever up to retract the cable into the drum.When the lever is in the middle (neutral) position, the cable willspin in place.Stacks, toilets, small drains (No Roots).The 1/4" and 5/16" diameter cables with EL Basin plug heads can be spunthrough most strainer crossbars and work well in lines blocked by soft stoppages such as hair, soap, fats, etc.Maximum Capacity: 50 ft. of 1/4” or 5/16” cable, or 35 ft. of 3/8” cable.Cutter Application Chart (Table 2)CutterArrowHeadFlexible ArrowHeadBoringGimletDown HeadBoringGimlet1-1/4"SideCutterCatalog #AHFeedPressureKnobTypical ApplicationsIdeal for heavy cutting andscraping.FAHMore flexibility than ArrowHead; can take sharp turns insmall lines.BGTo remove or retrieve looseobjects.DHBGLeads cable down drain linerather than up vent or acrosstee.1-1/4SCBWorks well in grease stoppages, scrapes walls of pipe.ReverseFeed ControlLeverForward5.6.OPERATION7.SET-UPDISCONNECT MACHING FROM POWER SOURCEBEFORE ATTACHING CUTTER!1.2.3.4.5.NeutralSlide the connector over the spout until the spring pops intoplace.The cable may have an EL-Basin plug head on the end to helpthe cable around tight bends, or it may have a connector for attaching cutters to the end.To attach a cutter, first unplug the machine. Then, remove thescrew and lock washer from the connector at the end of the cable. Slide the cutter into the slot, then replace the lock washerand connecting screw. Tighten the screw firmly.The Boring Gimlet and Arrow Head are good cutters to start with.Change to the larger cutters after you've gotten the water flowing.Position the machine so that the guide hose can be placed within6 in. (15 cm) of the drain opening without excessive bending ofthe guide hose.Place the cable end and cutter into the drain opening.With a hand on the guide hose, start the machine by steppingslowly but firmly on the foot pedal. The harder you press on thepedal, the faster the motor will rotate and the faster the cable willfeed.Feed the cable slowly. Use both the foot pedal and power cablefeed to adjust feeding speed as resistance is met. Don’t feedfaster than the cable can go into the drain. Too much cable between the guide hose and drain will cause whipping and kinking.DO NOT ALLOW TOO MUCH SLACK IN THE CABLE BETWEEN MACHINE AND DRAIN OPENINGSINCE THIS CAN CAUSE CABLE WHIPPING.8.9.If the cable starts to bend or build up too much twist, take yourfoot off the pedal and rotate the drum in the opposite direction torelieve the twist on the cable. Push any excess cable back intothe drum and then continue.When the cable reaches the stoppage, put the feed in neutral.Then allow the cable to progress slowly, chewing into the stoppage as it goes. This slow forward movement will reduce stresson the cable while doing a more thorough cleaning job. A backand forth action usually works best.DO NOT USE TOO MUCH FORCE –LET THE CUTTER DO THE WORK.Note: Avoid sharp bends or kinking of the guide hose by repositioningthe machine. The Drain-Rooter PH is designed to be positioned either horizontally or vertically to facilitate this.5
Drain-Rooter PH 10. When the obstruction is cleared, retract the cable by moving thefeed lever into the reverse position. Keep the motor in the forward position.IF CABLE TANGLES IN DRUMDISCONNECT MACHINE FROM POWER SOURCEBEFORE INSTALLING CABLES !DO NOT USE REVERSE TO PULL THE CABLE OUT OFTHE DRAIN. RUNNING MACHINE IN REVERSE CANCAUSE THE CABLE TO TANGLE IN THE DRUM.This is caused by using too much pressure when feeding the cable orby feeding the cable while running in reverse.Hint: It's often helpful to have a small stream of water running in theline to wash the cuttings away while the machine is in operation andafter.1.SPECIAL OPERATION3.IF CABLE GETS CAUGHT IN LINE4.2.The motor can be reversed to free the cable if it gets caught in theline. Use the following procedure:1.Move the motor switch to the Reverse position.2.Tighten the chuck against the cable.3.Pull on the cable while the drum is turning in reverse.4.When the cable has been freed, move the motor switch to theFORWARD position.To untangle, rotate the drum in the opposite direction to relievethe twist.If the cable has become badly tangled, disassemble the drum byloosening the screws around the rim of the drum and pull thedrum front off the drum. (Note: Open drum units cannot be disassembled.)Pull the cable completely out of the drum shell. Then, reassemble the drum.Straighten the cable out and push it back in the drum. (See “ToInstall Cable into Drum” below.)TO INSTALL CABLE IN DRUMDISCONNECT MACHINE FROM POWER SOURCEBEFORE INSTALLING CABLES !1.2.3.TO CHANGE CABLE CARTRIDGESDISCONNECT MACHINE FROM POWER SOURCEBEFORE CHANGING CARTRIDGES !Loosen feed control knob so that the cable can pass througheasily.Push the back of the cable through the spout into the drum.It will be easier to load the cable if you put a slight bend in thecable about one inch from the end.Note: The cable should lay in thedrum in a clockwise direction.1.Remove the cutter and connecting screw from the cable if one isattached.2. Loosen the knob at the base of the front post and swing the frontpost and power cable feed forward.3. Loosen the three screws around the outside of the drum that holdthe front and back of the drum together.4. Pull the drum front off the machine, revealing the cable cartridgewithin.5. Pull the cable out of the feed and guide tube and slide it into thecable cartridge by hand.6. Remove the cable cartridge.7. Press replacement cartridge firmly into the back of the drum.Make sure to line up the grooves in the cartridge with the slots inthe drum back.8. Slide the cable through the drum front, power cable feed, andguide tube.9. Position the drum front so that the three screws align with theslots in the drum back. Press the drum front into the drum backand tighten the screws firmly, making sure the screws are centered in the slots and the heads are flush with the drum.10. Swing the front post and feed back into position and tightenknob.6
Drain-Rooter PH MAINTENANCEDAMAGED ROLLERExcessive use may wear a roller to the point of failure. It is recommended that all three rollers be replaced at the same time (Cat # POMR-703). The replacement roller is an assembly consisting of oneFeed Roller, two Feed Roller Bearings, and two Bearing Spacers.DISCONNECT MACHINE FROM POWER SOURCEBEFORE PERFORMING MAINTENANCE!To keep your machine operating smoothly, it is essential that all bearings and distributor tube bushings be lubricated. Oiling moving parts isparticularly important where machine comes in contact with sand, gritand other abrasive material.Note: The Bearing Spacers must be installed between the Carrierand each Feed Roller Bearing (as illustrated below) in order toensure proper operation and to obtain maximum Feed Roller life.To Replace the Feed Roller Assembly:1. Remove the Feed Roller Assembly by unscrewing and removingthe Feed Roller Axle.2. For convenience, the components are assembled and wired together at the factory. Before attempting to install the assembly,hold the assembly together and remove the wire.3. While still holding the Feed Roller Assembly together, insert it intothe slot opening of the Carrier.4. In order to help align the Spacers and Bearings, insert a pencilpoint or similar object through the un-threaded end of the Axlehole in the Carrier. After removing the pencil point, continue tomaintain the alignment of the components.5. The Feed Roller Axle should then be inserted through the same un-threaded Axle hole and should continue to be guided through theSpacers and Bearings to the threaded Axle hole on the other sideof the Carrier.6. Securely tighten the Axle to the Carrier with a 3/16” allen wrench.CABLE MAINTENENCETo get maximum service from your cables,be sure that they are clean and well oiled.This not only provides running lubricationbut greatly extends the life of the cables aswell. Some users periodically pour oil directly into the drum. Then, as the drumturns, the cables get complete lubrication.Our SNAKE OIL is ideally suited for thispurpose, since it not only lubricates thecables, it deodorizes them as well.POWER FEED MAINTENANCEKeep feed free of excessive soil and grit. It is recommended that thefeed be flushed with fresh water followed by a light oiling of the moving parts. No disassembly is normally required. Failure to feed canusually be traced to the following possibilities:DIRT ACCUMULATIONOver time, dirt can harden enough to stop roller rotation. Flushing withwater followed by liberal oiling can usually restore function. If disassembly is required, proceed as follows:1. Remove the feed pressure knob, springs and spring plunger. Notethe positioning of these parts to ease re-assembly. The top rollercan now be removed.2. Remove the snap rings and thrust washers from the bottom housing cylinders. The bottom rollers can now be removed.3. Re-assembly is done in reverse order.TANGLED CABLEIf a cable loops over itself in the drum/cage, it will not feed properly.Remove and reload the cable to restore function. If the cable kinks, itis evidence of abuse and results from the use of too much pressure oruse of the wrong size cable for the line. Do not force the cable — letthe cutter do the work.7
Drain-Rooter PH TROUBLE SHOOTING GUIDE (TABLE 3)ProblemProbable CauseSolutionCable kinks or breaks.Operator forcing the cable.Do not force the cable. Let the cutter do the work.Too much slack between machine and drain. Do not allow more than six inches between guide hose and drain.Cable tangles in drum.Cable used in wrong size drain line.A cable that is too large or too small in diameter for a line is morelikely to kink (See Table 1—Cable Application Chart).Cable exposed to acid.Clean and oil cables regularly.Operator forcing the cable.Do not force the cable. Let the cutter do the work.Machine run in reverse.Do not run machine in reverse to retract cable from drain. Use reverse only if cable is caught in line.Drum stops while foot pedal Hole in pedal or hose.depressed.Hole in diaphragm switch.Replace as required.Failure to feed.Frozen or worn rollers.Clean debris from around rollers. If rollers do not turn, cable will notfeed. Badly worn rollers must be replaced.Cable tangled in drum.Make sure to use proper size cable for the job (see Table 1 – CableApplication Chart).Feed misadjusted.If feed tension knob is too loose, the cable will slip. If it is too tight,the feed rollers will wear prematurely.Worn cable.When cable coils wear flat, cable should be replaced.Motor does not run.Trigger in neutral (off) position.Switch Trigger to either Forward or Reverse.Motor turns in one directionbut not other.Reverse switch failure.Replace reverse switch.If no hole found in pedal or hose, replace diaphragm switch.See pages 26 & 27 for Parts List and Schematic Diagram.8
Drain-Rooter PH Mode d’emploiPour canalisations de 1-1/4 à 3 pouces(30mm—75mm)Votre déboucheur Drain-Rooter PH est conçupour vous procurer de nombreuses annéesde service fiable et rentable. Toutefois aucunemachine ne peut donner son plein rendementsi l'opérateur ne la connaît pas à fond.Lisez, comprenez et respectez toutes les consignes de sécurité et instructions fourniesavec ce produit. Le fait de ne pas suivre cesconsignes et instructions risquerait de provoquer une électrocution et/ou des blessuresgraves. Conservez ces documents pour futureréférence.CONSERVEZ CES INSTRUCTIONS !
Drain-Rooter PH CONSIGNES DE SÉCURITÉ GÉNÉRALESL'appareil doit être branchédans une prise correctementmise à la terre. Si le fil de miseà la terre est électrifié, vouspouvez être électrocuté par unsimple contact avec l'appareilet ce, même si l’interrupteurest à Arrêt (Off). Dans ce cas, ledisjoncteur de fuite à la terre nepeut pas vous protéger. Utilisezun testeur muni d'un label ULpour vérifier que la prise est sûre.Afin de minimiser les risques deblessures, l'utilisateur doit lire lemode d'emploi. Manquer de respecter les consignes d'utilisationpeut entrainer des blessures graves ou la mort.ATTENTION Lisez toutes les consignes etavertissements de sécurité. Manquer de suivre les avertissements et consignes peut entraîner des risques de chocs électriques, d'incendie et/ou des blessures graves. Conserveztous les avertissements et consignes d'utilisation pour référence. Des manuels de rechange peuvent être obtenus gratuitement surdemande, ou téléchargées à partir de notresite Internet, www.drainbrain.com. Des filmsd'instruction peuvent également être téléchargés de notre site Internet ou nous être commandés. En cas de question ou de problème,veuillez contacter le service clientèle de General au 412-771-6300.N'utilisez jamais des outils motorisés dans une atmosphèreexplosive générée par des liquides inflammables, des gazou de la poussière. Les outilsélectriques provoquent des étincelles qui risquent d’enflammer lapoussière ou les vapeurs.Conservez tous les avertissements etconsignes d'utilisation pour référence!Ne portez que des gants encuir. N’utilisez aucun autre type de gants, en tissu, caoutchouc ou enduit. Ne saisissezjamais un câble en mouvementavec des gants en tissu ou unchiffon; ces matériaux peuvents’enrouler autour du câble et causer des blessures graves.Ces instructions ont pour objet de familiariser tous les employés avec l’utilisation etl’entretien sans danger du Drain-Rooter PH.Ce symbole de sécurité vous avertit del’existence d'un danger pour votre sécurité personnelle. Respectez toutes lesconsignes de sécurité suivant ce symbole afin d’éviter des blessures graves oumortelles.Portez toujours des lunettes desécurité et des chaussures àsemelles de caoutchouc antidérapantes. L'emploi de ceséquipements de sécurité peutempêcher des blessures graves.DANGER signale un danger de haut risque qui, s’il n’estpas évité, entraînera des blessures graves ou mortelles.AVERTISSEMENT signale un danger de risque moyen qui,s’il n’est pas évité, peut entraîner des blessures graves oumortellesNe forcez jamais les câblesexagérément. Une tension excessive peut causer la torsion, levrillage ou la rupture du câble etpourrait provoquer des blessuresgraves.MISE EN GARDE signale un danger de faible risque qui,s’il n’est pas évité, peut entraîner des blessures de faibleou moyenne gravité.10
Drain-Rooter PH AVERTISSEMENTS GÉNÉRAUX DE SÉCURITÉCONCERNANT LES OUTILS ÉLECTRIQUESpolarisée. Ne changez la fiche pour aucune raison. La doubleisolation élimine le besoin d’une fiche à trois broches et d’un câblage électrique mis à la terre.AVERTISSEMENT !SÉCURITÉ PERSONNELLELisez toutes les consignes et avertissements de sécurité. Le faitde ne pas suivre toutes les instructions risque de provoquer une électrocution, un incendie et/ou des blessures graves.1. Ne vous laissez pas distraire, prêtez attention à ce que vousfaites et usez de bon sens lorsque vous utilisez un outil électrique. N'utilisez pas cet outil si vous êtes fatigué ou sousl’influence d'une drogue, de l'alcool ou de médicaments. Desblessures graves peuvent résulter d'un moment d'inattention.2. Utilisez des équipements de protection personnels. Porteztoujours une protection pour les yeux. Les équipements deprotection tels que masques de poussière, chaussures de sécuritéantidérapantes, casque ou protections de l'ouïe, utilisés dans lesconditions appropriées, auront pour effet de diminuer les risquesde blessures corporelles.3. Évitez les démarrages accidentels. Assurez-vous que l'interrupteur est en position arrêt avant de brancher l'outil à unesource d'alimentation et/ou à la pile, ou avant de soulever oude porter l'outil. La probabilité d'un accident augmente lorsquevous portez des outils électriques avec le doigt sur l'interrupteurou si l'interrupteur des outils électriques est en position de marcheau moment de les brancher.4. Retirez toute clé de réglage avant de mettre l'outil électriqueen marche. Une clé qui reste attachée à une partie tournante del'outil électrique peut entraîner des blessures corporelles.5. N'étendez pas trop les bras. Conservez votre équilibre en touttemps ainsi qu'un appui solide. Un bon appui ainsi qu'un bonéquilibre permettent de conserver un meilleur contrôle de l'outil encas d’imprévu.6. Habillez-vous correctement. Ne portez pas de bijoux ou devêtements risquant de se prendre dans l’appareil. Éloignezles cheveux, vêtements et gants des pièces en mouvement.Les vêtements lâches, les bijoux ou les cheveux longs peuventfacilement se prendre dans des pièces en mouvement.7. S'il est possible de raccorder des dispositifs de dépoussiérage, assurez-vous que ceux-ci sont bien raccordés et correctement utilisés. L'utilisation de dispositifs pour le dépoussiéragepeut diminuer les risques liés à la poussière.Conservez tous les avertissements et consignes d'utilisationpour référence !Le terme « outil électrique » dans les avertissements se réfère à votreoutil électrique fonctionnant sur secteur (à fil) ou sur pile (sans fil).SÉCURITÉ DE L'ESPACE DE TRAVAIL1. Conservez l’espace de travail propre et bien éclairé. Des établis encombrés et des zones mal éclairées sont causes d'accident.2. N'utilisez jamais des outils motorisés dans une atmosphèreexplosive générée par des liquides inflammables, des gaz oude la poussière. Ces outils produisent des étincelles qui peuventallumer les vapeurs inflammables ou les poussières.3. Ne laissez pas les curieux, les enfants et les visiteurs s'approcher quand vous faites fonctionner un outil motorisé. Desdistractions pourraient vous faire perdre le contrôle.ÉLECTRICITÉ ET SÉCURITÉ1. Les fiches des outils électriques doivent correspondre auxprises. Ne modifiez jamais la fiche de quelque manière que cesoit. N'utilisez jamais de fiche d'adaptation avec des outilsélectriques mis à la masse. Les fiches non modifiées et leursprises correspondantes réduiront les risques de chocs électriques.2. Évitez tout contact du corps avec d
Drain-Rooter PH Operating Instructions For 1-1/4" through 3" lines (30mm—75mm) Your Drain-Rooter PH is designed to give you years of trouble-free, profitable service. However, no machine is better than its operator. Read, understand and follow all safety warnings and instructions provided with the product.