Transcription
Introduction toPhotoshopCS6Copyright 2016, Faculty and Staff Training, West Chester University.A member of the Pennsylvania State System of Higher Education. No portion of thisdocument may be reproduced without the written permission of the authors.For assistance, contact the IT Help Desk, x3350
Table of ContentsIntroduction . 2Your Workspace . 3Opening an Image . 4Image Size . 5Color Mode . 6Working with Layers . 7Adding In More Images . 9Cropping . 10Creating Areas of Solid Colors. 11Adding Text . 12Saving your Photoshop Image . 131
IntroductionAdobe Photoshop is a graphics editing program, or image editing software, that allows you to createand manipulate visual images on the computer. Editing features in the program help in creating andmanaging visual images for Internet, print, and other new media disciplines. To begin creating aPhotoshop project, start Photoshop CS6 and follow along with the steps below.2
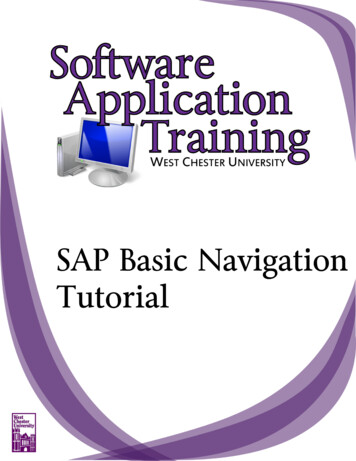
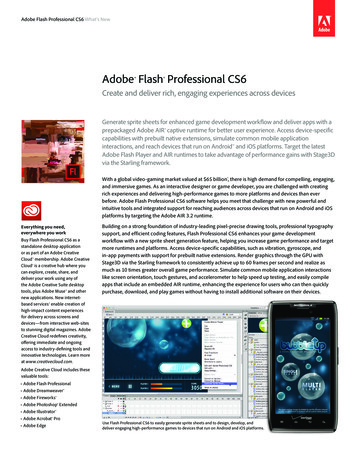
Your WorkspaceMenu BarOptions BarPanelsTool BarPhotoshop lays out the most important tools that you will need right on the main workspace. Thisallows you to easily find the tools that you need without digging through menus. Furthermore,Photoshop allows users to use simple keyboard shortcuts in order to get to these tools faster. Tool Bar – Provides access to a variety of tools with multiple image-editing functions.o These tools typically fall under the categories of drawing; painting; measuring andnavigation; selection; typing; and retouching.o Some tools contain a small triangle in the bottom right corner of the tool icon; thesetools can be expanded to reveal similar tools.Options Bar – Works in coordination with your tool bar to provide additional settings forthe tool you’re currently using.o The options bar changes according to whichever tool you are using.Menu Bar – Contains menus for performing common taskso Consists of eleven menu options: File; Edit; Image; Layer; Type; Select; Filter; 3D;View; Window; Helpo Menu items containing an ellipsis indicate that a dialogue box will follow thatoption.o Menu items with an arrow indicate a submenu for that particular option.Panels/Palettes - Helps you monitor and modify your worko Provides groups of functionality specific to certain tools or tasks.o You can create a custom workspace by moving and manipulating panels.3
Opening an ImageBefore you can start manipulating a visual image, you will need to either open an existing documentor create a new one. Select Open from the File menu in the top menu bar. (Ctrl O) Navigate to image location on your computer. Select the file and click Open.When you open an existing file, Photoshop will put that file into a new document panel on yourscreen.4
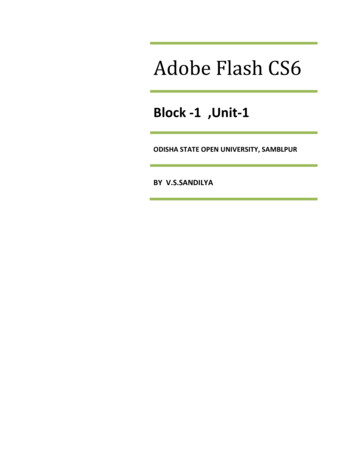
Image SizeWhen working on an image in Photoshop you must first properly size the image, depending on themedia discipline you are using. This is specifically important due to images varying for Web andPrint use. Larger images on a website will actually slow the site down, making it difficult for yourviewer to see the content. Larger images are used for print in order to ensure that detail of yourvisual image is present. To resize an image, select Image Size. from Image in the top menu. (Ctrl Alt I)*Set your Resolution according to your media discipline*o For Web set this to 72o For Print set this to 300It is important that you understand your media size when setting your height and width.For web, you always want to ensure that your image will be viewable on any or mostscreens.Adjusts the widthAdjusts the heightScales layers in document tothe selected size in addition tooverall documentKeeps your original dimensionsproportionateInvents new pixels based onresolution5
Color ModeIt is very important to establish your color modes based on the media discipline you are using. Each mediaoutput (computer screen, printer, etc.) interprets colors differently, so it is important to be able to set yourcolor mode for the output to understand it.To change the color mode go to Image in the top menu and select Mode. RGBoo RGB stands for “Red, Green, Blue” These are the three colors on electronic devices (computers, phones, tv, etc.)and therefore used for anything displayed on the screenAdditive color mode Red, Green, and Blue add up to make WhiteCMYKo CMYK stands for “Cyan, Magenta, Yellow, Key” Key is black These are the four inks in a standard printer and therefore used for anyprint materials (photographs, papers, posters, etc.)o Subtractive color mode Cyan, Magenta, and Yellow add up to make Black (but not the true “Key”black)6
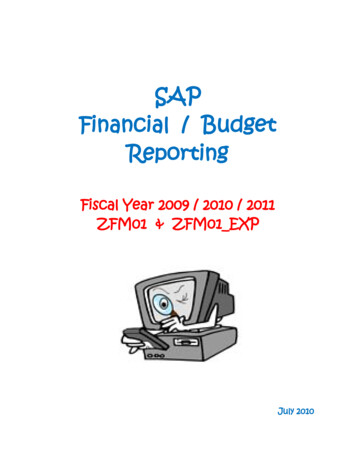
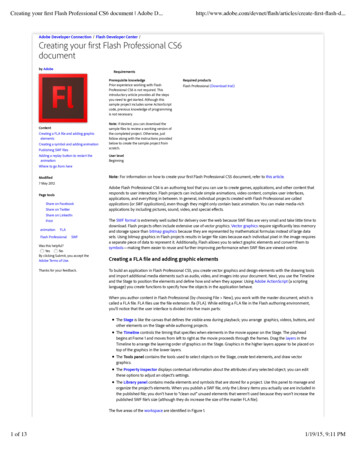
Working with LayersA Photoshop layer is like a sheet of transparent film, similar to ones used for an overhead projector.When you stack films (layers) together, you will be able to see through the transparent parts andnot be able to see through the parts with content. You can move, rotate, and manipulate a singlelayer without affecting any others. You can also change the opacity, or transparency, of one layer tomake content partially visible.A. Layer MenuB. Filter OptionC. Blending ModeD. Master OpacityE. Locking ControlsF. Fill OpacityG. Active LayerH. GroupI. Layer ThumbnailJ. Layer NameK. Show/Hide LayerL. Locked LayerM. Background LayerN. Link LayersO. Layer StylesP. Add Layer MaskQ. New Adjustment LayerR. New GroupS. New LayerT. Delete Layer7
Layer Menu gives you additional commands and optionsFilter Option helps you find key layers in complex documents quicklyBlending Mode controls how layers react with one anotherMaster Opacity controls the opacity of a layerLocking Controls allows you to lock various parts of a layer to prevent editingFill Opacity controls just the fill opacity of a layer (not the stroke)When you are working on a particular layer, it will become an Active LayerA folder icon will appear on layers that are in a GroupLayer Thumbnail shows you a smaller view of just that layerLayer Name can be changed to help organize and maintain your layersShow/Hide Layer makes a layer visible or invisibleA lock icon will appear on any Locked LayerBackground Layer is the bottommost layer in your panelLink Layers links multiple layers so you can move the content in them togetherLayer Styles adds effects (drop shadow, bevel and emboss, etc.) to your layersAdd Layer Mask allows control of particular pixels that you select within a layerNew Adjustment Layer provides image adjustments to all visible layers under themNew Group groups layers together to help you organize and manage themAdd a New Layer, name your layer, and click “Ok”If you no longer want a layer, then you can Delete it8
Adding In More ImagesPhotoshop projects can have multiple images by separating them into different layers. To addanother image into your project: Go to File at the top menu and select Place Next select the image you would like to add, and click PlaceWhen you Place a new image into your document, it will automatically go into Transformmodeo Transform mode is used to size content within a layero You can also move your content to any desired location by left clicking on it anddraggingo When you are satisfied with the size and placement of your content press Enter onyour keyboard9
CroppingThe Crop Tool can be used to select a particular area of an image and discard everything outsidethis area. Although cropping an image makes your image smaller, it is not the same as Image Size.While Image Size allows you to control the size of a document, the Crop Tool sets the focus area ofyour document. To crop an image select the Crop Tool located in your Tool Bar on theleft ( C )To crop an image, click on the dark arrows in the corners or the darklines on the sides, top, and bottom and drag to wherever you’d likeClick Enter on the keyboard when ready to crop10
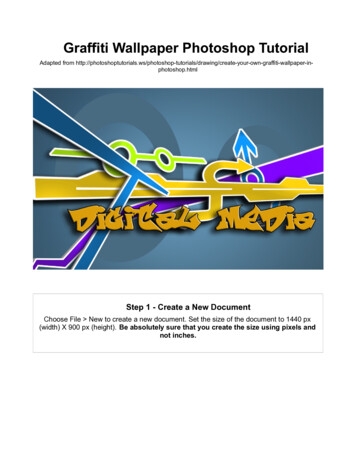
Creating Areas of Solid ColorsBy using the Shape Tool, located in your Tool Bar, we will be able to create a solid color on a layer.This layer will be used as background color for text we will add later. Click the Shape Tool in your Tool Bar and select the Rectangle Shape Tool Go to your Options Bar and click on the fill optionClick on the Color Picker button (the multicolorbutton) In the Color Picker window type 680269 to the“#” field and click “OK”o This number, called a Hex Code, is acombination of letters and numbersthat describes a colorUsing your mouse Click and Drag where you would the new solid color to be11
Adding TextYou can add text to your Photoshop project by using the Type Tool located in the Tool Bar. Everytime you add text to your document it will automatically be created in a new layer, located in yourLayers Panel on the right. Select the Type Tool located in the Tool BarUse your mouse and left click on your document where you want yourtext to beBy using the Options Bar located at the top of the screen, you canadjust your text to any style you would like.Font Color Used #FFBD0712
Saving your Photoshop ImageAfter you are finished with your document, Photoshop gives you the opportunity to save yourproject. You can save your project in various formats, depending on your media discipline. Photoshop also gives you the option of saving as a Photoshop File (.PSD) so that you cango back and edit your project whenever you’d like.o When you reopen a Photoshop File, all of your work will still be available, allowingyou to continue to work.o To save as .PSD go to File in the top menu and select SaveWhen saving your project for print, it is recommended to use an Image File Format (.jpg,.png, .gif, etc.), as a Photoshop File, or a PDF.o Go to File in the top menu and select Saveo Select the appropriate file format is the Format drop-down menuWhen saving your Photoshop project to be used on the Web, it is recommended to use .JPGor .PNGo Go to File in the top menu and select Save for the Web o Under Preset is the drop-down menu for file format Click on the drop-down menu and select JPEG or PNG-24 then click Save 13
o This number, called a Hex Code, is a that describes a color Using your mouse Click and Drag where you would the new solid color to be . 12 Adding Text You can add text to your Photoshop project by using the Type Tool located in the Tool Bar. Every time you add text to your document it will automatically be created in a new layer, located in your Layers Panel on the right. Select the Type .