Transcription
Safe Operating Procedure(Revised 2/20)BIOLOGICAL DECONTAMINATION OFLABORATORY EQUIPMENTScopeThis SOP describes decontamination of laboratory equipment that has been used withbiological agents, including recombinant/synthetic nucleic acids. Surface decontaminationmethods described in this document are appropriate and required for laboratory equipmentused with or exposed to biological materials prior to the equipment’s relocation,decommissioning/disposal, or transport for authorized repair.Any equipment authorized for use with radioactive material (RAM) MUST bedecontaminated/decommissioned by EHS Radiation Safety staff prior to relocation, repair, ordisposal. This shall occur prior to final biological decontamination. Please contact the EHSAssistant Radiation Safety Officer for additional guidance.ReferencesThe content of this SOP is based on the following: Biosafety in Microbiological and Biomedical Laboratories (BMBL), 5th ed. U.S. Dept. ofHealth and Human Services (CDC and NIH), 2009. NIH Guidelines for Research Involving Recombinant or Synthetic Nucleic AcidMolecules, U.S. Dept. of Health and Human Services (NIH), April 2019.Supplemental EHS SOPsThe following EHS SOPs provide additional guidance relative to certain aspects of this SOP: Chemical Disinfectants for Biohazardous MaterialsBiosafety CabinetsAutoclave Operation and UsePersonal Protective Equipment for Chemical ExposuresMeans of DecontaminationUse of UV light as a sole means of equipment decontamination is NOT sufficient oracceptable. Decontamination must be achieved with an appropriate EPA registered chemicaldisinfectant known to be effective against the agent(s) in use. When using chlorine-based(Created 4/15; Revised 5/15, 12/18)UNL Environmental Health and Safety · 402.472.4925 · http://ehs.unl.edu1
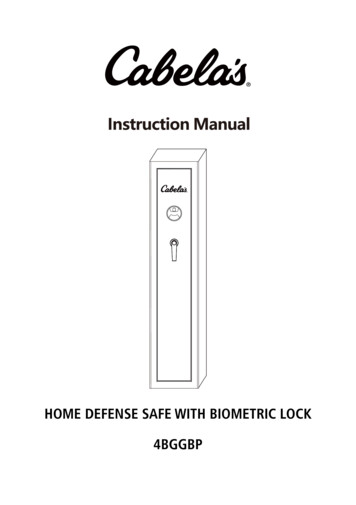
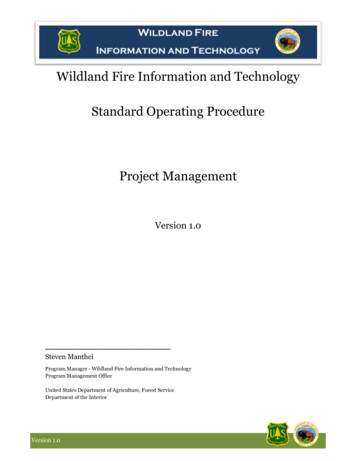
BIOLOGICAL DECONTAMINATION OF LABORATORY EQUIPMENTdisinfectants on stainless steel surfaces, follow disinfectant treatment with a wipe down withwater to remove chlorine residues, followed by either a 70% ethanol or 70% isopropanolsolution.In addition to standard laboratory attire, proper PPE to be used when decontaminatinglaboratory equipment are: chemical resistant gloves, eye protection, and lab coat. It is alwaysadvisable to be familiar with hazards associated with chemical disinfectants, which may befound on the product label and Safety Data Sheet.Specific Laboratory Equipment DecontaminationA) Biosafety Cabinet (BSC):Following chemical surface disinfection, biological safety cabinets used with humanpathogens, including zoonotics, must undergo gaseous disinfection prior to relocation,decommissioning/disposal, or repair. Gaseous decontamination is also required for cabinets inwhich other human derived materials (i.e., human tissue, cell lines) have been manipulated.Gaseous decontamination must be performed by an authorized BSC technician or BSM staff,and shall not be attempted by laboratory workers. If gaseous decontamination is indicatedbased on use of the biosafety cabinet, contact BSM to schedule decontamination.Surface decontamination alone is sufficient for BSCs that have been used withbiological agents that are not human pathogens.Recommended chemical decontamination procedure1. With the cabinet blower on, surface decontaminate and remove all materials,reagents, and waste containers from the cabinet and either store or discard properly.2. Clean up any spills which may have resulted from removal of materials from theBSC and discard properly.3. Make sure the plenum drain valve (located underneath the front of the cabinet) isclosed, and spray disinfectant into the front grill of the cabinet. Liberally applydisinfectant to the work surface, side walls, back wall, and inside of sash. DO NOTspray the ceiling of the cabinet workspace as the HEPA filter could be damaged bythe disinfectant. Allow disinfectant to remain on the surfaces for at least 10 minutesor as recommended on the disinfectant product label.4. Raise the workspace grill and work surface (it should lift up in some manner) andliberally apply the disinfectant to the underside and all surfaces beneath. You mayneed something or someone to hold the work surface up while you spraydisinfectant. Allow disinfectant to sit for at least 10 minutes, or as recommended onthe disinfectant product label.(Created 4/15; Revised 5/15, 12/18)UNL Environmental Health and Safety · 402.472.4925 · http://ehs.unl.edu2
BIOLOGICAL DECONTAMINATION OF LABORATORY EQUIPMENTWork SurfaceDrain PanFront Grill5. Following use of a chlorine-based disinfectant, wipe down all surfaces (includingunderneath the workspace and grill) with water, followed by 70% ethanol or 70%isopropanol (v/v, diluted in water) to remove any residue left by the disinfectant.This will help prevent subsequent corrosion of cabinet surfaces.6. After decontaminated surfaces have dried, replace the workplace grill, close thesash, and turn off the blower.7. For relocation, repair or decommissioning, also wipe down all external surfaces ofthe biosafety cabinet with an appropriate disinfectant, allowing sufficient contacttime.Important: If being sent for repair or being decommissioned/discarded,be sure to remove any biohazard stickers after decontamination.DO NOT use the BSC once it has been decontaminated for relocation,repair, or decommissioning. Place a sign on the equipment indicatingdate of decontamination. (See Appendix A for a sample sign)When the BSC is moved to the new laboratory, it must be recertified byan appropriately trained service technician prior to use.B) Incubator1. Remove all materials from the incubator and either store or discard appropriately.(Created 4/15; Revised 5/15, 12/18)UNL Environmental Health and Safety · 402.472.4925 · http://ehs.unl.edu3
BIOLOGICAL DECONTAMINATION OF LABORATORY EQUIPMENT2. Turn off incubator power supply and unplug from the source outlet.3. Clean up any spills which may have resulted from material removal and discardappropriately.4. Remove any modular shelving and liberally apply disinfectant to top, bottom, andsides of shelves. Allow disinfectant to remain on the surfaces for at least 10 minutesor as recommended on the disinfectant product label.5. You may also autoclave the shelves if compatible with exposure to autoclavetemperatures of 121 C.6. Liberally apply disinfectant to all surfaces inside the incubator, including the inside ofthe door and gaskets. Allow sufficient contact time for disinfectant (at least 10 minutesor as recommended on disinfectant label).7. Following use of a chlorine-based disinfectant, wipe down metal surfaces (includingshelving) with water, then 70% ethanol or 70% isopropanol (v/v, diluted in water) toremove any residue left by the disinfectant. This will help prevent subsequentcorrosion of surfaces.Important: If being sent for repair or being decommissioned/discarded,be sure to remove any biohazard stickers after decontamination.DO NOT use the incubator once it has been decontaminated forrelocation, repair, or decommissioning. Place a sign on the equipmentindicating date of decontamination. (See Appendix A for a sample sign)If necessary, tape the door shut to prevent opening during transport.C) Growth Chamber1. Remove all materials from the growth chamber and either store or discard properly.2. Turn off power supply and unplug from source outlet if possible.3. Clean up any spills or residual organic material with soap and water and discardproperly.a. Remove any modular shelving and liberally apply disinfectant to top, bottom, andsides of shelves. Allow disinfectant to remain on the surfaces for at least 10minutes or as recommended on disinfectant label. Alternatively, the shelves couldbe autoclaved at 121 C if they will tolerate heat treatment.4. Liberally apply disinfectant to all surfaces inside the chamber, including the inside ofthe door and gaskets.5. Following use of a chlorine-based disinfectant, wipe down all metal surfaces (includingshelving) with water, then 70% ethanol or 70% isopropanol (v/v, diluted in water) toremove any residue left by the disinfectant. This will help prevent subsequentcorrosion of surfaces.6. Replace the shelving inside the unit, and close the door.(Created 4/15; Revised 5/15, 12/18)UNL Environmental Health and Safety · 402.472.4925 · http://ehs.unl.edu4
BIOLOGICAL DECONTAMINATION OF LABORATORY EQUIPMENT7. If chamber light bulbs require replacement, dispose of used bulbs via EHS.Important: If being sent for repair or being decommissioned/discarded,be sure to remove any biohazard stickers after decontamination.DO NOT use the growth chamber once it has been decontaminated forrelocation, repair, or decommissioning. Place a sign on the equipmentindicating date of decontamination. (See Appendix A for a sample sign)D) Refrigerators/FreezersFor relocation of refrigerators/freezers, you have two decontamination options. If therefrigerator or freezer is being sent for repair, decommissioned/discarded, or sent to UNLinventory, you must use Option 2.Option 1: Relocate the equipment without removing samples and defrosting therefrigerator/freezer. Follow these steps if you choose this option:1. Clean and decontaminate all external surfaces with an appropriate disinfectant,allowing for sufficient contact time as recommended by the manufacturer of thedisinfectant.2. Once decontaminated, place signage on the equipment indicating that it is “out ofservice.” (See Appendix A for a sample sign)3. Seal the refrigerator/freezer using shrink wrap, tape, etc., so it cannot be opened.4. Just prior to relocating the equipment, power off (if necessary) and unplug theequipment from the outlet.5. Once relocated to its new location, remove any shrink wrap, and plug therefrigerator/freezer in to an outlet. Turn on the power and ensure operatingtemperature is achieved.6. Check for any damaged materials and clean as needed.Option 2: Remove samples from the refrigerator/freezer and defrost entirely prior torelocation. This option requires internal as well as external surface decontamination.Follow these steps if you choose this option:Plan for 2 days of freezer downtime during this process.1. Remove all materials from the refrigerator or freezer and either store or discardproperly.2. Turn off power supply and unplug from source outlet. Unplug the freezer in themorning. This allows you to monitor runoff throughout the day.(Created 4/15; Revised 5/15, 12/18)UNL Environmental Health and Safety · 402.472.4925 · http://ehs.unl.edu5
BIOLOGICAL DECONTAMINATION OF LABORATORY EQUIPMENT3.4.5.6.7.8.i. Never use sharp objects to chip at the ice. Freezer walls are easily puncturedby sharp objects, allowing coolant to escape and resulting in expensiverepairs or replacement costs.ii. Never allow liquid to run directly onto floors creating a slip hazard, or downany floor drain. If the unit is thawed outside, do not let runoff reach the stormsewer drain.Establish a wick and reservoir system to manage the melting ice:i. Place a piece of bench paper (paper side down, plastic side up) inside thefreezer, on the lower level and lead it into a large autoclave pan.ii. Surround the freezer and autoclave pan with paper towels or bench paper.iii. Manage contaminated ice and liquid by collecting it and add 1 part bleach to 9parts melted ice and liquids.iv. Allow 20 minutes of contact time before pouring the melted ice down thedrain.Clean up any spills or residual organic material with soap and water and discardproperly.Remove any modular shelving and liberally apply disinfectant to top, bottom, andsides of shelves. Allow disinfectant to remain on the surfaces for at least 10 minutesor as recommended on The disinfectant product label.Liberally apply disinfectant to all surfaces inside the refrigerator/freezer, including theinside of the door and gaskets.Following use of a chlorine-based disinfectant, wipe down all metal surfaces(including shelving) with water, then 70% ethanol or 70% isopropanol (v/v, diluted inwater) to remove any residue left by the disinfectant. This will help preventsubsequent corrosion of surfaces.Replace the shelving inside the unit, and close the door.Important: If being sent for repair or being decommissioned/discarded,be sure to remove any biohazard stickers after decontamination.DO NOT use the refrigerator/freezer once it has been decontaminatedfor relocation, repair, or decommissioning. Place a sign on theequipment indicating date of decontamination. (See Appendix A for asample sign)E)Portable/tabletop autoclavesThese units are often self-contained, providing steam from a water reservoir within the unit.Prior to transport, verify the water reservoir is completely empty and any residual water orspilled material is removed from the chamber.(Created 4/15; Revised 5/15, 12/18)UNL Environmental Health and Safety · 402.472.4925 · http://ehs.unl.edu6
BIOLOGICAL DECONTAMINATION OF LABORATORY EQUIPMENTImportant: If being sent for repair or being decommissioned/discarded,be sure to remove any biohazard stickers after decontamination.DO NOT use the autoclave once it has been decontaminated forrelocation, repair, or decommissioning. Place a sign on the equipmentindicating date of decontamination. (See Appendix A for a sample sign)F)Bioreactors/FermentersThis specialized equipment is designed for complete disassembly after use and is oftensterilized by autoclaving. Please consult the equipment user’s manual for disassembly anddecontamination instructions.Important: If being sent for repair or being decommissioned/discarded,be sure to remove any biohazard stickers after decontamination.DO NOT use the bioreactor/fermenter once it has been decontaminatedfor relocation, repair, or decommissioning. Place a sign on theequipment indicating date of decontamination. (See Appendix A for asample sign)G) Centrifuges1. Turn off power supply and unplug from source outlet.2. Clean up any spills or residual organic material with soap and water and discardproperly. Using tongs or forceps, place broken glass in a biohazard sharps container.3. Remove any rotors and baskets/buckets and liberally apply disinfectant on all surfacesof the rotor and baskets/buckets. Allow disinfectant to remain on the surfaces for thetime recommended by the manfacturer. If rotor is not removable, apply disinfectant inplace and be sure to wipe the underside of the rotor if possible.Note: Some centrifuge rotors and buckets can be autoclaved. Consult the equipmentuser’s manual for additional guidance.4. Liberally apply disinfectant to all surfaces inside the centrifuge, including the inside ofthe lid and gaskets.5. Wipe down the exterior of the centrifuge with disinfectant.6. Following use of a chlorine-based disinfectant, wipe down all metal surfaces (includingrotors) with water, then 70% ethanol or 70% isopropanol (v/v, diluted in water) toremove any residue left by the disinfectant. This will help prevent subsequentcorrosion of surfaces.7. If the centrifuge is equipped with a vacuum pump and HEPA filter, contact EHS forassistance in determining if decontamination of the tubing and pump is necessary.(Created 4/15; Revised 5/15, 12/18)UNL Environmental Health and Safety · 402.472.4925 · http://ehs.unl.edu7
BIOLOGICAL DECONTAMINATION OF LABORATORY EQUIPMENT8. Replace the rotor in the centrifuge, and close the lid. If the unit is being discarded orsent for repair, do not put the rotor back into the centrifuge.Important: If being sent for repair or being decommissioned/discarded,be sure to remove any biohazard stickers after decontamination.DO NOT use the centrifuge once it has been decontaminated forrelocation, repair, or decommissioning. Place a sign on the equipmentindicating date of decontamination. (See Appendix A for a sample sign)H) Miscellaneous equipment (shaker/rocker platforms, vortex mixers,etc.)Consult the equipment user’s manual for proper disassembly. Exposed surfaces can bedecontaminated as listed:1. Unplug the unit from the power supply.2. Liberally apply appropriate disinfectant to surfaces and allow sufficient contact time asrecommended by the manufacturer.3. Following use of a chlorine-based disinfectant, wipe down all metal surfaces withwater, then 70% ethanol or isopropanol to remove any residue.Important: If being sent for repair or being decommissioned/discarded,be sure to remove any biohazard stickers after decontamination.DO NOT use the equipment once it has been decontaminated forrelocation, repair, or decommissioning. Place a sign on the equipmentindicating date of decontamination. (See Appendix A for a samplesign)(Created 4/15; Revised 5/15, 12/18)UNL Environmental Health and Safety · 402.472.4925 · http://ehs.unl.edu8
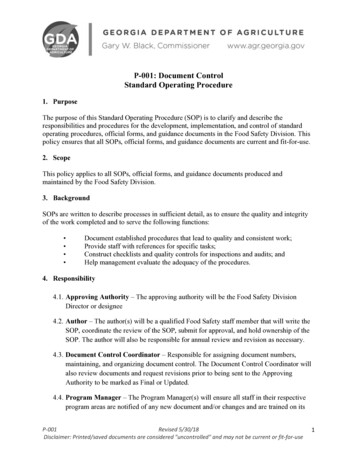
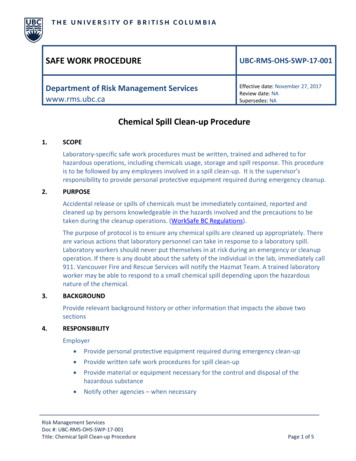
BIOLOGICAL DECONTAMINATION OF LABORATORY EQUIPMENTAppendix ASignage for Equipment DecontaminationOut of ServiceThe equipment listed below has been decontaminated andshould not be used until further notice.EquipmentDescription:(Include serial or IDnumbers if known)Location(Bldg., Room #)It is scheduled to dedBiological Agents Usedin/with or Stored inEquipment:Disinfectant Used:Date ofDecontamination:DecontaminationCompleted By:Contact Phone #Principal Investigator:SignatureDate:(Created 4/15; Revised 5/15, 12/18)UNL Environmental Health and Safety · 402.472.4925 · http://ehs.unl.edu9
Recommended chemical decontamination procedure . 1. With the cabinet blower on, surface decontaminate and remove all materials, reagents, and waste containers from the cabinet and either store or discard properly. 2. Clean up any spills which may have resulted from removal of materials from the BSC and discard properly. 3.