Transcription
#HOME DEFENSE SAFE WITH BIOMETRIC LOCK4BGGBP
IMPORTANT NOTICES1 Do not leave safe unattended while open.2 Keep Children Away from safe.3 Keep your safe locked and closed at all times when not in use, to avoid children being accidentlylocked in safe.4 Place your safe in a cool and dry location.5 Remember to record the serial number of your safe from the tag on the back of your safe. You willneed this serial number for all warranty or customer service inquiries.6 Electronic media, photographic media and all audio-visual media should not be stored in the safe forre protection. These materials will not survive the rated internal temperature of the safe and may bedamaged or destroyed.WARNINGSafe must be secured as detailed in these instructions. A child or Adult can tip the safeand can be killed or seriously injured. Failure to secure the safe can result in death orserious injury.1
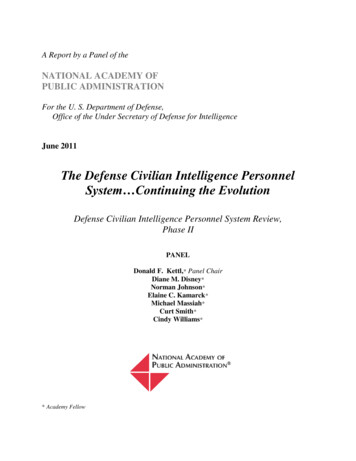
BATTERY INSTALLATION AND REPLACEMENTYou must rst install the batteries which are located in the front protective styrofoam.Batteries included: 4 AAA batteriesTo replace the batteries,remove the cover by pressing the taband turning as shown in the illustration (counter clockwise).Install new battery and align cover and install cover(clockwise).B-LOCKTABNOTE: Press the scanner with a recorded fingerprint. If the green and red indicator lightsflash together, it indicates low battery. Please replace with 4 new AAA alkaline batteries.OPENINGOPENINGTHETHESAFESAFEPlace any finger on the scanner and turn the handle clockwise.RECORDING YOUR FINGERPRINTSNOTE: When you first receive your safe there are no recordedfingerprints. Any fingerprint will open the safe until a fingerprint isrecorded. You can record up to 20 different fingerprints for openingthe safe. If you enter more than 20 fingerprints, the red light willflash 5 times with 5 beeps, which indicates you cannot record anew fingerprint.1. Press the red reset button located inside the safe under scannerlight off, then release it, the scanner will turn white with 2 beepsand the green light flashes twice. You will need to record yourfinger 3 separate times for it to record.2. Place your finger on the scanner until there is 1 beep and thegreen light flashes once. Lift your finger off the scanner.2
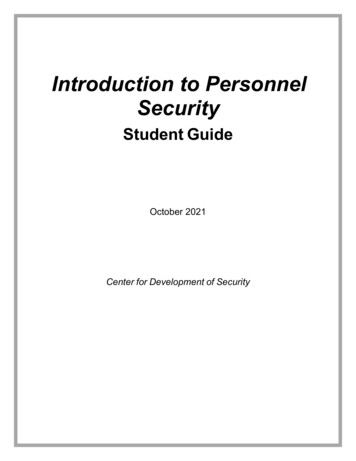
3. Place the same finger on the scanner for a second time, holding the finger in thesame position until there is 1 beep and the green light flashes once. Lift yourfinger off the scanner.4. Place the same finger on the scanner for a third time, holding the finger in the sameposition until there is 2 beeps and the green light flashes twice. Lift your finger offthe scanner. Your fingerprint is now recorded.5. If the red light flashes 3 times with 3 beeps, your fingerprint did not get recorded andyou will have to start over.BACK UP KEYRemove the cover by pressing the tab and turning the coverunder battery installation. Insert the key in the key hole andturn key ¼ turn (until stopped) to unlock the safe. Rotate thehandle and open the door.UNLOCKING THE SAFE1. Place a recorded finger on the scanner. The green light flashes once with 1 beep.The white light will come on and the scan will begin.2. If the green light flashes twice with 2 beeps, the scan has been accepted and youwill have 5 seconds to turn the handle to open the door.3. If the red light flashes once, the scanner did not read your fingerprint and you musttry again. If the red light flashes 3 times, the scanner read your fingerprint and didnot accept it.NOTE: If 3 invalid fingerprint attempts are made in succession, the red light will flash 5times with 5 beeps. And you will have an automatic lockout for 60 seconds before youcan try a scan again.If 1 more invalid fingerprint attempt is made, the red light will flash 5 times with 5beeps. And you will have an automatic lockout for 5 minutes before you can try a scanagain.There will be 1 beep with the green light flashing once. This means the lockout periodis over.3
LOCKING THE SAFETo lock the safe, close the door and turn the handle to the lock position.NOTE: Because the locking mechanism is deactivated for approximately 3 to 6 secondsafter the fingerprint is entered, wait a minimum of 6 seconds from the time yourfingerprint has been accepted to lock the safe.WARNING: Do not leave safe unattended while open, and keep children away from safe.CLEARING THE MEMORYPress the reset button and hold for about 5 seconds until the green light flashes 10times with 10 beeps. It means the memory of all recorded fingerprints has been cleared.TURNING THE SOUND OFF/ONYour safe comes with the beep sound turned on.To turn the sound off, press the scanner with a recorded fingerprint for 10 seconds untilthe green light flashes twice.To turn the sound on, press the scanner with a recorded fingerprint until you hear 2beeps and the green light flashes twice.4
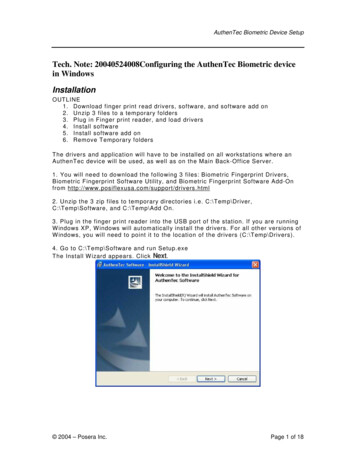
SECURINGSECURINGTHETHE SAFESAFEThis safe must be mounted to the oor. Failure to do so will compromise the safety, securityand warranty of the safe. Place your safe in a cool and dry SREQUIREDREQUIRED’’As all installation may vary, please contact your local Hardware Professional foradditional installation recommendations.5
WARRANTYWe are proud to stand behind our productswith a Limited Lifetime Warranty.LIMITED LIFETIME WARRANTYHeritage Security Products warrants that each new safe will be free from defects inmaterial and workmanship. Heritage Security Products will repair or replace at no cost(where applicable) in which the water level does not exceed 24 inches for a period of72 hours, break-in or break-in attempt during the lifetime of the original purchase ifthe homeowner’s insurance policy will not cover the damage. It does not include waterinclude the lock or painted surface.LOCK AND PAINTED SURFACE WARRANTYLocks and painted surfaces are warranted to be free from defects in workmanship andmaterials for a period of two years from the date of purchase. Heritage SecurityProducts obligation under the Limited Lifetime Warranty is limited to the repair(including labor) or replacement of any product that proves to be defective or damagedbreak-in or break-in attempts must be accompanied by a copy of your homeownermarshal report. A claim must be made within three months of the break-in. Proof ofpurchase is required to obtain service and/or to make a claim.6
Heritage Security Products takes seriously its obligation to stand behindits product with this warranty as long as the safe is properly installed andcared for as instructed in the Owner’s Instruction Manual. The warrantydoes not apply to safes or parts that have been misused, neglected orsubjected to unusual or extreme conditions and/or environments, or tounreasonable wear and tear. Changing or modifying the safe in ways thataffect its intended use will void this warranty. The safe must be registeredwithin 60 days of the purchase and must be on file at the time of the incident.As a special service to you, the limited lifetime warranty can be transferred,for a fee, to subsequent purchasers or owners with the prior written consentfrom Heritage Security Products. Simply contact our Customer Service teamwith your request. Heritage Security Products reserves the right to deny arequest or transfer for any reason.Limitation of Remedies: In no case shall Heritage Security Products beliable for any special, incidental, or consequential damages based uponbreach of warranty, breach of contract, negligence, strict tort, or any otherlegal theory. Such damages include, but are not limited to, loss of profits,loss of savings or revenue, loss of the contents of the safe or vault door, lossof use of the safe or vault door, or any associated equipment, cost ofcapital, cost of any substitute equipment, facilities or services, downtime,the claims of third parties including customers, and injury to property.Heritage Security Products provides this warranty in place of all otherwarranties and assurances whether expressed or implied. Heritage SecurityProducts accepts no liability for incidental or consequential damage or lossby anyone as a result of using this safe.This warranty is only applicable to the Safe itself and does not extendto the contents of the Safe. For optimal security and protection, safesshould be bolted to the floor. Please refer to your Instruction Sheet fordetails on anchoring your safe to the floor.7
For Customer Service needs,please contact us gesafe.comKEY REPLACEMENT SERVICEUpon Veri cation of ownership, replacement keys are available for purchasethrough customer service.Contact Customer Service for more information.Remember to record the serial number of your safe from the tag on theback of your safe.You will need this serial number for all warranty orcustomer serice inquiries.8
V-2020-02
ngerprint has been accepted to lock the safe. WARNING: Do not leave safe unattended while open, and keep children away from safe. LOCKING THE SAFE Your safe comes with the beep sound turned on. To turn the sound off, press the scanner with a recorded ngerprint for 10 seconds until the green light ashes twice.