Transcription
winchestersafes.comOwner’s ManualOWNER’S MANUAL(Actual safe model, size, color and specifications may vary.)winchestersafes.comPAGE 1
winchestersafes.comOwner’s ManualNOTES:VISIT WINCHESTERSAFES.COM FOR 24/7 CUSTOMER SERVICE, TUTORIALVIDEOS, FAQ AND MORE.CUSTOMER SERVICE DEPARTMENTHOURS: 7:00am - 5:00pm Central TimePHONE: 877-948-6723 (877-9GUNSAFE)WINCHESTER SAFES4801 Esco DriveFort Worth, Texas 76140PAGE 2
winchestersafes.comOwner’s ManualTABLE OF CONTENTSSafe Exterior. . . . . . . . . . . . . . . . . . . . . . . . . . . . . . . . . . . . . . . . . . . . . . . . . . . . . . . 4Safe Interior. . . . . . . . . . . . . . . . . . . . . . . . . . . . . . . . . . . . . . . . . . . . . . . . . . . . . . . 5Delivery and Installation . . . . . . . . . . . . . . . . . . . . . . . . . . . . . . . . . . . . . . . . . . . . 6Vault Handle Installation. . . . . . . . . . . . . . . . . . . . . . . . . . . . . . . . . . . . . . . . . . . . 8Mechanical Lock Operating Instructions . . . . . . . . . . . . . . . . . . . . . . . . . . . . . . . 9Mechanical Lock Dialing Instructions. . . . . . . . . . . . . . . . . . . . . . . . . . . . . . . . . 10Electronic Lock Operating & Changing Instructions . . . . . . . . . . . . . . . . . . . . . 11Care and Use . . . . . . . . . . . . . . . . . . . . . . . . . . . . . . . . . . . . . . . . . . . . . . . . . . . . . 14Lost Combination . . . . . . . . . . . . . . . . . . . . . . . . . . . . . . . . . . . . . . . . . . . . . . . . . 15Frequently Asked Questions . . . . . . . . . . . . . . . . . . . . . . . . . . . . . . . . . . . . . . . . 15Warranty Claims and Repairs. . . . . . . . . . . . . . . . . . . . . . . . . . . . . . . . . . . . . . . . 16Warranty . . . . . . . . . . . . . . . . . . . . . . . . . . . . . . . . . . . . . . . . . . . . . . . . . . . . . . . . 17Accessories. . . . . . . . . . . . . . . . . . . . . . . . . . . . . . . . . . . . . . . . . . . . . . . . . . . . . . . 19PAGE 3
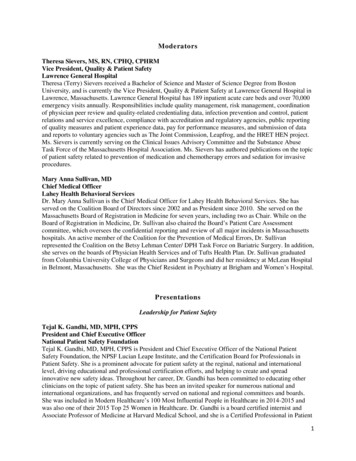
winchestersafes.comOwner’s ManualYou are now the proud owner of a Winchester Safe. Your new safe will provide youwith many years of trouble-free protection of your valuables with very little service onyour part.SAFE EXTERIORUpper HingeCombination Lock(shown)or optionalElectronic LockSpoke Handle(shown) orSingle Lever HandleMiddle Hinge(certain models)Lower HingeSerial Number LabelActual safe model, size, color and specifications may vary.PAGE 4
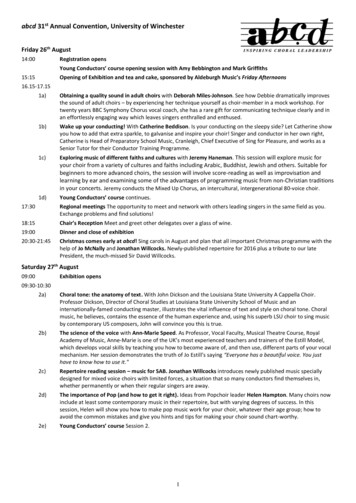
winchestersafes.comOwner’s ManualSAFE INTERIORAccessory Door PanelStationaryLocking Bolts (Available on certain InteriorShelvingModelNumberGun RackActive LockingBolts (Up to 3-waymovement, variesby model.)Palusol HeatExpandableDoor SealPower Docking System(Not shown. Available onlyon certain models.)Corner Anchor Hole Access Covers(Not shown. See winchestersafes.comfor bolt down instructions.)Actual safe model, size, color and specifications may vary.PAGE 5
winchestersafes.comOwner’s ManualDELIVERY AND INSTALLATIONA. If you purchased your safe from a retailer and are having it delivered andinstalled, the delivery company personnel will provide you with the proper instructionfor the correct operation of your safe. Pay very close attention to the operation of the lock.Make sure you can comfortably operate the lock before they leave your home or office.After they have shown you how to operate the lock, you should lock and unlock the safeseveral times without any assistance from them. Once you are comfortable with thisprocedure, and can do it consistently, you are now ready to operate your safe.Your new safe left the factory in new condition and without damage. Inspect your newsafe for any damage prior to the delivery people leaving. Any damage claims at time ofdelivery must be resolved with the delivery company and/or your retailer. Please do notcontact the factory.B. If you purchased your safe and are doing your own delivery and installation,you must read and follow these instructions. Safes are heavy and cumbersome andthere are risks associated with the untrained consumer doing their own delivery andinstallation. We recommend that you use a professional safe installer, who is insured, andwill have the necessary equipment and training to safely and properly install your safe.1. Packaging should have been removed and safe inspected for damage prior toaccepting the safe from your retailer. If your safe is damaged at this point, please contactyour retailer. Do not contact the factory.2. Verify that the Serial Numbers on the safe are the same as the one in this manual. SerialNumbers are located on the bottom right side of the safe’s front and also on the upper partof the inside door, near the locking bolts. In the unlikely event that all three serial numbersdo not match exactly, please contact the Winchester Safes Customer Service Department.PAGE 6
winchestersafes.comOwner’s ManualDELIVERY AND INSTALLATION (CONTINUED)3. Your safe was shipped with the door closed and locked. Open the safe by followingthe MECHANICAL LOCK OPERATING INSTRUCTIONS found on page 9 of this manual, or theELECTRONIC LOCK OPERATING INSTRUCTIONS found on page 11 of this manual.4. Remove the safe from the pallet by first opening safe the door. Find and remove the (4)four decorative plugs in the safe bottom. Using a 17mm socket and ratchet, remove thefour lag bolts that secure the safe to the pallet. Reinstall the four decorative plugs. Next,close the safe door and extend the locking bolts by rotating the handle counterclockwise.With the assistance of one or more adults, slide the safe to one side of the pallet toprevent it from tipping over. Tilt the safe over until the bottom side of the safe touches thefloor, and then tilt the safe over enough to allow the pallet to be removed from under thesafe. Tilt the safe back up and set flat on the floor.5. With a dolly substantial enough to support the size and weight of your safe, move thesafe to your desired location. Consideration should be given to the weight of the safe andthe type of flooring that the safe will be moved across. Wood, tile, carpet and other typesof flooring can be easily damaged and it is your responsibility to take whatever measuresnecessary to prevent any damage. If your home is pier and beam construction, you shouldplace the safe in an area of the floor that you are sure will support the safe’s weight.To maximize the fire protection of your safe, we recommend you place it in the lowestelevation in your home. In a home fire, the coolest part of the fire is in the basement areaand the hottest in the upstairs.6. To maximize the burglary protection, and prevent the safe from toppling over, youshould anchor your safe to the floor. See winchestersafes.com for bolt down instructions.7. Your new Winchester Safe is now ready to operate.PAGE 7
winchestersafes.comOwner’s ManualHANDLE INSTALLATIONINSTALLING THE TEMPORARY SPOKEThe temporary spoke provided is used to assist in opening the safe for the first time only.Step 1 - Locate the temporary spoke.WARNING: Do not apply Spoke HandleThread Lock on temporary spoke.Step 2 - Screw in the temporary spokeat the bottom of the handle hub.INSTALLING THE HANDLE SPOKESStep 1 - Remove and discard the temporary spoke.Step 2 - Remove the box of spokes from inside the safe. Unpack each spoke frompackaging.OPTIONAL STEP: Apply one drop of spoke handle thread lock on the threads beforescrewing in the handles. (This will result in permanent installation.)Step 3 -Screw handles into the spoke hub.OPTIONALImages are for instruction only and may not look identical to the handle on yourparticular safe.FOR SINGLE LEVER HANDLES: Your handle is installed from the factory and requiresno action on your part for assembly.PAGE 8
winchestersafes.comOwner’s ManualMECHANICAL LOCK OPERATING INSTRUCTIONSThe lock on your safe is a Sargent and Greenleaf (S&G), Mechanical Combination Lock,with a top reading dial and dial ring. The S&G mechanical lock is the finest, most trustedand reliable lock being used in the industry today. They are precisely made, and the brassconstruction of the lock tumblers, which does not require lubrication of any kind, will provideyou with many years of reliable functionality with little or no service. However, the dialinginstructions must be performed exactly or the lock will not open. A deviation of as little as ahalf number off the combination will be enough to not allow the lock to open. Practice thedialing of your combination several times when you first get your safe and you will avoid alot of unnecessary frustration.DO:Make note of the following Do’s and Don’ts:1. Always dial the combination on the index mark at 12 o’clock on the dial ring. The indexmark at 11 o’clock is for service only and is never used by the user of the safe.2. Turn your dial slowly and use finger-tip pressure only.3. Do not pass your number in the dialing sequence, even by the slightest amount. If you do,the lock will not open, you must start over and redial your combination.4. Have ample light on your dial for good visibility, and stand directly in front of your dialwhen running the combination. Do not stand to the side of the dial. The parallax viewcould be enough for you to go over or under your number and the lock will not open.5. Store this manual with your combination in a secure place other than insideyour safe.DON’T:1. Do not spin the dial in a rapid motion or turn it back and forth. It could damage the lock tothe point that it will not open and you will be locked out of your safe.2. Never use lubricant of any kind.3. Do not go past any of the numbers in your combination and continue dialing.The lock will not unlock. Start from the beginning and redial the entire combination4. Do not store this manual and your combination inside your safe.PAGE 9
winchestersafes.comOwner’s ManualMECHANICAL LOCK DIALING INSTRUCTIONSSERIAL NUMBER:COMBINATION:Record your combination from above, in the spaces below for each step.STEP 1:STEP 2:STEP 3:Turn the dialcounterclockwise(left) at least 3revolutions andstop when thefirst numbercomes to theindex mark.Turn the dialclockwise (right)passing thesecond numbertwice and stopwhen it comes tothe index markthe third time.Turn the dialcounterclockwise(left) passing thethird numberonce and stopwhen it comes tothe index markthe second time.1st#2nd#3rd#STEP 4:Turn the dialclockwise (right)until you feelthe dial tightenslightly. Usingfingertip pressureonly, continueturning the dialuntil it stops. Thelock is now open.Rotate the safehandle clockwiseand retract thebolt work beforeopening the door.PAGE 10
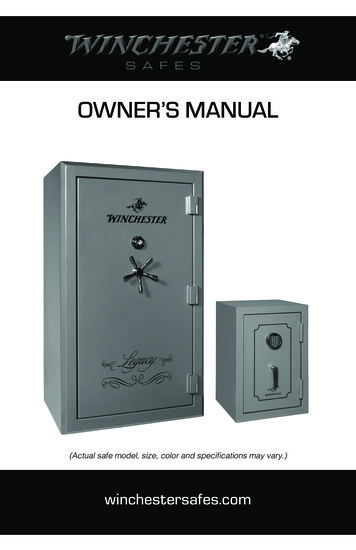
winchestersafes.comOwner’s ManualMECHANICAL SAFE LOCKING INSTRUCTIONSSTEP 1- Make sure there is not any obstruction inside the safe that will block the doorfrom closing or the movement of the locking bolts; close the door and rotate the handlecounterclockwise until it comes to a solid stop.STEP 2 - Turn the dial counterclockwise at least three revolutions. Your safe is nowlocked.ELECTRONIC LOCK OPERATING AND CHANGING INSTRUCTIONSThe Combination for this safe was preset at the factory to 1-2-3-4-5-6. The combinationcan be changed to any six (6) digit combination of your choice.STEP 1: INSTALLING THE BATTERYThe battery is located inside the keypad. To install the battery, findthe sliding door at the bottom of the keypad that provides accessto the battery. Slide the door to the right to open. Gently pull thebattery connector and wires down. Attach a new 9-volt ALKALINEbattery to the connector (ENERGIZER or DURACELL only). Gentlypush the battery and wires up into the compartment and closethe sliding door by sliding it to the left. The lock is now poweredand ready for use.Key PadBatteryConnector9V AlkalineBatterySTEP 2: OPENING THE DOOR FOR THE FIRST TIME Enter the factory set combination 1-2-3-4-5-6 Turn handle clockwise to open the safeIf entered correctly, you will hear one (1) beep after each entry and two (2) beeps afterentering the last number. The two (2) beep sound is your indicator that you have enteredthe correct combination. If you hear three (3) beeps, you have incorrectly entered thePAGE 11BatteryDoor
winchestersafes.comOwner’s ManualSTEP 2: OPENING THE DOOR FOR THE FIRST TIME (CONTINUED)preset combination of 1-2-3-4-5-6. Within five (5) seconds after entering your combination and getting the two (2) beep sound, turn the safe handle clockwise to retractthe locking bolts and open the door. If the safe handle is not turned during the five (5)second window, the lock will automatically go back into the locked mode and you willhave to reenter the combination.STEP 3: CHOOSING YOUR PERSONAL COMBINATIONChoose a six 6-digit combination that only you know and can easily remember. Pleasetake your time in choosing your combination, giving it the appropriate attention itdeserves. Once you have chosen your personal combination, please write it in the spacesprovided in the SETTING YOUR PERSONAL COMBINATION in Step 4 of these instructions.STEP 4: SETTING YOUR PERSONAL COMBINATIONFollow the instructions in Step 2 to open the door. The door is to remain open until theSETTING YOUR PERSONAL COMBINATION process is finished. This will prevent a lockoutcondition if a mistake is made in the combination changing procedure.The lock will beep two (2) times after each 6-digit entry, if entered correctly. Please notethat after entering the next sequence of numbers, you have five (5) seconds or the lockwill reject the combination change process and revert back to the original combination of1-2-3-4-5-6 (if you are setting your combination for the first time).THE DOOR MUST BE OPEN AND THE LOCKING BOLTS EXTENDED. Enter six (6) zeros: 0-0-0-0-0-0 Enter the existing 6-digit combination: 1-2-3-4-5-6 Enter your new 6-digit combination:- - - - - Enter your new 6-digit combination AGAIN:- - - - -PAGE 12
winchestersafes.comOwner’s ManualELECTRONIC LOCK OPERATING AND CHANGINGINSTRUCTIONS (CONTINUED)Keeping the door open, enter your new combination. If it was programmed correctly,you will get two (2) beeps after entry and the handle will turn clockwise and retract thelocking bolts.If at any time in the combination changing procedure you hear three (3) beeps, you muststart over at the beginning of Step 3 and repeat the entire procedure.CHANGING YOUR PERSONAL COMBINATION IN THE FUTUREYou can reset your 6-digit combination at any time you choose. Please follow the SETTINGYOUR PERSONAL COMBINATION instructions shown on page 12. You will have to use yourpersonal combination (rather than 1-2-3-4-5-6) as the existing combination. All othersteps are the same.LOW BATTERY POWERRepeated beeping after the entry of your 6-digit combination indicates that thebattery power is low. The safe may continue to open, but a new 9-volt ALKALINE battery(ENERGIZER or DURACELL only) should be installed immediately. Refer to INSTALLINGTHE BATTERY on page 11 for installation instructions.BATTERY IS DEAD AND YOU CAN NOT OPEN THE SAFEFirst of all, don’t worry. Your combination is retained in the lock even if all power is lost.Simply install a new 9-volt ALKALINE battery to the connector (ENERGIZER or DURACELL only) by referring to the INSTALLING THE BATTERY on page 11 for installation instructions.Once battery is installed, the lock will open normally.ELECTRONIC SAFE LOCKING INSTRUCTIONSSTEP 1- Make sure there is not any obstruction inside the safe that will block the doorfrom closing or the movement of the locking bolts; close the door and rotate the handlecounterclockwise until it comes to a solid stop.PAGE 13
winchestersafes.comOwner’s ManualCARE AND USE OF YOUR SAFEWhen putting guns inside your safe, ensure the barrel rests solidly in the gun placement toprevent accidental shifting when the door is closed.If you are storing data media in the safe, you should purchase a data media storagecontainer separately from an office products retailer, and place it inside your safe. Datamedia can be damaged in temperatures as low as 125 F and will not be protected in thesafe alone.You should install a dehumidifier, available from our website, if your safe is in a highhumidity environment.Do not place your safe in a pool house, garage or storage area where caustic chemicals arekept or are in the air. This will cause damage to the sensitive lock mechanism and couldcause the lock to fail.Your safe warranty may be voided if you use any tools whatsoever or attempt to repairyour safe. Contact Customer Service or your retailer if your safe does not function properly.Do not remove the back cover of the door. Removal of this component by anyone otherthan a certified safe technician may void your warranty.The lock does not require any service. Avoid using any spray lubricants.The lock will surely fail if you do.The locking mechanism or bolt work does not require any service other than occasionallywiping a very thin film of light grease on the locking bolts to facilitate easy travel.The safe has a baked on, durable, powder coat finish that resists scratching and chipping.To clean the surface, wipe with a cotton cloth, dampened with warm sudsy water. Do notuse any spray cleaners.The Palusol door seal does not require any maintenance. Do not allow the seal to beremoved, as its removal will significantly reduce the fire protection of your safe.PAGE 14
winchestersafes.comOwner’s ManualLOST COMBINATIONThe loss of your combination can create a high amount of frustration when trying toretrieve it from the manufacturer. We understand this and try to make the process as easyas possible. However, due to liability issues, we must be assured that we are giving thecombination to the true owner and as such, our Customer Service Representatives arerequired to follow the procedure exactly. We request your patience when you arerequesting a copy of the combination.The mechanical lock combination of your safe was determined by a random numbergenerator and set at its time of manufacturing. The only record of the combination andthe serial number is kept on file at our company and can be accessed by authorizedcompany personnel only. The electronic lock has an override code programmed at thetime of manufacturing. The only record of the override code and serial number is kept onfile at our company and can be accessed by authorized company personnel only. If youlose or forget your combination, you can request a copy for a nominal fee. You can visit ourwebsite at winchestersafes.com and print a copy of the Combination Request Form or callour Customer Service Department at 877-948-6723 and they will mail or fax a copy of theform to you. PLEASE NOTE: There is no guarantee that we will be able to recover acombination. Please keep your combination in a safe place.FREQUENTLY ASKED QUESTIONSQ. Can I change the mechanical lock combination to my safe?A. No. Only a Certified Safe Technician can change the mechanical lock combination.The mechanical lock combination can be changed and requires special tools and knowledge. You must contact a Certified Safe Technician in your local area for this service.Q. I bought the safe and it did not come with a mechanical lock combination.A. Every mechanical lock safe is shipped from the factory with a mechanical lockcombination and an Owner’s Manual. You now have two choices; go back to the retailerwhere you purchased it and see if they have it, or refer to the LOST COMBINATION section ofthis manual and follow the instructions on page 15 or on our website, winchestersafes.com.PAGE 15
winchestersafes.comOwner’s ManualFREQUENTLY ASKED QUESTIONS (CONTINUED)Q. I lost or misplaced my personal programmed electronic lock code.A. Most electronic lock safes have an override code kept on file at our company. Refer to theLOST COMBINATION section of this manual and follow the instructions on page 15 or onour website, winchestersafes.com.Q. Do I have to have the Lost Combination Request Form notarized?A. Yes. It is the only practical method for us to insure that you are the owner of the safe.Q. Can you give me the combination to my safe over the phone?A. No. We have no foolproof method to verify that you are the owner of the safe over thetelephone. See Page 15 under LOST COMBINATION.Q. My electronic lock keypad beeps five (5) times and the lock will not open.A. The five (5) beeps indicates the battery is low and cannot operate the electronic lock.Refer to the INSTALLING THE BATTERY on page 11. Make sure you use a new 9-voltALKALINE battery (ENERGIZER or DURACELL only).Q. Is my safe watertight?A. No. Consideration should be given to the risk of water exposure when choosing thelocation your safe will be placed.Q. Is the door removable?A. Yes, but not recommended to be removed by the consumer due to the very highlikelihood that you will damage the safe and/or could cause serious injury or death inthe event the door falls on someone. Removing the door will void your warranty.WARRANTY CLAIMSPlease read the entire WARRANTY located on page 17 of this manual. It will provide youwith the length and specifics of Warranty for the safe. It will also cover what we will doand what we will not do. If you do have an issue and it falls under the Warranty Coverage,you will be required to provide the serial number and proof of ownership. For Warrantyservice, please contact the Customer Service Department at 877-948-6723.PAGE 16
winchestersafes.comOwner’s ManualWARRANTY CLAIMS (CONTINUED)Please note that the Warranty specifically does not cover the loss or damage to thecontents of the safe, under any circumstance. We highly recommend that you purchaseinsurance coverage for the contents of your safe.WARRANTY REPAIRSAny Warranty repairs to your safe must be made with the authorization of one of ourCustomer Service Representatives. You may reach them Monday through Friday from7:00am to 5:00pm, Central Time at 877-948-6723. Without exception, if you havework performed on your safe without prior authorization, the payment for the workperformed will be the sole responsibility of the safe Owner.LIMITED LIFETIME WARRANTYREGISTER YOUR SAFE FOR WARRANTY AT WINCHESTERSAFES.COMThis safe made by Granite Security Products, Inc. (GSP) comes with a limited lifetimewarranty, beginning on the purchase date against defects in materials and workmanshipas well as damage from a burglary attack or fire. The lock is warranted against defects inmaterials and workmanship for a period of two (2) year from the purchase date. Proofof purchase is required to obtain service. An extended nine (9) year warranty forthe lock may be purchased for a fee of 75.00.This warranty also provides a free replacement safe if the safe is damaged in a burglaryattack or fire. Free replacement claims must be made in writing along with a timelypolice or fire department report. Photos of the damaged safe must accompany thereplacement claim.GSP may, at its discretion, open or repair the damaged safe on location, provided it islocated within 100 miles of a skilled safe technician. If the safe is damaged to the extentthat it cannot be opened by normal means, then GSP will have the safe opened by askilled safe technician to retrieve the owner’s belongings. The maximum expense torepair or open a safe is limited to 300.00 USD. If the safe is to be replaced, a comparable,PAGE 17
winchestersafes.comOwner’s ManualWARRANTY (CONTINUED)current production model will be shipped freight prepaid curb side delivery to theowner. Replacement safes that are outside of the contiguous United States, not includingCanada, will be shipped prepaid to the nearest seaport of debarkation in the ContinentalUnited States. Any freight cost(s) incurred from port to the consumer’s location will be theresponsibility of the consumer. This warranty does not cover any cost to remove or installthe replacement safe.This warranty does not cover neglect, misuse, or abuse. It also does not cover damagecaused by tampering with or altering of any part of the product. It also does not coverconsumables such as batteries for the electronic lock. The safe must not be housed inan enclosed swimming pool area. The safe is to be located in an area which is climatecontrolled and is to be installed as instructed in the Owner’s Manual.The Limited Lifetime Warranty can be transferred, for a nominal fee, to subsequentpurchasers or owners with the prior written consent from GSP.TO TRANSFER YOUR WARRANTY, PLEASE VISIT WWW.WINCHESTERSAFES.COM.This Warranty is transferable to subsequent Owners by contacting Customer Service.The Warranty of the safe will be voided if the Owner makes any unauthorized repairs,removes components, or alters the safe or its components in any way.Loss of contents of the safe is not covered, nor is water damage by any means covered bythis warranty. Safes used in a Commercial or Industrial environment carry a one (1) yearwarranty and the extended lock warranty is not available.Within one (1) year of purchasing the safe, the Owner must register the Warranty withWinchester Safes by either calling Customer Service at 877-948-6723 or registering itonline at www.winchestersafes.com.This is your complete Warranty. No other written or verbal statements by any WinchesterSafe employee or Retailer is authorized to make any modification beyond what isincluded in this Warranty.PAGE 18
winchestersafes.comOwner’s ManualACCESSORIESOutfit your safe with the right accessoriesto help protect your valuable items andcreate a customized fit for your needs.AVAILABLE ONLINE AT WINCHESTER SAFES.COMLED LIGHT KITESSENTIALS KITINCLUDES:Anchor Kit · HygrometerDehumidifier · Automatic Cordless Vault LightDEHUMIDIFIERANCHOR KITSILICA GEL CANAUTOMATICCORDLESS LIGHTHYGROMETERMAGNETIC BARREL RESTPAGE 19ENTRY LIGHTPISTOL RACKDOOR PANELORGANIZERLOGO HATS
WINCHESTERSAFES.COMOur website is continuously updated and is a user-friendlyresource that allows you to make an informed decision onthe safe that fits your specific needs. The site is packed withinformative features and exceptional customer support,complete with tutorial videos, warranty transfers and more.Visit our website to find:Scan with QR reader appto visit our website. Product Information Accessories Tutorial Videos Customer Support Authorized Dealer Locations Warranty Registrationwinchestersafes.comMade & Printed in the USA16-WS-UNIOM-IMPWinchester and the Winchester Horse and Rider are registered trademarks of the Olin Corporation and are used with permission.Unless otherwise noted, all trademarks in this catalog are subject to trademark rights of Winchester Safes. Copyright 2016 Winchester Safes. For more information please visit www.winchestersafes.com.Winchester Safes reserves the right to change options, features and prices at any time.
Your safe was shipped with the door closed and locked . Open the safe by following the MECHANICAL LOCK OPERATING INSTRUCTIONS found on page 9 of this manual, or the ELECTRONIC LOCK OPERATING INSTRUCTIONS found on page 11 of this manual . 4. Remove the safe from the pallet by first opening safe the door . Find and remove the (4)